HIGH HOPES, WILD MEN AND THE DEVIL’S JAW - Willem Barentsz Kolderstok 1:50

Hello Heinrich, Fantastic job you are doing on your W B K she sure is standing out. Great fix on the Whipstaff, I caught that in reading trough your build but I see that Johan beat me to it. Just love your Helmsmen's Hutt that is a real beauty and fits in very well with your Whipstaff. I do not envy you in having to move to a new home, for us it would be a night mare with over 45 years of collectable, not to mention what is in the Old Ship Yard.
I do hope that you can retire in your very much loved China, do not give up hope as so many things can change in two years.
Regards Lawrence
Thank you for the very kind words about the build my friend. I can only envy you for being so long in the same place and same house - that was something that my path did not allow me to do. Right now I am just grateful that I have a job for the next two years. Please give my regards to Bernadette and tell her that I hope she is getting stronger all the time.
 
Thank you so much for the well wishes Phil. I only start the new term on the 10th of February, but I have to start packing and boxing things for when my new apartment becomes available. Once school has started, there won't be time for that. I will still help and encourage where I can and will enjoy the next few days looking at other logs and doing some further research.
Hello Heinrich, I have not been around for awhile, and am catching up on build logs. I see you are set to start your new position soon. Congratulations and best of luck, I am sure you will be happy to get settled into your new place and get your shipyard up and running again in the near future. ;)
 
Hello Heinrich, I have not been around for awhile, and am catching up on build logs. I see you are set to start your new position soon. Congratulations and best of luck, I am sure you will be happy to get settled into your new place and get your shipyard up and running again in the near future. ;)
Thank you Dean - and welcome back!
 
Heinrich I too want to wish you congratulations and best of luck for your new position. I hope all goes well for you! I'll miss your log updates, building hints, history lessons and general silliness we have here. Hope you have the time to get the shipyard back in production in short order.

Glenn
 
Heinrich I too want to wish you congratulations and best of luck for your new position. I hope all goes well for you! I'll miss your log updates, building hints, history lessons and general silliness we have here. Hope you have the time to get the shipyard back in production in short order.

Glenn
Thank you very much Glenn. I will try my utmost to make the interruption as short as I can. However, it will only be the actual build that may have a bit of an over wintering. I will still be on the forum and will still post updates of all kinds. :)
 
Hello Everyone

As promised.

EXPEDITION HISTORICAL BACKGROUND - PART 4

I would like to start this update with this depiction of the Willem Barentsz by Arnold de Lange (De Lange Maritiem) showing a fascinating detail.

45765-orig-123135673 - 副本.jpg

Note the absence of both stern and bow canopies (overkappings) which were removed from the ship to be used in the construction of the Safe House.

In addition to battling the freezing conditions, the other big danger was that of polar bears. During their journey at sea, the men saw just how dangerous a hungry polar could be and on land that was no different.

03.jpeg

barentz1598-BritishLibrary - 副本.jpg
Print: British Library : Note the ever-present danger of the polar bears

Nova Zembla was the backdrop of a daily struggle between man and bear. Incident upon incident taught the men never to leave the protection of the house unarmed. De Veer regularly described the polar bear attacks in an almost ritualistic kind of way – probably because it served as the “highlight” in an otherwise monotonous and hopeless existence. Each bear that the men managed to kill seemed to have served as some sort of retribution for all the troubles and dangers that they have experienced up to that point.

Another major point of concern was of course the lack of available fresh food and vitamins which made the advent of scurvy an ever-present fear. It already reared its ugly head during the journey, but in the icy cold conditions of Nova Zembla, things took an even worse turn. Their gums started rotting, they lost their teeth, and suffered fits of fainting and a stiffening of their limbs as further symptoms of the on setting scurvy.

Their food stores diminished fast and the men were forced to ration food – especially bread and beer. Instead, they relied on rusks, porridge, melted snow and some salted meat. Luckily for them, they caught a polar fox – purely by chance – and subsequently, it soon became some form a staple diet. Even though there was not much meat to these animals, it was still a welcome source of additional nutrition.

DBFEB.png

Het Behouden Huys op Nova Zembla. De bemanning velt een beer. / Safe House on Nova Zembla. The men kill a bear.

Source: (Beeld uit Waerachtighe beschryvinghe van drie seylagien, ter werelt noyt soo vreemt ghehoort (1598)
(The True Story of three expeditions as never told before 1598)

However strange it may have sounded; the polar bear was only seen as a trophy by the men. Once, they did try to eat some of its meat, but everyone got so sick from it that they vowed never to touch it again. The cause of this was traced to the liver of the polar bear. As the polar bear’s main diet consists of seals, it resulted in its liver being exceptionally rich in Vitamin A content, which was just too much for the men’s weakened constitutions. The Vitamin A actually poisoned the men’s systems and soon they were suffering from severe blistering of the skin and skin loss.

Come November and the sun no longer rose and day had become night as the polar winter struck in full force. No longer could they leave the house to hunt for foxes, neither could their personal waste be disposed of outside. The scurvy was so bad that the majority of men could no longer walk and eventually one of the men died from the disease.

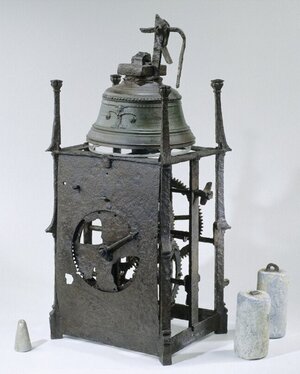
Days were almost unbearable in their monotony – the men’s only relief was brought about by playing some board games, reading the books they brought with them and watching the mechanical clock as it counted down the passing days.

Screenshot_20211129-224756_Google.jpg
The famous clock of Willem Barentsz - Rijksmuseum - Amsterdam

That is all for this update dear friends. I hope to have a final update on my build within the next two days. Until next time, take care, stay safe and enjoy your modeling!
 
Hello Everyone

As promised.

EXPEDITION HISTORICAL BACKGROUND - PART 4

I would like to start this update with this depiction of the Willem Barentsz by Arnold de Lange (De Lange Maritiem) showing a fascinating detail.

View attachment 288687

Note the absence of both stern and bow canopies (overkappings) which were removed from the ship to be used in the construction of the Safe House.

In addition to battling the freezing conditions, the other big danger was that of polar bears. During their journey at sea, the men saw just how dangerous a hungry polar could be and on land that was no different.

View attachment 288685

View attachment 288686
Print: British Library : Note the ever-present danger of the polar bears

Nova Zembla was the backdrop of a daily struggle between man and bear. Incident upon incident taught the men never to leave the protection of the house unarmed. De Veer regularly described the polar bear attacks in an almost ritualistic kind of way – probably because it served as the “highlight” in an otherwise monotonous and hopeless existence. Each bear that the men managed to kill seemed to have served as some sort of retribution for all the troubles and dangers that they have experienced up to that point.

Another major point of concern was of course the lack of available fresh food and vitamins which made the advent of scurvy an ever-present fear. It already reared its ugly head during the journey, but in the icy cold conditions of Nova Zembla, things took an even worse turn. Their gums started rotting, they lost their teeth, and suffered fits of fainting and a stiffening of their limbs as further symptoms of the on setting scurvy.

Their food stores diminished fast and the men were forced to ration food – especially bread and beer. Instead, they relied on rusks, porridge, melted snow and some salted meat. Luckily for them, they caught a polar fox – purely by chance – and subsequently, it soon became some form a staple diet. Even though there was not much meat to these animals, it was still a welcome source of additional nutrition.

View attachment 288688

Het Behouden Huys op Nova Zembla. De bemanning velt een beer. / Safe House on Nova Zembla. The men kill a bear.

Source: (Beeld uit Waerachtighe beschryvinghe van drie seylagien, ter werelt noyt soo vreemt ghehoort (1598)
(The True Story of three expeditions as never told before 1598)

However strange it may have sounded; the polar bear was only seen as a trophy by the men. Once, they did try to eat some of its meat, but everyone got so sick from it that they vowed never to touch it again. The cause of this was traced to the liver of the polar bear. As the polar bear’s main diet consists of seals, it resulted in its liver being exceptionally rich in Vitamin A content, which was just too much for the men’s weakened constitutions. The Vitamin A actually poisoned the men’s systems and soon they were suffering from severe blistering of the skin and skin loss.

Come November and the sun no longer rose and day had become night as the polar winter struck in full force. No longer could they leave the house to hunt for foxes, neither could their personal waste be disposed of outside. The scurvy was so bad that the majority of men could no longer walk and eventually one of the men died from the disease.

Days were almost unbearable in their monotony – the men’s only relief was brought about by playing some board games, reading the books they brought with them and watching the mechanical clock as it counted down the passing days.

View attachment 288690
The famous clock of Willem Barentsz - Rijksmuseum - Amsterdam

That is all for this update dear friends. I hope to have a final update on my build within the next two days. Until next time, take care, stay safe and enjoy your modeling!
Hi Heinrich,

And what a fantastic history lesson once again, highlighting the struggles and hardships they endured.

Cheers,
Stephen.
 
Hi Heinrich,

And what a fantastic history lesson once again, highlighting the struggles and hardships they endured.

Cheers,
Stephen.
Thank you very much Stephen. Yes, they did not have things easy, but the fact that Barentsz had the foresight to construct the Safe House, saved the majority of the men's lives - unfortunately though, not that of Barentsz himself.
 
Hello Everyone.

This really is my last update before I return to work - and let me tell you straight out - I found this to be a really difficult task to accomplish.

I wanted to finish the canopy by installing the front wall and doors. The goal at the end of this step was to have something similar to @pietsan Piet's final outcome.

S1.jpg
Photograph: Piet Sanders
Piet's superb-looking front wall and door assembly.

S2.jpg
Photograph: Piet Sanders. This may look like an easy assembly (and for some people it probably is, but I had my task cut out for me.

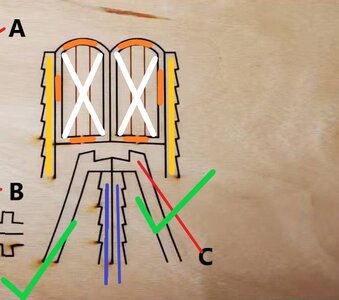
For this we will again need the laser sheet I showed you earlier.

S3.jpg

PART C (marked with the green ticks): Already used.

Blue-marked Parts: Outer Wallposts

Yellow-marked Parts: Inner Wallposts

White-Crossed Parts: Doors.

Orange-marked Parts: Door Posts.

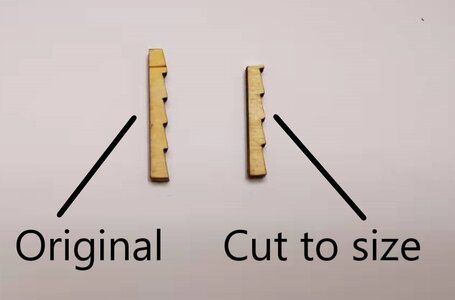
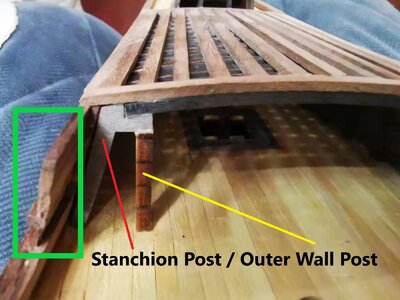
The instructions call for the outer wallposts (blue-marked parts) to be glued underneath the already mounted stanchion posts with the notched part facing forward towards the bow. The supplied part is too long and needs to be cut to the correct length at the TOP!

S4.jpg

Here you van clearly see the difference between the cut-to-size outer wallpost and the one directly from the laser sheet. On the original one I had already scored the cutting line.

S5.jpg

The outer wallpost has been glued underneath the stanchion post. The green rectangle indicates the bulwark overlap that will be cut to size and finished off later.

S6.jpg

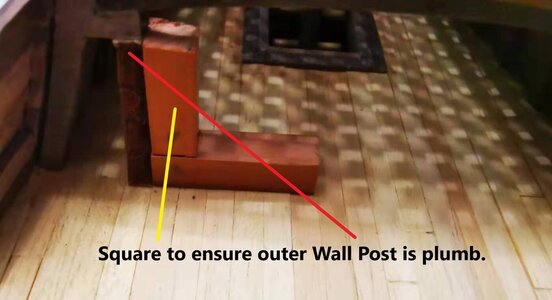
To make sure that I mount the wall post plumb, I fabricated a square that is small enough to fit in underneath the canopy.

With the outer wallposts mounted underneath the stanchion posts it was now time to test-fit the doors.

S7.jpg

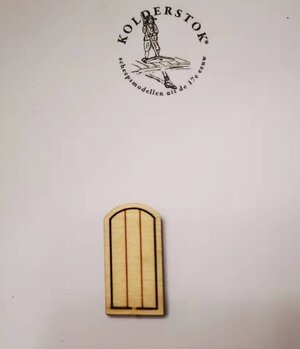
This is how the door comes out of the laser-cut sheet. Note that the door post still surrounds the door. Leave this as is for the time being.

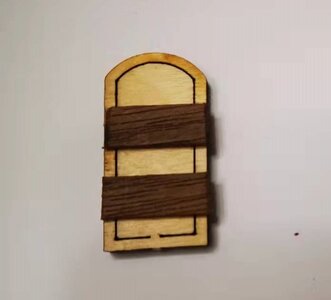
Now what Piet has done is to glue two 6mm walnut strips behind both door and doorpost to ensure that it remains one, solid construction.

S8.jpg

This is what Piet has done in his build. I have just overlaid these planks as means of illustration.

S9.jpg

However, in my case, if I had used this method as above, the door was too high in relation to the canopy. (In this picture it actually looks as if the door is protruding above the company, but in reality that it was lying flush with the top edge.) Whilst I have seen one or two WB builders who used the doors as above, I was not happy to do so. Therefore, I went a different route.

S10.jpg

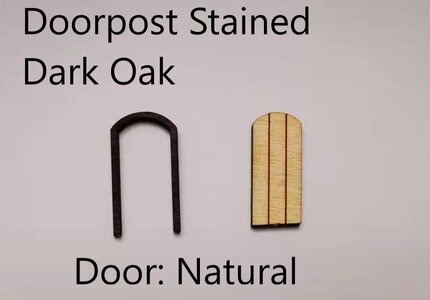
I separated my door post from the door and cut off the bottom part. At the same time I stained the door post with Dark Oak – the fact that I had separated the two parts and stained the door post while not attached to the door, obviously prevented the stain from overflowing onto the door. After the stain had dried, I glued the door frame back around the door.

S11.jpg

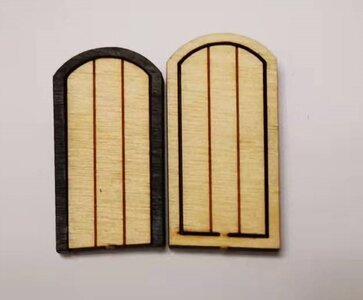
Here you can see my modified construction (on the left) compared to the standard kit one. Note that my modified door now was markedly lower compared to how it came out of the laser cut sheet.

S12.jpg

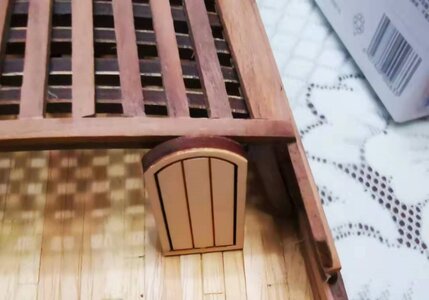
Test-fitted, my modification had the desired effect as the door assembly now fits neatly underneath the upper edge of the canopy.

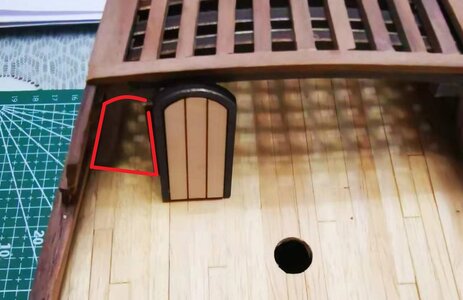
Now I could make a start by planking the sides (the area demarcated in red) using 1.5mm x 6mm walnut planks. They are planked in an overlapping (schotelende) way made easy by the notches in the outer wall post.

微信图片_20220206163259.jpg

Before I started the planking though, I dry-fitted the door and then glued the inner wallpost into position - again making sure it was plumb and butted up tightly against the door.

微信图片_20220206163251.jpg

With the two side walls planked up to this point. I could make a start with the center section.

微信图片_20220206163244.jpg

At this point, I decided to glue the doors into the walls so that they were secure. I thought that that would make it easier then to close the gap off at the top.

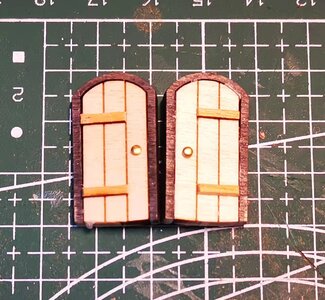
But this obviously meant that I had to prepare the doors for installation and that meant hinges and door handles/knobs. I made a decision prior to the build, that I was not going to use any blackening fluid or paint. I could have used brass strips for the hinges, but against the very light-colored doors they just did not show up properly. I thus delved into my wood stash and cut two hinges out of very light-colored pear wood. The idea is this: I know that the tung oil, when applied, is not going to change the color of the door much, but tung oil darkens pear wood considerably. So when the whole assembly is treated with tung oil, the hinges will become a lot darker than what they are now while the doors will remain (more or less) the same color. It was thus more a case of insinuating the hinges rather than having sharply-defined hinges in place. The door knobs were easy - Kolderstok-supplied nails.

微信图片_20220206163237.jpg

If the hinges do not work satisfactorily for me, I can always remove them and do something else. They are still easily accessible and since they are just tacked with PVA glue, removing them will be a cinch. Note the uneven lines at the bottom of the doors. They were sanded to fit in with the curvature of the deck.

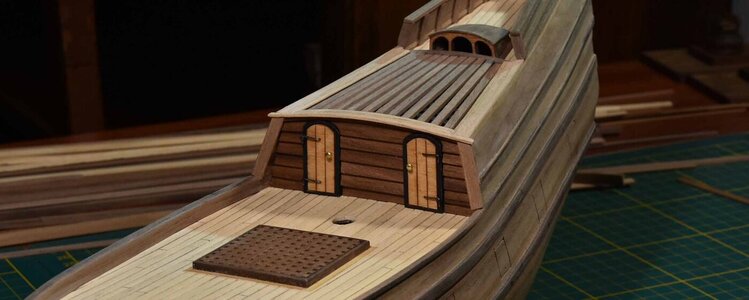
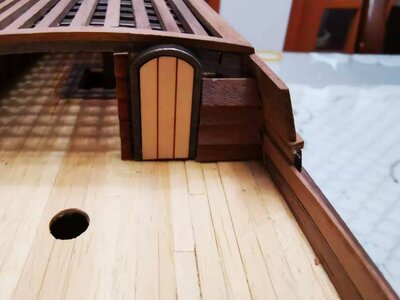
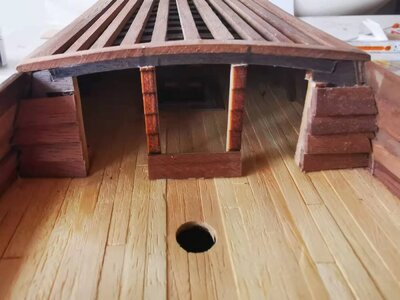
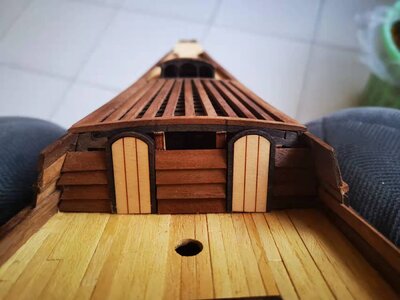
With the doors in place, the top could be closed. Here I edge-glued two 1.5 x 6mm walnut planks together (the opening at the top was too big to use a single plank) and then filed out the openings for the door tops. This took ages to get it right.

微信图片_20220206173021.jpg

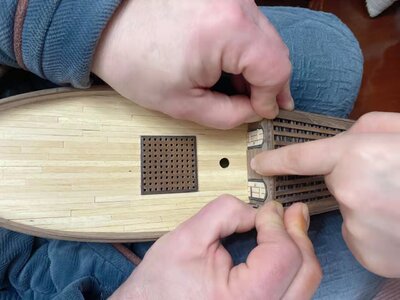
And gluing that final clamp into position was even more fun. I quickly realized that I needed a third hand so I asked the Admiral (very nicely) to pull-up a chair opposite me and to provide the third hand/finger for an hour while I whispered sweet-nothings into her ear! :D

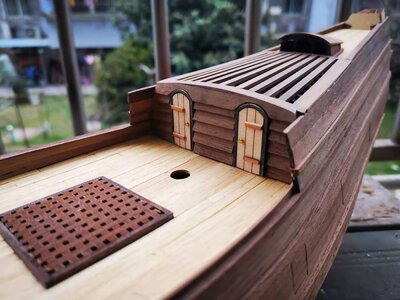
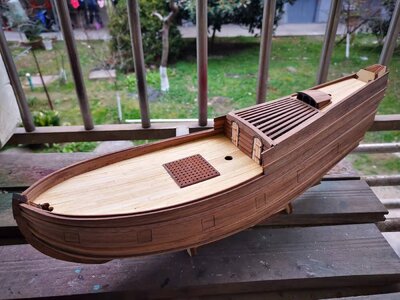
When the glue was dry, it was a case of filing and sanding the top edge of the plank flush with the top edge of the canopy. And finally, when all was said and done, this is where I am tonight.

微信图片_20220206163315.jpg

微信图片_20220206163345.jpg

Many many hours from now, I will go to bed a very happy Willem Barentsz builder. Never in my wildest dreams would I have imagined that I would get this far in two months. I have thoroughly enjoyed myself and my satisfaction of the build has only been surpassed by the wonderful participation of all of you. Until next time, take care, keep safe, cherish your loved ones and happy shipbuilding.
 
Heinrich, I think all of us are amazed at how you have “squeezed “ another part of your build into such a short timeline.
Well done my friend. Best wishes for the upcoming move and position.
Thank you very much for the well wishes my friend. Tonight I am a happy man as all loose-ends have been tied up. Now I can relax the next three days before I start my work. Also a big thanks to your invaluable support along the way - it is sincerely appreciated.
 
Hello Everyone.

This really is my last update before I return to work - and let me tell you straight out - I found this to be a really difficult task to accomplish.

I wanted to finish the canopy by installing the front wall and doors. The goal at the end of this step was to have something similar to @pietsan Piet's final outcome.

View attachment 288870
Photograph: Piet Sanders
Piet's superb-looking front wall and door assembly.

View attachment 288871
Photograph: Piet Sanders. This may look like an easy assembly (and for some people it probably is, but I had my task cut out for me.

For this we will again need the laser sheet I showed you earlier.

View attachment 288872

PART C (marked with the green ticks): Already used.

Blue-marked Parts: Outer Wallposts

Yellow-marked Parts: Inner Wallposts

White-Crossed Parts: Doors.

Orange-marked Parts: Door Posts.

The instructions call for the outer wallposts (blue-marked parts) to be glued underneath the already mounted stanchion posts with the notched part facing forward towards the bow. The supplied part is too long and needs to be cut to the correct length at the TOP!

View attachment 288873

Here you van clearly see the difference between the cut-to-size outer wallpost and the one directly from the laser sheet. On the original one I had already scored the cutting line.

View attachment 288874

The outer wallpost has been glued underneath the stanchion post. The green rectangle indicates the bulwark overlap that will be cut to size and finished off later.

View attachment 288875

To make sure that I mount the wall post plumb, I fabricated a square that is small enough to fit in underneath the canopy.

With the outer wallposts mounted underneath the stanchion posts it was now time to test-fit the doors.

View attachment 288876

This is how the door comes out of the laser-cut sheet. Note that the door post still surrounds the door. Leave this as is for the time being.

Now what Piet has done is to glue two 6mm walnut strips behind both door and doorpost to ensure that it remains one, solid construction.

View attachment 288877

This is what Piet has done in his build. I have just overlaid these planks as means of illustration.

View attachment 288878

However, in my case, if I had used this method as above, the door was too high in relation to the canopy. (In this picture it actually looks as if the door is protruding above the company, but in reality that it was lying flush with the top edge.) Whilst I have seen one or two WB builders who used the doors as above, I was not happy to do so. Therefore, I went a different route.

View attachment 288879

I separated my door post from the door and cut off the bottom part. At the same time I stained the door post with Dark Oak – the fact that I had separated the two parts and stained the door post while not attached to the door, obviously prevented the stain from overflowing onto the door. After the stain had dried, I glued the door frame back around the door.

View attachment 288880

Here you can see my modified construction (on the left) compared to the standard kit one. Note that my modified door now was markedly lower compared to how it came out of the laser cut sheet.

View attachment 288881

Test-fitted, my modification had the desired effect as the door assembly now fits neatly underneath the upper edge of the canopy.

Now I could make a start by planking the sides (the area demarcated in red) using 1.5mm x 6mm walnut planks. They are planked in an overlapping (schotelende) way made easy by the notches in the outer wall post.

View attachment 288882

Before I started the planking though, I dry-fitted the door and then glued the inner wallpost into position - again making sure it was plumb and butted up tightly against the door.

View attachment 288883

With the two side walls planked up to this point. I could make a start with the center section.

View attachment 288884

At this point, I decided to glue the doors into the walls so that they were secure. I thought that that would make it easier then to close the gap off at the top.

But this obviously meant that I had to prepare the doors for installation and that meant hinges and door handles/knobs. I made a decision prior to the build, that I was not going to use any blackening fluid or paint. I could have used brass strips for the hinges, but against the very light-colored doors they just did not show up properly. I thus delved into my wood stash and cut two hinges out of very light-colored pear wood. The idea is this: I know that the tung oil, when applied, is not going to change the color of the door much, but tung oil darkens pear wood considerably. So when the whole assembly is treated with tung oil, the hinges will become a lot darker than what they are now while the doors will remain (more or less) the same color. It was thus more a case of insinuating the hinges rather than having sharply-defined hinges in place. The door knobs were easy - Kolderstok-supplied nails.

View attachment 288885

If the hinges do not work satisfactorily for me, I can always remove them and do something else. They are still easily accessible and since they are just tacked with PVA glue, removing them will be a cinch. Note the uneven lines at the bottom of the doors. They were sanded to fit in with the curvature of the deck.

With the doors in place, the top could be closed. Here I edge-glued two 1.5 x 6mm walnut planks together (the opening at the top was too big to use a single plank) and then filed out the openings for the door tops. This took ages to get it right.

View attachment 288886

And gluing that final clamp into position was even more fun. I quickly realized that I needed a third hand so I asked the Admiral (very nicely) to pull-up a chair opposite me and to provide the third hand/finger for an hour while I whispered sweet-nothings into her ear! :D

When the glue was dry, it was a case of filing and sanding the top edge of the plank flush with the top edge of the canopy. And finally, when all was said and done, this is where I am tonight.

View attachment 288891

View attachment 288892

Many many hours from now, I will go to bed a very happy Willem Barentsz builder. Never in my wildest dreams would I have imagined that I would get this far in two months. I have thoroughly enjoyed myself and my satisfaction of the build has only been surpassed by the wonderful participation of all of you. Until next time, take care, keep safe, cherish your loved ones and happy shipbuilding.
Wonderful explanation of your construction technique. I notice you talk about keeping a wood stash, I keep a box full of scraps, drop offs, as well as unused lumber too. I would bet most everyone does. I really like the way you carried the deck color into the doors, the contrast of doors and walls is superb, I love it.
 
Wonderful explanation of your construction technique. I notice you talk about keeping a wood stash, I keep a box full of scraps, drop offs, as well as unused lumber too. I would bet most everyone does. I really like the way you carried the deck color into the doors, the contrast of doors and walls is superb, I love it.
Hi Daniel - I am so chuffed to hear that you love the contrasting door-and wall colors - that really makes me happy, as that was the whole idea. I am also glad that you liked the (long) explanation of the build process. It may be boring to some, but to a person building the model, it should give different options of how to achieve the same result. Your description of your wood stash describes my own perfectly - such a scrap box is an indispensable part of modelbuilding (or at least of mine)!:)
 
Hello Everyone.

This really is my last update before I return to work - and let me tell you straight out - I found this to be a really difficult task to accomplish.

I wanted to finish the canopy by installing the front wall and doors. The goal at the end of this step was to have something similar to @pietsan Piet's final outcome.

View attachment 288870
Photograph: Piet Sanders
Piet's superb-looking front wall and door assembly.

View attachment 288871
Photograph: Piet Sanders. This may look like an easy assembly (and for some people it probably is, but I had my task cut out for me.

For this we will again need the laser sheet I showed you earlier.

View attachment 288872

PART C (marked with the green ticks): Already used.

Blue-marked Parts: Outer Wallposts

Yellow-marked Parts: Inner Wallposts

White-Crossed Parts: Doors.

Orange-marked Parts: Door Posts.

The instructions call for the outer wallposts (blue-marked parts) to be glued underneath the already mounted stanchion posts with the notched part facing forward towards the bow. The supplied part is too long and needs to be cut to the correct length at the TOP!

View attachment 288873

Here you van clearly see the difference between the cut-to-size outer wallpost and the one directly from the laser sheet. On the original one I had already scored the cutting line.

View attachment 288874

The outer wallpost has been glued underneath the stanchion post. The green rectangle indicates the bulwark overlap that will be cut to size and finished off later.

View attachment 288875

To make sure that I mount the wall post plumb, I fabricated a square that is small enough to fit in underneath the canopy.

With the outer wallposts mounted underneath the stanchion posts it was now time to test-fit the doors.

View attachment 288876

This is how the door comes out of the laser-cut sheet. Note that the door post still surrounds the door. Leave this as is for the time being.

Now what Piet has done is to glue two 6mm walnut strips behind both door and doorpost to ensure that it remains one, solid construction.

View attachment 288877

This is what Piet has done in his build. I have just overlaid these planks as means of illustration.

View attachment 288878

However, in my case, if I had used this method as above, the door was too high in relation to the canopy. (In this picture it actually looks as if the door is protruding above the company, but in reality that it was lying flush with the top edge.) Whilst I have seen one or two WB builders who used the doors as above, I was not happy to do so. Therefore, I went a different route.

View attachment 288879

I separated my door post from the door and cut off the bottom part. At the same time I stained the door post with Dark Oak – the fact that I had separated the two parts and stained the door post while not attached to the door, obviously prevented the stain from overflowing onto the door. After the stain had dried, I glued the door frame back around the door.

View attachment 288880

Here you can see my modified construction (on the left) compared to the standard kit one. Note that my modified door now was markedly lower compared to how it came out of the laser cut sheet.

View attachment 288881

Test-fitted, my modification had the desired effect as the door assembly now fits neatly underneath the upper edge of the canopy.

Now I could make a start by planking the sides (the area demarcated in red) using 1.5mm x 6mm walnut planks. They are planked in an overlapping (schotelende) way made easy by the notches in the outer wall post.

View attachment 288882

Before I started the planking though, I dry-fitted the door and then glued the inner wallpost into position - again making sure it was plumb and butted up tightly against the door.

View attachment 288883

With the two side walls planked up to this point. I could make a start with the center section.

View attachment 288884

At this point, I decided to glue the doors into the walls so that they were secure. I thought that that would make it easier then to close the gap off at the top.

But this obviously meant that I had to prepare the doors for installation and that meant hinges and door handles/knobs. I made a decision prior to the build, that I was not going to use any blackening fluid or paint. I could have used brass strips for the hinges, but against the very light-colored doors they just did not show up properly. I thus delved into my wood stash and cut two hinges out of very light-colored pear wood. The idea is this: I know that the tung oil, when applied, is not going to change the color of the door much, but tung oil darkens pear wood considerably. So when the whole assembly is treated with tung oil, the hinges will become a lot darker than what they are now while the doors will remain (more or less) the same color. It was thus more a case of insinuating the hinges rather than having sharply-defined hinges in place. The door knobs were easy - Kolderstok-supplied nails.

View attachment 288885

If the hinges do not work satisfactorily for me, I can always remove them and do something else. They are still easily accessible and since they are just tacked with PVA glue, removing them will be a cinch. Note the uneven lines at the bottom of the doors. They were sanded to fit in with the curvature of the deck.

With the doors in place, the top could be closed. Here I edge-glued two 1.5 x 6mm walnut planks together (the opening at the top was too big to use a single plank) and then filed out the openings for the door tops. This took ages to get it right.

View attachment 288886

And gluing that final clamp into position was even more fun. I quickly realized that I needed a third hand so I asked the Admiral (very nicely) to pull-up a chair opposite me and to provide the third hand/finger for an hour while I whispered sweet-nothings into her ear! :D

When the glue was dry, it was a case of filing and sanding the top edge of the plank flush with the top edge of the canopy. And finally, when all was said and done, this is where I am tonight.

View attachment 288891

View attachment 288892

Many many hours from now, I will go to bed a very happy Willem Barentsz builder. Never in my wildest dreams would I have imagined that I would get this far in two months. I have thoroughly enjoyed myself and my satisfaction of the build has only been surpassed by the wonderful participation of all of you. Until next time, take care, keep safe, cherish your loved ones and happy shipbuilding.
Where'd you grow that extra hand?
 
Bravo Heinrich, what a great finish. Of course we also need to thank your Admiral for participation.

Jan
Thank you my dear friend. The Admiral, as always has been great. But I have to tell you a little story. I said to her that when the time comes to move, the Haarlem, the Sampan, Bluenose, the RC Seaducer, the 1935 Bowman Steamboat and the 1900 Carette Electric Speedboat has to go to her new apartment. I will only take my tools and the WB. Her response? "No, you can take all the others, I want the WB!"
 
Back
Top