- Joined
- Jan 9, 2020
- Messages
- 10,565
- Points
- 938

I read it the same way!I read that as ....... be ready it wouldn't be easy at all.
 |
As a way to introduce our brass coins to the community, we will raffle off a free coin during the month of August. Follow link ABOVE for instructions for entering. |
 |
 |
The beloved Ships in Scale Magazine is back and charting a new course for 2026! Discover new skills, new techniques, and new inspirations in every issue. NOTE THAT OUR FIRST ISSUE WILL BE JAN/FEB 2026 |
 |

I read it the same way!I read that as ....... be ready it wouldn't be easy at all.
I second that. When my boys turned thirteen they knew everythingBest wishes for your thirteen year olds.
She looks fantastic Heinrich! You can be happy with that for sure!Hello Everyone.
This really is my last update before I return to work - and let me tell you straight out - I found this to be a really difficult task to accomplish.
I wanted to finish the canopy by installing the front wall and doors. The goal at the end of this step was to have something similar to @pietsan Piet's final outcome.
View attachment 288870
Photograph: Piet Sanders
Piet's superb-looking front wall and door assembly.
View attachment 288871
Photograph: Piet Sanders. This may look like an easy assembly (and for some people it probably is, but I had my task cut out for me.
For this we will again need the laser sheet I showed you earlier.
View attachment 288872
PART C (marked with the green ticks): Already used.
Blue-marked Parts: Outer Wallposts
Yellow-marked Parts: Inner Wallposts
White-Crossed Parts: Doors.
Orange-marked Parts: Door Posts.
The instructions call for the outer wallposts (blue-marked parts) to be glued underneath the already mounted stanchion posts with the notched part facing forward towards the bow. The supplied part is too long and needs to be cut to the correct length at the TOP!
View attachment 288873
Here you van clearly see the difference between the cut-to-size outer wallpost and the one directly from the laser sheet. On the original one I had already scored the cutting line.
View attachment 288874
The outer wallpost has been glued underneath the stanchion post. The green rectangle indicates the bulwark overlap that will be cut to size and finished off later.
View attachment 288875
To make sure that I mount the wall post plumb, I fabricated a square that is small enough to fit in underneath the canopy.
With the outer wallposts mounted underneath the stanchion posts it was now time to test-fit the doors.
View attachment 288876
This is how the door comes out of the laser-cut sheet. Note that the door post still surrounds the door. Leave this as is for the time being.
Now what Piet has done is to glue two 6mm walnut strips behind both door and doorpost to ensure that it remains one, solid construction.
View attachment 288877
This is what Piet has done in his build. I have just overlaid these planks as means of illustration.
View attachment 288878
However, in my case, if I had used this method as above, the door was too high in relation to the canopy. (In this picture it actually looks as if the door is protruding above the company, but in reality that it was lying flush with the top edge.) Whilst I have seen one or two WB builders who used the doors as above, I was not happy to do so. Therefore, I went a different route.
View attachment 288879
I separated my door post from the door and cut off the bottom part. At the same time I stained the door post with Dark Oak – the fact that I had separated the two parts and stained the door post while not attached to the door, obviously prevented the stain from overflowing onto the door. After the stain had dried, I glued the door frame back around the door.
View attachment 288880
Here you can see my modified construction (on the left) compared to the standard kit one. Note that my modified door now was markedly lower compared to how it came out of the laser cut sheet.
View attachment 288881
Test-fitted, my modification had the desired effect as the door assembly now fits neatly underneath the upper edge of the canopy.
Now I could make a start by planking the sides (the area demarcated in red) using 1.5mm x 6mm walnut planks. They are planked in an overlapping (schotelende) way made easy by the notches in the outer wall post.
View attachment 288882
Before I started the planking though, I dry-fitted the door and then glued the inner wallpost into position - again making sure it was plumb and butted up tightly against the door.
View attachment 288883
With the two side walls planked up to this point. I could make a start with the center section.
View attachment 288884
At this point, I decided to glue the doors into the walls so that they were secure. I thought that that would make it easier then to close the gap off at the top.
But this obviously meant that I had to prepare the doors for installation and that meant hinges and door handles/knobs. I made a decision prior to the build, that I was not going to use any blackening fluid or paint. I could have used brass strips for the hinges, but against the very light-colored doors they just did not show up properly. I thus delved into my wood stash and cut two hinges out of very light-colored pear wood. The idea is this: I know that the tung oil, when applied, is not going to change the color of the door much, but tung oil darkens pear wood considerably. So when the whole assembly is treated with tung oil, the hinges will become a lot darker than what they are now while the doors will remain (more or less) the same color. It was thus more a case of insinuating the hinges rather than having sharply-defined hinges in place. The door knobs were easy - Kolderstok-supplied nails.
View attachment 288885
If the hinges do not work satisfactorily for me, I can always remove them and do something else. They are still easily accessible and since they are just tacked with PVA glue, removing them will be a cinch. Note the uneven lines at the bottom of the doors. They were sanded to fit in with the curvature of the deck.
With the doors in place, the top could be closed. Here I edge-glued two 1.5 x 6mm walnut planks together (the opening at the top was too big to use a single plank) and then filed out the openings for the door tops. This took ages to get it right.
View attachment 288886
And gluing that final clamp into position was even more fun. I quickly realized that I needed a third hand so I asked the Admiral (very nicely) to pull-up a chair opposite me and to provide the third hand/finger for an hour while I whispered sweet-nothings into her ear!
When the glue was dry, it was a case of filing and sanding the top edge of the plank flush with the top edge of the canopy. And finally, when all was said and done, this is where I am tonight.
View attachment 288891
View attachment 288892
Many many hours from now, I will go to bed a very happy Willem Barentsz builder. Never in my wildest dreams would I have imagined that I would get this far in two months. I have thoroughly enjoyed myself and my satisfaction of the build has only been surpassed by the wonderful participation of all of you. Until next time, take care, keep safe, cherish your loved ones and happy shipbuilding.

Thank you Ron! We will see on Monday what they are like!Best wishes for your thirteen year olds.

Thank you Jan! I like a challenge - so let's see what they've got next week.I second that. When my boys turned thirteen they knew everything

Thank you very much Dean! Yes, I am very happy with the Willem Barentsz. I wish everything could be a smooth sailing as this build has been up until now!She looks fantastic Heinrich! You can be happy with that for sure!


Thank you Jan. That is why I am leaving it open for discussion.I'm looking forward to the next "installment". The discrepancy in the canopy picture is pretty obvious. That could be another discussion topic.
Jan

I'm looking forward to the next "installment". The discrepancy in the canopy picture is pretty obvious. That could be another discussion topic.
Jan
Good afternoon Heinrich, they are pearls for the eyes and a source of high culture, Thanks for these sharesHello Everyone
Tonight, I will introduce Part II of the reconstruction of the replica which still deals with the preparatory stages.
As mentioned in the introductory post on the replica, the two men behind the build of the Willem Barentsz replica ship were Gerald de Weerdt and Koos Weestra. Years of study preceded the start of the actual construction. In fact, Gerald’s research spanned all of twenty years.
The main source of information on the construction methods of the ship stemmed from maritime archeological research. This entailed how the joints were formed, how thick the wood was, where the reinforcements were placed, etc. (Remember, there were no drawings at the time – shipwrights trusted their eyes and experience). As Gerald de Weerdt made computer drawing after computer drawing everything was checked and double-checked. However, his work at best remained drawings and there was nothing tangible against which the results could be checked and verified.
In stepped Koos Weestra. You will recall that in the last historical update, I posted a picture of the clock that Willem Barentsz took with him on the expedition and which now resides in the Rijksmuseum in Amsterdam. Well, prior to Weestra becoming involved with the reconstruction of the WB, he had already built a model of the clock, but now he wanted to take that one step further.
Koos had always wanted to build a ship model of the WB and with the help of some 30 books he learned how everything worked. He built the model down to the smallest detail. For example, the hull planking and trusses were secured with approximately 4000 trennels, just like on the reconstructed ship, while every single part of the model works and is functional.
Finally, Gerald de Weerdt had a model against which he could check his results.
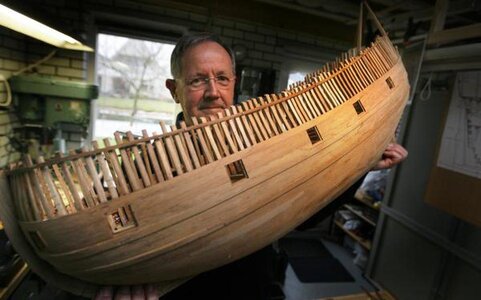
View attachment 290146
Koos Weestra with the planked hull of his model.
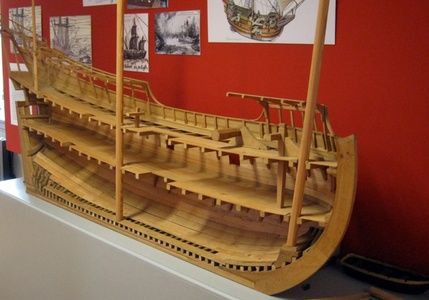
View attachment 290147
A separately-constructed cross-section of the basic hull structure.
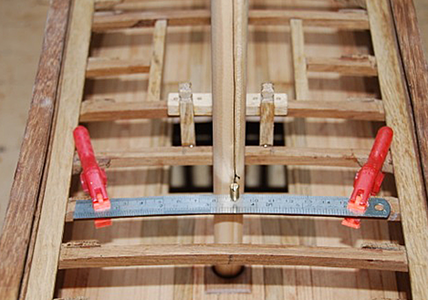
View attachment 290148
Frameworks and deck beams.
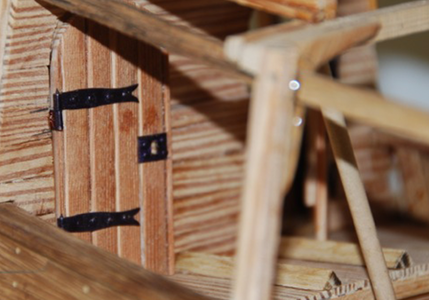
View attachment 290149
Close up of the front wall of the canopy, doors and hinges. Those of you with an eye for detail, are most welcome to point out a "discrepancy" - between this model and mine.
View attachment 290151
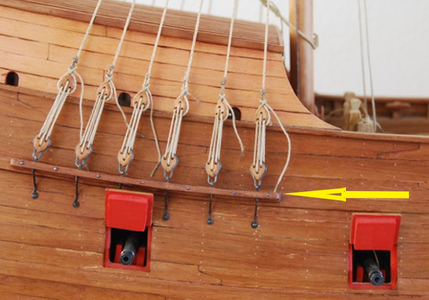
Note that the deadeyes (jufferblokken) and shrouds are mounted on a chain plates (rusten). This will be another discrepancy that we will get to later on.
View attachment 290152
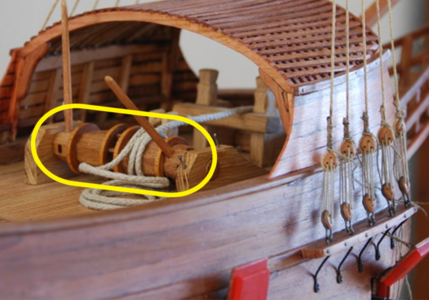
Also note the placement and position of the winch underneath the front canopy on Weestra's model. This will be the third bone of contention later on (and one hotly disputed between different builders of the ship).
View attachment 290154
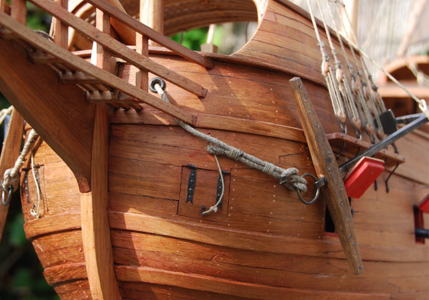
Close-up of the bow highlighting the anchors, hawse holes, galleon, and front gunports and hinges.
View attachment 290156
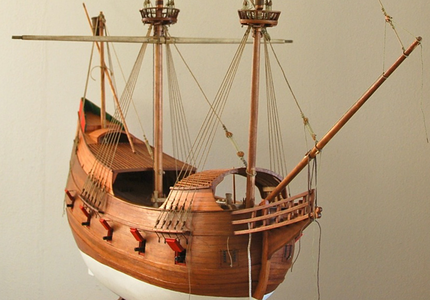
Lastly we conclude with a front view of the ship during the construction.
That is all for now dear friends. I hope you enjoy the pictures and when I get to those aspects that I mentioned and pointed out as differences between this model and mine, I will obviously discuss it detail and give you the relevant points of view of the respective parties.
Please take care, stay safe and enjoy a weekend of happy modeling!
The bulkhead adjustments are completed and the gluing process has started. I’m sort of paranoid about the gluing. I’ve only glued a couple bulkheads a day so I can be sure they are square and true to the keel.Thank you Jan. That is why I am leaving it open for discussion.By the way, how are you doing with the adjustments of the bulkheads on the keel? I can't wait for your next update!
Hallo Heinrich, your pictures are very beautiful and extremely informative. What I appreciate so much about you is the extensive, cultural and historical description that you combine very nicely with your building activity.Hello Everyone
Tonight, I will introduce Part II of the reconstruction of the replica which still deals with the preparatory stages.
As mentioned in the introductory post on the replica, the two men behind the build of the Willem Barentsz replica ship were Gerald de Weerdt and Koos Weestra. Years of study preceded the start of the actual construction. In fact, Gerald’s research spanned all of twenty years.
The main source of information on the construction methods of the ship stemmed from maritime archeological research. This entailed how the joints were formed, how thick the wood was, where the reinforcements were placed, etc. (Remember, there were no drawings at the time – shipwrights trusted their eyes and experience). As Gerald de Weerdt made computer drawing after computer drawing everything was checked and double-checked. However, his work at best remained drawings and there was nothing tangible against which the results could be checked and verified.
In stepped Koos Weestra. You will recall that in the last historical update, I posted a picture of the clock that Willem Barentsz took with him on the expedition and which now resides in the Rijksmuseum in Amsterdam. Well, prior to Weestra becoming involved with the reconstruction of the WB, he had already built a model of the clock, but now he wanted to take that one step further.
Koos had always wanted to build a ship model of the WB and with the help of some 30 books he learned how everything worked. He built the model down to the smallest detail. For example, the hull planking and trusses were secured with approximately 4000 trennels, just like on the reconstructed ship, while every single part of the model works and is functional.
Finally, Gerald de Weerdt had a model against which he could check his results.
View attachment 290146
Koos Weestra with the planked hull of his model.
View attachment 290147
A separately-constructed cross-section of the basic hull structure.
View attachment 290148
Frameworks and deck beams.
View attachment 290149
Close up of the front wall of the canopy, doors and hinges. Those of you with an eye for detail, are most welcome to point out a "discrepancy" - between this model and mine.
View attachment 290151
Note that the deadeyes (jufferblokken) and shrouds are mounted on a chain plates (rusten). This will be another discrepancy that we will get to later on.
View attachment 290152
Also note the placement and position of the winch underneath the front canopy on Weestra's model. This will be the third bone of contention later on (and one hotly disputed between different builders of the ship).
View attachment 290154
Close-up of the bow highlighting the anchors, hawse holes, galleon, and front gunports and hinges.
View attachment 290156
Lastly we conclude with a front view of the ship during the construction.
That is all for now dear friends. I hope you enjoy the pictures and when I get to those aspects that I mentioned and pointed out as differences between this model and mine, I will obviously discuss it detail and give you the relevant points of view of the respective parties.
Please take care, stay safe and enjoy a weekend of happy modeling!

Thank you so much for those thoughts Adi. The cultural and historical aspects add so much to the total experience of recreating such an old ship, that I could never leave that out. Also, because I love History so much, it is also a very enjoyable part of the build for me!Hallo Heinrich, your pictures are very beautiful and extremely informative. What I appreciate so much about you is the extensive, cultural and historical description that you combine very nicely with your building activity.
So...is it going to be Ni Hau Ma? Or Ni Hau Boo Hau?Thank you so much for those thoughts Adi. The cultural and historical aspects add so much to the total experience of recreating such an old ship, that I could never leave that out. Also, because I love History so much, it is also a very enjoyable part of the build for me!

Hello my dear Peter! When I reach that point in my build, I will most certainly point out these differences and then we can discuss them. Thank you for the good wishes with the boys - I will need all the help I can get!Again a beautiful update on the Willem Barentsz Heinrich, i am looking forward to your explanation of the discrepancys.
In the meantime i wish you the best of luck with the two 13 year olds

Hi Phil!So...is it going to be Ni Hau Ma? Or Ni Hau Boo Hau?
 Ni Hau Ma! I have a weekend ahead of me and tonight I can spend so time with my friends on SOS. So, I am a happy chappy!