HM Armed Cutter Alert (1777) - Vanguard Models - 1/64

Do you think I don't already spend enough time bangin' on me laptop like a chimpanzee trying to write the works of Shakespeare? ROTF

Tips and tricks sections, are they worth the bother of writing?

Also, ..............
Also,............
Also, ..........
Also, ..........

Perhaps the 'secret' reason that we post these hacks isn't to help others but to boast about our own triumphs?
Nah, I'm not going to write all these things twice. Let's rely on serendipity and initiative instead. :)
Jeez, sorry I mentioned it ROTF ROTF
 
Perhaps the 'secret' reason that we post these hacks isn't to help others but to boast about our own triumphs? In which case I prefer to limit my bragging however unconscious it might be, to my own thread. :eek:

Perhaps the 'secret' reason that I post these hacks isn't to help others but to boast about MY own triumphs? In which case I prefer to limit my bragging however unconscious it might be, to my own thread.

That's better. Honest. Clear.
 
PB020071.JPG

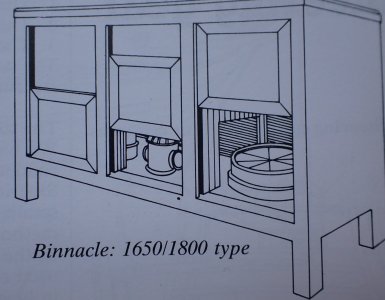
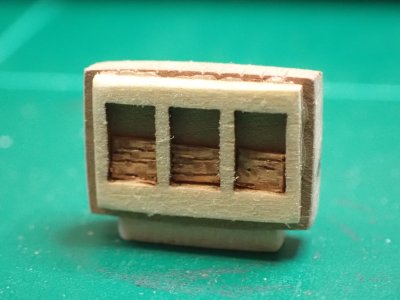
Laying awake one night, I was wondering where to go next on this boat build. Then it struck me, the sailors might also be wondering where they are going since there is no binnacle in the kit nor in Goodwin's AotS Alert. Perhaps the compasses and their home in the binnacle were the private property of the Master and therefore not on the plans? I don't know. I am fairly sure that there would have been one so I improvised.

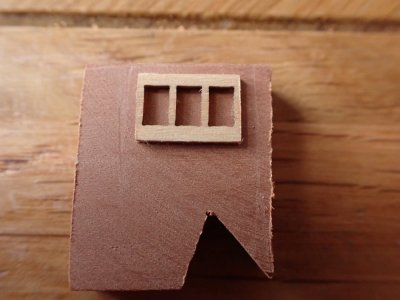
PB020072.JPG

That plywood piece came from an ultra cheap Chinese toy boat I bought and decided not to bother building, some years ago. I think it's the front face of a binnacle which was very convenient. I'm not trying anything fancy at the mo, due to being a little under the weather so I elected to build the rest of the cabinet from the solid.

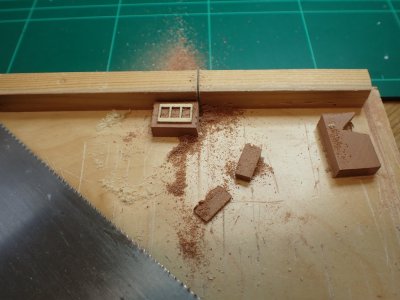
PB020073.JPG

My bench hook was on the point of replacement. The cutting zone on the right is all but chopped away. I couldn't be bothered to make another one today so I just cut a slot in the middle of the rail. Another triumph of laziness! It works much better that way with the thin pieces of wood we use supported both sides of the cut. And there's room for half a doz more cuts, maybe at different angles too...


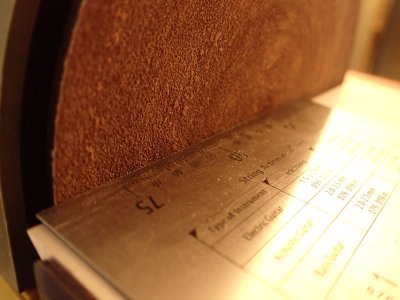
PB020075.JPG

Using the Proxxon disc sander on small pieces like this can be dodgy because the gap between the table and the disk is quite wide by our standards. I use a small steel guitar measuring thing as a bridge over troubled machinery. I'm not the only one, @dockattner does the same thing and he's also invented a v good way to work right at the edge of the disc by hacking out a small part of the disc guard/shroud. I'll show you what that looks like when I get around to doing it myself.

PB020076.JPG

I couldn't manage individual legs today but the plinth will be good enough.
PB020077.JPG

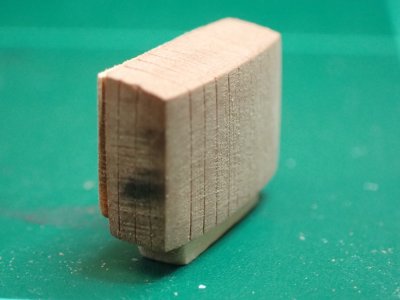
I got a bit carried away and gave the binnacle a curved back. Bow fronted furniture was popular in the Georgian period but I may have erred with the bow back. I seem to have made a 1950s cocktail cabinet by mistake, or possibly a deluxe 1960s television. Better anachronistic than missing though?

~~~~~~~~~~

I might not be making much headway on the model at the moment but ...

PA260059.JPG

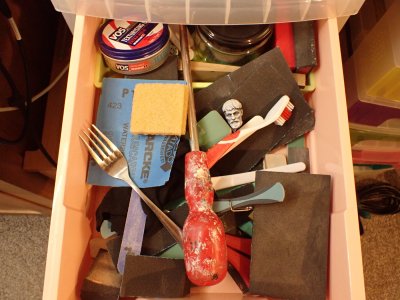
...I'm getting ahead with the abrasive drawer clear out.
 
Hi Smitty
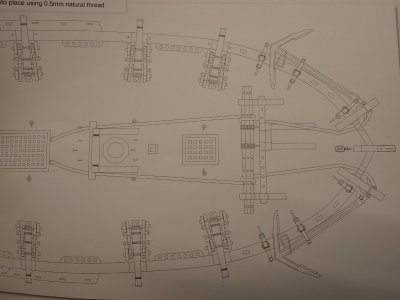
Can you share which book the binnacle drawing is from?
Thanks

Perhaps the compasses and their home in the binnacle were the private property of the Master
There were multiple binnacles kept on board so probably not the property of the Master. You may find the following interesting. The binnacles were not normally fixed in place as they were typically held down with ropes attached to each side of the binnacle and cleats or rings in the deck so they could be removed when not under sail or replaced with a spare if damaged. From Lavery, The Arming and Fitting of English Ships of War, pp26-27, ships carried up to three binnacles in the mid 18th century but the admiralty reduced it to two in 1779 unless demanded otherwise by a flag officer. The extra one(s) were presumably stored below as spares.
Allan
 
Hi Smitty
Can you share which book the binnacle drawing is from?
Thanks


There were multiple binnacles kept on board so probably not the property of the Master. You may find the following interesting. The binnacles were not normally fixed in place as they were typically held down with ropes attached to each side of the binnacle and cleats or rings in the deck so they could be removed when not under sail or replaced with a spare if damaged. From Lavery, The Arming and Fitting of English Ships of War, pp26-27, ships carried up to three binnacles in the mid 18th century but the admiralty reduced it to two in 1779 unless demanded otherwise by a flag officer. The extra one(s) were presumably stored below as spares.
Allan

It's from Zu Mondfeld Historic Ship Models p.147

Yes Alan, I was aware that the compass binnacles were removable but thanks for reminding me that they were lashed into place. I might reproduce that.
 
I've done some painting today but not a great deal and since it's those deck fittings that you've seen before I won't bother re-photographing them today.

One of the things I've been painting was the big windlass used for raising the anchors.

PB020074.JPG

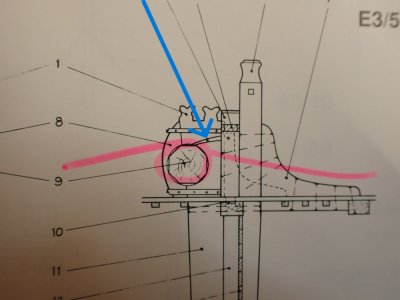
This is the illustration from the instruction booklet. Follow those cables aft from the anchor and see if you can find the three things that bother me. The first is an over-simplification, the second is a gross error and the third is a fantasy. I'll give you a few moments...

10
9
8
7
6
5
4
3
2
1
Time's up!

PB020073.JPG

Here's Godwin's drawing of the windlass in cross section viewed from stbd. My pink lines show the route of the cable which passes over the windlass drum twice. I know this for two reasons. Firstly because the pawl which prevents the drum running out if the matelots lose their grip on the bars is on top of the drum and points aft (Blue arrow). It will only stop the drum rotating clockwise in this drawing. The second reason is that if the cable is routed under the drum twice, as in the kit booklet, those matelots will have to push upwards on the bars weakly with triceps and back muscles, rather than pulling downward with all of their weight and strength of big muscles like the biceps and belly.

There was a time when I first started doing boat kits that this sort of mistake would have annoyed me, mostly because I wouldn't have spotted it until too late. Now however, I regard it as part of the fun to check diagrams and proof read text for myself. I think I catch a lot more now than three years ago but doubtless there's still 'tests' like this that I'll fail to find in time.

I was a technical author for a while and enjoyed the job and checking doccummantts is still something I enjoy. In fact, I once offered to proof read and correct the mistake-ridden instructions of another kit (unpaid) but the manufacturers weren't interested - I guess they had already printed all they intended to use. It's probably difficult to find that rare combination of technical author and maritime enthusiast before sending the masters to the printers. ;)

PB020075.JPG

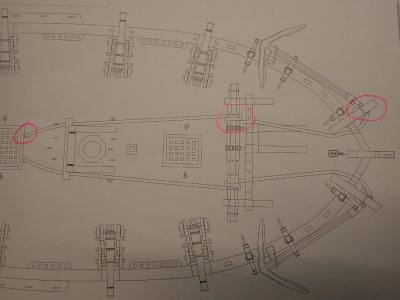
The over-simplification (as far as I'm concerned) is at the cathead where the ring of the anchor is simply tied onto the spar. There's no sign of the sheaves in the cathead or the catting tackle which I think is far too interesting to leave out. And yet, and yet, can I be bothered to drill the holes and do it properly? I'm not keen right now but maybe later...

The third thing is the fantasy which I already mentioned a few pages back. The cables dive down through holes in the deck which are spurious. They were actually routed through cut-outs in the grating over the main hatch. The grating is a brass piece in this kit and I'm guessing that the grating was drawn, ordered and delivered without the cut outs and then the holes in the deck were invented to get round the mistake. The holes nearly caught me out because I confused them with the holes for the pumps and actually left a gap in the plaking for them. Fortunately, I can invent a slightly more forward position for the hatch to cover the invented holes. In fact I'll shuffle everything forward by a couple of feet to make space for that cocktail cabinet binnacle.

~~~~~~~~~~

PA260062.JPG

They say you can't have too many clamps. I've bean looking for this little beauty for weeks now.
 
I've been painting again today.

PB030069.JPG

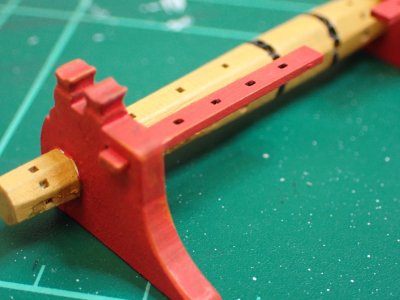
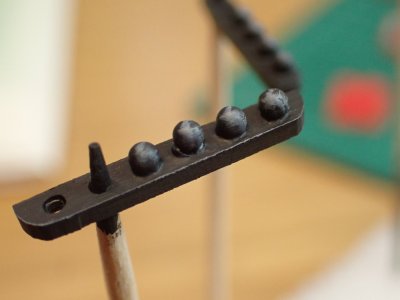
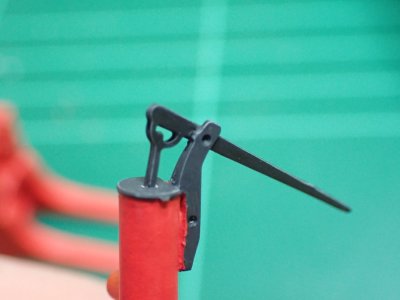
I've not had much enthusiasm to spare for modelling today due to other distractions and I was mostly was applying that second thin coat so no reason for a photo. However, I've used a technique from figure modelling that you might not have seen before. It's called edge highlighting and that probably tells you most of what you need to know.

PB030070.JPG

The idea is to apply a lighter colour to edges which would catch the light on the real thing. When you look at a boat in a harbour in the sunshine, all of the edges shine, even on matt painted surfaces. we see this without noticing and use it to comprehend the volumes of the various objects that make up the boat. As I look around my apartment, I see that shine on the edges of the bookshelves, the hiking pole, my coffee cup. It's so everywhere that normally only artists see it, but take a look and it's there. The problem for modellers is that on a miniature, that effect is lost in the small scale of the object. Mini painters learn to reproduce the effect with paint.

First a lighter shade of the base colour is used along all of the edges, then an even lighter one on the topmost parts and finally a white dot or two on the very highest points. If it's done well it's very subtle almost impossible to see on a photo because it looks so normal but the mini really seems to 'gain volume' when it's in your hand. I don't do it well because I'm not a big fan of subtle.

PB030071.JPG

The effect I'm aiming at is something I call 'Grand Opera'. I don't want my models to look like life, I want them LARGER than life. Think of the costumes and scenery at an opera house and you'll get the idea. I use only one layer of a colour which is quite markedly lighter than the base colour; mid grey over 'almost black' or a yellow orange over red.

It's not difficult to do and the effect can be quite dramatic. Often the viewers will know there's something happening to make the model 'pop' like a Viewmaster slide (remember them?) but they won't know what it is.

I don't know whether I can make it work as well over a great big boat model as I could on an armoured knight or a tank or aircraft though. We'll soon find out.

~~~~~~~~~~

PB030068.JPG

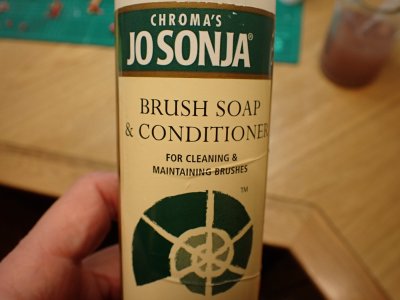
To get those fine lines right on the edges I use the side of my brush in an almost dry condition, scrubbing off the wetness with paper. That's really hard on the brush and though I use cheap semi-disposable brushes, I do like to make them last as long as possible. I recommend using this or one of the many equivalent products at the end of a painting session. They make the brushes last and make them work better too.

~~~~~~~~~~

And finally, finally...

PA310067.JPG

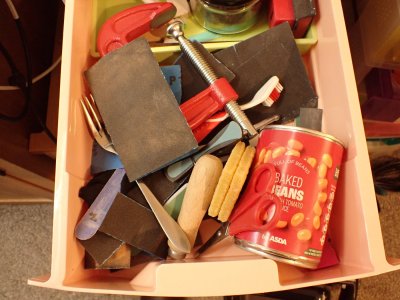
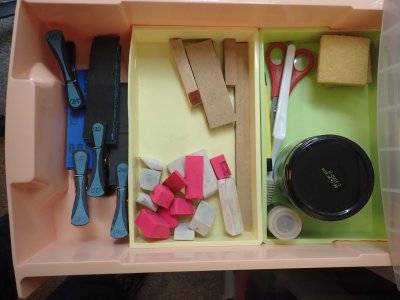
I was bored with that running gag so here's the tidy abrasives drawer. Usually it's only like this at the beginning of a project so this is a bit of a bonus for me.

The pegs hold pre-cut strips of the various grades I use, of a size suitable for the erasers which I use as blocks when sanding curved surfaces. The spare pieces of MDF from laser cut frets are used as sanding sticks and pads for flat surfaces. I make both the eraser and the MDF shapes as required for a particular job and then come to love them and use them over and over again. You'll see 120, 240, and 600 grit. I need 400 rather than 600 which is a bit fine for wood but great on plastic so I have lots leftover to use up

I use good quality wet and dry paper which is capable of being unclogged easily with either a toothbrush, a standard eraser or the special sticky rubber pads (top right) sold for cleaning disc and belt sanders. Most of the paper we throw away isn't blunt, it's just clogged. I get four or five times the use out of my paper by cleaning it, though of course it does wear out eventually as the cutting edges fall off or more rarely become dulled.

The cheap scissors are for cutting the paper and amazingly they still work after at least seven years of this scissor torture.

The big jar is 0000 wire wool for taking the shine off varnish and also for applying wax polish over a varnished surface.

The small jar has a small patch of tights/pantyhose which is excellent for getting that final polish on plastic (It's also the best material ever invented for getting a parade gloss on your shoes, assuming I'm not the only man left in the world who shines leather shoes - I seem to be the only one around here!)

Almost invisible next to the scissors is a fibreglass pencil for cleaning metal surfaces for soldering.

And that, guys and gals is where I'll stop for the night, though I've only just scratched the surface of the subject. ;)
 
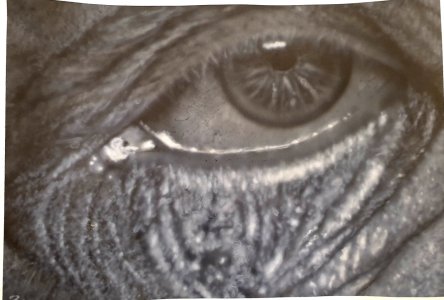
Love it mate, I related to the paint shading because of my other passion of airbrushing portraits.
the "Pop" comes from adding the lighter shades as you say, I can never wait until I add the white highlight to make it look real.
Here's an eye I did before I did Clint Eastwood

View attachment 481797

Without the white it looked a mess. ;)

That’s astonishing! What are you doing messing about with boats when you can do THAT!
 
I've been painting again today.

View attachment 481765

I've not had much enthusiasm to spare for modelling today due to other distractions and I was mostly was applying that second thin coat so no reason for a photo. However, I've used a technique from figure modelling that you might not have seen before. It's called edge highlighting and that probably tells you most of what you need to know.

View attachment 481766

The idea is to apply a lighter colour to edges which would catch the light on the real thing. When you look at a boat in a harbour in the sunshine, all of the edges shine, even on matt painted surfaces. we see this without noticing and use it to comprehend the volumes of the various objects that make up the boat. As I look around my apartment, I see that shine on the edges of the bookshelves, the hiking pole, my coffee cup. It's so everywhere that normally only artists see it, but take a look and it's there. The problem for modellers is that on a miniature, that effect is lost in the small scale of the object. Mini painters learn to reproduce the effect with paint.

First a lighter shade of the base colour is used along all of the edges, then an even lighter one on the topmost parts and finally a white dot or two on the very highest points. If it's done well it's very subtle almost impossible to see on a photo because it looks so normal but the mini really seems to 'gain volume' when it's in your hand. I don't do it well because I'm not a big fan of subtle.

View attachment 481767

The effect I'm aiming at is something I call 'Grand Opera'. I don't want my models to look like life, I want them LARGER than life. Think of the costumes and scenery at an opera house and you'll get the idea. I use only one layer of a colour which is quite markedly lighter than the base colour; mid grey over 'almost black' or a yellow orange over red.

It's not difficult to do and the effect can be quite dramatic. Often the viewers will know there's something happening to make the model 'pop' like a Viewmaster slide (remember them?) but they won't know what it is.

I don't know whether I can make it work as well over a great big boat model as I could on an armoured knight or a tank or aircraft though. We'll soon find out.

~~~~~~~~~~

View attachment 481764

To get those fine lines right on the edges I use the side of my brush in an almost dry condition, scrubbing off the wetness with paper. That's really hard on the brush and though I use cheap semi-disposable brushes, I do like to make them last as long as possible. I recommend using this or one of the many equivalent products at the end of a painting session. They make the brushes last and make them work better too.

~~~~~~~~~~

And finally, finally...

View attachment 481763

I was bored with that running gag so here's the tidy abrasives drawer. Usually it's only like this at the beginning of a project so this is a bit of a bonus for me.

The pegs hold pre-cut strips of the various grades I use, of a size suitable for the erasers which I use as blocks when sanding curved surfaces. The spare pieces of MDF from laser cut frets are used as sanding sticks and pads for flat surfaces. I make both the eraser and the MDF shapes as required for a particular job and then come to love them and use them over and over again. You'll see 120, 240, and 600 grit. I need 400 rather than 600 which is a bit fine for wood but great on plastic so I have lots leftover to use up

I use good quality wet and dry paper which is capable of being unclogged easily with either a toothbrush, a standard eraser or the special sticky rubber pads (top right) sold for cleaning disc and belt sanders. Most of the paper we throw away isn't blunt, it's just clogged. I get four or five times the use out of my paper by cleaning it, though of course it does wear out eventually as the cutting edges fall off or more rarely become dulled.

The cheap scissors are for cutting the paper and amazingly they still work after at least seven years of this scissor torture.

The big jar is 0000 wire wool for taking the shine off varnish and also for applying wax polish over a varnished surface.

The small jar has a small patch of tights/pantyhose which is excellent for getting that final polish on plastic (It's also the best material ever invented for getting a parade gloss on your shoes, assuming I'm not the only man left in the world who shines leather shoes - I seem to be the only one around here!)

Almost invisible next to the scissors is a fibreglass pencil for cleaning metal surfaces for soldering.

And that, guys and gals is where I'll stop for the night, though I've only just scratched the surface of the subject. ;)
yes i remember the viewmasters. your tips are great, thanks. I think I will try it out.. I would imagine the effect is more pronounced on metal parts than wood?
 
That’s astonishing!

Thank you Smithy, very kind, but remember that's after years of art school and practice ;)
I haven't done any since Clint a while back, he took me about 4 months to complete in-between work and life, I still got all the equipment and mean to get back into it (one day) but found modelling as a new passion and absolutely loving every minute :p
Here's my friend Clint Thumbsup

Reviewing your point you made earlier, before I put the light Grey/White he was unrecognizable

20230113_194318.jpg
 
Back
Top