HMB ENDEAVOUR - New 1/65 Artesania Latina Model

Hi Peter,
I am admiring your build and, at the same time, looking enviously at your ship's assembly stand. Was it supplied by the kit manufacturer?
Regarding the shrouds: Did you serve the foreward pair of shrouds for each mast?
Trevor
Yes I think its Artesania's (though my Daughter bought it for me for Christmas fromModellers Central in Australia) It comes with a 'tool box' on which the stand sits atop when things are put away.
 
Hi Peter,

How do like your tray ? Is it sturdy enough and did it altered the hull paint by friction ?
The stand has felt on the surface to protect the model. This is supplied with the tool box/stand kit. I did not start using the stand (except when putting the. model away at night to clear my desk) until it came time to detailing the hull and rigging. It's sturdy enough to hold the hull at most angles while I'm working on the ship. Its fully adjustable in both length and width for many vessels and wildcatter for larger vessels.
 
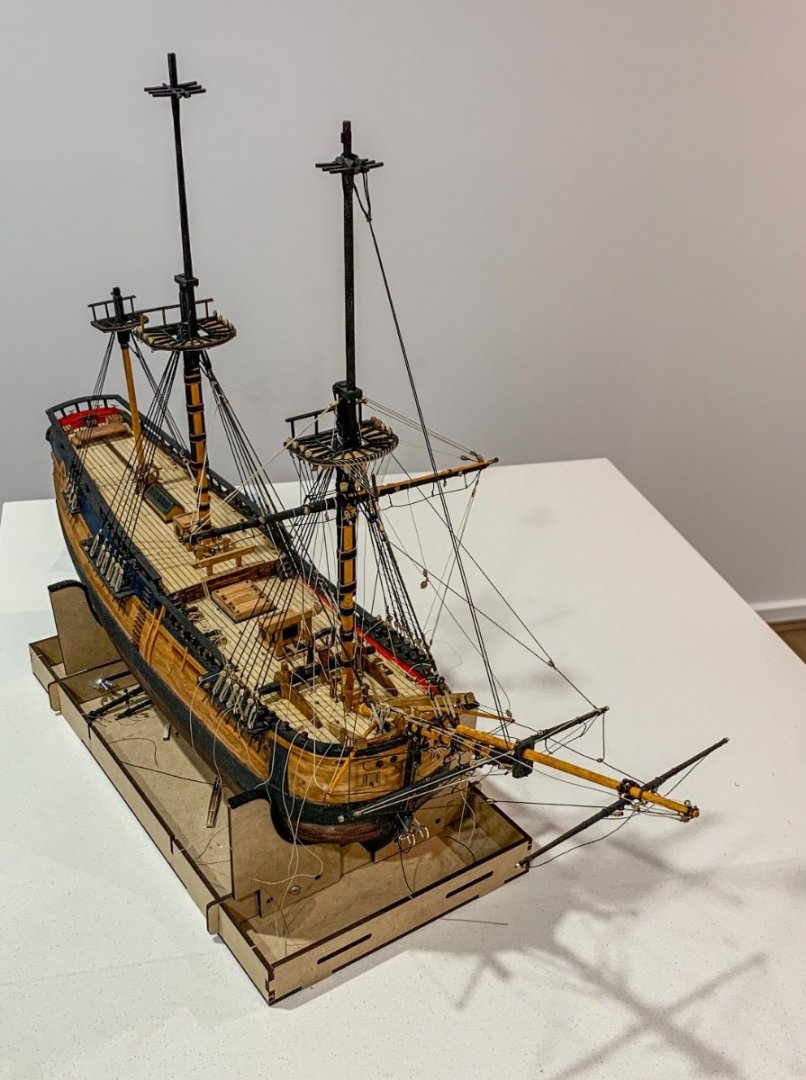
Rigging has slowly progressed. Still waiting for my next order of Ropes for Scale as I am short some standing rigging. I'm close to completing the fore course yard and will soon progress to the Topsail mast and yard. The Stays on the topsail mast are only temporarily in place (held down by a bulldog clip on the stem post) as I wait for standing rigging to make up the pendants and shrouds. I still have to make up a truss for the fore course yard but have yet to identify where it ties off too as its not represented in the kit, Marquardt's drawings or the replica ENDEAVOUR. According to Petersson's book on rigging it would venture to the base of the fore mast via a table hooked to a ring in the deck and tie off on the bitts aft of the mast. but there aren't enough belaying ins for this purpose.
IMG_0355.jpg
Good morning Peter. Great work. I have been considering "hoisting my yards" prior to doing my ratlines however I am concerned the yards will get in m way when doing the ratlines? Cheers Granr
 
Good morning Peter. Great work. I have been considering "hoisting my yards" prior to doing my ratlines however I am concerned the yards will get in m way when doing the ratlines? Cheers Granr
I prefer to leave the ratlines till nearly last as there is more room to ring behind them by passing between the shrouds. The yards are to the front of the shrouds so they aren't really in the way at all. Its worth fitting the ratlines in the Futtock shrouds before hoisting the yards though as it does get tight.
 
I prefer to leave the ratlines till nearly last as there is more room to ring behind them by passing between the shrouds. The yards are to the front of the shrouds so they aren't really in the way at all. Its worth fitting the ratlines in the Futtock shrouds before hoisting the yards though as it does get tight.
Good morning. Thanks Peter- yep it was the futtock ratlines which worries me. Great work BTW. Cheers Grant
 
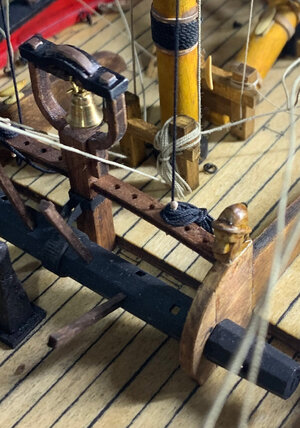
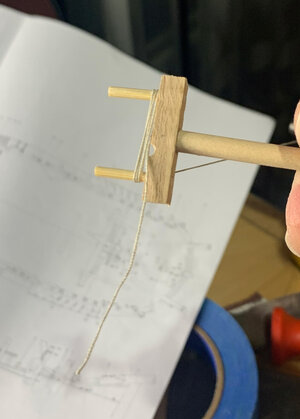
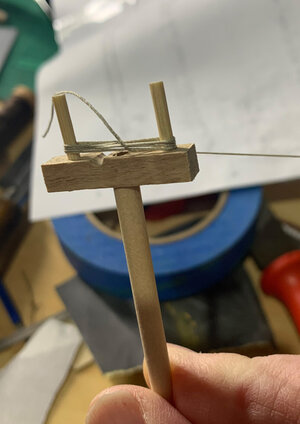
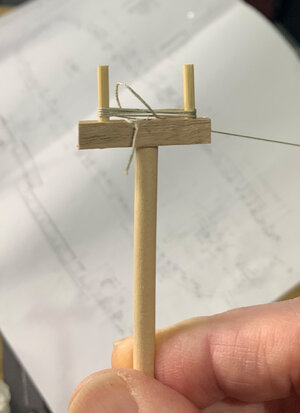
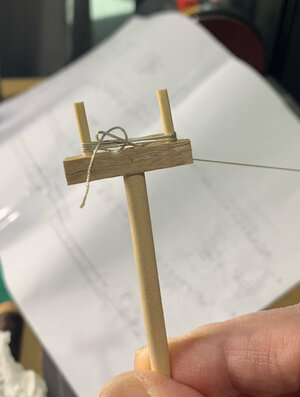
So I have to admit that I have been having real issues trying to tie off the rope ends when finishing lines on the bitts near the masts. As I aim to keep the rope ready to unrig should I choose to do so. There is just not enough room for my fingers.
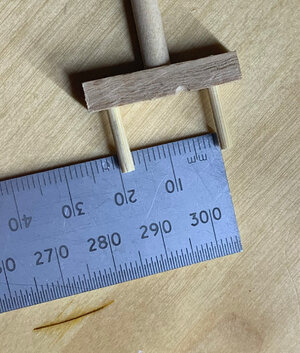
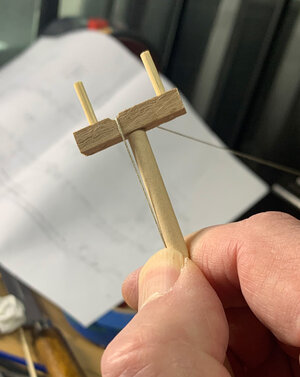
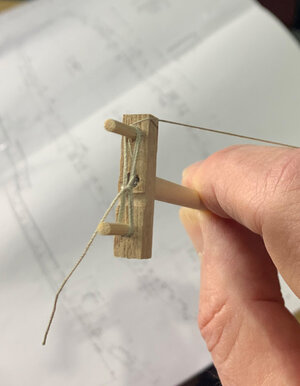
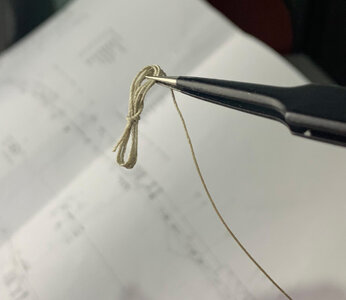
Well I thought about it an came up with a type of fork (refer diagrams). Taking the end of the rope between thumb and spindle, I rotate the device wrapping the rope around the two dowels until I get to the bitts. I then put the device down and then using long tweezers wrap the end around the rope loop and finish off. I then slip the loop off the device and then hang the rope over the bitts. Worked great first attempt (after doing some off model trials. You may not like how I finished the rope but that's up to your own preference as its independent of the device.
NOTE: I'm using bees waxed Artesania thread for the demo

IMG_0356.jpg

IMG_0358.jpg

IMG_0359.jpg

IMG_0360.jpg

IMG_0361.jpg

IMG_0362.jpg

IMG_0363.jpg

IMG_0364.jpg

IMG_0365.jpg
 
Last edited:
So I have to admit that I have been having real issues trying to tie off the rope ends when finishing lines on the bitts near the masts. As I aim to keep the rope ready to unrig should I choose to do so. There is just not enough room for my fingers.
Well I thought about it an came up with a type of fork (refer diagrams). Taking the end of the rope between thumb and spindle, I rotate the device wrapping the rope around the two dowels until I get to the bitts. I then put the device down and then using long tweezers wrap the end around the rope loop and finish off. I then slip the loop off the device and then hang the rope over the bitts. Worked great first attempt (after doing some off model trials. You may not like how I finished the rope but that's up to your own preference as its independent of the device.

View attachment 316415

View attachment 316416

View attachment 316417

View attachment 316418

View attachment 316419

View attachment 316420

View attachment 316421

View attachment 316422

View attachment 316423
Good morning Peter. I like! Good thinking “Batman “ ;). I have taken a similar approach to mine. It does leave a neat look on the ship- some say not realistic- too tidy- however I like it. Do you use any PVA water mix or do the ropes hold that shape. Cheers Grant
 
Good morning Peter. I like! Good thinking “Batman “ ;). I have taken a similar approach to mine. It does leave a neat look on the ship- some say not realistic- too tidy- however I like it. Do you use any PVA water mix or do the ropes hold that shape. Cheers Grant
No PVA or any other glue Grant. I want it so that I can lift off, unwind, retighten or alter the rigging should the need arise; just like on the real ship. I've doe this a couple of time now as these scale ropes do stretch/loosen a little after the initial tensioning.
 
No PVA or any other glue Grant. I want it so that I can lift off, unwind, retighten or alter the rigging should the need arise; just like on the real ship. I've doe this a couple of time now as these scale ropes do stretch/loosen a little after the initial tensioning.
Very Well done Peter. I couldn’t get mine to go anywhere near those without a little PVA and water. Did you use the rope from the kit? The Mantua ones are polyester and don’t hold shape at all. I am impressed.Thumbsup
 
Very Well done Peter. I couldn’t get mine to go anywhere near those without a little PVA and water. Did you use the rope from the kit? The Mantua ones are polyester and don’t hold shape at all. I am impressed.Thumbsup
Hell no. I gave up using kit thread after my first model from Modellers Central. While it was reasonable and much better than the hairy threads by other manufacturers, it just doesn't perform like rope should. So I made the decision to use scale rope for my future models staring with ENDEAVOUR. These scale ropes look, feel and perform like real rope should (including stretch). I use Ropes of Scale in Canada. Great range of sizes, colours, left and right twist as well as cable laid. Takes about 3-4 weeks in the post from Canada to Australia.
 
Last edited:
So I have to admit that I have been having real issues trying to tie off the rope ends when finishing lines on the bitts near the masts. As I aim to keep the rope ready to unrig should I choose to do so. There is just not enough room for my fingers.
Well I thought about it an came up with a type of fork (refer diagrams). Taking the end of the rope between thumb and spindle, I rotate the device wrapping the rope around the two dowels until I get to the bitts. I then put the device down and then using long tweezers wrap the end around the rope loop and finish off. I then slip the loop off the device and then hang the rope over the bitts. Worked great first attempt (after doing some off model trials. You may not like how I finished the rope but that's up to your own preference as its independent of the device.
NOTE: I'm using bees waxed Artesania thread for the demo

View attachment 316415

View attachment 316416

View attachment 316417

View attachment 316418

View attachment 316419

View attachment 316420

View attachment 316421

View attachment 316422

View attachment 316423
great idea, I love the progress on the ship Thumbsup Okay :D
 
AAAhhh.:eek: :mad::confused: Don't you just hate it when you're in the middle of rigging and find you forgot to drill holes in the bitts for belaying pins.......
Well at least tying off without glueing means I can undo the tied end, unwind, remove and then access the bitts to drill those damn holes..:oops:.:rolleyes::)
Or run out of the size of rope you need...
 
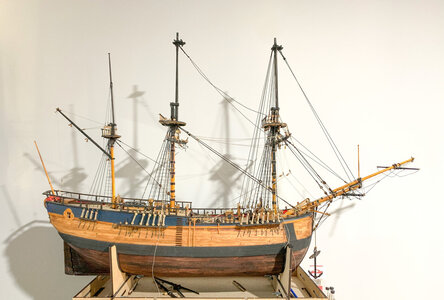
Well the postal service is not always what it should be and I await some key ropes for the continuation of the main mast. This meant moving onto the Mizzen instead (though I have managed to raise the main yard.
Felt like Edward Scissor hands; actually Edward Tweezer fingers while doing a swag of the ratlines. I have a feeling I should have done a 6mm rather than 8mm spacing on them but after doing one set of shrouds I had to keep it consistent.
I also added one cable with the anchor 'a cockbill'. Not sure if I will leave it like this or have it under the cathead being lifted.
Yes, the Mizzen topsail mast is leaning backwards but this will be corrected once I get the 0.4mm black rope for its fore stay.
The Ensign and Jack staff are back in situ as I await some cloth flags as I want them to both be hanging somewhat limply; something you cannot achieve with the nicely printed kit flags.

IMG_0366.jpg
 
Well the postal service is not always what it should be and I await some key ropes for the continuation of the main mast. This meant moving onto the Mizzen instead (though I have managed to raise the main yard.
Felt like Edward Scissor hands; actually Edward Tweezer fingers while doing a swag of the ratlines. I have a feeling I should have done a 6mm rather than 8mm spacing on them but after doing one set of shrouds I had to keep it consistent.
I also added one cable with the anchor 'a cockbill'. Not sure if I will leave it like this or have it under the cathead being lifted.
Yes, the Mizzen topsail mast is leaning backwards but this will be corrected once I get the 0.4mm black rope for its fore stay.
The Ensign and Jack staff are back in situ as I await some cloth flags as I want them to both be hanging somewhat limply; something you cannot achieve with the nicely printed kit flags.

View attachment 317809
Good morning Peter- cool picture. I love pictures of the whole ship and this one does justice to a beautiful Endeavor. Yep the thin top gallant mast is easily tensioned correct with forestay. Re your postal service- you should experience the SA postal service- @dockattner (Paul) kindly sent me some anchor rope some weeks back- I will only get these in 3 months time if lucky. :rolleyes: Cheers Grant
 
looking really good!

The post has been problematic and expensive lately. I'm hoping my last parcel gets to you fast.
 
looking really good!

The post has been problematic and expensive lately. I'm hoping my last parcel gets to you fast.
Not your fault Ben. I just had to relocate two parcels from my apartment block to two adjacent apartment blocks because the post man can't tell the difference between the numbers 2, 6 and 8... Unfortunately post COVID, service delivery companies have been really short staffed and Australia Post contracts out parcel delivery but those guys then sub contract to people who cannot read let alone speak English because they are cheap labour and desperate for work.
 
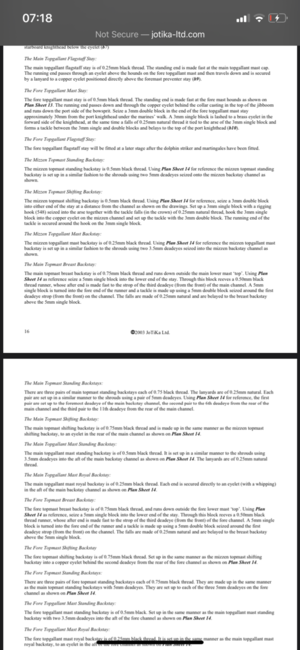
I understand that most model ship plans miss breast stays but as I am modelling them I need information about them but cannot find them in The Art of Rigging or rigging tabes I have access to.
Can anyone tell me the size of a breast stay vs the associated backstay (e.g. equal size, 75% or 50%) so that I can model them in the correct scale rope. Marquardt's drawings of ENDEAVOUR show them quite clearly so rigging them is not the problem but that doesn't help with sizing the rope.
Hello Peter. Yes the art of rigging is like working your way through a cypher. The only way I can help is by looking at the definition of the breast stay and seeing where on the mast it sits- I think 3 ft below the topmast cross trees. Then on the table it just refers to “back stay” However if you find which part of the mast (top mast) The breast stay connects to in the table this would be the breast stay. The table doesn’t specify each back stay- sort of by deduction. Confuses the hell out of me so this is just a suggestion.

On my Victory I went with Caldercraft (most accurate kit )sizing as below. Simplifies the matter but may help.
9C41E2A9-2BA2-48CB-BCE7-8D82B7A02834.png
Cheers Grant
 
Back
Top