• LUCZORAMA SHIPWRECK SCAVENGER HUNT GIVEAWAY. 4 Weeks of Fun • 1 Legendary Prize ((OcCre’s Fram Ship)) • Global Crew Welcome!
    **VIEW THREAD HERE**

HMS Alert [1777] 1:48 POF by serikoff. (Two hulls: skeleton and fully rigged)

Yes, you are right that there is no pure ultraviolet filter in Tung oil specifically (it often comes in teak), but there are additives that suspend the yellowing of the tree. The manufacturer himself writes this phrase everywhere (my jar also has this phrase) that this oil prevents the yellowing of the tree. Most likely this is not an ultraviolet filter, but something else that they add to the oil, since Belinka is not pure tung oil but oil based on tung oil, there are several components, but it is difficult to find what these components are. Probably marketing so as not to make fakes, but I can be wrong. But in any case, I myself checked, in comparison with linseed oil, the color remains the original as much as possible. But, for how long... I think at home most likely for a long time. And if you take the model outside, nothing will help there ROTF

There is an ultraviolet filter in the Danish oil based on tung. I got it mixed up with it. But there is something in the tung from Belinka, since it also does not turn yellow.

If you're interested, I wrote quite a lengthy post here about finishes and the mixture I use for turnings. It would not be suitable in your situation, because it must be wiped off to prevent a surface film, but it is one of the easiest and most versatile finishes I have used.
 
For the lazy - you can scroll to the end of the post, there will be conclusions and the final result.
And for the curious - pleasant reading!

This post is also for those who like to learn something useful and read the course and results of experiments with different oils and tree species, as well as different options for nailing.


Everything is clear with the first building... after being covered in oil, it rests and dries.

Now, you need to understand how to cover the second case... there is enough material, but you need to understand how to best combine colors and how different oils will affect this material.

To begin with, I have 3 types of dark pear, light pear (there are also many shades), and there are colored blanks... about them later.

At the beginning, I decided which pear to make the deck from. From the dark I understood that it was not an option, but I did it for the test and confirmed it. But here is a light pear with layers. And in the layers it varies and quite strongly, which is why tests are needed.

Alert 968.jpg

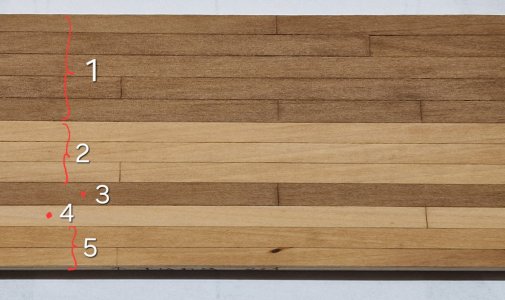
After coating with Tung oil, the wood appeared and this is what was discovered...

Alert 969.jpg

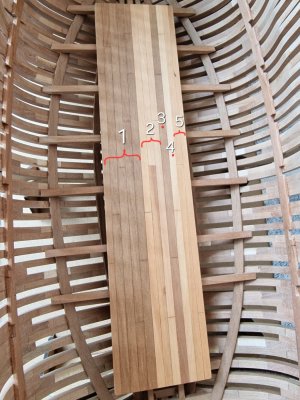
1 and 3. Dark pear - definitely not suitable for the deck in full. Although it has a homogeneous structure and without color differences, it can be used on the deck except for single power boards, which can go next to the grilles with two belts on the sides and two on the border with the sides... (I will try this again on the final probe).

2. Light pear (like 4 and 5 it is from the same blank, but as I said that the color is different, because there is an idea of how to deal with this, more on that later). This shade is not bad, but light, like 4, which is lighter still. And here...

5. This is just that pear, or rather the color that I really like (peach).

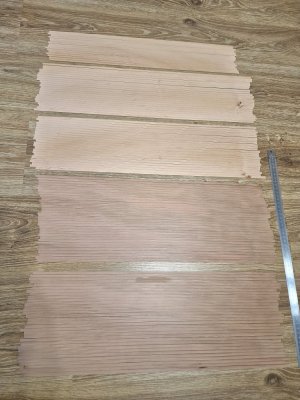
So that's how I will act. I will cut all the blanks that I have on the slats and will immediately sign them in the same order as I sawed them. Then I will lay them out not changing the top-bottom position or the outer-inner side, but just like sawing and fixing them on a flat surface, and then polishing them so that they are calibrated. Then I will cover them with oil, but only in a thin layer. (Wipe lightly with a napkin so that the oil does not get very saturated and immediately wipe it off). This will show the color of all the rails and I will be able to understand exactly what color suits me. I will remove the rails with a dark or light shade and leave only those that I will count so that there are no big jumps in color between them (checkerboard effect).

Alert 970.jpg

With the deck, I am not finished yet and will soon be making a new probe already close to the true result.

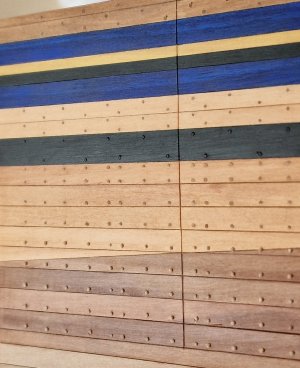
Next, I made a side sampler.

Alert 971.jpg

I finalized it a little in the process, but in general, all the breeds that I will use for the second case are here:

Alert 972.jpg

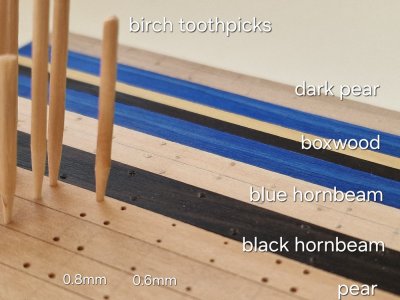
Basically, a light and dark side pear will be used. Black hornbeam for velvet and railings. And also boxwood for railings and blue hornbeam for the decorative rail that was on the original ship.
My favorite misty pink pear will also be used, but it will be for details on the deck and maybe in some places there will be toptimbesses from it and maybe the inner skin of the sides... it still needs to be tried... (but it is not shown in the photo).

To be honest, I really liked this blue hornbeam. Not quite in the photo, he is like that, although close to the original, but he is sooo beautiful alive. And most importantly, it was this color on the ship and I got this hornbeam by accident. The person who helped me with sawing a tree just gave me a couple of blanks of this blue hornbeam... and he was perfect for me... I am delighted that now no paints are needed (since both black and yellow (boxwood) and blue I have), hurray!

Alert 1777.jpg

Only instead of white, there will be a dark pear below the waterline. I'll tell you a little about this in detail...

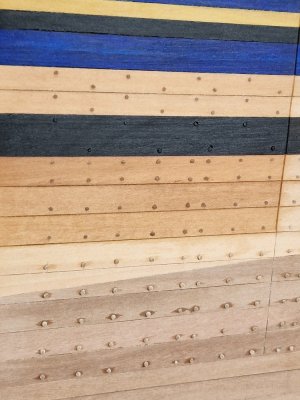
And so, after applying Tung oil to the probe - here is the result.

Alert 973.jpg

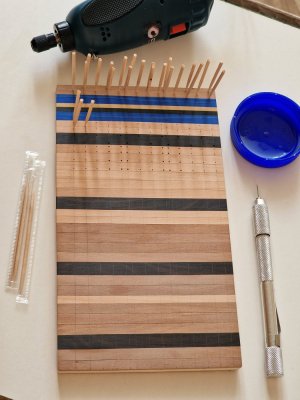
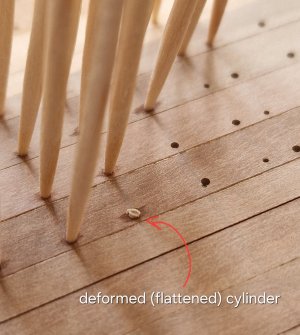
I made Nagel from birch toothpicks. NOT bamboo!!! The cut at the (end) of bamboo toothpicks consists of small cylinders (pores) and this is very rushed and does not look natural in combination with wood.

At first I glued toothpicks to PVA diluted in water (some modelers do it), but I didn't like the method, since pile on a tree rises from water in PVA and deforms the surface a little. (I will talk about this later). This is not critical if the surface, together with the pins, is then polished, but I will do this only on the deck, and there will be different equipment on the sides.

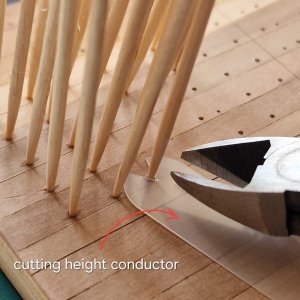
Therefore, I then glued the toothpicks on the CA very liquid. And with the help of a special conductor of height (a piece of plastic) that I put under the clippers, I bit off toothpicks with them.

Alert 974.jpg

Alert 975.jpg

Alert 977.jpg

The only thing you need to remember is to erase the line from the pencil after drilling and before acupuncture, otherwise it will be more difficult to erase later.

Alert 978.jpg

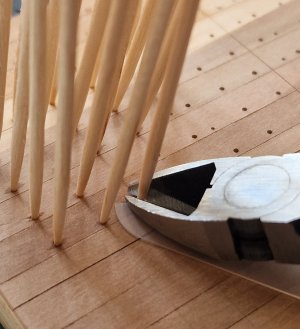
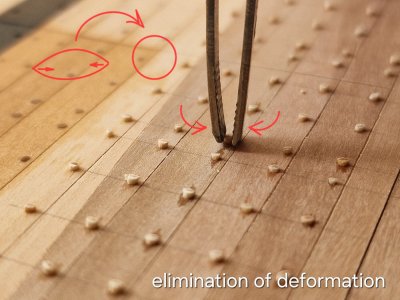
Since the clippers flatten the toothpick, you need to return the geometry to them with tweezers.

Alert 979.jpg

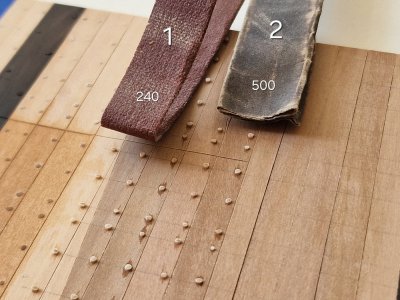
And then, with two issues of sandpaper, I shorten and circle the protruding ends.

Alert 980.jpg

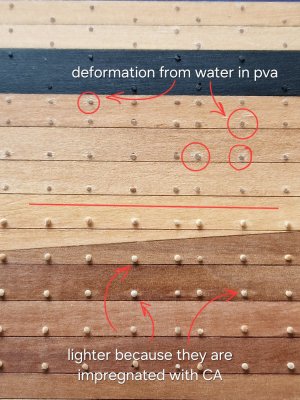
And here are two disadvantages from different types of glue. Deformations remain on the surface from PVA and pile rises (I'm not saying that the fixation is much worse than that of the CA and when biting off they can simply fall off or stratify)...

Alert 981.jpg

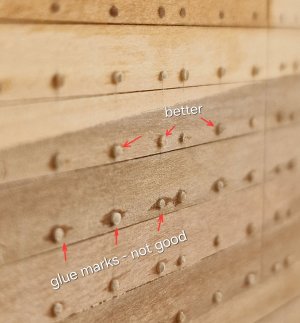
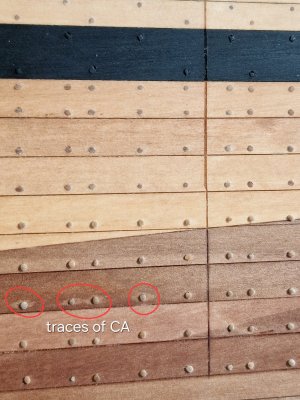
... and from the glue straightener there are leaks on the surface, as in the photo below. You can fight this by dipping the toothpick less into the glue and it will not take on much glue, which will not soak the surface later. And one more moment from SA (pictured above). This is that the glue seals the entire surface of the toothpick and after applying the oil, it does not cover it from the outside and does not completely penetrate into the cutoff, which is how the CA can be slightly impregnated into the end of the toothpick. Therefore, a very small amount is needed so that there are no leaks and the toothpick itself is not very saturated. And then the result is good, but you still need to try and practice.

Alert 982.jpg

Alert 983.jpg

Here, by the way (running ahead) traces of CA glue leaks after applying oil, and you need to be careful with this. I think these zones will be hidden under the bitumen (and yes, I will cover with bitumen and create an aging effect).

Alert 982ы.jpg

As you noticed, I did a little bit of redoing of the probe and added a diagonally dark pear...

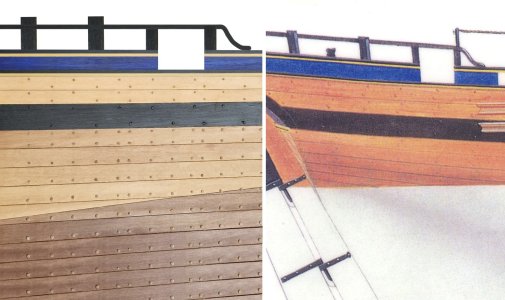
... all because I plan to make the body skin two-tone. Before the waterline - a light pear and below the waterline - a dark pear. And the transition will be the waterline itself - which will combine these two colors without painting... That is, I will need to connect 6-7 skin belts and make the slats prefabricated from two colors, or rather from 3 parts, since some belts begin above the waterline, then lower under it and the prom rises again. And yes, it is very difficult, but I really want to try it!

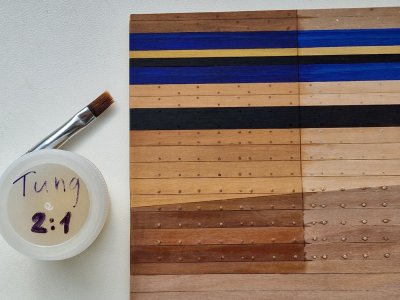
I covered the left side with Tung oil (Belinka) 2:1...

Alert 984.jpg

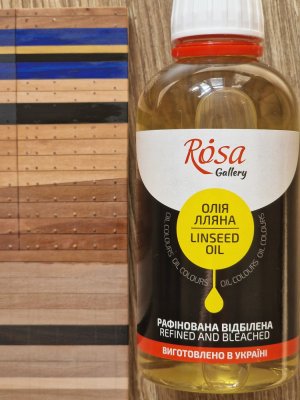
... and the right Linseed Oil. To test how it will change the colour of the tree over time, as Flaxseed Oil yellows light woods and darkens dark breeds.

Alert 985.jpg

So let's check what the difference will be. And how the time will come for applying oil - I will decide... the only catch... I wanted to cover with oil initially before choosing the color of the slats, so that when the oil shows wood - remove too different in color... So... here you need to think, but most likely I will cover Tungov, as I worry that Flax can distort the colors later, and I would not want this. But as an experiment, let the probe be covered with both oils.

And here, some macro textured nagels.

Alert 986.jpg

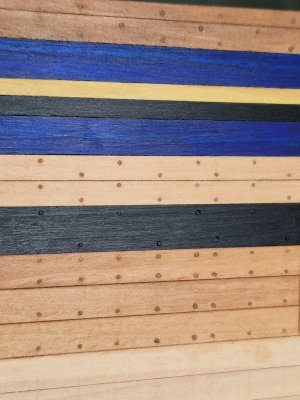
As you can see, thin pins (0.6 mm) will be on the rails above the borkhout and they will only slightly rise above the surface of the rails. Creating a small textured shape. But below the black velvet and the velvet itself, (black nagel on it) will appear stronger imitating the caps of bolts (0.8 mm). By the way, it was not just such hats.. on the final probe, I will do as needed and show the final result. In the meantime, this is how it looks like.

Alert 987.jpg

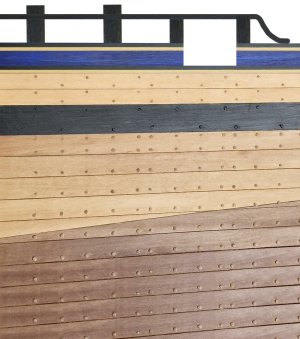
And if you photoshop a couple of elements a little (since they will be on the final version), you can see an almost finished result...


Oh yes, I promised brief conclusions for the lazy :p

1. I cover the tree with Tung oil Belinka 2:1 diluted with a solvent for artistic paints. One layer, but maybe 2 (if I want a semi-matte coating). And there will be bitumen varnish on top.
2. Nagel - birch. The glue on the CA is very liquid, but only at the tip, so as not to heavily impregnate the slats.
3. Of the wood species will be: 2 (3) types of dark pear, light pear, black and blue hornbeam, boxwood. I will not use paints.
4. I will redo the probes. The following will be as similar as possible to the final version, but for now - this is approximately what I plan according to the color scheme on the sides (the deck will be made of a light pear and maybe with several belts of a dark pear).

Alert 988.jpg

How do you like the result and color scheme?

Ship-1
 
would be my preferred choice. I am a big fan of your work, Sergey. :)
I am very glad to hear this)) I will tell you a secret, before and during the assembly of my case, I constantly revised your assembly branch of this model! And I really hope that you will return to her soon. I hope I throw motivations with my assembly so that you come back for yours)))
 
For the lazy - you can scroll to the end of the post, there will be conclusions and the final result.
And for the curious - pleasant reading!

This post is also for those who like to learn something useful and read the course and results of experiments with different oils and tree species, as well as different options for nailing.


Everything is clear with the first building... after being covered in oil, it rests and dries.

Now, you need to understand how to cover the second case... there is enough material, but you need to understand how to best combine colors and how different oils will affect this material.

To begin with, I have 3 types of dark pear, light pear (there are also many shades), and there are colored blanks... about them later.

At the beginning, I decided which pear to make the deck from. From the dark I understood that it was not an option, but I did it for the test and confirmed it. But here is a light pear with layers. And in the layers it varies and quite strongly, which is why tests are needed.

View attachment 528370

After coating with Tung oil, the wood appeared and this is what was discovered...

View attachment 528371

1 and 3. Dark pear - definitely not suitable for the deck in full. Although it has a homogeneous structure and without color differences, it can be used on the deck except for single power boards, which can go next to the grilles with two belts on the sides and two on the border with the sides... (I will try this again on the final probe).

2. Light pear (like 4 and 5 it is from the same blank, but as I said that the color is different, because there is an idea of how to deal with this, more on that later). This shade is not bad, but light, like 4, which is lighter still. And here...

5. This is just that pear, or rather the color that I really like (peach).

So that's how I will act. I will cut all the blanks that I have on the slats and will immediately sign them in the same order as I sawed them. Then I will lay them out not changing the top-bottom position or the outer-inner side, but just like sawing and fixing them on a flat surface, and then polishing them so that they are calibrated. Then I will cover them with oil, but only in a thin layer. (Wipe lightly with a napkin so that the oil does not get very saturated and immediately wipe it off). This will show the color of all the rails and I will be able to understand exactly what color suits me. I will remove the rails with a dark or light shade and leave only those that I will count so that there are no big jumps in color between them (checkerboard effect).

View attachment 528373

With the deck, I am not finished yet and will soon be making a new probe already close to the true result.

Next, I made a side sampler.

View attachment 528374

I finalized it a little in the process, but in general, all the breeds that I will use for the second case are here:

View attachment 528375

Basically, a light and dark side pear will be used. Black hornbeam for velvet and railings. And also boxwood for railings and blue hornbeam for the decorative rail that was on the original ship.
My favorite misty pink pear will also be used, but it will be for details on the deck and maybe in some places there will be toptimbesses from it and maybe the inner skin of the sides... it still needs to be tried... (but it is not shown in the photo).

To be honest, I really liked this blue hornbeam. Not quite in the photo, he is like that, although close to the original, but he is sooo beautiful alive. And most importantly, it was this color on the ship and I got this hornbeam by accident. The person who helped me with sawing a tree just gave me a couple of blanks of this blue hornbeam... and he was perfect for me... I am delighted that now no paints are needed (since both black and yellow (boxwood) and blue I have), hurray!

View attachment 528382

Only instead of white, there will be a dark pear below the waterline. I'll tell you a little about this in detail...

And so, after applying Tung oil to the probe - here is the result.

View attachment 528395

I made Nagel from birch toothpicks. NOT bamboo!!! The cut at the (end) of bamboo toothpicks consists of small cylinders (pores) and this is very rushed and does not look natural in combination with wood.

At first I glued toothpicks to PVA diluted in water (some modelers do it), but I didn't like the method, since pile on a tree rises from water in PVA and deforms the surface a little. (I will talk about this later). This is not critical if the surface, together with the pins, is then polished, but I will do this only on the deck, and there will be different equipment on the sides.

Therefore, I then glued the toothpicks on the CA very liquid. And with the help of a special conductor of height (a piece of plastic) that I put under the clippers, I bit off toothpicks with them.

View attachment 528396

View attachment 528397

View attachment 528398

The only thing you need to remember is to erase the line from the pencil after drilling and before acupuncture, otherwise it will be more difficult to erase later.

View attachment 528399

Since the clippers flatten the toothpick, you need to return the geometry to them with tweezers.

View attachment 528400

And then, with two issues of sandpaper, I shorten and circle the protruding ends.

View attachment 528401

And here are two disadvantages from different types of glue. Deformations remain on the surface from PVA and pile rises (I'm not saying that the fixation is much worse than that of the CA and when biting off they can simply fall off or stratify)...

View attachment 528402

... and from the glue straightener there are leaks on the surface, as in the photo below. You can fight this by dipping the toothpick less into the glue and it will not take on much glue, which will not soak the surface later. And one more moment from SA (pictured above). This is that the glue seals the entire surface of the toothpick and after applying the oil, it does not cover it from the outside and does not completely penetrate into the cutoff, which is how the CA can be slightly impregnated into the end of the toothpick. Therefore, a very small amount is needed so that there are no leaks and the toothpick itself is not very saturated. And then the result is good, but you still need to try and practice.

View attachment 528403

View attachment 528405

Here, by the way (running ahead) traces of CA glue leaks after applying oil, and you need to be careful with this. I think these zones will be hidden under the bitumen (and yes, I will cover with bitumen and create an aging effect).

View attachment 528406

As you noticed, I did a little bit of redoing of the probe and added a diagonally dark pear...

... all because I plan to make the body skin two-tone. Before the waterline - a light pear and below the waterline - a dark pear. And the transition will be the waterline itself - which will combine these two colors without painting... That is, I will need to connect 6-7 skin belts and make the slats prefabricated from two colors, or rather from 3 parts, since some belts begin above the waterline, then lower under it and the prom rises again. And yes, it is very difficult, but I really want to try it!

I covered the left side with Tung oil (Belinka) 2:1...

View attachment 528407

... and the right Linseed Oil. To test how it will change the colour of the tree over time, as Flaxseed Oil yellows light woods and darkens dark breeds.

View attachment 528408

So let's check what the difference will be. And how the time will come for applying oil - I will decide... the only catch... I wanted to cover with oil initially before choosing the color of the slats, so that when the oil shows wood - remove too different in color... So... here you need to think, but most likely I will cover Tungov, as I worry that Flax can distort the colors later, and I would not want this. But as an experiment, let the probe be covered with both oils.

And here, some macro textured nagels.

View attachment 528409

As you can see, thin pins (0.6 mm) will be on the rails above the borkhout and they will only slightly rise above the surface of the rails. Creating a small textured shape. But below the black velvet and the velvet itself, (black nagel on it) will appear stronger imitating the caps of bolts (0.8 mm). By the way, it was not just such hats.. on the final probe, I will do as needed and show the final result. In the meantime, this is how it looks like.

View attachment 528410

And if you photoshop a couple of elements a little (since they will be on the final version), you can see an almost finished result...


Oh yes, I promised brief conclusions for the lazy :p

1. I cover the tree with Tung oil Belinka 2:1 diluted with a solvent for artistic paints. One layer, but maybe 2 (if I want a semi-matte coating). And there will be bitumen varnish on top.
2. Nagel - birch. The glue on the CA is very liquid, but only at the tip, so as not to heavily impregnate the slats.
3. Of the wood species will be: 2 (3) types of dark pear, light pear, black and blue hornbeam, boxwood. I will not use paints.
4. I will redo the probes. The following will be as similar as possible to the final version, but for now - this is approximately what I plan according to the color scheme on the sides (the deck will be made of a light pear and maybe with several belts of a dark pear).

View attachment 528411

How do you like the result and color scheme?

Ship-1
Hi Sergey,

For some reason I thought this ship had metal bolts on the hull planking? But maybe I made that up in my head. I do that sometimes ROTF.
 
Hi Sergey,

For some reason I thought this ship had metal bolts on the hull planking? But maybe I made that up in my head. I do that sometimes ROTF.
You think everything is right, but I just don't like this solution. The metal bolts really hurt my eyes))) I like the solution with the protruding dowels more. I will experiment with them some more, but it will be something like this. And how do you like the color scheme?
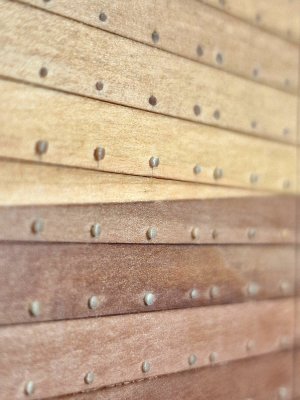
There was also copper... but one ship with copper was enough for me ROTF ROTF ROTF
 
I learned that lesson BEFORE I even tried a copper hull ROTF.

The color scheme looks great to my eye.
Hello , we had already exchanged some opinions about the model, you have a strong manual dexterity é steps of excellent workmanship but, let me tell you, the utmost respect for everything you are doing to YOUR liking é compromises I appreciate you.Why don't you adopt in parallel the veracity of the real construction, so that someone who has no knowledge will make learning of it.Frank
 
Hello , we had already exchanged some opinions about the model, you have a strong manual dexterity é steps of excellent workmanship but, let me tell you, the utmost respect for everything you are doing to YOUR liking é compromises I appreciate you.Why don't you adopt in parallel the veracity of the real construction, so that someone who has no knowledge will make learning of it.Frank
Hello. What exactly do you mean? Well, I'll answer the question. We make a model as a hobby and enjoy it. If I don't really like something in this or that implementation of some unit, I don't do it that way. But I do it so that for me it is visually beautiful, while not differing much from reality. Otherwise, we would all have to paint ships with paints and make them the same as in miniatures. But our hobby is also creativity, so I do it the way I would like to see it in my shop window. But I'm interested in what you mean by the words - truthfulness of the real design?
 
Last edited:
Hello. What exactly do you mean? Well, I'll answer the question. We make a model as a hobby and enjoy it. If I don't really like something in this or that implementation of some unit, I don't do it that way. But I do it so that for me it is visually beautiful, while not differing much from reality. Otherwise, we would all have to paint ships with paints and make them the same as in miniatures. But our hobby is also creativity, so I do it the way I would like to see it in my shop window. But I'm interested in what you mean by the words - truthfulness of the real design?
Thank you for responding, my ossevation is not about YOUR model and I understand that you are building it the way YOU like it but to give news about YOUR modifications in such a way to help those who have no knowledge. That is all.Frank
 
At the beginning, I decided which pear to make the deck from. From the dark I understood that it was not an option, but I did it for the test and confirmed it. But here is a light pear with layers. And in the layers it varies and quite strongly, which is why tests are needed.
As you say, go with what you like but if any member wants to make things even more complex, the deck planks usually were oak for the outboard most 4 or 5 strakes, and Deal for the rest. Sometimes the binding strakes were oak. I do not recall seeing this detail on any model, but someone might want to go with two species such as box or castello for the outer and holly or pine for the inner strakes to show the contrast

Allan
 
Thank you for responding, my ossevation is not about YOUR model and I understand that you are building it the way YOU like it but to give news about YOUR modifications in such a way to help those who have no knowledge. That is all.Frank
I got it. You mean that I could talk in parallel about other methods that are closer to the original than those that I do for acquaintance with those who are interested. Well, alternatively, you can. But I don't know if I can take everything into account, it takes a lot of time. I already attach a lot of attention to the ship... or rather three ships ROTF

As you say, go with what you like but if any member wants to make things even more complex, the deck planks usually were oak for the outboard most 4 or 5 strakes, and Deal for the rest. Sometimes the binding strakes were oak. I do not recall seeing this detail on any model, but someone might want to go with two species such as box or castello for the outer and holly or pine for the inner strakes to show the contrast

Allan
I think I'm going to experiment over the deck. And depending on the probes and their results, I will decide. But preliminary - I think to make two-color. Just one color, at least it will be boring:D;)
 
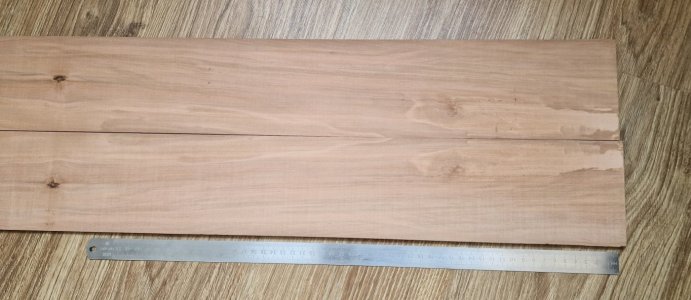
Sawed boards.

Today was a noisy day... may my neighbors forgive me ROTF ROTF

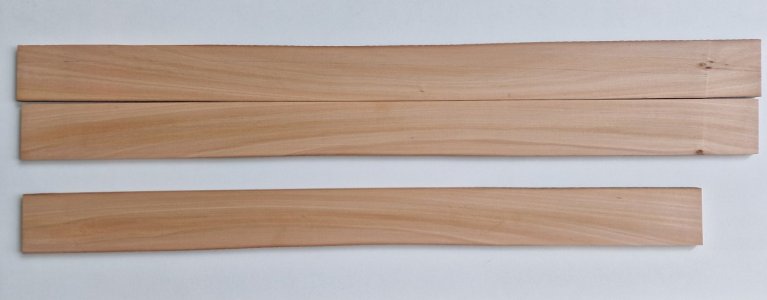
Sawed several hours of slats on the main part of the side plating.

Light pear. (Striped enough, therefore, you will need to choose so that there are no very large jumps in color).

Alert 989.jpg

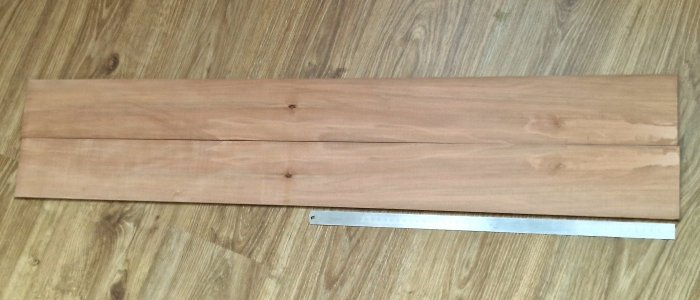
And a dark pear.

Alert 991.jpg

To understand, these are more than meter blanks. Near the ruler for half a meter. And I took this fragment.

Alert 992.jpg

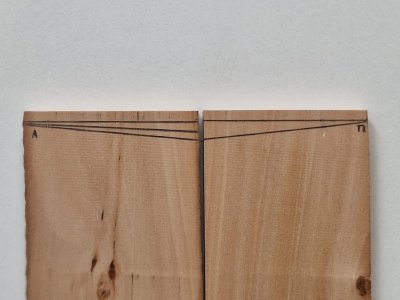
In order not to confuse either side or plane, I drew such a beacon...

Alert 990.jpg

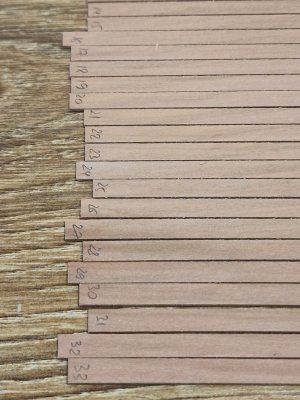
So that later he can be seen on the ends of the rails. And then he laid them out in order, and signed at the end.

Alert 993.jpg

This is necessary in order to then select the rails as much as possible in color, so that there is no checkerboard effect with very noticeable color differences.

And so much happened:

Alert 994.jpg

If it were not necessary to select by color, then here the slats would be enough for 4 hulls))) But I hope after the selection of the slats it will be enough to perfectly fit all the uniform color.

I remind you that I will use a light pear (in addition to the deck) on the sides above the waterline, and a dark pear below the waterline.

Alert 995.jpg

Now you need to choose everything by uniform color.. and here the question is to first show the tree with oil, or still do all this dry... it is necessary to check, after coating with oil, the tree will react to polishing and glue when fixed.
 
For the deck planking I would love to see two colors if you decide to do this. From a contract for an English 6th rate 1776.
The waterways to be 4 in thick in the chine, & the planks of the deck 3 in thick the foremost lengths, and as far out as the standards to be English oak plank. To then have 2 strakes of oak plank, and the 2 & 3 next the comings on each side scored down 3⁄4 in on the beams & ledges, the rest of the deck laid with 3 in Prussia deal, and well fastened to the transom, breasthooks, beams, & ledges.
In the anatomy drawings there are no load boards on the deck...

Screenshot_20250627_213122_Gallery.jpg

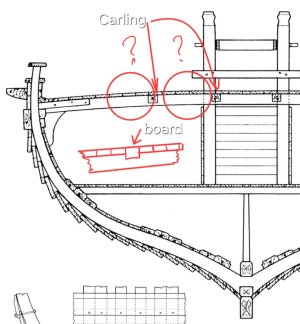
... but if there were, it would be logical that they would be where the boards would be subject to a lot of stress. In my case, it's the winch and anchor mechanism. So, I think I'll make the boards marked in purple darker than the others.

Screenshot_20250627_213144_Gallery.jpg

But still, the fact that these boards were the same thickness is certain, since there are carlings under them, which excludes their thickening. Therefore, the color will be dark only because of the different wood. The purple ones (dark) will imitate the color of oak, and the rest are lighter - imitate the color of light pine.
 
Last edited:
Back
Top