
Sorry was supposed to represent exploding head over having to do that! No offence meant.

-

SUBSCRIBE TO SHIPS IN SCALE TODAY!
The beloved Ships in Scale Magazine is back and charting a new course for 2026!
Discover new skills, new techniques, and new inspirations in every issue.
NOTE THAT OUR NEXT ISSUE WILL BE July/August 2026 -

Win a Free Custom Engraved Brass Coin!!!
As a way to introduce our brass coins to the community, we will raffle off a free coin during the month of August. Follow link ABOVE for instructions for entering.
- Home
- Forums
- Ships of Scale Group Builds and Projects
- HMS Alert 1777 1:48 PoF Group Build
- HMS Alert 1777 1:48 Group Build Logs
You are using an out of date browser. It may not display this or other websites correctly.
You should upgrade or use an alternative browser.
You should upgrade or use an alternative browser.
- Joined
- Sep 9, 2017
- Messages
- 135
- Points
- 133

A bit of an update.. as per attached pics. I have dry fitted parts of the upper deck and found them to be fitting in quite well with a minimum of sanding. Very pleasing. Be very careful as to the orientation of the beams i.e. their fore or aft facing. My rataionale in this dry fit was to establish that all was "ship shape" . I was particularly keen to assess the fit of the carlings, ledges and knees . I am still able to insert interior details at this stage and Paulv's vids. have given me some hope.
Really sorry re of the "melt down" of the P.E. Paul. A real shame.Take heart, there is more than one way to skin a cat.
Cheers, Danielw![20201105_064632[1].jpg](https://shipsofscale.com/sosforums/data/attachments/174/174115-6c647ac411745646a87b35826c8183fb.jpg?hash=bGR6xBF0Vk "20201105_064632[1].jpg")
![20201105_064623[1].jpg](https://shipsofscale.com/sosforums/data/attachments/174/174116-dc039fc4a2253c5f418106a1b8d38195.jpg?hash=3AOfxKIlPF "20201105_064623[1].jpg")
Really sorry re of the "melt down" of the P.E. Paul. A real shame.Take heart, there is more than one way to skin a cat.
Cheers, Danielw

It is looking very good - and well prepared by Trident 
Shit happens.
BTW the fit of the upper braces / crossbeams look great. Just did mine as a test fit and amazed at how very little sanding is needed if any on some. The upper breast hook needed adjusting as this is dependant on individual bow shaping. Just started the Cabinsaand there are issues with some of the door sizes( to small so have to think about what I'm going to do.) As there is no floor in the cabin kit, it does not distract from the open build. What they gave and what Wang did is not to the same level.Its more of an AOTS image interpretation. Unfortunately some of my pieces are badly lasered / marked so I'm having to do the best I can. If you leave it out it will not be missed.
BTW the fit of the upper braces / crossbeams look great. Just did mine as a test fit and amazed at how very little sanding is needed if any on some. The upper breast hook needed adjusting as this is dependant on individual bow shaping. Just started the Cabinsaand there are issues with some of the door sizes( to small so have to think about what I'm going to do.) As there is no floor in the cabin kit, it does not distract from the open build. What they gave and what Wang did is not to the same level.Its more of an AOTS image interpretation. Unfortunately some of my pieces are badly lasered / marked so I'm having to do the best I can. If you leave it out it will not be missed.
- Joined
- Sep 9, 2017
- Messages
- 135
- Points
- 133
Agreed that the fit of the main beams is quite good.I reckon I might leave the interior cabins etc.out.except maybe the stove given that the chimney is quite prominent on the deck. The breast hook on my Alert also could do with a bit of attention. I might remake it and see if I can get a more convincing fit.No photos yet as I am at work.
Illustrated update will follow in due course.
Illustrated update will follow in due course.
- Joined
- Sep 9, 2017
- Messages
- 135
- Points
- 133
A bit of an update. .I have started installing the carlings on a temp. basis. They require patience and concentration to get the slots for the ledges to line up. I confess to having to de-glue the first couple owing to a lapse in concentration. It all worked out though. The carlings are only dry fitted at present. A tiny error in a piece near the bow can result in a huge misalignment at the stern. Be warned there is a certain amount of finessing involved in this step.
On another note... Maarten's photos always show an impressively clean and dust free work area!! Whilst mine looks like an explosion at a sawmill!! Perhaps he has two benches, one for working at and another for the photographs.? Or maybe he has a good contract cleaner come in ?Whatever it is Maarten love ya work.
![20201114_134919[1].jpg](https://shipsofscale.com/sosforums/data/attachments/177/177008-d810377e68e5db4fc85039c3c9802c26.jpg?hash=2BA3fmjl20 "20201114_134919[1].jpg")
![20201114_134855[1].jpg](https://shipsofscale.com/sosforums/data/attachments/177/177009-028f452e3907ecf0e8fb27ce010b8f23.jpg?hash=Ao9FLjkH7P "20201114_134855[1].jpg")
On another note... Maarten's photos always show an impressively clean and dust free work area!! Whilst mine looks like an explosion at a sawmill!! Perhaps he has two benches, one for working at and another for the photographs.? Or maybe he has a good contract cleaner come in ?Whatever it is Maarten love ya work.
Great progress, Dan, and you are 100% correct, you need a lot of patience and concentration. I have not seen internal structures like a pump well. Do you opt-out for all the internal structures?
- Joined
- Sep 9, 2017
- Messages
- 135
- Points
- 133
While the glue is drying.....Has anybody given any thought as to the best method of removing the unwanted parts of the ribs?That is the part of the rib that extends above the sheerline/rails that is required to be removed.
I think it could get ugly.....I look forward to suggestions . The reason I ask is that know the carlings are complted I am thinking of removing the hull and trimming the ribs to enable an easier way to install the ledges .It's along way down to the bilge to retrieve a dropped piece of timber with tweezers. Cheers, Danielw
I think it could get ugly.....I look forward to suggestions . The reason I ask is that know the carlings are complted I am thinking of removing the hull and trimming the ribs to enable an easier way to install the ledges .It's along way down to the bilge to retrieve a dropped piece of timber with tweezers. Cheers, Danielw
That's alright, they will keep that rubber band company. , but if you have not glued in the cross beams yet, I'd remove them and do a complete assembly of all parts from the bow to stern working a beam section at a time. Then if they fall its easy. I'm not looking fwd to it with the cabin walls in place.! BTW I've orderd the 1:200 Le Bell stern & Mid section Rib kits on 11/11 Ali Baba day China. $100 for both delivered!. Now that will be a challenge to my eyes!
- Joined
- Sep 9, 2017
- Messages
- 135
- Points
- 133
Re the 1/200...We never learn do we? La Belle should be great... I did the Druid stern and centre sections in 1/128 and enjoyed them thoroughly!!
That's a cheap shot re the rubber band ! I can't wait to clean up and sand those rather manky looking beams.
Cheers.
That's a cheap shot re the rubber band
! I can't wait to clean up and sand those rather manky looking beams.Cheers.
With a shot of whisky and one of theseWhile the glue is drying.....Has anybody given any thought as to the best method of removing the unwanted parts of the ribs?That is the part of the rib that extends above the sheerline/rails that is required to be removed.
I think it could get ugly.....I look forward to suggestions . The reason I ask is that know the carlings are complted I am thinking of removing the hull and trimming the ribs to enable an easier way to install the ledges .It's along way down to the bilge to retrieve a dropped piece of timber with tweezers. Cheers, Danielw
") They fit on a Dremel type tool.
They fit on a Dremel type tool.
I tried it with removing the 2 x 2 mm planks from its sheet and the results were encouraging (I still have all my fingers and there was no blood!)
- Joined
- Sep 9, 2017
- Messages
- 135
- Points
- 133
Yes, Jolley Roger, That's exactly the procedure I adopted.. It went well with no real drama. I used the Dremel wood cutting disc ;a gold looking piece of kit .Mind you ,there were a few" sphincter clenching" moments but gently does it.
I left myself a reasonable of space between the template marks and where I actually cut. I just wasn't quite sure how the ribs would react to the cutting process. Now of course I have a fair bit of cleaning up to do to get the ribs as per the template. It will be in my opinion, easier to get an accurate profile when dealing with one rib at a time.
For those unfamiliar with the cutting process as per JolleyRoger or myself ,may I suggest that you leave an amount of slack... Seeing that disc cut into your carefully placed and secured ribs can be a bit "off-putting".
Now where is that whiskey? I left it here somewhere.
Cheers, DanielW
- Joined
- Sep 9, 2017
- Messages
- 135
- Points
- 133
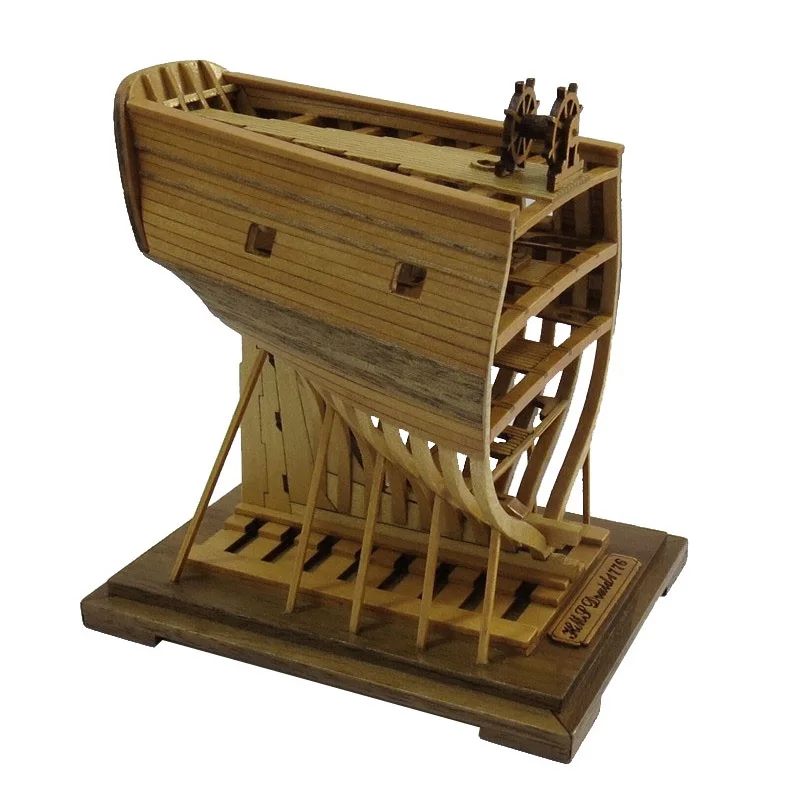
I have attached some photos of the aforementioned process.. So yes "Alert" has been set free from the constraints of the jig and is gently rocking with the tide at the fitting out dock. Mind you, the dockyard mateys have their work cut out for them ,what with the ledges each requiring an individual measure and cut.
I have left the stern portion of the jig attached as the fragility of those particular timbers will require some very delicate and properly thought out methods to safely release them.
As Paulv said in his log, one sometimes needs to slip into "scratch building" mode to get any sense from the manual.
I found that by referring to the plan sheet but not slavishly and literally following the written instructions progress can be made without the nagging thought "oh, have I stuffed that up?![20201117_064712[1].jpg](https://shipsofscale.com/sosforums/data/attachments/177/177586-a542629e284c05e0d6fdf377250b8b98.jpg?hash=pUJinihMBe "20201117_064712[1].jpg")
![20201117_064624[1].jpg](https://shipsofscale.com/sosforums/data/attachments/177/177590-951e857f3de4155dd973fd9936794871.jpg?hash=lR6Ffz3kFV "20201117_064624[1].jpg")
![20201117_064629[1].jpg](https://shipsofscale.com/sosforums/data/attachments/177/177589-dd54910c3caaa45fab5debe8063b0dc0.jpg?hash=3VSRDDyqpF "20201117_064629[1].jpg")
![20201117_064643[1].jpg](https://shipsofscale.com/sosforums/data/attachments/177/177588-dccb967b4a94cd18abf7ec63ecdf7095.jpg?hash=3MuWe0qUzR "20201117_064643[1].jpg") ".
".
I have left the stern portion of the jig attached as the fragility of those particular timbers will require some very delicate and properly thought out methods to safely release them.
As Paulv said in his log, one sometimes needs to slip into "scratch building" mode to get any sense from the manual.
I found that by referring to the plan sheet but not slavishly and literally following the written instructions progress can be made without the nagging thought "oh, have I stuffed that up?
".Yay!! First Alert freed up from the berth! Congrats Dan! Please show the photos, I cannot wait to see mine without the jig...LOL.

Hi Paul, do you have a link to these kits?BTW I've orderd the 1:200 Le Bell stern & Mid section Rib kits on 11/11 Ali Baba day China. $100 for both delivered!. Now that will be a challenge to my eyes!
I did a search but could not find them.
sorry but they are the Druid not La Belle.
They have gone back up in price a little.
 www.aliexpress.com
The also are doing paypal again Yeah!
www.aliexpress.com
The also are doing paypal again Yeah!
They have gone back up in price a little.
36.9US $ 18% OFF|New Scale 1/128 Uk Royal Navy Druid Section Ship Model Kits Series 1 : Stern Section Model Luxury Tail Ship Wood Model - Model Building Kits - AliExpress
Smarter Shopping, Better Living! Aliexpress.com
Thanks, I have both the Druid miniatures already.
Is it worth doing a build log?
Getting my first phone on the weekend (won't need to use my wife's phone anymore) so I may start posting photos, more often.
Is it worth doing a build log?
Getting my first phone on the weekend (won't need to use my wife's phone anymore) so I may start posting photos, more often.
Absolutely!!!! Please do! We will be waiting with huge interest.Is it worth doing a build log?
")