HMS Druid P.O.F. - Unicorn Models by Donnie [COMPLETED BUILD]

@Gennaro
my apologies for not being precise. What I mean is this: I wish that the planking strips bundle supplied with the kit would have been 700mm long. This way, I have the possibility to cut each plank to about 110mm in length and to make sure that I do not have some ODD length leftover (like 25mm or 50mm). If I had the entire length of 700mm to do as I please.
I am cutting each plank to about 110mm which is about the right length in real life. This length ALSO lines up with the center of the frame(s). The planking strips supplied with the kit are only 500mm long. If the kit had provided MORE 500mm length strips, then that is not a problem as I have the extra to cut each one just like I wish for it to be.
Thanks Donnie. Now I see what you mean. Keep up the great work!
 
I'm trying to follow by notifications, but something is wrong, has a post been removed,

best regards John,
This is the post that I am talking about, I was just wondering if it had been deleted, or am I missing something, it would be nice to know,

thank you in anticipation,

best regards john.


HMS Druid P.O.F. - Unicorn Models by Donnie


I guess my mind is half gone, as it just occurred to me what to do. That is if it will work. What I need to do is to divide the 500mm strip into sections that will so happen to line up with the frame / butt joints OR to get it as close as possible.
I was doing just the opposite. I was trying to cut the strips TO SCALE, meaning that I was cutting my strips to about 110mm as this particular length guaranteed that my strips would FALL on a Frame for a Butt Joint. What I have to do is the opposite. I have to DIVIDE the given 500mm into equal pieces and play around with the division so that the plank lengths ALSO so happen to fall on the Frame Joint. (if that makes any sense)
This is the first layer of WALES, so I am not worried about the appearance of joints as this will be covered up with another layer.

So each frame is 6mm wide with a 6mm gap ---- so on with the Math to figure this out !! I shall return hopefully with a plank length that will work. If not, then I will not worry about it. The only other solution would be to purchase my own planking strips -

 
John,
I am not sure. It has been almost a month since the last time I posted and is hard for me to back track to see what all has happened. It is possible that I might have deleted one of my posts to clean things up. I do not remember - my apologies.

I have to continue with my progress as it has been a long time since I worked on the ship.

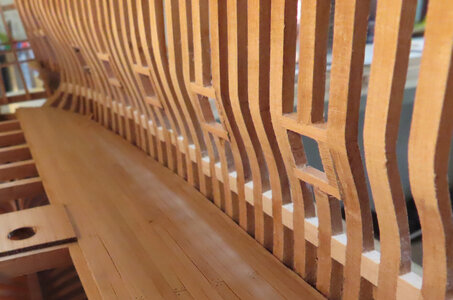
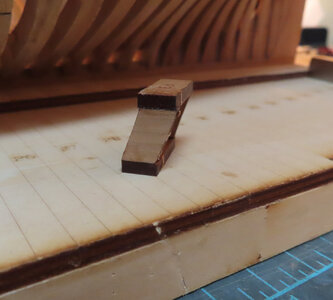
These are the images of the gun ports. They come in 4 pieces and you MUST pay attention to the orientation of the curvature of the sides of the ports as the SIDES of the ports will follow the same curvature of the frame. The ports are NOT square but have a SMALL amount of curvature to them.

gp-01.jpggp-02.jpg
 
REVIEW TIME:
Now that I am 6 months into this build, I want to give a short review. Even though this kit is a Plank on Frame (POF) or Plank on Ribs which ever you say it, I want to be clear here. This is NOT an admiralty-style kit. Even though yes there are RIBS and BEAMS, this kit in my opinion does not qualify as an Admiralty style even though from the box art, it does look like such.
I have a few things that disappoint me about this kit. You MUST be careful as some of the parts are STAMPED WRONG and some of the frames are stamped wrong and it easy to get the frames out of order. The plans are only basic and just give you an idea of how things might go together. Next, basically I have given up on the pictorial instructions booklet. I do not see how anyone can build this kit step by step in the progression that they show. The steps are NOT logical in sequence in my opinion.
So, please be aware of these things. I realize that NO kit is perfect, but somehow in the china to English METHODS, there is a lot to be desired.

Just because it is a kit, that DOES NOT mean that EVERY PART has to be laser cut !!!
 
Interesting observations Donnie! Unicorn

First let me say that Unicorn is one of the big players in China. They have their own dedicated WeChat page with more than 120 000 followers!!!

Incidentally, I am also busy with a little project that uses a Unicorn kit as base. You are absolutely right about the instructions and the pictorial layout. After numerous attempts I have given up trying to build this model as advised by them. I get the impression that they build "a" model (following whichever method they see fit to use) and then create some sort of instructions afterwards. To try and recreate their advertised model, based on their instructions, is well-nigh impossible.

However - with all of that being said - with the basic hull structure completed (with blood, sweat and choice words) the model I am building is "finishing-off" beautifully. In addition to that, their choice is of Pear Wood is something else! It is simply the most beautifully-colored Pear (or Elsbeere) that I have ever seen (especially when married to high-quality Tung Oil). Also, from a historically accurate point of view, I have found their models to be very very accurate. And as far as the instructions go - well maybe the huge interaction between builders on their own build pages negate the deficiencies associated with that to a large extent.

So my advice to you is to hang in there. You are doing a great job and you will end up with a beautiful model!
 
Thanks again for all the likes. It is greatly appreciated. Onward with almost closing in Deck #2. The central region will not have planks. I probably should not have spent so much time on the false treenailing as most of that will be covered up by Deck #1, but we will see how it all turns out. At least I know it is all there !!! :)

The first image is of the Stern view. As soon as this part is done, I must Plank the Hull next (and I am NOT looking forward to that at all). Thank goodness only a portion of the hull is planked.

View attachment 236700View attachment 236701
丁寧な建造。いいですね。
 
REVIEW TIME:
Now that I am 6 months into this build, I want to give a short review. Even though this kit is a Plank on Frame (POF) or Plank on Ribs which ever you say it, I want to be clear here. This is NOT an admiralty-style kit. Even though yes there are RIBS and BEAMS, this kit in my opinion does not qualify as an Admiralty style even though from the box art, it does look like such.
I have a few things that disappoint me about this kit. You MUST be careful as some of the parts are STAMPED WRONG and some of the frames are stamped wrong and it easy to get the frames out of order. The plans are only basic and just give you an idea of how things might go together. Next, basically I have given up on the pictorial instructions booklet. I do not see how anyone can build this kit step by step in the progression that they show. The steps are NOT logical in sequence in my opinion.
So, please be aware of these things. I realize that NO kit is perfect, but somehow in the china to English METHODS, there is a lot to be desired.

Just because it is a kit, that DOES NOT mean that EVERY PART has to be laser cut !!!

Thanks Donnie for your extremely important information, as I also want to build the HMS Druid someday, I don't want to fall into any traps. I would like to say, however, that your work and the involvement with the kit is absolutely exemplary and I like it very much.
In this context, I find Heinrich's contribution very motivating and helpful and can imagine a very good result.
 
two points i would comment on

first when we think of "kits" we think of plastic hobby kits and they are basicly gluing part A to part B. Wood ship model kits are nothing of the sort, i would consider any of the ship kits "semi scratch" . Even the best instructions or practicums are just one way of building, they are just a general idea of how to proceed. It is up to the builder to figure out how to build the model and that is where a forum such as this comes in. When i created build logs in the past it dawned on me this is what i did or how i solved a problem it may not be the best way it was based on my personal skills, my tools, and my thinking process. The bottom line here is it's not any kit mauufacture short comings they provide the basic materials it is up to your skills and knowledge to figure out how to do it.

second i would comment on

First let me say that Unicorn is one of the big players in China. They have their own dedicated WeChat page with more than 120 000 followers!!!

SoS and MSW combined do not even come close to just this one WEChat forum and Unicorn is just one of many. Well SoS and MSW are actually combined because a lot of members are part of both forums, anyhow you would really be a pinhead if you think you are going to make a difference or influence such a huge market. As they say big wheels keep on turning. The one event that took place right here on SoS set a president in the hobby and that is the wheel for the Blue Nose kit. A group stepped up to the challenge designed and produced a better part for a kit made in China. That is a small part of a kit but implications are a big deal.
kits and fittings made in China are here to stay and growing bigger and bigger, just look at the high quality blocks offered by Dry Dock price and quality can not be beat and that is what the hobby needs,
It is up to Ships of Scale to bridge the gap between a manufacture and their product and builders across the globe and like Donnie has done is to offer a build log to help builders.
 
Hi Folks, you are ALL very correct. I am wrong again. I am wrong due to my lack of experience --- so to all that wish to build this model, PLEASE do not let me stop you and you might find that it is a very easy model for you to build. It is I that is afraid that I will make a mistake. So to everyone, please accept my apologies for making such harsh comments.

Donnie
 
I edited my REVIEW
REVIEW TIME: EDITED
Now that I am 6 months into this build, I want to give a short review. Even though this kit is a Plank on Frame (POF) or Plank on Ribs. Even though yes there are RIBS and BEAMS, the kit is sort of a mixture of basic kit and admiralty style - I will say that this kit is a good kit if you wish to get started making an admiralty style. It gives you the real to life example of how the Frames were constructed on a real ship.
You MUST be careful as some of the parts are stamped incorrectly. But, even with that, common sense will prevail and is NOT that big of a problem
The plans are only basic and just give you an idea of how things might go together. Next, the pictorial instructions booklet does show a step by step progression . The steps might not be in a logical sequence that you might be used to. However, again, basic common sense will prevail if you have past experience with advanced models.

I will continue to build the kit and as they say," it will make a model" - mine not be as good as others, but we will see.
 
Donnie I honestly do not believe that your comments are harsh - neither do you have a lack of experience. That is what I find so valuable on SOS - and this is something that we have to fight for to keep - is the amount of communication that is ongoing. My first attempt at building a Unicorn model ended up in the garbage bin (no kidding) but that was what taught me NOT to follow the instructions slavishly. As soon as the build seems to reach a certain point, things become a lot easier. Your early scratch-building with regards to ensuring a 90-degree angle between the frames and keel, was invaluable to me and I learnt a lot. If kit manufacturers were to spend those kind of labor-intensive hours on kits, the pricing would simply become prohibitive.

@Dave Stevens Dave also makes very valid comments. The Chinese kits are certainly here to stay but there is also a lesson for all of us. Many kits are bought from dealers and not from the manufacturer directly. These kits are first and foremost intended for the Chinese market - the fact that members buy them, is their own choice and they have to accept the fact that instructions - just to mention one thing - will not be up to Western standards. When manufacturers like CAF, Trident, YQ Models and hopefully Sail for Sail launch kits intended for Western markets their efforts at pleasing their audience are considerably more pronounced and they can get direct feedback from us. By the way, the really big players in China - Luhaiqingkong, Shicheng, and Unicorn have not even shown any interest in making any kind of effort to enter Western markets up to now.
 
i agree with Heinrich and that is Donnie was not harsh or that he has lack of experence what he is pointing out is "lost in translation" you can not expect a product made in China for that market to cater to the western market which we are dwarfed by the Eastern market. It is up to us in the west to bridge that gap. If we are to build kits made in China or Russia or elsewhere WE have to translate the process not them.
Look at kit manufactures in North America how many are there in all of North America 2 not counting the little mom and pop part time operations. The western market is wide open and for the taking so as more and more kits and products flood in the better comunications and improvements can be accomplished. This is what we are trying to do here it is most likely we will help you build rather than ban you. Donnie and this build is the first step in bridging the gap.
So carry on Donnie
 
Thanks guys for the 'pep talk'. :)

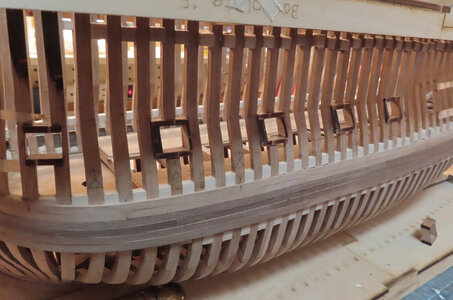
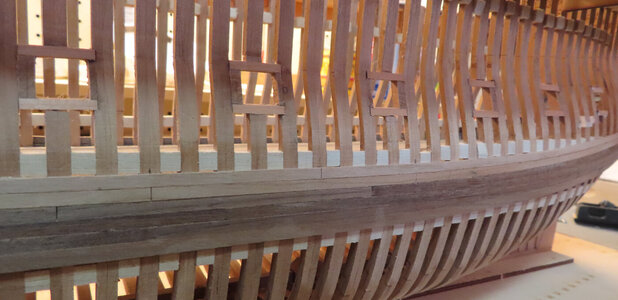
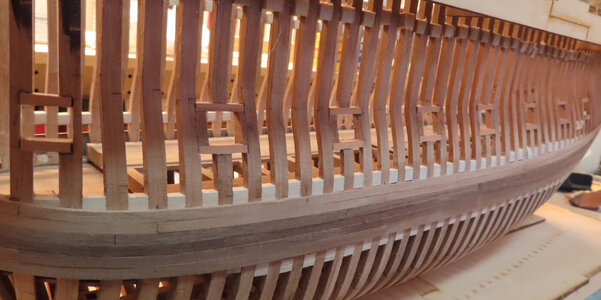
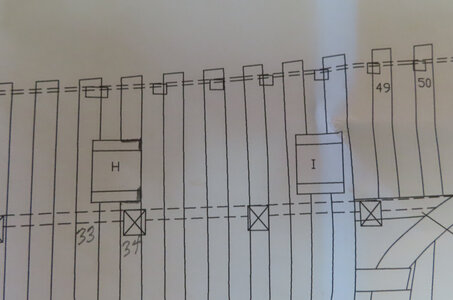
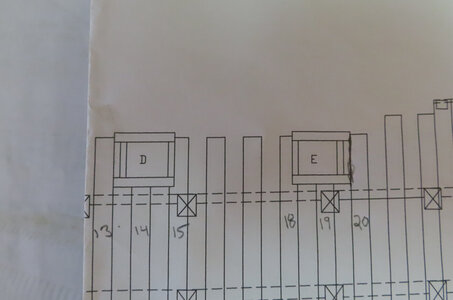
Well, I am almost finished with the Gun Ports on one side and I have done a rough sanding to get an idea of how it is going to look. So far, it seems ok. I included some snap shots of the plans. As you can see NOT all of the gunports are made exactly, but have their own unique arrangements. So, the advice is to build one port at a time following the plans.

Kindly
Donald


gp-03.jpggp-04.jpggp-05.jpggp-06.jpggp-07.jpg
 
Thanks guys for the 'pep talk'. :)

Well, I am almost finished with the Gun Ports on one side and I have done a rough sanding to get an idea of how it is going to look. So far, it seems ok. I included some snap shots of the plans. As you can see NOT all of the gunports are made exactly, but have their own unique arrangements. So, the advice is to build one port at a time following the plans.

Kindly
Donald


View attachment 242267View attachment 242268View attachment 242271View attachment 242272View attachment 242273
Hi Donnie,
Good to see that, despite the dips, you are still working on your Druid. It looks sleek and neat, as always!
Well documented and provided with a clear explanation.
Regards, Peter
 
Thank you Peter and others. Actually I feel like I should be providing more instructions and documentation. It is a balance to consider in building verses writing and picture taking. I need to provide some info on how I derived at the placement of the ports as the given instructions are not too clear. I should set aside time for that.
 
Donnie you are so correct.
It take 3 time longer to create a build log as apposed to just building a model. My latest build is documented at each and every step along the way and yes more time is spent on photography and writing than the actual build.
The way i see it is builders like you and me and others are blazing the trial for future builders. Like i said instructions are lacking in all kits no matter who made the kit, Once you get the general idea of how model ships are built and how to deal with kits, that is the basic information and once you got it you can build any kit or scratch project.

details my friend details how did you do that? and why?
 
Thank you Dave. I used to detail each step - I need to get back to that -- so, I hope this post will keep me in good standing -- GRIN

gp-08.jpg


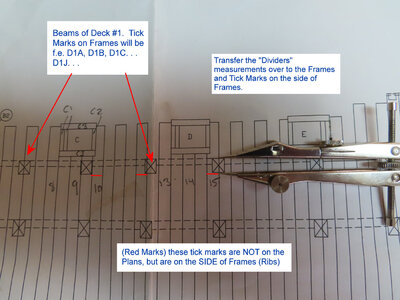
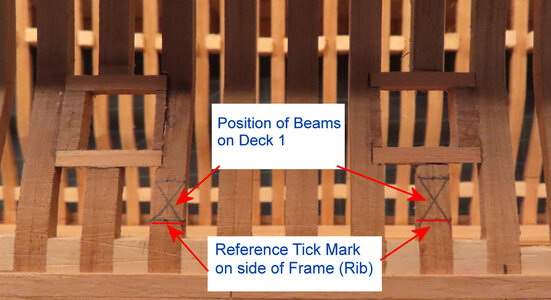
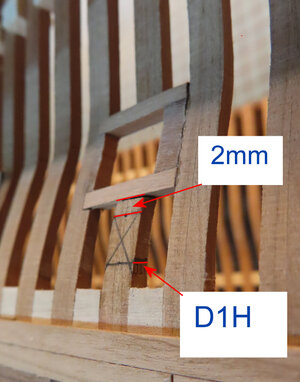
MOST ALL "REFERENCE" lines and tick marks are on the SIDE of the FRAME or RIB. Right above the Tick mark will be notations like D1A, D1B, D1C and so forth.
The BOTTOM of the BEAM will set on top of the tick mark.


gp-09.jpggp-10.jpg
 
Back
Top