• Win a Free Custom Engraved Brass Coin!!!
    As a way to introduce our brass coins to the community, we will raffle off a free coin during the month of August. Follow link ABOVE for instructions for entering.

HMS Fly Build (Amati) 1:64 by Nomad

And so the rigging begins. I decided to start with the Mizzen mast and work my way forward, for no other reason than working forwards sounds better than working backwards, and also that the Mizzen mast looks a bit easier to do than the rest of them :p

The mast is stepped by applying a small amount of wood glue to the base and housing it into position through the stern decks. The mast is supported by four sets of shrouds which is where the rigging really begins. I created staple-shape brackets from 24-gauge wire to hold the upper deadeyes in place and equidistant from the lower row of deadeyes on the channels. This is purely for aesthetic reasons, of course. I understand there are all sorts of reasons why this is not necessarily realistic in practice.

View attachment 535004

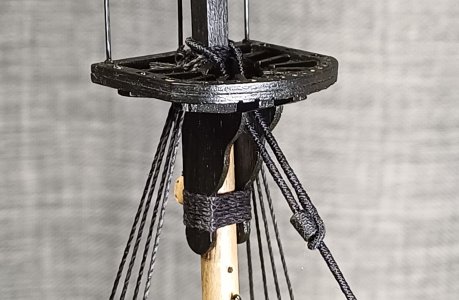
The kit instructions recommend 1mm rope for the lower Mizzen shrouds, although the plans indicate .75 mm instead which, to my eye, looks more to scale especially when wrapped around 3 mm deadeyes. Each shroud-pair loops around the mast top and is seized to two of the upper deadeyes with .25 mm line. I did not serve the central section of the shroud rope as there is not enough room in the lubber hole to accommodate the thickened rope. It may work on the other, larger mast tops.

View attachment 535005

The wire brackets are removed and .5 mm natural thread is reeved as a lanyard through the upper and lower sets of deadeyes. The lanyards are used to tension up the shroud lines and then seized just above the upper deadeye.

View attachment 535006

Finally, the loose ends of the shroud lines are seized in a couple of places above the lanyard seizing. I experimented with various knots off-model to find those that gave a reasonable look of authenticity and did not leave too many of those pesky stray ends. The knots were secured with a mild fabric glue that dries clear and does not freeze the rope in the way that superglue does.

View attachment 535007

That's the lower Mizzen shrouds done! I installed the shroud lines in the order of starboard-fore, port-fore, starboard-aft, port-aft, and will stick to that pattern with the other shroud rigging as well. The process is not as daunting as it first seems and gets easier once you get into the zone. Keeping the two rows of deadeyes equidistant and maintaining a fair bit of tension in the shroud lines are the two variables that can make the exercise quite challenging, and I'm sure that I'll have forgotten all the lessons learnt by the time I get to setting up the shrouds on the Main and Foremast :rolleyes:

View attachment 535008

Thanks for checking in :)

Mark
Good morning Mark. It is good to see you working on your HMS Fly again. A good start to the rigging and everything looking neat and tidy. Just a thought for your deadeyes especially when you get to the main and foremasts. The lanyards for the aft deadeyes will be longer than the fore deadeyes due to the angle of the shrouds. Just remember to adjust for this with your wire staple brackets to accommodate for this-I’m probably telling you something you already knowROTF. A very cool start to your rigging very much in line with the quality of your ship. Cheers Grant
 
Excellent advice Grant, thanks for that! It is something I don't think I would have considered until too late. This is why I go so slowly with my model - I let you guys go on ahead and learn all these good things, while I hang back to catch all the grand advice from your experiences :p
Seriously though, it's good to be back and building again...
 
And so the rigging begins. I decided to start with the Mizzen mast and work my way forward, for no other reason than working forwards sounds better than working backwards, and also that the Mizzen mast looks a bit easier to do than the rest of them :p

The mast is stepped by applying a small amount of wood glue to the base and housing it into position through the stern decks. The mast is supported by four sets of shrouds which is where the rigging really begins. I created staple-shape brackets from 24-gauge wire to hold the upper deadeyes in place and equidistant from the lower row of deadeyes on the channels. This is purely for aesthetic reasons, of course. I understand there are all sorts of reasons why this is not necessarily realistic in practice.

View attachment 535004

The kit instructions recommend 1mm rope for the lower Mizzen shrouds, although the plans indicate .75 mm instead which, to my eye, looks more to scale especially when wrapped around 3 mm deadeyes. Each shroud-pair loops around the mast top and is seized to two of the upper deadeyes with .25 mm line. I did not serve the central section of the shroud rope as there is not enough room in the lubber hole to accommodate the thickened rope. It may work on the other, larger mast tops.

View attachment 535005

The wire brackets are removed and .5 mm natural thread is reeved as a lanyard through the upper and lower sets of deadeyes. The lanyards are used to tension up the shroud lines and then seized just above the upper deadeye.

View attachment 535006

Finally, the loose ends of the shroud lines are seized in a couple of places above the lanyard seizing. I experimented with various knots off-model to find those that gave a reasonable look of authenticity and did not leave too many of those pesky stray ends. The knots were secured with a mild fabric glue that dries clear and does not freeze the rope in the way that superglue does.

View attachment 535007

That's the lower Mizzen shrouds done! I installed the shroud lines in the order of starboard-fore, port-fore, starboard-aft, port-aft, and will stick to that pattern with the other shroud rigging as well. The process is not as daunting as it first seems and gets easier once you get into the zone. Keeping the two rows of deadeyes equidistant and maintaining a fair bit of tension in the shroud lines are the two variables that can make the exercise quite challenging, and I'm sure that I'll have forgotten all the lessons learnt by the time I get to setting up the shrouds on the Main and Foremast :rolleyes:

View attachment 535008

Thanks for checking in :)

Mark
A nice start and a solid base for the rigging, Mark.
Regards, Peter
 
And so the rigging begins. I decided to start with the Mizzen mast and work my way forward, for no other reason than working forwards sounds better than working backwards, and also that the Mizzen mast looks a bit easier to do than the rest of them :p

The mast is stepped by applying a small amount of wood glue to the base and housing it into position through the stern decks. The mast is supported by four sets of shrouds which is where the rigging really begins. I created staple-shape brackets from 24-gauge wire to hold the upper deadeyes in place and equidistant from the lower row of deadeyes on the channels. This is purely for aesthetic reasons, of course. I understand there are all sorts of reasons why this is not necessarily realistic in practice.

View attachment 535004

The kit instructions recommend 1mm rope for the lower Mizzen shrouds, although the plans indicate .75 mm instead which, to my eye, looks more to scale especially when wrapped around 3 mm deadeyes. Each shroud-pair loops around the mast top and is seized to two of the upper deadeyes with .25 mm line. I did not serve the central section of the shroud rope as there is not enough room in the lubber hole to accommodate the thickened rope. It may work on the other, larger mast tops.

View attachment 535005

The wire brackets are removed and .5 mm natural thread is reeved as a lanyard through the upper and lower sets of deadeyes. The lanyards are used to tension up the shroud lines and then seized just above the upper deadeye.

View attachment 535006

Finally, the loose ends of the shroud lines are seized in a couple of places above the lanyard seizing. I experimented with various knots off-model to find those that gave a reasonable look of authenticity and did not leave too many of those pesky stray ends. The knots were secured with a mild fabric glue that dries clear and does not freeze the rope in the way that superglue does.

View attachment 535007

That's the lower Mizzen shrouds done! I installed the shroud lines in the order of starboard-fore, port-fore, starboard-aft, port-aft, and will stick to that pattern with the other shroud rigging as well. The process is not as daunting as it first seems and gets easier once you get into the zone. Keeping the two rows of deadeyes equidistant and maintaining a fair bit of tension in the shroud lines are the two variables that can make the exercise quite challenging, and I'm sure that I'll have forgotten all the lessons learnt by the time I get to setting up the shrouds on the Main and Foremast :rolleyes:

View attachment 535008

Thanks for checking in :)

Mark
Great job and a wonderful tutorial on the work !!!
 
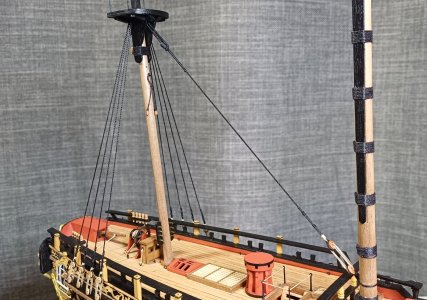
Next up is the Mizzen Stay, the standard rigging rope that runs along the centre-line of the ship from the Mizzen mast top to a point near the base of the Main mast. I have opted to assemble the Mizzen Stay before continuing shroud work on the Main mast as it seems likely that the shrouds may impede access.

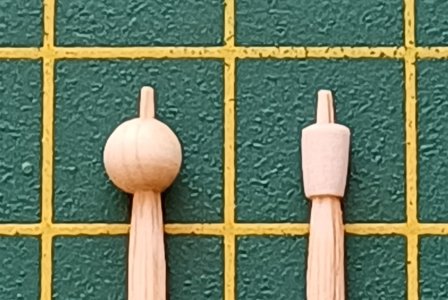
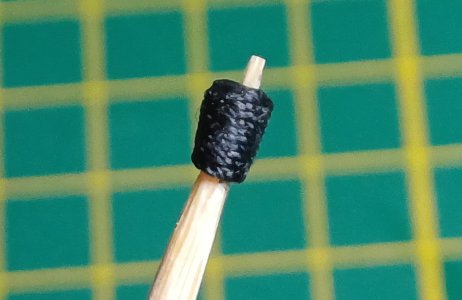
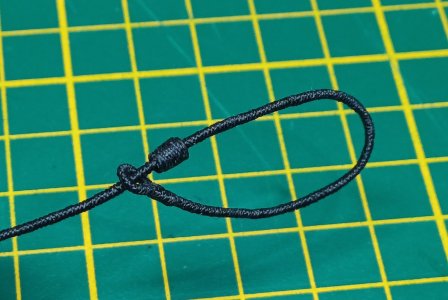
The Stay is fastened at the Mizzen end with the help of a mouse, and to this end I have whittled a wooden parrel-bead into a thinner, conical shape. The mouse is then painted black and weaved with thin black thread to give it a fabric-like appearance.

1370_20250808_hms_fly.jpg 1375_20250808_hms_fly.jpg

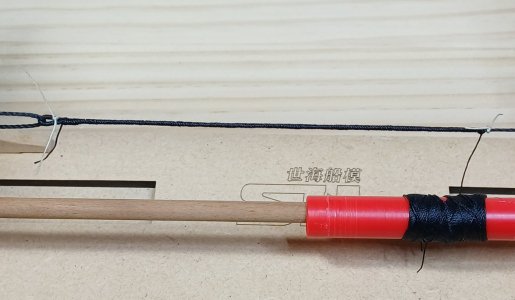
The Mizzen Stay uses 1 mm black rope, with an eye spliced at the Mizzen end and served to a point a bit below where the mouse will be fitted as a stopper. This was a bit tricky. First, the Stay is trial-fitted around the Mizzen mast top to determine the point at which the serving line should end. Next, the eye portion of the Stay is served and seized. Finally, the eye is held at one end of a serving machine while the Stay rope is served to the point marked out in the trial fit.

1380_20250808_hms_fly.jpg

The end result is something like this. The mouse is still loose at this point so that it can be adjusted to tension the Stay as necessary during assembly.

1385_20250808_hms_fly.jpg

The Mizzen Stay requires the Main mast to be stepped. A small blob of PVA glue at the base of the Main mast is enough to secure it to the depths of the ship, and provided enough time for me to run around the ship and survey the symmetry of the masts from every possible angle :)

1390_20250808_hms_fly.jpg

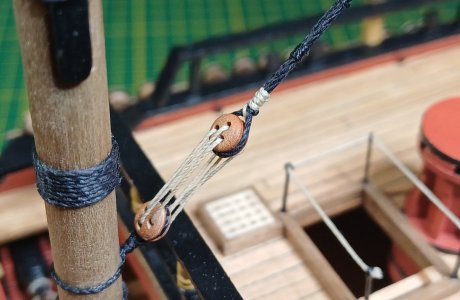
The Mizzen Stay is attached to the Main mast by way of deadeyes and lanyard in much the same way as the shrouds are assembled. Research revealed that heart-shaped blocks may have been lashed together for this purpose, but I have gone with the deadeyes as per the kit's instructions.

1395_20250808_hms_fly.jpg

The Stay is looped over the Mizzen mast above the existing shrouds loops. The mouse is adjusted to a position that gives the Mizzen stay a fair bit of tension and is then glued to the Stay rope. The lanyards at the other end can also be adjusted to contribute towards the overall tension in the Stay rope.

1400_20250808_hms_fly.jpg

The Mizzen Stay, done and dusted :)

1405_20250808_hms_fly.jpg

Thanks for checking in :)

Mark
 
Next up is the Mizzen Stay, the standard rigging rope that runs along the centre-line of the ship from the Mizzen mast top to a point near the base of the Main mast. I have opted to assemble the Mizzen Stay before continuing shroud work on the Main mast as it seems likely that the shrouds may impede access.

The Stay is fastened at the Mizzen end with the help of a mouse, and to this end I have whittled a wooden parrel-bead into a thinner, conical shape. The mouse is then painted black and weaved with thin black thread to give it a fabric-like appearance.

View attachment 536642 View attachment 536643

The Mizzen Stay uses 1 mm black rope, with an eye spliced at the Mizzen end and served to a point a bit below where the mouse will be fitted as a stopper. This was a bit tricky. First, the Stay is trial-fitted around the Mizzen mast top to determine the point at which the serving line should end. Next, the eye portion of the Stay is served and seized. Finally, the eye is held at one end of a serving machine while the Stay rope is served to the point marked out in the trial fit.

View attachment 536644

The end result is something like this. The mouse is still loose at this point so that it can be adjusted to tension the Stay as necessary during assembly.

View attachment 536645

The Mizzen Stay requires the Main mast to be stepped. A small blob of PVA glue at the base of the Main mast is enough to secure it to the depths of the ship, and provided enough time for me to run around the ship and survey the symmetry of the masts from every possible angle :)

View attachment 536646

The Mizzen Stay is attached to the Main mast by way of deadeyes and lanyard in much the same way as the shrouds are assembled. Research revealed that heart-shaped blocks may have been lashed together for this purpose, but I have gone with the deadeyes as per the kit's instructions.

View attachment 536647

The Stay is looped over the Mizzen mast above the existing shrouds loops. The mouse is adjusted to a position that gives the Mizzen stay a fair bit of tension and is then glued to the Stay rope. The lanyards at the other end can also be adjusted to contribute towards the overall tension in the Stay rope.

View attachment 536648

The Mizzen Stay, done and dusted :)

View attachment 536649

Thanks for checking in :)

Mark
Good morning Mark. Getting some detail into rigging is always cool although it is often only the builder who ever notices. Looking clean and tidy - Very nice. Cheers Grant
 
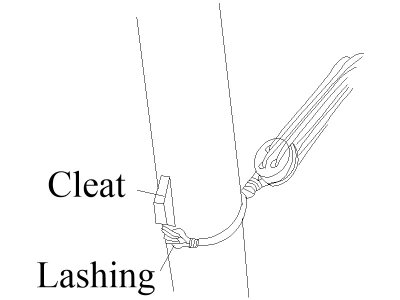
Excellent rope work Mark. I have looked for information on the following with no firm answer, hopefully you can help. The mizzen stay collar with the deadeye had two loose ends with an eye in each end and were secured around the most with a rose lashing (which most of us will not do at our scales and go with a simple lashing:)) My problem is how was this collar secured to around the mast so it did not slip? Were there thumb cleats as on the sprit for the forestays or were they nailed to the fore side of the mast once the lashing was tightened?
Thanks
Allan
1754648420689.jpeg
 
Next up is the Mizzen Stay, the standard rigging rope that runs along the centre-line of the ship from the Mizzen mast top to a point near the base of the Main mast. I have opted to assemble the Mizzen Stay before continuing shroud work on the Main mast as it seems likely that the shrouds may impede access.

The Stay is fastened at the Mizzen end with the help of a mouse, and to this end I have whittled a wooden parrel-bead into a thinner, conical shape. The mouse is then painted black and weaved with thin black thread to give it a fabric-like appearance.

View attachment 536642 View attachment 536643

The Mizzen Stay uses 1 mm black rope, with an eye spliced at the Mizzen end and served to a point a bit below where the mouse will be fitted as a stopper. This was a bit tricky. First, the Stay is trial-fitted around the Mizzen mast top to determine the point at which the serving line should end. Next, the eye portion of the Stay is served and seized. Finally, the eye is held at one end of a serving machine while the Stay rope is served to the point marked out in the trial fit.

View attachment 536644

The end result is something like this. The mouse is still loose at this point so that it can be adjusted to tension the Stay as necessary during assembly.

View attachment 536645

The Mizzen Stay requires the Main mast to be stepped. A small blob of PVA glue at the base of the Main mast is enough to secure it to the depths of the ship, and provided enough time for me to run around the ship and survey the symmetry of the masts from every possible angle :)

View attachment 536646

The Mizzen Stay is attached to the Main mast by way of deadeyes and lanyard in much the same way as the shrouds are assembled. Research revealed that heart-shaped blocks may have been lashed together for this purpose, but I have gone with the deadeyes as per the kit's instructions.

View attachment 536647

The Stay is looped over the Mizzen mast above the existing shrouds loops. The mouse is adjusted to a position that gives the Mizzen stay a fair bit of tension and is then glued to the Stay rope. The lanyards at the other end can also be adjusted to contribute towards the overall tension in the Stay rope.

View attachment 536648

The Mizzen Stay, done and dusted :)

View attachment 536649

Thanks for checking in :)

Mark
That part of the rigging is looking very nice, Mark.
Regards, Peter
 
Next up is the Mizzen Stay, the standard rigging rope that runs along the centre-line of the ship from the Mizzen mast top to a point near the base of the Main mast. I have opted to assemble the Mizzen Stay before continuing shroud work on the Main mast as it seems likely that the shrouds may impede access.

The Stay is fastened at the Mizzen end with the help of a mouse, and to this end I have whittled a wooden parrel-bead into a thinner, conical shape. The mouse is then painted black and weaved with thin black thread to give it a fabric-like appearance.

View attachment 536642 View attachment 536643

The Mizzen Stay uses 1 mm black rope, with an eye spliced at the Mizzen end and served to a point a bit below where the mouse will be fitted as a stopper. This was a bit tricky. First, the Stay is trial-fitted around the Mizzen mast top to determine the point at which the serving line should end. Next, the eye portion of the Stay is served and seized. Finally, the eye is held at one end of a serving machine while the Stay rope is served to the point marked out in the trial fit.

View attachment 536644

The end result is something like this. The mouse is still loose at this point so that it can be adjusted to tension the Stay as necessary during assembly.

View attachment 536645

The Mizzen Stay requires the Main mast to be stepped. A small blob of PVA glue at the base of the Main mast is enough to secure it to the depths of the ship, and provided enough time for me to run around the ship and survey the symmetry of the masts from every possible angle :)

View attachment 536646

The Mizzen Stay is attached to the Main mast by way of deadeyes and lanyard in much the same way as the shrouds are assembled. Research revealed that heart-shaped blocks may have been lashed together for this purpose, but I have gone with the deadeyes as per the kit's instructions.

View attachment 536647

The Stay is looped over the Mizzen mast above the existing shrouds loops. The mouse is adjusted to a position that gives the Mizzen stay a fair bit of tension and is then glued to the Stay rope. The lanyards at the other end can also be adjusted to contribute towards the overall tension in the Stay rope.

View attachment 536648

The Mizzen Stay, done and dusted :)

View attachment 536649

Thanks for checking in :)

Mark
Excellent work Mark! Glad to see the rigging going up, it looks really good on the ship.

The Cutty Sark is still in the Doldrums while I have been busy on some other things over the summer. Hopefully, I will get back onto the task in a few weeks time but, I am dreading starting the rigging!
 
Good morning Mark. Getting some detail into rigging is always cool although it is often only the builder who ever notices. Looking clean and tidy - Very nice. Cheers Grant
Thanks Grant. Agreed, eye of the beholder and all that. While I thought I'd created a magnificent Mizzen stay for my ship, the Admiral saw only a thin thread tied between two sticks ROTF
 
Excellent rope work Mark. I have looked for information on the following with no firm answer, hopefully you can help. The mizzen stay collar with the deadeye had two loose ends with an eye in each end and were secured around the most with a rose lashing (which most of us will not do at our scales and go with a simple lashing:)) My problem is how was this collar secured to around the mast so it did not slip? Were there thumb cleats as on the sprit for the forestays or were they nailed to the fore side of the mast once the lashing was tightened?
Thanks
Allan
Hi Allan. Short answer, I don't know, and I guess they couldn't use a dab of CA back in the day either :p

That said, a closer examination of my Amati kit plans show the Mizzen stay collar as being directly beneath, and therefore secured from slipping by the lowest rope woolding on the Main mast. In practice, however, if I went that low on the Main mast the Mizzen stay would end up going through the quarterdeck rails and I was obliged to move the collar higher up. I looked at several other Fly and Pegasus models and they all seemed to do the same.

I wonder if the forces and tension exerted on the stay were enough to prevent it from slipping up the mast? Mind you, if I was Master of the ship I think I'd feel more comfortable with a cleat as you suggested :)

Sorry I couldn't be more helpful...
 
Last edited:
Excellent work Mark! Glad to see the rigging going up, it looks really good on the ship.

The Cutty Sark is still in the Doldrums while I have been busy on some other things over the summer. Hopefully, I will get back onto the task in a few weeks time but, I am dreading starting the rigging!
Thanks Dom. I know how you feel, I have had to attend to many other things this year and the shipyard is unfortunately first to be moved down the priority list. Looking forward to the continued progress of your CS :)
 
I guess they couldn't use a dab of CA back in the day either
You started my day with a hearty laugh, great response!!!!

Lees notes that the mizzen stay was secured to the main mast about 6 feet above the deck if that is of any help as to where it goes. A rope woolding would not help but the wooden rings on the top and bottom of the rope wooldings might work, as they were about 1.5 inches wide and about the same thickness.

Allan
 
The headworks are made up of a variety of multi-shaped components that are arranged to form the headrail and cathead assembly. Blu Tack is a useful agent to get an idea of how all the pieces hang together.

View attachment 399534

My starting point was to join and fix the upper and lower cheeks and the upper prow rail. The pieces are generously oversized, fortunately, as they all need to be cut, bevelled and shaped to fit together seamlessly and follow the curvature of the hull gracefully.

View attachment 399535

Care must be taken to size the lower cheek extension piece so that it doesn't interfere with the heels of the figurehead!

View attachment 399536

A mortise is created on either side of the prow to accomodate the catheads between the bulwarks and the rail, and deep enough to ensure that the capping rails will sit smoothly on top of the bulwarks. The cathead is also bolted to the deck for extra stability.

View attachment 399537

The hawse hole bolsters are used to position the hawse holes on the hull and were shaped, very carefully, in a progression of increasing drill bit sizes to a diameter that can eventually accommodate the anchor cables.

View attachment 399538

The three head timbers are installed on the prow and their ends are all angled to accommodate the bow head rail that will lie flat against them when installed later on. It is also a good time to install the remaining frieze work decorations which could otherwise be tricky to position with the headrails in the way.

View attachment 399539

The lower rail is bevelled at one end to fit snugly against the hull, and passes through the three notches of the head timbers until it comes to rest against the sloping curve of the upper prow rail.

View attachment 399540

The kit provides a decorative brass strip to serve as the eking rail, the extension that runs from the lower rail to the underside of the cathead support. I'm not sure why they do this as it seems at odds with the other rails, and I opted instead to create my own from template scraps. The only tricky bit was using a heating rod to slightly bend the lower half of the rail to conform to the curvature of the hull. Perhaps this is why a bendable brass strip was supplied in the kit.

View attachment 399541

Getting there. The lower and eking rails are in place, just the bow head rails to go. Symmetry is everything in this game.

View attachment 399542

The bow head rail flows from the top of the upper prow rail to the top of the bulwark right next to the cathead assembly, lying flush against the head timber edges along the way. The angle at which the rail terminates against the bulwark is a bit tenuous at best and was bolted to the sheer rail for good measure.

View attachment 399543

Getting the bow head rails to fit flush against the head timbers is quite imperative as there is little else to hold it securely in position.

View attachment 399544

I have taken some license in this headrail and cathead assembly. I understand the outer ends of the catheads should have sheaves, although this was not mentioned in the kit and I bound them with black rope instead for effect. I also kept the paintwork simple and did not install many of the decorations supplied in the kit ... too much bling for my liking :)

View attachment 399545

Thanks for checking in Thumbsup

Mark
Hi Nomad, thank you for this thread with images which show your progress in such a detail. I am working on my first model (Pegasus) and your images concerning the construction of tha bow helped me. In my kit the manual states that part 288 is white metal, but I could not find it. It seems, you made it from spare wood. Very helpful, thanks again!
 
Back
Top