-

Win a Free Custom Engraved Brass Coin!!!
As a way to introduce our brass coins to the community, we will raffle off a free coin during the month of August. Follow link ABOVE for instructions for entering.
-

PRE-ORDER SHIPS IN SCALE TODAY!
The beloved Ships in Scale Magazine is back and charting a new course for 2026!
Discover new skills, new techniques, and new inspirations in every issue.
NOTE THAT OUR FIRST ISSUE WILL BE JAN/FEB 2026
You are using an out of date browser. It may not display this or other websites correctly.
You should upgrade or use an alternative browser.
You should upgrade or use an alternative browser.
HMS Royal Caroline kit ZHL 1/30
- Thread starter Maarten
- Start date
- Watchers 112
-
- Tags
- royal caroline zhl
G'day Maarten, I second what Pat has said, very nice work, you are going the extra mile,
best regards John.
best regards John.
G'day Maarten
Another example of maartenellant piece of craftsmanship.
There's no word that express the excellant job that you are doing, so I made one up. Hope that you don't mind.
happymodeling
Greg
Another example of maartenellant piece of craftsmanship.
There's no word that express the excellant job that you are doing, so I made one up. Hope that you don't mind.
happymodeling
Greg
Hi Gents,
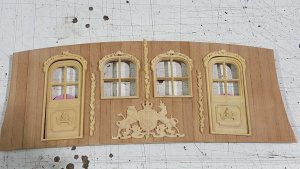
Many thx for your comments. I am now working on the coloring of the outside, in the original it was most probably red but as John Id like to keep the woodthread visible but with a red colour.
Hope I have a good solution tomorrow as I am mixing paints to get it right.
Ps Greg, I an getting shy.
Many thx for your comments. I am now working on the coloring of the outside, in the original it was most probably red but as John Id like to keep the woodthread visible but with a red colour.
Hope I have a good solution tomorrow as I am mixing paints to get it right.
Ps Greg, I an getting shy.
I live next to Paris. I confirm that the Musée de la Marine in Paris is actually closed for renovation until 2021.Indeed they are refurbishing the museum untill 2021, but it seems to be open. Unfortunately this visit no time to go there, on the list for next time.
You may have made a mistake looking at the website because, oddly, the National Marine Museum (Musée de la Marine) in France has 5 different places: Paris, Rochefort, Brest, Port-Louis and Toulon.
But, unfortunately, the model of the Soleil Royal is in Paris ...
Looks Amazing Brother
Hi Ekis,I live next to Paris. I confirm that the Musée de la Marine in Paris is actually closed for renovation until 2021.
You may have made a mistake looking at the website because, oddly, the National Marine Museum (Musée de la Marine) in France has 5 different places: Paris, Rochefort, Brest, Port-Louis and Toulon.
But, unfortunately, the model of the Soleil Royal is in Paris ...
THX for your comment, I checked indeed their website. There it is not clearly mentioned it is closed. So add this to the list for 2021.
Today it was time to mix some paint to create a nice red coloured varnish. For this I used two slightly different types of plain water based wall paint which I mixed with acrylic matt varnish. The two reds are fire truck red and kings red and finally the fire truck red is the one I go for.
See below the two products I mixed. For the paint base I use testers from the diy store, these are available in small quantities for just a few cents.
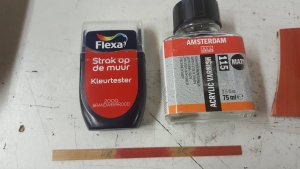
First I prepared some tests to get the right colour I need and from these I select the finall choice of which I mix a batch enouch to paint all surfaces needed.
This is after the first layer.
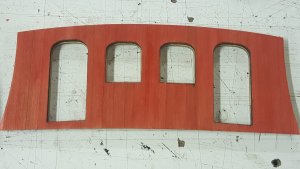
Dry fitting in place to see if the colour is correct.
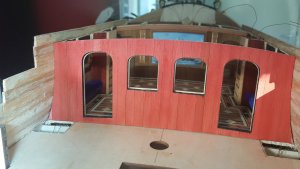
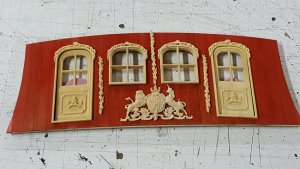
And below covered with a second layer of matt clear varnish to seal the paint. Also dry fitting and enjoying the contrast with the carvings. These still need waxing and polishing.
See below the two products I mixed. For the paint base I use testers from the diy store, these are available in small quantities for just a few cents.

First I prepared some tests to get the right colour I need and from these I select the finall choice of which I mix a batch enouch to paint all surfaces needed.
This is after the first layer.

Dry fitting in place to see if the colour is correct.

And below covered with a second layer of matt clear varnish to seal the paint. Also dry fitting and enjoying the contrast with the carvings. These still need waxing and polishing.

Looking very nice Maarten,
Wow the carvings just pop out right at you, great choice on the color.
Maartenellant my friend
I love the contrast between the red wall and the carvings.Happymodeling
Gref
Baby steps towards finalizing the bulkhead. Today I have waxed all carvings, put glass in one of the windows and finished one door.
For the door I first fitted a frame for the glass from veneer.
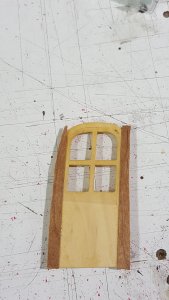
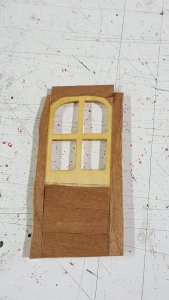
After finishing the outside the glass is fitted.
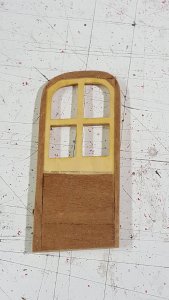
When the glass is fitted a second layer of 1 mm walnut is sealing the glass and finishing the door on the inside with an additional panneling on the lower part where the RG monogram will be fitted.
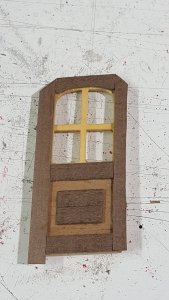
After finishing the outside edges the door is finished and ready for sanding, waxing and polishing.
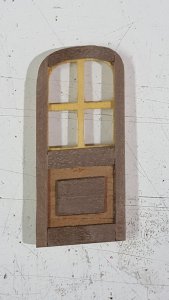
Finally dry fitting in place.
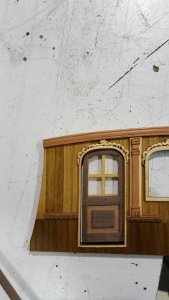
For the door I first fitted a frame for the glass from veneer.


After finishing the outside the glass is fitted.

When the glass is fitted a second layer of 1 mm walnut is sealing the glass and finishing the door on the inside with an additional panneling on the lower part where the RG monogram will be fitted.

After finishing the outside edges the door is finished and ready for sanding, waxing and polishing.

Finally dry fitting in place.

loving it
Today a slightly frustrating day at the shipyard.
The idea was to finish the bulkhead for the cabin by putting in the doors etc. etc. This meant making all the hinges for the doors which went well.
These 1:30 scale door hinges are part of the kit and made from etched brass. See the parts below.
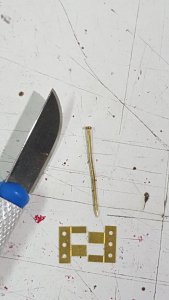
These you need to bend around a nail which will be the door hinge pin in al later stage. This 8 times for 4 door hinges.
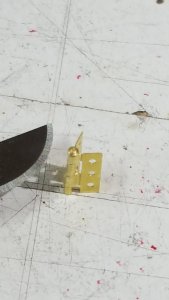
See the finished hinge.
After this I burnished the hinges and started to fit the first door.
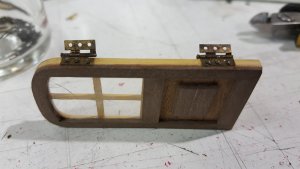
This all went well, except for damaging my window glass which I now need to replace. Ok these things happen. So fit the door to the bulkhead.
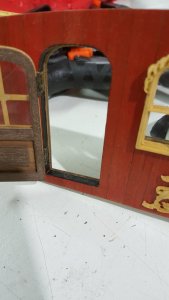
Door fitted, but then it starts. The etched brass is partly etched between the plate fitted to the door and the eyes holding the pin and due to the stress of opening and closing the door the hinges brake at the partly etched surface because it is to weak. I replaced several hinges but they all brake at the same spot. Now I decided to make my own which I also did for the interior doors these held up after plenty openings and closing the doors. So this was a day which did not bring a lot of progress. Hopefully tomorrow evening I have some time to cut some new hinges from brass plate I still have.
The idea was to finish the bulkhead for the cabin by putting in the doors etc. etc. This meant making all the hinges for the doors which went well.
These 1:30 scale door hinges are part of the kit and made from etched brass. See the parts below.

These you need to bend around a nail which will be the door hinge pin in al later stage. This 8 times for 4 door hinges.
See the finished hinge.

After this I burnished the hinges and started to fit the first door.

This all went well, except for damaging my window glass which I now need to replace. Ok these things happen. So fit the door to the bulkhead.

Door fitted, but then it starts. The etched brass is partly etched between the plate fitted to the door and the eyes holding the pin and due to the stress of opening and closing the door the hinges brake at the partly etched surface because it is to weak. I replaced several hinges but they all brake at the same spot. Now I decided to make my own which I also did for the interior doors these held up after plenty openings and closing the doors. So this was a day which did not bring a lot of progress. Hopefully tomorrow evening I have some time to cut some new hinges from brass plate I still have.
Excellent and outstanding work! It is an awesome example of a craftsmanship as the whole.  Forgive me if I have missed between the lines, did the kit came with such wonderful carvings or you carve it yourself?
 Forgive me if I have missed between the lines, did the kit came with such wonderful carvings or you carve it yourself?
Hi Jim,
Many thx for your comment. The kit came with the carvings which are cnc milled in boxwood. But there is a lot of finishing to do on them and as they are 3 axis milled I have ben carving a lot of these on the reverse side to create a thrue 3d.
Many thx for your comment. The kit came with the carvings which are cnc milled in boxwood. But there is a lot of finishing to do on them and as they are 3 axis milled I have ben carving a lot of these on the reverse side to create a thrue 3d.
...and you are doing it with great success, Maarten! Great attention to details! Please continue your build.


