-

Win a Free Custom Engraved Brass Coin!!!
As a way to introduce our brass coins to the community, we will raffle off a free coin during the month of August. Follow link ABOVE for instructions for entering.
-

PRE-ORDER SHIPS IN SCALE TODAY!
The beloved Ships in Scale Magazine is back and charting a new course for 2026!
Discover new skills, new techniques, and new inspirations in every issue.
NOTE THAT OUR FIRST ISSUE WILL BE JAN/FEB 2026
You are using an out of date browser. It may not display this or other websites correctly.
You should upgrade or use an alternative browser.
You should upgrade or use an alternative browser.
HMS Royal Caroline kit ZHL 1/30
- Thread starter Maarten
- Start date
- Watchers 112
-
- Tags
- royal caroline zhl
Very good result - Great
I guess, that the big scale of 1:30 is helping also to get this good quality (also in close-up photos!!!!)
I guess, that the big scale of 1:30 is helping also to get this good quality (also in close-up photos!!!!)
Excellent work Maarten.Are you going to represent the frames that went across between the vertical timbers in this area?These are illustrated in the AOS book drawings but missed in many of the kits of this vessel including Panart's.
Kind Regards
Nigel
Kind Regards
Nigel
I thought, the figurehead would be complete scratchbuild if add carving crown.@Jimsky offcourse it is possible but will it be an improvement of all boxwood vs a gilded crown?
For this I use black Ecoline which is an ink, this is not waterproof so it should be sealed for which I use oil or beewax.Very nice result Maarten, what kind of black color did you use, ink or stain ?.
I will think about itI thought, the figurehead would be complete scratchbuild if add carving crown.
Hi Nigel,Excellent work Maarten.Are you going to represent the frames that went across between the vertical timbers in this area?These are illustrated in the AOS book drawings but missed in many of the kits of this vessel including Panart's.
Kind Regards
Nigel
I have doubled the vertical timbers and according to the AOTS drawings I have these were directly placed on the upper large knee supporting the cutwater, see top drawing below.
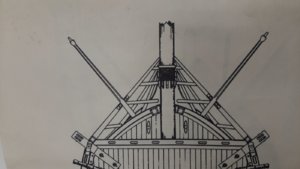
On this drawing there are no horizontal timbers visible.
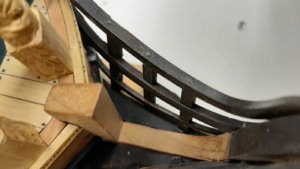
If you have additional info please let me know.
Many thx.
Maarten
I am sure I have seen a drawing somewhere with crutch timbers that run across,Not beams at the top,like on larger vessels just ones going across the bottom and forming a knee at each side.
I have just got in from a nightshift and off to bed.Give me some time and I will see what I can find
Kind Regards
Nigel
What a beautiful, clean work.Hi Nigel,
I have doubled the vertical timbers and according to the AOTS drawings I have these were directly placed on the upper large knee supporting the cutwater, see top drawing below.
View attachment 128514
On this drawing there are no horizontal timbers visible.
View attachment 128515
If you have additional info please let me know.
Many thx.
- Joined
- Oct 15, 2017
- Messages
- 1,191
- Points
- 443

Marrten, echoing many, beautiful work and thank you for sharing your techniques and methods and helping all of us perhaps build our own skills. I imagine it takes a steady hand to achieve the detail on your head rails and timbers. I think I may try the black ink application technique on my ST project.
I do have a couple of questions, if you don't mind. How or what technique do you use to sand or smooth the very small areas of your figure carvings to remove the tiny knife marks left. Do you use a special tool or polish them out with something like a Dremel buff wheel? The other question, you said the black ink you use is not water proof, my assumption is it is then water based. Would you please provide which type of oil you used and which manufacturer you obtained it from.
Thank you for taking the time to share.
Ken
Hi Ken.
Polishing of surfaces I do with steelwool.
The small surfaces I do with beewax and a proxxon buffing wheel. To remove the cutting edges I scrape the surface with the knife blade, this gives a very smooth surface that doesn't need a lot of polishing.
The black ink I use is Ecoline from Talens. Finishing can be done with Tung oil, allthough I currently use a matt parquettery oil. Tung oil is widely used and available.
- Joined
- Oct 15, 2017
- Messages
- 1,191
- Points
- 443

Thanks Knute. I guess I need to work on my reading comprehension.Ken, Maarten said he uses, black Ecoline, earlier in this log, I asked about exactly the same as you.
- Joined
- Oct 15, 2017
- Messages
- 1,191
- Points
- 443

Hi Marrten,Hi Ken.
Polishing of surfaces I do with steelwool.
The small surfaces I do with beewax and a proxxon buffing wheel. To remove the cutting edges I scrape the surface with the knife blade, this gives a very smooth surface that doesn't need a lot of polishing.
The black ink I use is Ecoline from Talens. Finishing can be done with Tung oil, allthough I currently use a matt parquettery oil. Tung oil is widely used and available.
Thank you for responding so quickly. I cannot wait to try your methods.
Maarten,
I have read through your entire build of the RC - it’s fabulous And inspiring. Can you please tell me exactly the procedure you follow to coat the boxwood carvings with beeswax? Do you heat a small amount and then brush it on?
Thanks,
Paul
I have read through your entire build of the RC - it’s fabulous And inspiring. Can you please tell me exactly the procedure you follow to coat the boxwood carvings with beeswax? Do you heat a small amount and then brush it on?
Thanks,
Paul
Hi Paul,
I use clear beeswax with turpentine, you can buy this in any traditional furniture or woodworking shop. This is a small tin can and when applying I first put the heat gun it then becomes liquid. Then apply it with a toothbrush on the wood, then again I use the heat gun the beeswax penetrates further into the wood and the color becomes richer. Remove too much of wax from the surface with a toothbrush or a cloth. Let the wax harden before polishing it with a buffing wheel at low to medium speed. High speed will create more heat and melt your wax again reducing the shine.
I use clear beeswax for my boxwood carvings. There are also different colored beeswax. For instance @neptune John used this for his RC with pear carvings.
Maarten
I have checked out the AOS book and your rendition is on the money to the book re the headtimbers.My issue is it is really bugging me now where I have seen this detail.It may have been on a model and that is not to say it was correct.I will dig more when I have time at the weekend.
Kind Regards
Nigel
Hi Paul,
I use clear beeswax with turpentine, you can buy this in any traditional furniture or woodworking shop. This is a small tin can and when applying I first put the heat gun it then becomes liquid. Then apply it with a toothbrush on the wood, then again I use the heat gun the beeswax penetrates further into the wood and the color becomes richer. Remove too much of wax from the surface with a toothbrush or a cloth. Let the wax harden before polishing it with a buffing wheel at low to medium speed. High speed will create more heat and melt your wax again reducing the shine.
I use clear beeswax for my boxwood carvings. There are also different colored beeswax. For instance @neptune John used this for his RC with pear carvings.
G'day Paul, I'm the guy Maarten just mentioned, I wanted to take a different approach with a darker colour as I bought the kit with the Basic Pear wood carvings, see pics below, I hope you don't mind me posting them on your log Maarten,
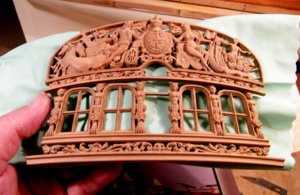
This is the basic Pear wood stern carving,
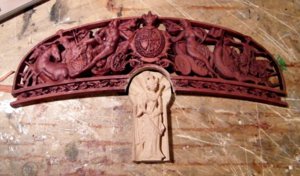
The top part after a coat of the wax,
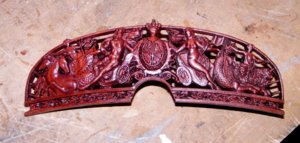
and after buffing,
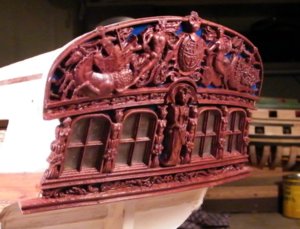
and all the carving on the stern,
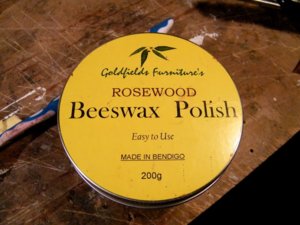
This is the wax I used, I did the same as Maarten and applied it with a toothbrush, my daughter gave me one of those little pots
that have a candle underneath and I dipped the toothbrush into the melted wax and applied it to the carvings using a hairdryer
to make sure it melted into all the little crevices etc, hope this with Maartens explanation helps you,
here is the link to my Royal Caroline build if you would like to take a look,
https://shipsofscale.com/sosforums/threads/zhl-royal-caroline-kit-scale-1-30.1310/page-5
best regards john,
.
Maarten / John
I still did not work out a proper technik to finish Boxwood carvings for myself. Currently I use wipe-on Poly but not happy with it. This Beeswax seems to be interesting. My question is will the polished Beeswax not become dull after a while? And what is happening to the surace when is becomes dusty?
Janos


