HMS Royal William 1719 1:55 by OlegM

I have not read thru your entire build yet as this if the first time that I have seen it, but I have to say that you are definitely one talented person not just an average model builder as am I. I can see that you are designing this from the ground up perfectly engineering each detail, I have to ask are you going to develope and produce a kit? Of the Royal William? I don't believe that any other kits exist of this ship. I will definitely reread the thread and follow to completion.
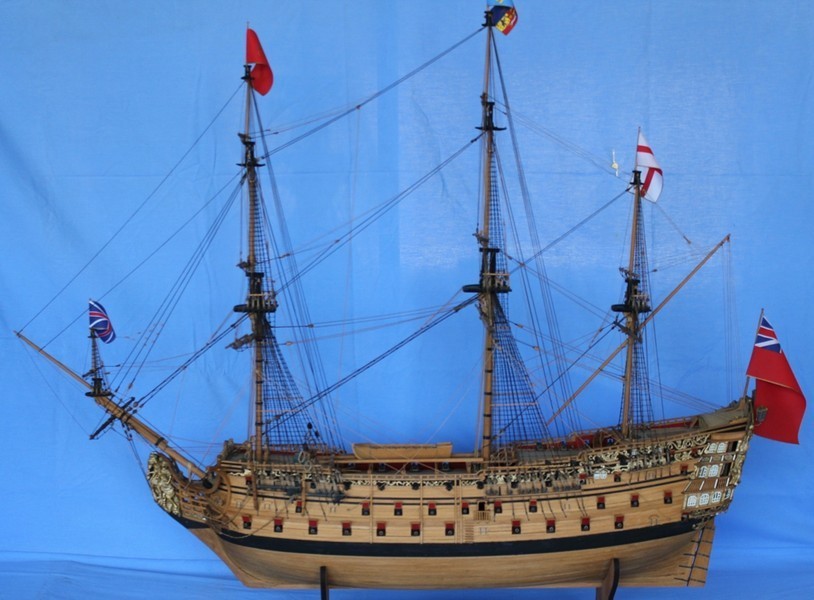
There's one Royal William Euromodel kit on ebay in US and one in Italy


When I typed Royall William Euromodel kit the web browser showed two shops. Can't really say if the're trustworthy, but maybe worth checking. Maybe othe users have some opinion or experience with them
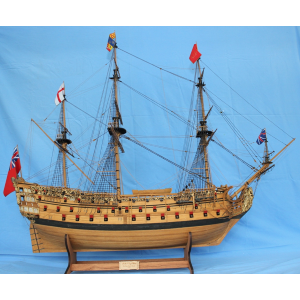
 
Beautiful Work! I hope that you can describe your methods clearly in all steps of the photo-etch as in you have previously in the progress of you magnificent build as you progress, I am sure there are many of us who would like to master the art of photo-etching to add to our scratch or enhance our kit builds. Again fantastic work!
 
I will post the process stages as I actually do it.
First, I make a 2-side drawing. The parts should be white, areas to be removed - black.
Print on the transparent film. I have a laser printer, so this film is for laser printers. Either side of it is ok for print.
Then cut out the templates, superpose them on the window against the light, make sure they match and fix with a tape to create an envelope. Ink on the both films should be inside the envelope.

1.JPGIMG_20230530_161537.jpgIMG_20230530_170030.jpg
 
Now prepare the negative photoresist film. It comes in a roll, so I need to cut the sheets of required size, 2 sheets per one brass sheet. The film has protective layers each side, so its 3-layer.
All operations with this film have to be carried out in darkness (no ultraviolet).

The next set of operations has to be done all at once.
First clean the brass sheet, both sides, wet. I used 600 grit and then 1000. Here I use brass sheet of 0.5mm thickness, 100x100mm.
We need a laminator machine, so turn it on, so that it's warmed up by the time we need it.
Remove the protective layer from one side only of the photoresist film and, working under a weak tap stream, attach the film to the brass sheet, so that the remaining protective layer is facing outwards, and the photosensitive layer is touching the metal. Water helps adjust the film position and ensure full adherence.
Do the same with the second film and attach it to the other side of the brass sheet.
Put the resulting sandwich between the 2 white cardboard sheets (to protect the photoresist) and pass it through the laminator, so that the films are baked onto the metal. I pass it twice.
As a result, I have a metal that is covered with photosensitive material on both sides and protective film layers are still there, both sides, outside.
The cardboard can be reused.

The most difficult thing for me was removing the protective layer from one side of the photoresist film. All in darkness of course. I found that doing it under water or making the film wet, helps.

Second and third photos are made in darkness

IMG_20230530_204257.jpgIMG_20230530_204909.jpgIMG_20230530_214204.jpg
 
Last edited:
Last edited:
I use caustic soda solution for development - around 0.7g of NaOH per 100ml of water. Those areas of the photoresist that were not exposed to UV are diluted by the solution and wiped off from the metal. It's important neither make the solution too strong nor keep the metal in it for too long, otherwise even the exposed to UV photoresist will start to go off. Basically it takes around 1 minute for the procedure. Not to forget to remove the remaining protective film from both sides of the photoresist covered brass before immersing it into the solution.


Now the parts can be dried outside, we don't care about the light anymore.

IMG_20230602_154504.jpgIMG_20230602_155402.jpg
 
Honestly, I have no confidence I can do it. I'm afraid, the lines of those decorative whorls are too thin for the thickness of the sheet. Also, some edges on the bigger peace of brass are not very sharp. But we'll see...
 
Back
Top