
Building a model without having lots of re-design challenges is indeed stress free and provides lots of joy to modelers who don't enjoy the tedium and slow progress of scratch work. I have a couple models which I intended to build with that same idea in mind, Mamoli's USS Rattlesnake, and Artisania Latina's San Francisco II. This conflicts with that part of me that wants to throw all the detail I can and strive to push my skills to the limit, and I know my work is not as neat as some of the builders here, including Paul and especially Olha. I am satisfied with that. I'm afraid every build will be a massive research project, and lots of bashing. I just can't help it, because doing less wouldn't make me happy with the model, and that is what we are all aiming for. You have plenty of company of you have the same approach. We both want to climb that ladder just one more rung. As far as glitches go, the process eliminates them with each build, and some new ones are discovered because no builds are the same (that would be boring).DARIVS ARCHITECTVS
My goodness. You got your hands full again.
I forgot where but I read an essay from a modeler speaking that after a big build, he would do something smaller and easier so he wont get exasperated if the new build got problematical.
That theory strokes a cord with me and I have been doing that with satisfactory results.
But that is only I.
Maybe my age voices me to go that path, but I also understand that other modelers like you with more enthusiast and eagerness can easily jump from a complicated build to another and even sometimes more complex since they feel more comfortable after overcoming past glitches with the last built.

-

SUBSCRIBE TO SHIPS IN SCALE TODAY!
The beloved Ships in Scale Magazine is back and charting a new course for 2026!
Discover new skills, new techniques, and new inspirations in every issue.
NOTE THAT OUR NEXT ISSUE WILL BE July/August 2026 -

Win a Free Custom Engraved Brass Coin!!!
As a way to introduce our brass coins to the community, we will raffle off a free coin during the month of August. Follow link ABOVE for instructions for entering.
You are using an out of date browser. It may not display this or other websites correctly.
You should upgrade or use an alternative browser.
You should upgrade or use an alternative browser.
HMS Sovereign of the Seas - Bashing DeAgostini Beyond Believable Boundaries
- Thread starter DARIVS ARCHITECTVS
- Start date
- Watchers 111
- Joined
- Aug 30, 2020
- Messages
- 684
- Points
- 353

Oh wow so much fine tuning, I admire your ability to make all these changes, it's going to be a beauty when finished.No, the structure is quite sound. The counter has been reinforced by the inner planking. You can remove the inner support structure once the shell of the hull is created. However, one has to be careful to remove only those supports from the kit that will be replaced by other structures. The hull as it is now is a thin shell, prone to distortion from changes in moisture and holds its ship because of the frames provided by the kit. As the decks are completed from the bottom up, the kit's frames are being removed in sections and replace by the inner planking of the bulwarks and the hull sides anchored by the deck beams.
There are times when, faced with a problem in making a kit accurate, that you have to be fearless in your decision to modify a ship model, after long careful consideration of the effects of that change on later steps in the build. I am at one such crossroad. In order to build the Sovereign in the form that she was initially built in 1635 with the guns closer to the water, I have to undo the features of this kit that were influenced by the form of the ship after 1660.
As I was looking at the deck height and gun port placement relative to the stern, it became apparent that the lower deck is a bit too high such that the stern chase guns would be located too high relative to the gun ports on the counter. This is because the of the kit's design as to the location of the lower deck. It may be possible to raise the counter up 5mm, and adjust all gun ports and decorations to come later. The entire stern will have to be re-evaluated. I think I can squeeze in the lower deck stern chasers with slightly lower gun carriages, but the middle gun deck gun port as drawn on the side of the hull are about 12mm too high as drawn, and the location of the middle gun deck and its ports will be adjusted to match the stern. The curve of the counter needs to be adjusted, so the top planks of that curve will have to be removed and replaced higher on the stern. All these changes came with a close study of the Willem van de Velde and Payne drawings and prints. Knowing that the van de Velde depicted the guns of the lower deck at the newer, high positions in his drawing resulting from the deck being raised in 1660, but mistakenly drew the two ports under the side galleries in their lower, original positions prior to 1660, when in fact they were eliminated, it is logical to assume that the reason DeAgostini designed the gun decks at their heights in the kit is because they copied the deck positions from the later rebuild of the Sovereign, not at the original, lower positions shown on Payne's print. The reason the gun decks were raised were obviously to raise the guns above the waterline to make the ship more seaworthy and such that it would not suffer the same fate as the Wasa. King Charles I had already ordered that the ship be loaded with more cannon that she had been designed for, and to make up for problems of that decision, many changes to the internal structure were made in 1659-60 to get more use out of the ship, including lightening of ship to reduce its draft by removing many of the heavy decorations prior to re-christening the ship HMS Royal Sovereign. With some tweaking, I may yet be able to align the level of the lower and middle gun ports from the sides to the stern, but without totally gutting and repositioning the lower gun deck, it will be difficult, and the proportions of the stern decorations as shown in the Lely Portrait of Peter Pett may not be successfully preserved. Uwe's solution was to change the shape of the counter and raise the upper transom, judging from his model photographs. It has become obvious that my build will have to follow a similar path. However, despite his changes, it does not appear that Uwe's counter will terminate as high on the stern as it appears in my sources. As a result, I think he may run into trouble with the placement of the middle deck stern chase guns.
Uwe's ship plan with interior decks shown in red
View attachment 265927
The proposed redesigned profile of the counter, bringing the top edge of the counter above the middle deck gun ports. My three principal sources, the Payne print, Willem van de Velde sketch, and the Lely Portrait of Peter Pett all seem to show the top of the counter terminating at level of the top of the middle gun ports. Looks like more demolition of the stern is in order.
View attachment 265922
The last of the starboard guns on the lower gun deck have been rigged with gun tackles. The tackles which has etched hooks with strops were far less delicate, and easier to rig since you don't have to hole each hook on the eyelet with CA as you go. This is as much detail as I want on any of the guns, even the ones exposed on the weather deck and forecastle. The two stern chasers still need to be installed. The hanging knee brackets and deck knee are next. After that, the fixtures close to centerline will be constructed for this deck, such as the anchor handling bits, various deck rings, and capstans. Stanchions will come later after the overhead beams are installed.


A milestone. Congratulations!
Looks great Kurt!
I was thinking about the issue of the cannon barrels being proud of the ship hull, as far as planking and sanding goes. I almost think some kind of track for them would have been beneficial, although a lot more work. I was thinking a slot in the deck under the carriages, and maybe a t-shaped pin that you insert in the bottom of the gun carriage and rotate, then glue. That way they could be pushed back enough to tape off the opening for the hull work. Then taped removed and guns pulled back outward after you’re done! Just need enough travel for the barrels to be flush with the frame. Preferably a little past?
Then there’s the option of a slot with a metal rail and a magnet, similar to a slot car. But the side tackles would need to have some slack either way you go.

At this scale, such a contrived solution would be far too complex. It's much simpler to just avoid whacking the gun barrels. Any movement of the gun carriages is restricted by the gun tackles anyway.Looks great Kurt!
I was thinking about the issue of the cannon barrels being proud of the ship hull, as far as planking and sanding goes. I almost think some kind of track for them would have been beneficial, although a lot more work. I was thinking a slot in the deck under the carriages, and maybe a t-shaped pin that you insert in the bottom of the gun carriage and rotate, then glue. That way they could be pushed back enough to tape off the opening for the hull work. Then taped removed and guns pulled back outward after you’re done! Just need enough travel for the barrels to be flush with the frame. Preferably a little past?
Then there’s the option of a slot with a metal rail and a magnet, similar to a slot car. But the side tackles would need to have some slack either way you go.
Yes, I mentioned the tackles would need some slack. probably the most problematic part of making them move. I know... spring loaded tackles! Just kidding!At this scale, such a contrived solution would be far too complex. It's much simpler to just avoid whacking the gun barrels. Any movement of the gun carriages is restricted by the gun tackles anyway.

You're one of them "engineers", aren't you Dean?Yes, I mentioned the tackles would need some slack. probably the most problematic part of making them move. I know... spring loaded tackles! Just kidding!

How did you guess…You're one of them "engineers", aren't you Dean?
Sorry, I was just thinking out loud…lol. There are many ways to make them move in and out, and it would obviously be a lot of work. So…I’m sure you will be careful. However it would be cool if they moved and the doors could open and close. Not asking for much right?
")
Yeah. NOBODY like the *crunch* sound.How did you guess…
Sorry, I was just thinking out loud…lol. There are many ways to make them move in and out, and it would obviously be a lot of work. So…I’m sure you will be careful. However it would be cool if they moved and the doors could open and close. Not asking for much right?
The brackets and bed pieces of the middle gun deck guns were planned today. The bed parts for the lower gun deck were 19mm long, 12mm wide at the rear end and 10mm wide at the front with 35mm gun barrels. These bed parts are 17mm long, 11mm wide at the rear end and 9mm wide at the front with 28mm gun barrels. Like the carriages on the lower gun deck, the ones for the middle gun deck will be made similar in design as the lower gun carriages, which were based on the carriage found recently from the wreck of the HMS London which sank in the Thames estuary off Southend. A gun powder barrel caught fire and the ship exploded in shallow water killing over 300 sailors and women and children passengers. Only 24 people survived.

17th century English carriage

Gun carriage salvaged from HMS London c.1665


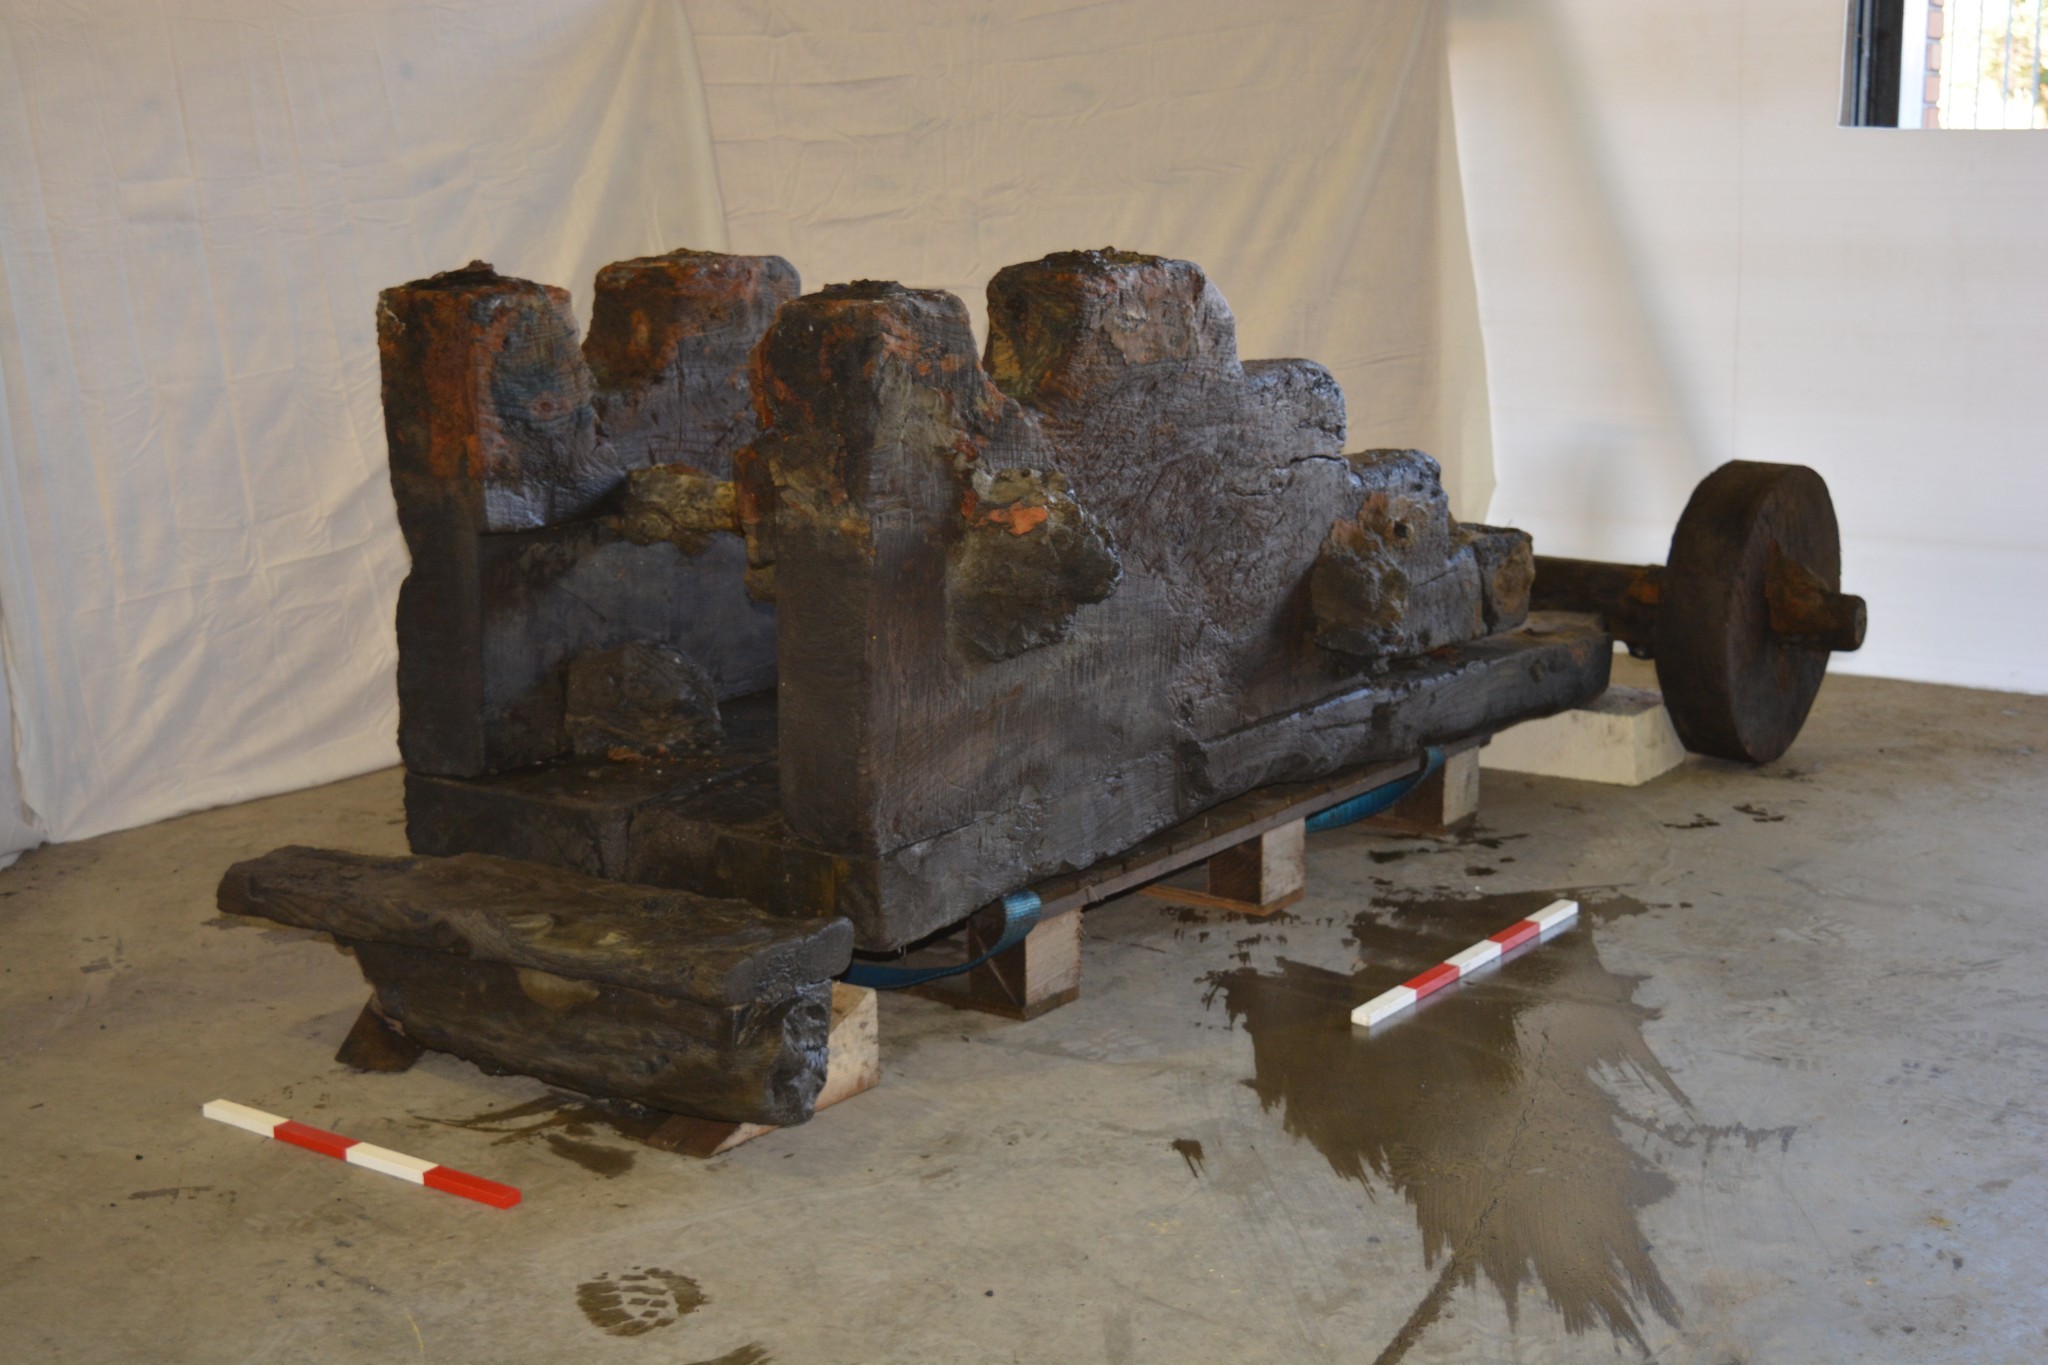
17th century English carriage
Gun carriage salvaged from HMS London c.1665
- Joined
- Oct 9, 2020
- Messages
- 2,390
- Points
- 488

and make them fire too. Now that would be cool.How did you guess…
Sorry, I was just thinking out loud…lol. There are many ways to make them move in and out, and it would obviously be a lot of work. So…I’m sure you will be careful. However it would be cool if they moved and the doors could open and close. Not asking for much right?
Where's the facepalm emoji when I need it?and make them fire too. Now that would be cool.
It's all possible Kurt, just more electronics!Where's the facepalm emoji when I need it?
Last edited:

You guys are killing me.

Wonderful gun rigging, Kurt. I really appreciate the care you've taken to work this lower deck. The effort will pay off, as you move up the decks!
Part for the middle gun deck are being prepared by modifying 1:64 scale 12 pound carriage kits bought from Dave's Lumberyard. The 18th century carriages are being adapted into 17th century carriages. Two stern chasers for the lower gun deck are also being assembled from modified and scratch built parts using material Dave provided, painted, and test fit in the stern gun ports on the lower gun deck. Eyebolts and other fittings will follow before they are rigged in place in the hull.
Contrary to James Sephton's book Sovereign of the Seas - The Seventeenth Century Warship, I can not fit 28 guns on the lower gun deck, only 26, because of the interference of the stern corner guns if the stern chaser and broadside ports were both fit with guns. This is even after taking into account that the forward most bow chaser port are to be left empty. How to squeeze two guns in the stern corners has long been a subject of debate, since the placement of the corner ports using Payne's and William van de Velde's side profiles of the ship, combined with the ship's stern in Lely's Portrait of Peter Pett leave no room for two guns in each corner. I could squeeze two guns in, but the broadside guns would have to be rolled all the way to midships for the stern chaser to have room to operate. It is possible that the stern ports are portrayed too far outboard in the Lely painting, but that still doe snot leave enough room for operating two guns in each corner. My only solution is to leave two guns out, and show the outboard stern chasers on this deck with closed gun ports.
Gun Brackets being shortened in height and length to create 17th century style carriages.

The bottom pieces (beds) on the right, and some brackets on the left waiting to be sanded.

I took some sample pieces and assembled one carriage to test the 28mm barrels for use on the middle gun deck for the 9.5' culverin drakes. Longer 32mm barrels will be used for the lower gun deck chase guns, which were 10.5' demi-cannon drakes.


Same type of carriage slated to be a lower gun deck stern chaser. Shown here is a 35mm barrel, but when installed, a 32mm barrel will be used.


Both stern chasers being test fitted in the gun ports to check the gun barrel height relative to the gun port. These will work.

Inside view. Note how little room there is for the guns in the stern corners. The recoil of an outboard stern chaser would cause the gun to crash into the stern broadside carriage.

Bottom right, you can see how the carriage brackets were reshaped by comparison of the profiles. The two stern chaser carriages above were painted red and are ready to have the trucks, eyebolts, and breech lines fitted. For me, making the guns is the most fun part of building this model.

Before gluing the trucks on the carriages, a 0.5mm mechanical pencil was used to make the bolt heads.

Above, a near finished stern chaser carriage. Below, a similar carriage about to get the trucks glued on.

Contrary to James Sephton's book Sovereign of the Seas - The Seventeenth Century Warship, I can not fit 28 guns on the lower gun deck, only 26, because of the interference of the stern corner guns if the stern chaser and broadside ports were both fit with guns. This is even after taking into account that the forward most bow chaser port are to be left empty. How to squeeze two guns in the stern corners has long been a subject of debate, since the placement of the corner ports using Payne's and William van de Velde's side profiles of the ship, combined with the ship's stern in Lely's Portrait of Peter Pett leave no room for two guns in each corner. I could squeeze two guns in, but the broadside guns would have to be rolled all the way to midships for the stern chaser to have room to operate. It is possible that the stern ports are portrayed too far outboard in the Lely painting, but that still doe snot leave enough room for operating two guns in each corner. My only solution is to leave two guns out, and show the outboard stern chasers on this deck with closed gun ports.
Gun Brackets being shortened in height and length to create 17th century style carriages.
The bottom pieces (beds) on the right, and some brackets on the left waiting to be sanded.
I took some sample pieces and assembled one carriage to test the 28mm barrels for use on the middle gun deck for the 9.5' culverin drakes. Longer 32mm barrels will be used for the lower gun deck chase guns, which were 10.5' demi-cannon drakes.
Same type of carriage slated to be a lower gun deck stern chaser. Shown here is a 35mm barrel, but when installed, a 32mm barrel will be used.
Both stern chasers being test fitted in the gun ports to check the gun barrel height relative to the gun port. These will work.
Inside view. Note how little room there is for the guns in the stern corners. The recoil of an outboard stern chaser would cause the gun to crash into the stern broadside carriage.
Bottom right, you can see how the carriage brackets were reshaped by comparison of the profiles. The two stern chaser carriages above were painted red and are ready to have the trucks, eyebolts, and breech lines fitted. For me, making the guns is the most fun part of building this model.
Before gluing the trucks on the carriages, a 0.5mm mechanical pencil was used to make the bolt heads.
Above, a near finished stern chaser carriage. Below, a similar carriage about to get the trucks glued on.
...if my eyes don't fall out my head first.Wonderful gun rigging, Kurt. I really appreciate the care you've taken to work this lower deck. The effort will pay off, as you move up the decks!

Kurt,
As always great work -- trying to catch up with logs.....
As always great work -- trying to catch up with logs.....