CA seems too brittle.I’m thinking of using epoxy to keep the guns stuck on the carriages.
-

Win a Free Custom Engraved Brass Coin!!!
As a way to introduce our brass coins to the community, we will raffle off a free coin during the month of August. Follow link ABOVE for instructions for entering.
-

PRE-ORDER SHIPS IN SCALE TODAY!
The beloved Ships in Scale Magazine is back and charting a new course for 2026!
Discover new skills, new techniques, and new inspirations in every issue.
NOTE THAT OUR FIRST ISSUE WILL BE JAN/FEB 2026
You are using an out of date browser. It may not display this or other websites correctly.
You should upgrade or use an alternative browser.
You should upgrade or use an alternative browser.
HMS Sovereign of the Seas - Bashing DeAgostini Beyond Believable Boundaries
- Thread starter DARIVS ARCHITECTVS
- Start date
- Watchers 105
Hi Jack. The oscillating cutter has been indispensable for getting in tight corners to cut away hull supports as shown in the build log. It also makes perfectly straight plunge cuts in the hull for the gun ports, as long as you have a firm and steady hand. That saves a lot of time sanding and filing material away to enlarge the ports to the proper size. I bought a few extra blades for the cutter, and ground them to a narrower width so that the slots it cuts are likewise narrower. This was necessary because the gun ports on the middle gun deck are smaller that those on the lower gun deck. Model kits are always "one size fits all" and make all gun ports the same size, which is incorrect.That is going to be a nice looking ship. The hull looks very well shaped. Was wondering what you think of your oscillating cutter?
- Joined
- Oct 9, 2020
- Messages
- 2,235
- Points
- 488

Thank you. I was thinking how much easier it would be to use this tool instead of drilling holes, exacto knife of death, and then filing until you are blue in the face. This seems like the perfect fit for me because i only build ships with cannons. That's my thing.Hi Jack. The oscillating cutter has been indispensable for getting in tight corners to cut away hull supports as shown in the build log. It also makes perfectly straight plunge cuts in the hull for the gun ports, as long as you have a firm and steady hand. That saves a lot of time sanding and filing material away to enlarge the ports to the proper size. I bought a few extra blades for the cutter, and ground them to a narrower width so that the slots it cuts are likewise narrower. This was necessary because the gun ports on the middle gun deck are smaller that those on the lower gun deck. Model kits are always "one size fits all" and make all gun ports the same size, which is incorrect.
I think the drilled hole and filing technique won't be nearly as consistent as using the oscillating cutter and square tube inserts. I like making the tiny cannons too! It's one of the steps that has more fun in it. And ANYTHING is better than ratlining... 
- Joined
- Oct 9, 2020
- Messages
- 2,235
- Points
- 488

I hear you. I am in the process of doing the ratlines right now. But I have a couple of ships in the closet that I will be working on at some point in time in this century and both contain more than 100 cannons. ok 4 actually. but don't tell my wife...
I invested major points with the wife for future ship model purchases. I have terrible allergies to cats, and my wife had to give up her two cats to marry me 11 years ago. My wife, having a terrible case of baby fever, was mollified with the purchase of two purebred Bengal kittens today. Big points obtained for this. I'm good for at least two more ships. Works 1,000 times better than roses. The downside: these cats have less FEL D protein in their saliva, allowing me to be in the same room with them without dying from respiratory arrest, but they cost me $2850.00 USD! I figure it's worth it in order to build a couple more galleons. 
You gotta do what you gotta do if you're serious about ship modeling, gentlemen.
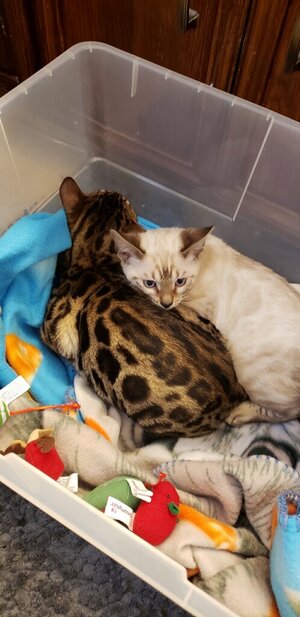

You gotta do what you gotta do if you're serious about ship modeling, gentlemen.

I hope the spotted one won't grow into this:I invested major points with the wife for future ship model purchases. I have terrible allergies to cats, and my wife had to give up her two cats to marry me 11 years ago. My wife, having a terrible case of baby fever, was mollified with the purchase of two purebred Bengal kittens today. Big points obtained for this. I'm good for at least two more ships. Works 1,000 times better than roses. The downside: these cats have less FEL D protein in their saliva, allowing me to be in the same room with them without dying from respiratory arrest, but they cost me $2850.00 USD! I figure it's worth it in order to build a couple more galleons.
You gotta do what you gotta do if you're serious about ship modeling, gentlemen.
View attachment 273577

Last edited:
What do you mean? I’d make them a crown!Beautiful kittens! Just keep @Dean62 away from them.
Th power the women have.... between the age of 5-8 our son was in treatment for leukemia. When he was diagnosed our dog went on a permanent vacation to my mother's house. We didn't want to take any chances while he was in treatment. About 6 months before he completed treatment, my wife kept on mentioning a havenesse. I caved in and we bought it. I do have to admit, every night at 23:30 when I gave our son his chemo, the dog would watch him take it.... it made the last months easier for our son. 6 months after he completed treatment, we had a titer done at Walter Reed. Our son was alegic to cats. So I said, no problem, Gizmo has to go. The doctor (Army) said: No, Gizmo is part of the family he has to stay, my husband is allergic to cats but I didn't give up my.cats when I got married. I just looked at her and surrendered.I invested major points with the wife for future ship model purchases. I have terrible allergies to cats, and my wife had to give up her two cats to marry me 11 years ago. My wife, having a terrible case of baby fever, was mollified with the purchase of two purebred Bengal kittens today. Big points obtained for this. I'm good for at least two more ships. Works 1,000 times better than roses. The downside: these cats have less FEL D protein in their saliva, allowing me to be in the same room with them without dying from respiratory arrest, but they cost me $2850.00 USD! I figure it's worth it in order to build a couple more galleons.
You gotta do what you gotta do if you're serious about ship modeling, gentlemen.
View attachment 273577
I was going to buy a saw, on sale Cyber Monday, and my wife said if there is a sale, get the other tools you want too. So I bought a combo disk/belt sander and a saw.I invested major points with the wife for future ship model purchases. I have terrible allergies to cats, and my wife had to give up her two cats to marry me 11 years ago. My wife, having a terrible case of baby fever, was mollified with the purchase of two purebred Bengal kittens today. Big points obtained for this. I'm good for at least two more ships. Works 1,000 times better than roses. The downside: these cats have less FEL D protein in their saliva, allowing me to be in the same room with them without dying from respiratory arrest, but they cost me $2850.00 USD! I figure it's worth it in order to build a couple more galleons.
You gotta do what you gotta do if you're serious about ship modeling, gentlemen.
View attachment 273577
But she also just purchased a Klipsch home theatre system not too long ago. So I guess we all play the same game!
And therefore I can buy many more tools!
Ps - those cats are awesome!
Last edited:
Mass production of cannon carriages began today for the middle gun deck. I need to make a few complete guns, and use them to determine the vertical location of the middle gun deck relative to the gun ports already cut in the hull. A line will be drawn on the bulwark, and the beam, knee, and stanchion network will be constructed for a known deck thickness. After deck planking, the guns should end up with their muzzles at the correct level in the center of the gun ports. I struggled to get the guns in the correct positions for the lower deck because I used the kit deck pieces and kit instructions for the position of the gun ports. The middle gun deck should be easier to get the vertical position correct since it will be scratch built based on the gun port positions which are already established.
Cut cheeks to the correct height for custom 17th century carriages, in which the cheeks are mounted on the top surface of the base of the carriage.
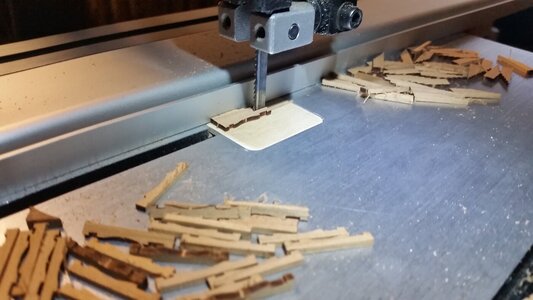
Next, the length of the cheeks is cut. Using laser cut carriages from Dave at The Lumberyard for Model Shipwrights saved me tons of cutting for the stepped sections and provided a basis for making 17th century carriages, which no one supplies.
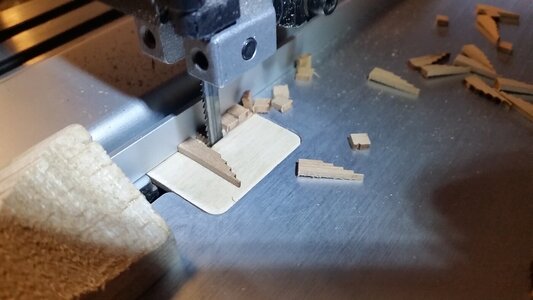
Cheeks are glued to tapered bases that were cut from scrap from Dave's Lumberyard.

Carriages under assembly.
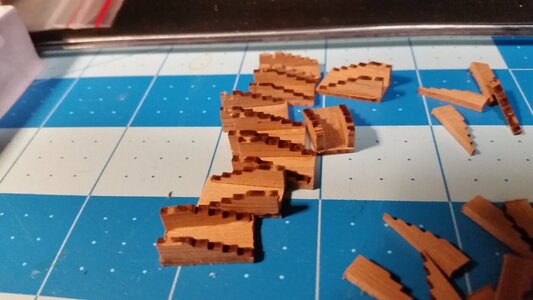
Axles are glued to the bases, rounded to accept the trucks, bolster pieces fashioned and glued in place at the front end, and the carriages are painted. More details will be added later such as the quoins, breeching rope rings, train tackle rings, etc.

Cut cheeks to the correct height for custom 17th century carriages, in which the cheeks are mounted on the top surface of the base of the carriage.

Next, the length of the cheeks is cut. Using laser cut carriages from Dave at The Lumberyard for Model Shipwrights saved me tons of cutting for the stepped sections and provided a basis for making 17th century carriages, which no one supplies.

Cheeks are glued to tapered bases that were cut from scrap from Dave's Lumberyard.

Carriages under assembly.

Axles are glued to the bases, rounded to accept the trucks, bolster pieces fashioned and glued in place at the front end, and the carriages are painted. More details will be added later such as the quoins, breeching rope rings, train tackle rings, etc.

I have great respect for SoS members as you have done in their planning and execution not only of the mass produced items but in planning and obtaining the correct sizes and placements of the materials within which they will be placed. Some items can be mass produced and others remain a one-at-a-time hands on matter. Well done. Rich (PT-2)Mass production of cannon carriages began today for the middle gun deck. I need to make a few complete guns, and use them to determine the vertical location of the middle gun deck relative to the gun ports already cut in the hull. A line will be drawn on the bulwark, and the beam, knee, and stanchion network will be constructed for a known deck thickness. After deck planking, the guns should end up with their muzzles at the correct level in the center of the gun ports. I struggled to get the guns in the correct positions for the lower deck because I used the kit deck pieces and kit instructions for the position of the gun ports. The middle gun deck should be easier to get the vertical position correct since it will be scratch built based on the gun port positions which are already established.
Cut cheeks to the correct height for custom 17th century carriages, in which the cheeks are mounted on the top surface of the base of the carriage.
View attachment 273934
Next, the length of the cheeks is cut. Using laser cut carriages from Dave at The Lumberyard for Model Shipwrights saved me tons of cutting for the stepped sections and provided a basis for making 17th century carriages, which no one supplies.
View attachment 273935
Cheeks are glued to tapered bases that were cut from scrap from Dave's Lumberyard.
View attachment 273936
Carriages under assembly.
View attachment 273937
Axles are glued to the bases, rounded to accept the trucks, bolster pieces fashioned and glued in place at the front end, and the carriages are painted. More details will be added later such as the quoins, breeching rope rings, train tackle rings, etc.
View attachment 273938
Still working on gun carriages for the middle gun deck. Trucks were colored black on the rims with a Sharpie marker and bolt heads drawn with a mechanical pencil. Eyebolts for the gun tackles, and rings for the train tackles and breeching lines were fabricated and installed. Much of the repetitive work has been done. I am waiting on 32mm brass gun barrels to arrive, and trunnion caps need to be made.
Each piece gets some added detail.
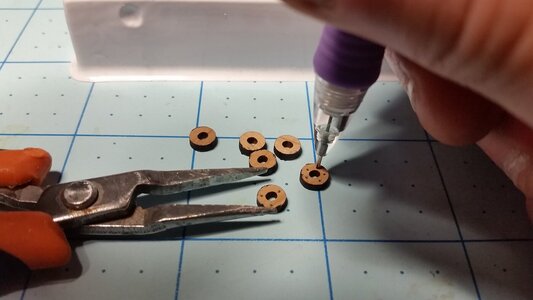
Production of carriages continues.
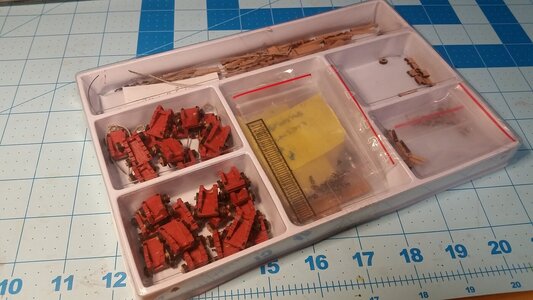
Each piece gets some added detail.

Production of carriages continues.

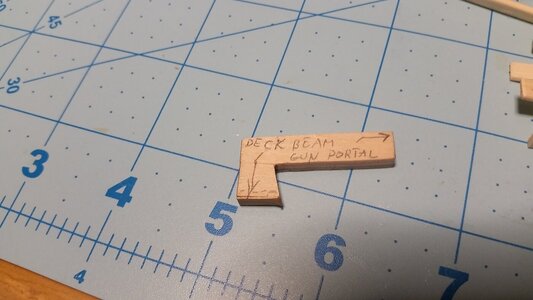
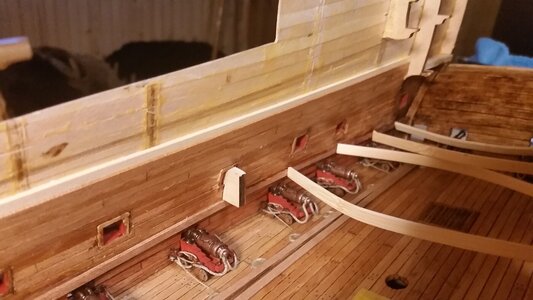
After days of contemplating the approach to start installing the web of deck beams, then hanging knees, lodging knees, carlings, and ledges, It was time to calculate the vertical position of the deck support strips called the clamps and attach it to the bulwarks for the middle gun deck. The vertical position of the clamps was determined using a cannon carriage temporarily glued to a small piece of simulated decking. The deck is a thin, three ply piece of quality birch plywood with strips of Tanganyika deck planks layered onto it. using this cannon/deck assembly as a measuring jig, the assembly was inserted into a gun portal, and a pencil was used to draw a line along the bottom of the deck piece on the bulwark. This line showed me where the beam structure meets the bulwarks, and when the plywood/deck plank pieces are layered on top of this structure, the deck will be at the correct height relative to the gun portals. The decking will be precisely 1.5mm thick. Measuring the distance from the pencil mark, to the bottom edge of the gun portal, an "L" shaped gage was cut from scrap plywood, and this gage was used to glue the clamp strips at the correct height along the bulwarks.

Clamp location gage.
The clamp strip is clamped to the bulwark, and CA glue is applied to the top edge. The glue soaks into the joint by capillary action.
Moving from the stern to the bow, the gage is inserted into a gun port, the strip is placed against the bottom of the gage, clamps are applied, and CA glue applied to the top edge. Below, the starboard side clamp is finished being glued in place.
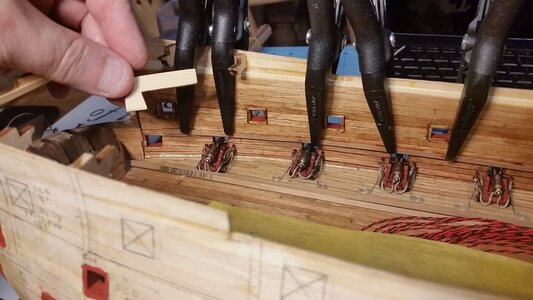
View of starboard side clamp strip showing clamps still in place.
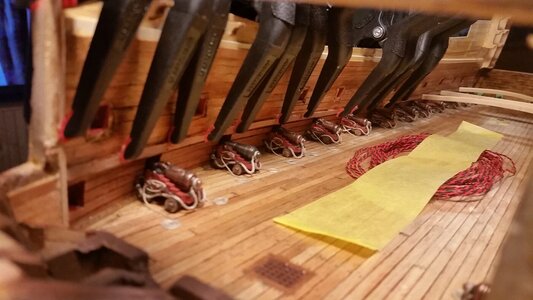
The port side is glued in the same fashion. You can see the gage in position, assuring that the deck will eventually be at the correct vertical position.

Clamp location gage.

The clamp strip is clamped to the bulwark, and CA glue is applied to the top edge. The glue soaks into the joint by capillary action.

Moving from the stern to the bow, the gage is inserted into a gun port, the strip is placed against the bottom of the gage, clamps are applied, and CA glue applied to the top edge. Below, the starboard side clamp is finished being glued in place.

View of starboard side clamp strip showing clamps still in place.

The port side is glued in the same fashion. You can see the gage in position, assuring that the deck will eventually be at the correct vertical position.

Last edited:
we can see now very good how narrow the decks of the old ships were
Very ingenious way of determining the height on a consistent basis.After days of contemplating the approach to start installing the web of deck beams, then hanging knees, lodging knees, carlings, and ledges, It was time to calculate the vertical position of the deck support strips called the clamps and attach it to the bulwarks for the middle gun deck. The vertical position of the clamps was determined using a cannon carriage temporarily glued to a small piece of simulated decking. The deck is a thin, three ply piece of quality birch plywood with strips of Tanganyika deck planks layered onto it. using this cannon/deck assembly as a measuring jig, the assembly was inserted into a gun portal, and a pencil was used to draw a line along the bottom of the deck piece on the bulwark. This line showed me where the beam structure meets the bulwarks, and when the plywood/deck plank pieces are layered on top of this structure, the deck will be at the correct height relative to the gun portals. The decking will be precisely 1.5mm thick. Measuring the distance from the pencil mark, to the bottom edge of the gun portal, an "L" shaped gage was cut from scrap plywood, and this gage was used to glue the clamp strips at the correct height along the bulwarks.
View attachment 277500
Clamp location gage.
View attachment 277501
The clamp strip is clamped to the bulwark, and CA glue is applied to the top edge. The glue soaks into the joint by capillary action.
View attachment 277502
Moving from the stern to the bow, the gage is inserted into a gun port, the strip is placed against the bottom of the gage, clamps are applied, and CA glue applied to the top edge. Below, the starboard side clamp is finished being glued in place.
View attachment 277503
View of starboard side clamp strip showing clamps still in place.
View attachment 277504
The port side is glued in the same fashion. You can see the gage in position, assuring that the deck will eventually be at the correct vertical position.
View attachment 277505
The cats are beautiful and you'll be in love with them, in no time! SOS is really coming along, nicely, Kurt!
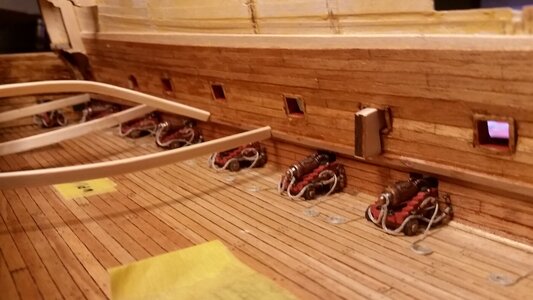
Thanks for all the compliments friends! Small update today. Now that the guns are installed, it's time to move on to the fixtures closer to the centerline on the deck, and begin creating the middle gun deck beam above. The anchor handling bits for the hawsers were installed first. Two 3x3mm beams were installed at the bow after soaking them in water carefully bending the camber, and cutting and sanding the ends for a precise fit. They are only held in place with CA glue, so the joints are pretty brittle, but hanging knees, lodging knees, carlings and ledges will be added later. The columns I fabricated earlier in the build appear to be too large in diameter. I have only eight 28mm columns made by Caldercraft (part# 86120) and left over from the La Couronne build that I want to use, but I need a lot more of them for this ship. I will have to devise a way of turning 2.5mm diameter wooden columns in walnut to match them or make at least 40-50 columns of some other design to reinforce the beams and hold them at the proper camber until the deck is made.
Some more details were crafted for the base of the foremast, and the foundation for the end of the bowsprit. At some point the hawse pipes will need to be drilled through the hull for the anchor hawsers.
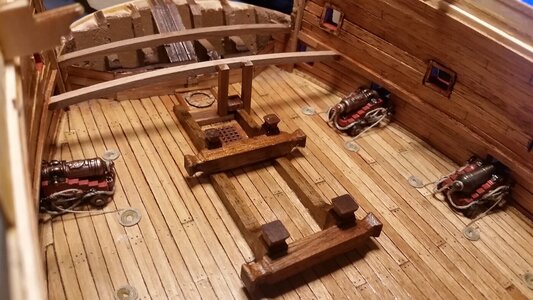
Some more details were crafted for the base of the foremast, and the foundation for the end of the bowsprit. At some point the hawse pipes will need to be drilled through the hull for the anchor hawsers.


