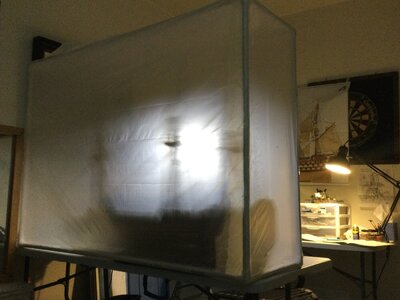
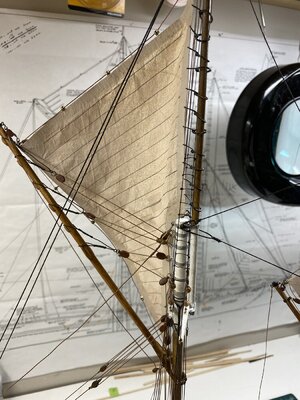
Many Thanks for showing us an update of your works on your Victory !!!
-

Win a Free Custom Engraved Brass Coin!!!
As a way to introduce our brass coins to the community, we will raffle off a free coin during the month of August. Follow link ABOVE for instructions for entering.
-

PRE-ORDER SHIPS IN SCALE TODAY!
The beloved Ships in Scale Magazine is back and charting a new course for 2026!
Discover new skills, new techniques, and new inspirations in every issue.
NOTE THAT OUR FIRST ISSUE WILL BE JAN/FEB 2026
You are using an out of date browser. It may not display this or other websites correctly.
You should upgrade or use an alternative browser.
You should upgrade or use an alternative browser.
HMS Victory (1765) - Artesania Latina [COMPLETED BUILD]
Hallo @RmazdraI purchased my AL kit of HMS Victory early in 2019 off of eBay. I paid $600 for it (which is about the average cost that I see).
Overall, I am happy with the kit. I really like the beauty in the different variety of woods. My initial intention was to paint the entire model the battle colors at the time of Trafalgar in 1805. However, I wanted to show some of the wood's patterns and shades. Thus, one side of the hull is left unpainted (which is as the kit was designed) and the other half painted. It's almost been like building 2 models at once. The deck work is also, for the most part, unpainted. It's been interesting thinking of how to blend the painted portion with the unpainted. I wanted the blending to come across as natural as possible regardless of the viewer's perspective.
I also chose to build out the lower gun deck with full carronades versus using a "fake" lower gun deck. This was all done because I wanted to put in lights to all 3 gun decks and transom.
So far, I'm about 1300 hours into the build. I can foresee needing that much time to get through the rest.
we wish you all the BEST and a HAPPY BIRTHDAY

- Joined
- Jul 3, 2020
- Messages
- 41
- Points
- 78

Ahoy! Been a while since I've posted.
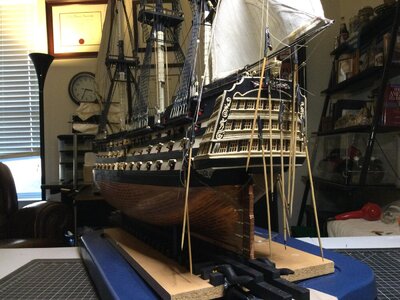
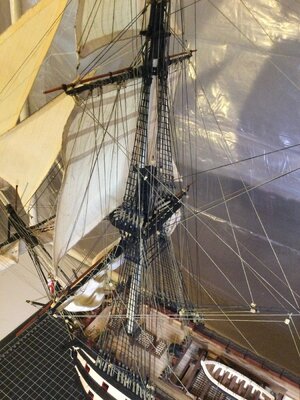
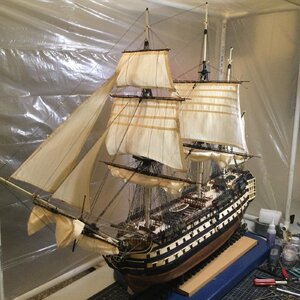
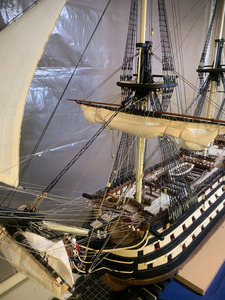
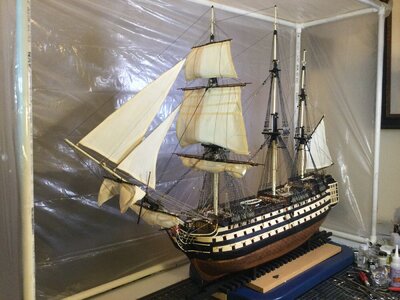
Victory is still making progress, albeit a bit slower. Yards, sails, and rigging. Rinse. Repeat. Getting close to finishing all the sails I'm going to outfit her with. Just the main topgallant and the mizzen sails to go.
Trying to get the provided sails by Artesania Latina to hold their shape has been interesting. I started off using a product called Stiffen Quick (I'm not joking on that name). It was too heavy when I sprayed it on and I couldn't get a decent billowing form to stay. It also dried very unevenly, leaving a lot of wrinkles. I wound up discarding that approach and instead just used an iron, steam, and spray starch. After ironing and starching, I usually hung the sails to dry, wrapped up in a cylinder, for a few days, leaving them dangling below my desk light which I left on. They are holding up their form pretty well without being overly stiff. They can still flex a bit as I'm rigging and I think are looking pretty natural.
I had a vision early on not to rig all the sails (especially the stay sails) because I wanted to leave all the rigging between the masts better visible. And I furled up the main and fore masts to give a good look at all the activity on deck getting all the lines tied down.


Good morning. An exquisite Victory. One of the best I have seen. Awesome. Cheers GrantAhoy! Been a while since I've posted.
Victory is still making progress, albeit a bit slower. Yards, sails, and rigging. Rinse. Repeat. Getting close to finishing all the sails I'm going to outfit her with. Just the main topgallant and the mizzen sails to go.
Trying to get the provided sails by Artesania Latina to hold their shape has been interesting. I started off using a product called Stiffen Quick (I'm not joking on that name). It was too heavy when I sprayed it on and I couldn't get a decent billowing form to stay. It also dried very unevenly, leaving a lot of wrinkles. I wound up discarding that approach and instead just used an iron, steam, and spray starch. After ironing and starching, I usually hung the sails to dry, wrapped up in a cylinder, for a few days, leaving them dangling below my desk light which I left on. They are holding up their form pretty well without being overly stiff. They can still flex a bit as I'm rigging and I think are looking pretty natural.
I had a vision early on not to rig all the sails (especially the stay sails) because I wanted to leave all the rigging between the masts better visible. And I furled up the main and fore masts to give a good look at all the activity on deck getting all the lines tied down.
View attachment 357269View attachment 357271View attachment 357273
View attachment 357270
View attachment 357272
How did you create the rivet impressions on the copper cladding?I purchased my AL kit of HMS Victory early in 2019 off of eBay. I paid $600 for it (which is about the average cost that I see).
Overall, I am happy with the kit. I really like the beauty in the different variety of woods. My initial intention was to paint the entire model the battle colors at the time of Trafalgar in 1805. However, I wanted to show some of the wood's patterns and shades. Thus, one side of the hull is left unpainted (which is as the kit was designed) and the other half painted. It's almost been like building 2 models at once. The deck work is also, for the most part, unpainted. It's been interesting thinking of how to blend the painted portion with the unpainted. I wanted the blending to come across as natural as possible regardless of the viewer's perspective.
I also chose to build out the lower gun deck with full carronades versus using a "fake" lower gun deck. This was all done because I wanted to put in lights to all 3 gun decks and transom.
So far, I'm about 1300 hours into the build. I can foresee needing that much time to get through the rest.
- Joined
- Jul 3, 2020
- Messages
- 41
- Points
- 78

Thanks for the positive feedback Grant.Good morning. An exquisite Victory. One of the best I have seen. Awesome. Cheers Grant
- Joined
- Jul 3, 2020
- Messages
- 41
- Points
- 78

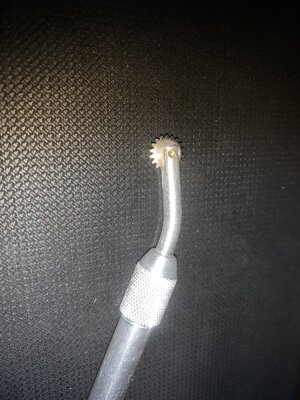
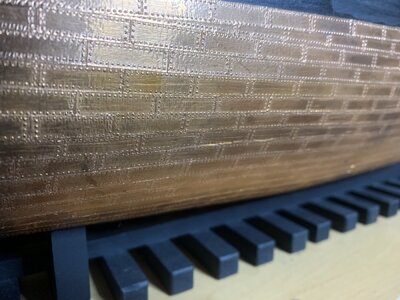
Hi there. I decided to do the copper plating the easy way using 1/4” copper tape. That was the right width for the scale of my build. I measured a long strip of tape to fit down the length of the hull, then marked the width of each plate on the paper backing of the tape. The rivet impressions were made using a pounce wheel (see pic). This is a small metal wheel with spikes, usually used for marking cloth when sewing. I ran the pounce on the back side of the copper tape so that the impression pushed out the front of the tape, but didn’t puncture it. I think the real copper plates are nailed over the entire surface of the plate, but with the pounce wheel, I only felt steady enough to do the outlines of each plate. I like the final result, and the copper tape is even starting to show a nice patina.How did you create the rivet impressions on the copper cladding?
- Joined
- Jul 3, 2020
- Messages
- 41
- Points
- 78

Highflight, thx for the insight. I like it a lot. I can see where I could have used something like that to get a fuller look.this model of the Victory is a work of art. As for billowing sails I used a very thin coper wire imbedded is the perimeter of the sail which worked well on my Bluenose.
View attachment 357303
I agree. I need to get one for my cross section model.Hi there. I decided to do the copper plating the easy way using 1/4” copper tape. That was the right width for the scale of my build. I measured a long strip of tape to fit down the length of the hull, then marked the width of each plate on the paper backing of the tape. The rivet impressions were made using a pounce wheel (see pic). This is a small metal wheel with spikes, usually used for marking cloth when sewing. I ran the pounce on the back side of the copper tape so that the impression pushed out the front of the tape, but didn’t puncture it. I think the real copper plates are nailed over the entire surface of the plate, but with the pounce wheel, I only felt steady enough to do the outlines of each plate. I like the final result, and the copper tape is even starting to show a nice patina.View attachment 357382View attachment 357383
Dear @RmazdraI had to add 1 more photo of "Phantom Vic"...
we wish you all the BEST and a HAPPY BIRTHDAY

How is the work on your great "Phantom Victory" going? Did you finish her in the meantime?
Happy birthday. Enjoy. Cheers GrantDear @Rmazdra
we wish you all the BEST and a HAPPY BIRTHDAY
How is the work on your great "Phantom Victory" going? Did you finish her in the meantime?
Hope my German Shepherd doesn't decide to do that. The fur will fly!Clair, just for you...His name is Bubba. I had to reorganize my hobby area when I found out he was getting up on the table at night.
That is such a beautiful model. I'm so glad to see the Ivory sides instead of the yellow. It looks way better this way. I'm toying with this kit for my next build. I have reason to believe that my Grandfather served on it in the late 1800's and looking now for more information on him. Incidentally I'm putting sails on my Cutty Sark and found some Elmers glue that is clear. Painted both sides of a sail with the glue and left it on a curved surface with waxed paper between the sail and the curved surface to dry over night. The next day I removed it from the form and peeled the waxed paper off and had a nice curved sail (lower Main) to work with. It was very pliable but kept it's form pretty well with help from the lines attached to it. I'll try a few more sails like this and see how it goes. NorgaleAhoy! Been a while since I've posted.
Victory is still making progress, albeit a bit slower. Yards, sails, and rigging. Rinse. Repeat. Getting close to finishing all the sails I'm going to outfit her with. Just the main topgallant and the mizzen sails to go.
Trying to get the provided sails by Artesania Latina to hold their shape has been interesting. I started off using a product called Stiffen Quick (I'm not joking on that name). It was too heavy when I sprayed it on and I couldn't get a decent billowing form to stay. It also dried very unevenly, leaving a lot of wrinkles. I wound up discarding that approach and instead just used an iron, steam, and spray starch. After ironing and starching, I usually hung the sails to dry, wrapped up in a cylinder, for a few days, leaving them dangling below my desk light which I left on. They are holding up their form pretty well without being overly stiff. They can still flex a bit as I'm rigging and I think are looking pretty natural.
I had a vision early on not to rig all the sails (especially the stay sails) because I wanted to leave all the rigging between the masts better visible. And I furled up the main and fore masts to give a good look at all the activity on deck getting all the lines tied down.
View attachment 357269View attachment 357271View attachment 357273
View attachment 357270
View attachment 357272
What was your reference for the width of the black and white bands on the painted side? I am building the Corel cross-section. I am trying to start at the water line (16mm below the lower gun ports (Ref: Bugler)) but its not balancing out quite right.I purchased my AL kit of HMS Victory early in 2019 off of eBay. I paid $600 for it (which is about the average cost that I see).
Overall, I am happy with the kit. I really like the beauty in the different variety of woods. My initial intention was to paint the entire model the battle colors at the time of Trafalgar in 1805. However, I wanted to show some of the wood's patterns and shades. Thus, one side of the hull is left unpainted (which is as the kit was designed) and the other half painted. It's almost been like building 2 models at once. The deck work is also, for the most part, unpainted. It's been interesting thinking of how to blend the painted portion with the unpainted. I wanted the blending to come across as natural as possible regardless of the viewer's perspective.
I also chose to build out the lower gun deck with full carronades versus using a "fake" lower gun deck. This was all done because I wanted to put in lights to all 3 gun decks and transom.
So far, I'm about 1300 hours into the build. I can foresee needing that much time to get through the rest.
Wow, I like this a lot. Very nice!
Hallo @RmazdraI purchased my AL kit of HMS Victory early in 2019 off of eBay. I paid $600 for it (which is about the average cost that I see).
Overall, I am happy with the kit. I really like the beauty in the different variety of woods. My initial intention was to paint the entire model the battle colors at the time of Trafalgar in 1805. However, I wanted to show some of the wood's patterns and shades. Thus, one side of the hull is left unpainted (which is as the kit was designed) and the other half painted. It's almost been like building 2 models at once. The deck work is also, for the most part, unpainted. It's been interesting thinking of how to blend the painted portion with the unpainted. I wanted the blending to come across as natural as possible regardless of the viewer's perspective.
I also chose to build out the lower gun deck with full carronades versus using a "fake" lower gun deck. This was all done because I wanted to put in lights to all 3 gun decks and transom.
So far, I'm about 1300 hours into the build. I can foresee needing that much time to get through the rest.
we wish you all the BEST and a HAPPY BIRTHDAY

Ho wis your work on the victory going?
- Joined
- Jul 3, 2020
- Messages
- 41
- Points
- 78

Sorry for the delayed response. I actually don't remember how I came up with the width of the bands other than looking online at pictures of the real Victory and seeing other models. I wasn't researching too much of the detail at that stage of the build. I spent much more time researching when it came to the masts, yards, sails, and rigging. I also recall that on the upper part of the hull, there was a 2nd layer of planking. On the unpainted sides, this layer was made of coral wood. That wound up being my black layer on the painted side and so gave a perfect separation. I used the upper plank in a grouping to align with the bottom of the gunport openings.What was your reference for the width of the black and white bands on the painted side? I am building the Corel cross-section. I am trying to start at the water line (16mm below the lower gun ports (Ref: Bugler)) but its not balancing out quite right.


