Hms Victory by Caldercraft - Build Log

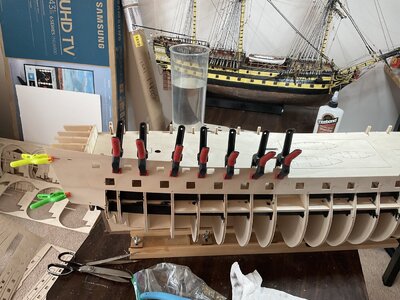
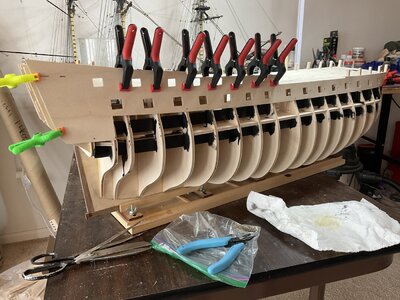
Okay, time for the first update,, Unfortunately I am realizing that my wood glue is now old and I need to go out and get some new white glue,, what I am using is old and from when I was working Vanguard hull,, it seems to have worked but the spouts are destroyed,,,I am going to get some new glue later today to keep. Moving and be more precise, You can see my vanguard is back in the shipyard for some “cleaning and touché up” in the back round!!!!! I am scared to death of getting these gunport templates right, I had them slightly off on the Vanguard and I never was able to really recover. I know I am a perfectionist, but even half a millimeter off and I am unhappy,,,

image.jpg

image.jpg

image.jpg
 
Hi TraumaDoc.

Looking forward to your build. I also will be starting the Caldercraft Victory early next year so your log will be of great interest.

I am taking a break of a few months between finishing the Billing Vasa, but looking forward to this new challenge.

Keep up the log and Happy Christmas!!

Regards

PeterG
 
Good luck.
It's really a big project
The model produced by Cadercraft is the most successful, but also the most expensive!
Marco
 
Okay, time for the first update,, Unfortunately I am realizing that my wood glue is now old and I need to go out and get some new white glue,, what I am using is old and from when I was working Vanguard hull,, it seems to have worked but the spouts are destroyed,,,I am going to get some new glue later today to keep. Moving and be more precise, You can see my vanguard is back in the shipyard for some “cleaning and touché up” in the back round!!!!! I am scared to death of getting these gunport templates right, I had them slightly off on the Vanguard and I never was able to really recover. I know I am a perfectionist, but even half a millimeter off and I am unhappy,,,

View attachment 344878

View attachment 344879

View attachment 344880
Good afternoon. All looking great. Something I would consider before going too much further is to do the fairing of the frames. There is significant shaping around the the bow and stern with the Victory and may be easier to get the sanding in without too much fitting above/near these frames/bulkheads. Cheers Grant
 
Your Vanguard is looking very good - so you had a very good "learning exercise"
I am looking forward and hope to see as often as possible some progress on this project
 
time for updates,,, I am about half way through first planking, already have made errors,,, (Still a surgeon, confess your errors to the group at M&M)
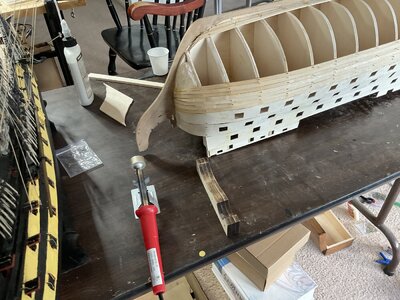
I messed up the bearding line,, I put the stern post on early by accident following the plan sheets instead of written directions reading into the lines, and ended up sanding the sternpost down with the bearding line,, I don’t think it will be a big deal, I will plank over it and I doubt it will make difference in the end. As I look at the gunport patterns I realize one side is about 3/4 of a MM off and I am upset about that, I was so sure it was perfect as I put it on,, too late now, I will adjust as we go. I also failed to taper the stern extensions a bit before I put the gunport on, so hopefully it isn’t too wide. I can sand things down as I need, And lastly I have already lost a something. I did my inventory and now can’t find a small bag of dome head nails. (Part 696) that I know I had because I was impressed with the quality when I did my first pass through the box. Stupid,,,,

image.jpg

image.jpg
 
Hello Traumadoc,
Let's go! It should not be a drama, it is only the 1st passage, many of these minor errors will no longer be seen! Courage!
As for those pesky nails, they will reappear! A little mischief puts spice to test our patience!
You need it when you build such a brand and beautiful ship
Marco
 
time for updates,,, I am about half way through first planking, already have made errors,,, (Still a surgeon, confess your errors to the group at M&M)
I messed up the bearding line,, I put the stern post on early by accident following the plan sheets instead of written directions reading into the lines, and ended up sanding the sternpost down with the bearding line,, I don’t think it will be a big deal, I will plank over it and I doubt it will make difference in the end. As I look at the gunport patterns I realize one side is about 3/4 of a MM off and I am upset about that, I was so sure it was perfect as I put it on,, too late now, I will adjust as we go. I also failed to taper the stern extensions a bit before I put the gunport on, so hopefully it isn’t too wide. I can sand things down as I need, And lastly I have already lost a something. I did my inventory and now can’t find a small bag of dome head nails. (Part 696) that I know I had because I was impressed with the quality when I did my first pass through the box. Stupid,,,,

View attachment 346103

View attachment 346104
Good morning Doc. Looking good. As you venture along your journey with this massive and majestic ship, you will misplace many little parts - I know I did. They always resurface at a point tho mostly a point when you don’t need them anymore ROTF . As a fellow Victory builder I will follow your progress with enthusiasm. Cheers Grant
 
Doc, you are making great progress, looking good. I had some issues with the port to starboard alignment of the gun port strips, a little off when looking at the ship head on. Will have to adjust as always. Have about 10 planking strips on either side of the hull, going on ok. I am finding the stern planking to be at least as challenging as the bow. Patience is a virtue they say. Am looking forward to the day when first planking is done and sanded.
Cheers
 
... Unfortunately I am realizing that my wood glue is now old and I need to go out and get some new white glue,, what I am using is old and from when I was working Vanguard hull,, it seems to have worked but the spouts are destroyed,,,I am going to get some new glue later today to keep.
Can I make a suggestion about keeping your wood glue ready to use? Like you, I use Titebond but I transfer it into a plastic syringe (from Amazon). It's much more precise than the Titebond bottle spout. Between sessions, I leave the glue in the syringe but keep the syringe tip-down in a container of water. The water keeps the glue from hardening inside the syringe tip and is easily cleaned up before you start using it again. Just my $.02.
 
Can I make a suggestion about keeping your wood glue ready to use? Like you, I use Titebond but I transfer it into a plastic syringe (from Amazon). It's much more precise than the Titebond bottle spout. Between sessions, I leave the glue in the syringe but keep the syringe tip-down in a container of water. The water keeps the glue from hardening inside the syringe tip and is easily cleaned up before you start using it again. Just my $.02.
Excellent idea.
I will put it into practice immediately.
Thank you for this good advice!
Marco
 
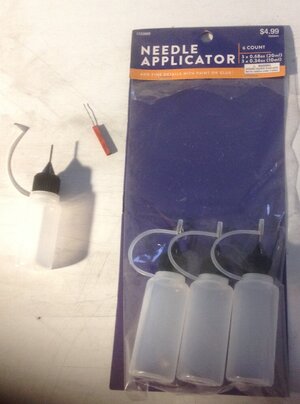
I saw these in a prior post here about a year ago. Unable to credit the original poster. Speechless They come in the two sizes shown, work great with Titebond, and give really precise application. I have saved the cost of the bottles several times over through the tremendous saving of glue. The little tool shown is a thin wire glued into a small block of wood to clean out the applicator tube when I forget to put the little rubber cap back in place. I seem to do that a lot... Anway, they sell these at local hobby stores and I am sure Amazon has similar. Highly recommended. IMG_0390.JPG
 
Latest update, I have completed the first planking, sanded, It is not horrible, could be better, but I will take it and move on. I completed the roughing in of the stern galleries, and will start cleaning that up tomorrow. Minor problem I had a slip of the brain and used superglue near one of the windows and got the white fog on the inside of it. I guess I am going to have to cut it out and replace it, not sure what else to do,,, I have the rudder post fixed, sanded , and the ready for the lower stern plate.

image.jpg

image.jpg

image.jpg

image.jpg
 
Hi Doc
I think you did a good job.
This is only the beginning,
it will be covered.
It's very homogeneous
Marco
 
Spend a good deal of time sanding/filling/sanding the hull and get the curves exactly symmetrical port to starboard. Time spent now will become a perfect hull shape later after final planking. Looking good so far. Fix the window so you don't have to look at it forever and let it bother you. This is one fine build!
 
Spend a good deal of time sanding/filling/sanding the hull and get the curves exactly symmetrical port to starboard. Time spent now will become a perfect hull shape later after final planking. Looking good so far. Fix the window so you don't have to look at it forever and let it bother you. This is one fine build!
Thanks so much,, I made a major mistake on my ship, didn’t know how to get “the curves just right” so the bumpers took a lot of adjusting when I tried to fit them,, Let me know if you have any ideas on how to “fix” the windows. As a surgeon I am obsessive about having a plan so to speak , I am trying to figure out how to cut out the windows and replace, but then I can’t access the back side to get them to adhere, and I am afraid of cutting out the entire piece,,,, thoughts????
 
Thanks so much,, I made a major mistake on my ship, didn’t know how to get “the curves just right” so the bumpers took a lot of adjusting when I tried to fit them,, Let me know if you have any ideas on how to “fix” the windows. As a surgeon I am obsessive about having a plan so to speak , I am trying to figure out how to cut out the windows and replace, but then I can’t access the back side to get them to adhere, and I am afraid of cutting out the entire piece,,,, thoughts????
I would carefully cut the side gallery section off, cutting only at the glue joints with a sharp razor knife, replacing the glass, and glue it back on. It seems the only way to get to the inside. Using CA on windows is risky. If you do, you need air movement over the glass until fully dry or it gets frosted. It happened on my first ship too, so don't feel bad. Best to use some other type of glue, one that bonds to plastic. When building, one occasionally gets in a jam like that. I've had to hone my talents at rework because of such things. Getting pretty good at doing major surgery on model ship hulls. It build confidence needed to bash kits or scratch build. Fortunately, you get better with experience screwing up. :D
 
Thanks,, I was thinking that, thought I was smart, used the safe glue to get the glaze/window attached, then used the regular glue to attach the panel to the frame and I guess it dripped on,, Will be more carefull next time….
 
Back
Top