Every day's a school day as they say. I read the post about the clamp/press and thought 'why didn't I think of that'. I will definitely do this next time
-

Win a Free Custom Engraved Brass Coin!!!
As a way to introduce our brass coins to the community, we will raffle off a free coin during the month of August. Follow link ABOVE for instructions for entering.
-

PRE-ORDER SHIPS IN SCALE TODAY!
The beloved Ships in Scale Magazine is back and charting a new course for 2026!
Discover new skills, new techniques, and new inspirations in every issue.
NOTE THAT OUR FIRST ISSUE WILL BE JAN/FEB 2026
You are using an out of date browser. It may not display this or other websites correctly.
You should upgrade or use an alternative browser.
You should upgrade or use an alternative browser.
HMS Victory - Caldercraft-Jotika - 1/72. Build log
- Thread starter PeterG
- Start date
- Watchers 66
-
- Tags
- caldercraft jotika victory
Thank you Tommy Bowler. I agree - If you don't come away, everyday without having discovered something new, you have wasted a day!! Carpe diem...
Before fixing the Middle Gun Deck patterns, I needed to line each of the floors of the gun bays with a false floor. I am using 1.5mm balsa and inscribing some dark, thin pencil carbon as faux planking. These are then cut and glued to the bases of each bay. I did both the Middle and Lower Gun Decks while at it. I have the internal LEDs in place and operating. Not every gun bay has lighting. It is randomly placed with about 8-10 LEDs per deck.
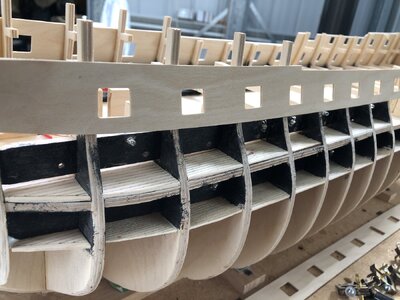
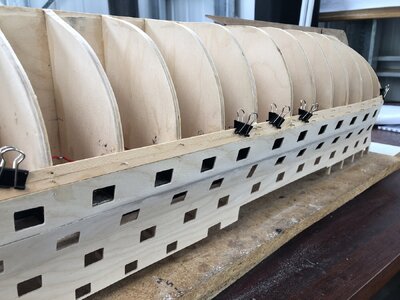
Once these false floors were in place, I then mounted and glued the Middle Gun Deck outside pattern (Port side first). I did this the same way as Paulv1958 recommended and used both clamps and the supplied small brass nails to secure the pattern to the bulkheads. I was careful and sanded/adjusted the upper edge of the pattern with the lower edge of the Middle Gun Deck so they butted together almost seamlessly. The already rounded, curved bow section fitted nicely with only 3-4 nails and the larger clamp was needed with the tight bend as the pattern came around and between Bulkhead 1 and 2.
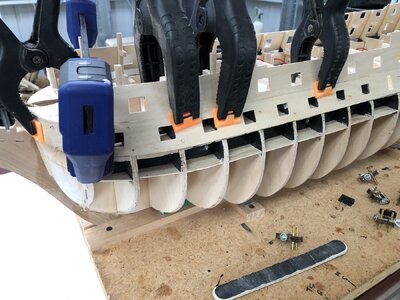
The process of aligning the Lower Gun Deck pattern (to fit and match the lower edge of the Middle Gun Deck), can be then done as a repeat of the Middle Gun Deck. It also requires bow bending (again using the clamp/press already shown). Once this is in place, I can then start installing the false cannon trucks into each cannon bay for the Middle Deck and the Lower Gun Decks, but I might leave this until after the hull planking.
The next stages involve planking. Firstly I have to commence the first hull planking, sanding and shaping (a long process), and then I have to plank the Middle Gun Deck which is visible through hatch openings in the Quarter Deck and Upper Decks. Finally, installation of the Upper Deck floor will be tricky as the fit is very tight and the 3mm plywood will require some judicious but careful bending. I have already done this as a test fit and it does go in, but its a fiddle with getting the 18 bulkheads to slot into the cut-outs of the floor for both sides (that's 36 tight fits to be negotiated). Just prior this too, I have to ensure I have LED wiring bus access points to allow for more LEDs and lighting in the Middle Deck. I will have to work out the optimal positioning of these once the deck and visual lines of sight are worked out.
Best Regards,
PeterG
Elapsed Time: 144 hours
Before fixing the Middle Gun Deck patterns, I needed to line each of the floors of the gun bays with a false floor. I am using 1.5mm balsa and inscribing some dark, thin pencil carbon as faux planking. These are then cut and glued to the bases of each bay. I did both the Middle and Lower Gun Decks while at it. I have the internal LEDs in place and operating. Not every gun bay has lighting. It is randomly placed with about 8-10 LEDs per deck.

Once these false floors were in place, I then mounted and glued the Middle Gun Deck outside pattern (Port side first). I did this the same way as Paulv1958 recommended and used both clamps and the supplied small brass nails to secure the pattern to the bulkheads. I was careful and sanded/adjusted the upper edge of the pattern with the lower edge of the Middle Gun Deck so they butted together almost seamlessly. The already rounded, curved bow section fitted nicely with only 3-4 nails and the larger clamp was needed with the tight bend as the pattern came around and between Bulkhead 1 and 2.

The process of aligning the Lower Gun Deck pattern (to fit and match the lower edge of the Middle Gun Deck), can be then done as a repeat of the Middle Gun Deck. It also requires bow bending (again using the clamp/press already shown). Once this is in place, I can then start installing the false cannon trucks into each cannon bay for the Middle Deck and the Lower Gun Decks, but I might leave this until after the hull planking.
The next stages involve planking. Firstly I have to commence the first hull planking, sanding and shaping (a long process), and then I have to plank the Middle Gun Deck which is visible through hatch openings in the Quarter Deck and Upper Decks. Finally, installation of the Upper Deck floor will be tricky as the fit is very tight and the 3mm plywood will require some judicious but careful bending. I have already done this as a test fit and it does go in, but its a fiddle with getting the 18 bulkheads to slot into the cut-outs of the floor for both sides (that's 36 tight fits to be negotiated). Just prior this too, I have to ensure I have LED wiring bus access points to allow for more LEDs and lighting in the Middle Deck. I will have to work out the optimal positioning of these once the deck and visual lines of sight are worked out.
Best Regards,
PeterG
Elapsed Time: 144 hours
Last edited:
After reviewing my previous post, I realised that there may be some confusion in the naming of decks aboard Victory. As a First Rate ship, the most powerful type of ship of her day was fitted with three gun decks mounting 100 guns. Below this there were two lower decks which include the lowest in the ship, nearest the keel, being the Hold where stores, munitions and ballast was kept. Above this was the Orlop Deck which housed magazines, cables, Gun Room and other services (see below).
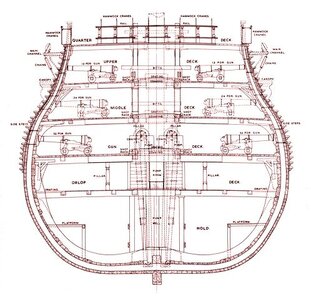 (after Longridge, 1977)
Above the Orlop Deck are the three Gun Decks with larger to smaller cannon armaments as you go up. The names of these decks differs with the various authors writing in their descriptions. For example, McKay (The 100-Gun Ship Victory), and McGowan (HMS Victory, Her Construction, Career and Restoration), describe the above decks as Lower, Middle and Upper Decks. Longridge (1977, The Anatomy of Nelson's Ships), however refers to the decks as the Gun Deck, Middle and Upper Decks (although even Longridge, in his Figure 18, refers to the lowest gun deck as the Lower or Gun Deck. Above these of course is the Quarter Deck and above and to the stern is the Poop Deck. This variation of deck names is a source of some confusion as some authors of Build Logs use the Gun Deck reference, but here, and as compliant with the Caldercraft kit, I will be referring to the gun decks as Lower, Middle and Upper decks.
Moving on to the first planking. I have placed the first two planks directly butted up to the Lower Deck pattern plywood, and with some water soaking (about 10 minutes), and then the hot iron with the timber 'shaping form', (the same as Paulv1958), I have found that the front 10-15cm of a plank bend extremely well and form a good fit to the forward bulkheads. Progressive pinning from fore to aft shapes the planks easily and at this stage there is no requirement for shaping the planks. after 6-8 however, shaping will be required.
In the picture below, the first plank has been shown with the bulkhead pins in place. Removal after the glue dries is a simple pull out with pliers.
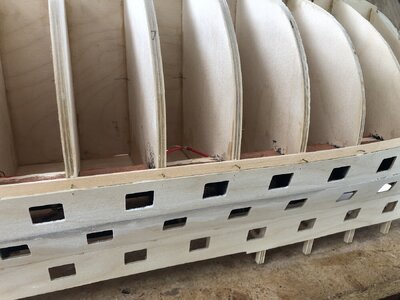
Below is another picture of the second plank added beneath the first. I have opted to cut and butt fit planks along mid-section bulkheads. These joins have not been scarfed but are simple end-butt joins, because there is another planking phase to cover the joints and it is fast and simple to join the planks without having to soak the forward section as well as the aft stern bends which although tight, would be difficult to do while also managing the forward bending.
To align the edges of each plank strip, I have used paper clips and this at this stage seems adequate for the task.
The Limewood timber supplied for the first planking is of excellent quality, straight and consistent in grain in the Caldercraft kit and I am pleased to be using it. It bends well and appears to follow a good bend when soaked in water for about 10 minutes. With the commencement of the hull planking underway, it will be just a long process to get the whole hull planked. I like to take my time and with care for this planking. Ultimately, the overall hull shape is formed by the first planking and this needs to be done slowly and correctly. If it takes a couple of weeks before sanding, well so be it. This will occupy my next few posts I expect.
Best Regards,
PeterG
Estimated Time: 165 hours
 (after Longridge, 1977)
Above the Orlop Deck are the three Gun Decks with larger to smaller cannon armaments as you go up. The names of these decks differs with the various authors writing in their descriptions. For example, McKay (The 100-Gun Ship Victory), and McGowan (HMS Victory, Her Construction, Career and Restoration), describe the above decks as Lower, Middle and Upper Decks. Longridge (1977, The Anatomy of Nelson's Ships), however refers to the decks as the Gun Deck, Middle and Upper Decks (although even Longridge, in his Figure 18, refers to the lowest gun deck as the Lower or Gun Deck. Above these of course is the Quarter Deck and above and to the stern is the Poop Deck. This variation of deck names is a source of some confusion as some authors of Build Logs use the Gun Deck reference, but here, and as compliant with the Caldercraft kit, I will be referring to the gun decks as Lower, Middle and Upper decks.
Moving on to the first planking. I have placed the first two planks directly butted up to the Lower Deck pattern plywood, and with some water soaking (about 10 minutes), and then the hot iron with the timber 'shaping form', (the same as Paulv1958), I have found that the front 10-15cm of a plank bend extremely well and form a good fit to the forward bulkheads. Progressive pinning from fore to aft shapes the planks easily and at this stage there is no requirement for shaping the planks. after 6-8 however, shaping will be required.
In the picture below, the first plank has been shown with the bulkhead pins in place. Removal after the glue dries is a simple pull out with pliers.

Below is another picture of the second plank added beneath the first. I have opted to cut and butt fit planks along mid-section bulkheads. These joins have not been scarfed but are simple end-butt joins, because there is another planking phase to cover the joints and it is fast and simple to join the planks without having to soak the forward section as well as the aft stern bends which although tight, would be difficult to do while also managing the forward bending.

To align the edges of each plank strip, I have used paper clips and this at this stage seems adequate for the task.
The Limewood timber supplied for the first planking is of excellent quality, straight and consistent in grain in the Caldercraft kit and I am pleased to be using it. It bends well and appears to follow a good bend when soaked in water for about 10 minutes. With the commencement of the hull planking underway, it will be just a long process to get the whole hull planked. I like to take my time and with care for this planking. Ultimately, the overall hull shape is formed by the first planking and this needs to be done slowly and correctly. If it takes a couple of weeks before sanding, well so be it. This will occupy my next few posts I expect.
Best Regards,
PeterG
Estimated Time: 165 hours
Hi Peter
I'm just catching up with the build logs and found yours this is an awesome kit and you have made a great start. I like the way you present your log lots of additional information I can learn a lot from this well done.
Tony
I'm just catching up with the build logs and found yours this is an awesome kit and you have made a great start. I like the way you present your log lots of additional information I can learn a lot from this well done.
Tony
Very Nice !
I will be following too.
I will be following too.
Great Job. The lime wood is excellent to work with and sands nicely later. Start to taper the front boards as it soon needs it. A lot of the hull gets covered with 2nd layer, 3d layer whales and 3rd coppering, so just make sure the shape is good. The second layer is only really visible at the rear and the whales cover all but about a cm of pre waterline at the bow and below is coppered. Be aware that the copering exagerates any bumps & dents. If done again I would have filled in all the bulkheads with balsa for a firmer surface to shape to.
Nearly coppered mine now. About 2 weeks to go and I will be back on line. Yay!
Nearly coppered mine now. About 2 weeks to go and I will be back on line. Yay!
- Joined
- Jun 5, 2021
- Messages
- 165
- Points
- 88

Bonjour Peter,
Merci pour toutes ces précisions.
L'exposé est intéressant et permet de mieux connaître la vie à bord.
Marco
Hello Peter,
Thanks for all the details.
The presentation is interesting and allows you to better understand life on board.
Marco
Merci pour toutes ces précisions.
L'exposé est intéressant et permet de mieux connaître la vie à bord.
Marco
Hello Peter,
Thanks for all the details.
The presentation is interesting and allows you to better understand life on board.
Marco
- Joined
- Dec 25, 2023
- Messages
- 5
- Points
- 1

Hi Peter. Can I ask what method you are using to lock down your lazy Susan so it doesn’t rotate when you need it still?
Thanks and keep up the great detailed log.
Thanks and keep up the great detailed log.
Thanks Tony H and Donnie.
Thanks also to Paulv1958. I am about halfway through the first planking now and at about 6 planks, am having to start tapering. The shape I think will be OK although I have about 2 mm gap on Bulkhead 2 as the bow curvature is tending to pull away from the required shape. The gap is even on both sides and as I start to get higher, it is closing to the bulkhead and so I think the shape will be OK. The rest of the hull flanks and stern are coming together well, although as you say, there will be quite a bit of sanding.
In cases where you get a bit of 'clinker' planking, that is, the subsequent plank is slightly proud of the one before it - Did you tend to use filler to smooth the proud edge, or did you sand the edge down to match its adjacent plank?
Thanks Geoff Tompkinson too. I am fortunate in that I have a dedicated workspace on which the baseboard supporting the Lazy Susan sits. At both fore and aft ends of the baseboard (when it is rotated to the long length of the workspace), I have a hole (about 3/8") which I drop a small bolt through and then this engages into a small hole in the lower, stationary baseboard. This locks the rotating surface then with either the port or the starboard side facing me (whichever I am working on). The bolt upper end sits proud of the baseboard so I can easily grip it to rotate when I want to (I hope that answers your question).
Regards,
PeterG
Hello PeterAfter reviewing my previous post, I realised that there may be some confusion in the naming of decks aboard Victory. As a First Rate ship, the most powerful type of ship of her day was fitted with three gun decks mounting 100 guns. Below this there were two lower decks which include the lowest in the ship, nearest the keel, being the Hold where stores, munitions and ballast was kept. Above this was the Orlop Deck which housed magazines, cables, Gun Room and other services (see below).
View attachment 416819 (after Longridge, 1977)
Above the Orlop Deck are the three Gun Decks with larger to smaller cannon armaments as you go up. The names of these decks differs with the various authors writing in their descriptions. For example, McKay (The 100-Gun Ship Victory), and McGowan (HMS Victory, Her Construction, Career and Restoration), describe the above decks as Lower, Middle and Upper Decks. Longridge (1977, The Anatomy of Nelson's Ships), however refers to the decks as the Gun Deck, Middle and Upper Decks (although even Longridge, in his Figure 18, refers to the lowest gun deck as the Lower or Gun Deck. Above these of course is the Quarter Deck and above and to the stern is the Poop Deck. This variation of deck names is a source of some confusion as some authors of Build Logs use the Gun Deck reference, but here, and as compliant with the Caldercraft kit, I will be referring to the gun decks as Lower, Middle and Upper decks.
Moving on to the first planking. I have placed the first two planks directly butted up to the Lower Deck pattern plywood, and with some water soaking (about 10 minutes), and then the hot iron with the timber 'shaping form', (the same as Paulv1958), I have found that the front 10-15cm of a plank bend extremely well and form a good fit to the forward bulkheads. Progressive pinning from fore to aft shapes the planks easily and at this stage there is no requirement for shaping the planks. after 6-8 however, shaping will be required.
In the picture below, the first plank has been shown with the bulkhead pins in place. Removal after the glue dries is a simple pull out with pliers.
View attachment 416816
Below is another picture of the second plank added beneath the first. I have opted to cut and butt fit planks along mid-section bulkheads. These joins have not been scarfed but are simple end-butt joins, because there is another planking phase to cover the joints and it is fast and simple to join the planks without having to soak the forward section as well as the aft stern bends which although tight, would be difficult to do while also managing the forward bending.
View attachment 416817
To align the edges of each plank strip, I have used paper clips and this at this stage seems adequate for the task.
The Limewood timber supplied for the first planking is of excellent quality, straight and consistent in grain in the Caldercraft kit and I am pleased to be using it. It bends well and appears to follow a good bend when soaked in water for about 10 minutes. With the commencement of the hull planking underway, it will be just a long process to get the whole hull planked. I like to take my time and with care for this planking. Ultimately, the overall hull shape is formed by the first planking and this needs to be done slowly and correctly. If it takes a couple of weeks before sanding, well so be it. This will occupy my next few posts I expect.
Best Regards,
PeterG
Estimated Time: 165 hours
Very instructive post regarding the various decks. This definitely clarifies things.
Good luck with the planking and as you said, taking your time and doing it right is essential.
Best
Hi Peter. Spit the hull lengthwise into several sections with planks that naturally bend to the hull shape ( Mine was bout 6 horizontal sections. The fill with planks tapering were necessary . I made my hull sections about 30cm max variable by bulkhead length and tapered them their while length in some situations from full to half width ( they get covered by second layer).
Doing it by section makes it so much easier. If they clinker too much sanding down makes them very thin. ( it heppend with someof mine and I had to apply watare down pva to strengthen back up.
Doing it by section makes it so much easier. If they clinker too much sanding down makes them very thin. ( it heppend with someof mine and I had to apply watare down pva to strengthen back up.
What an adventure! Your writing is most excellent, as are the tips, of course.
Hope everyone had a Happy New Year and Merry Christmas. Sheesh, it's 2024 already!!
Thank you rshousha and Gilbertm. Again also, thanks to Paulv1958. The 'clinkering' of the planking will not be too bad and its only around Bulkhead 1 where the bow curvature is the greatest. Tapering from Plank 6 has accounted for most of the plank edge offset and so sanding of the plank edge will be only minor. The hull shape is forming up well and should be able to support the second planking without any problem. I have been using the supplied brass nails to secure the planks at each bulkhead crossing and these with the PVA glue (I am using Gorilla PVA) have been securing the planks very tightly.
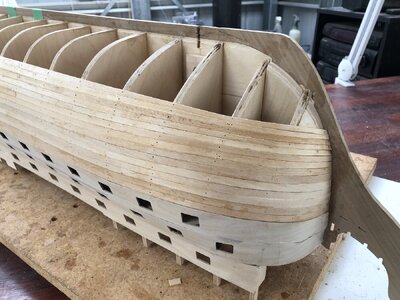
As you can see in the image above, I am nearing the last of the first planks coming up from the gun deck patterns (and as per the Manual). Each plank is in two halves and although the lengths are quite long, the limewood with soaking in water and then heating with an iron is providing excellent 'flexibility' to shaping. At this point I have used NO stealers and am only anticipating a few as it gets closer to the keel. I am thinking I will fit a garboard plank (from the keel outwards on each side) and few others. to ensure a nice close fit.
At the stern, the limewood planks have had to bend tightly over Bulkhead 18, but they seem to be able to do it without splitting or cracking. I am surprised they can withstand the bending, but the soaking/heating appear to be doing the job well. In the photo below you can see the sharp bend as the planks cross Bulkhead 18 to rise to the stern counter of the ship.
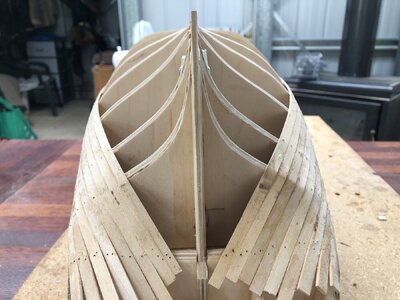
I have been doing port-starboard planks alternatively, but this is probably not necessary. The frame and bulkheads are so rigid I don't think there would be any chance of warping or twisting of the shape if you did 4-5 planks on one side and then the other.
Now, a message of a delay:
I am going to be travelling overseas from this coming Friday and am away for just over 5 weeks, so I will have to apologise in advance that there will not be any further updates until late February. Interestingly, half the holiday is on the Queen Mary and the first half is touring around Africa, so no chance of posting any updates to the Log. I will try and make some more entries soon after we return.
Regards,
PeterG
Elapsed Time: 182 hours
Thank you rshousha and Gilbertm. Again also, thanks to Paulv1958. The 'clinkering' of the planking will not be too bad and its only around Bulkhead 1 where the bow curvature is the greatest. Tapering from Plank 6 has accounted for most of the plank edge offset and so sanding of the plank edge will be only minor. The hull shape is forming up well and should be able to support the second planking without any problem. I have been using the supplied brass nails to secure the planks at each bulkhead crossing and these with the PVA glue (I am using Gorilla PVA) have been securing the planks very tightly.

As you can see in the image above, I am nearing the last of the first planks coming up from the gun deck patterns (and as per the Manual). Each plank is in two halves and although the lengths are quite long, the limewood with soaking in water and then heating with an iron is providing excellent 'flexibility' to shaping. At this point I have used NO stealers and am only anticipating a few as it gets closer to the keel. I am thinking I will fit a garboard plank (from the keel outwards on each side) and few others. to ensure a nice close fit.
At the stern, the limewood planks have had to bend tightly over Bulkhead 18, but they seem to be able to do it without splitting or cracking. I am surprised they can withstand the bending, but the soaking/heating appear to be doing the job well. In the photo below you can see the sharp bend as the planks cross Bulkhead 18 to rise to the stern counter of the ship.

I have been doing port-starboard planks alternatively, but this is probably not necessary. The frame and bulkheads are so rigid I don't think there would be any chance of warping or twisting of the shape if you did 4-5 planks on one side and then the other.
Now, a message of a delay:
I am going to be travelling overseas from this coming Friday and am away for just over 5 weeks, so I will have to apologise in advance that there will not be any further updates until late February. Interestingly, half the holiday is on the Queen Mary and the first half is touring around Africa, so no chance of posting any updates to the Log. I will try and make some more entries soon after we return.
Regards,
PeterG
Elapsed Time: 182 hours
Have a good vacation, Peter! Enjoy the trip!
Well, as they say in the classics - " I'm baaaaack......". Returned from travels in Africa, Zambia, Zimbabwe then a ship cruise to Western Australia before returning home in the southeast. A great holiday, but now back to the Victory.
Since returning, I have completed the first planking (as below). I have used a number of spoilers towards the stern and a couple at the bow, but overall I am pleased with how it has turned out. Considerable sanding with course and then finer paper has produced a good uniform planked finish. The kit's limewood provides an excellent wood medium as it relatively pliable, strong and soft enough to shape with judicious sanding where a joint or seam may be fractionally proud. I have NOT used any filler with the planks and have achieved a good base for the second planking when it comes time. It is a testament to the quality of this Caldercraft kit that it has gone so well. Note in every plank over every bulkhead, after shaping and gluing, sometimes with some soaking/bending, I have used a small drill and small brass nail to secure the plank. Leaving the brass nail head proud allowed each bulkhead crossing to have the nail removed easily after the glue had dried and secured the plank.
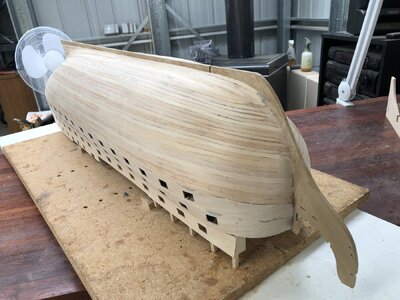
You can see in the photo below, the tight plank folding after the last bulkhead to shape the stern. These planks had to be soaked and heated into position before nailing and holding with clamps (where I could). Note too, that after this first planking, the rear central spine of the keel (where the sternpost will be positioned, had to be smoothed and sanded back to only 3mm in thickness. The sternpost walnut is 5mm and with the second planking, having a 1mm thickness, will bring the plank ends to abut the sternpost at 5mm final thickness.
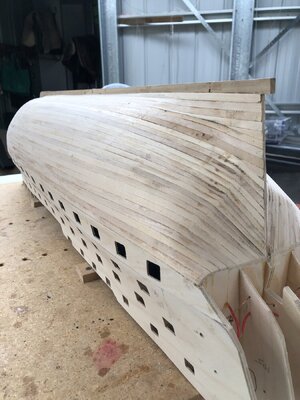
After the completion of the first planking and the sanding etc, the next task is to add the stern galleries which I will post next.
Best Regards,
PeterG
Estimated Elapsed Time = 235 hours
Since returning, I have completed the first planking (as below). I have used a number of spoilers towards the stern and a couple at the bow, but overall I am pleased with how it has turned out. Considerable sanding with course and then finer paper has produced a good uniform planked finish. The kit's limewood provides an excellent wood medium as it relatively pliable, strong and soft enough to shape with judicious sanding where a joint or seam may be fractionally proud. I have NOT used any filler with the planks and have achieved a good base for the second planking when it comes time. It is a testament to the quality of this Caldercraft kit that it has gone so well. Note in every plank over every bulkhead, after shaping and gluing, sometimes with some soaking/bending, I have used a small drill and small brass nail to secure the plank. Leaving the brass nail head proud allowed each bulkhead crossing to have the nail removed easily after the glue had dried and secured the plank.

You can see in the photo below, the tight plank folding after the last bulkhead to shape the stern. These planks had to be soaked and heated into position before nailing and holding with clamps (where I could). Note too, that after this first planking, the rear central spine of the keel (where the sternpost will be positioned, had to be smoothed and sanded back to only 3mm in thickness. The sternpost walnut is 5mm and with the second planking, having a 1mm thickness, will bring the plank ends to abut the sternpost at 5mm final thickness.

After the completion of the first planking and the sanding etc, the next task is to add the stern galleries which I will post next.
Best Regards,
PeterG
Estimated Elapsed Time = 235 hours
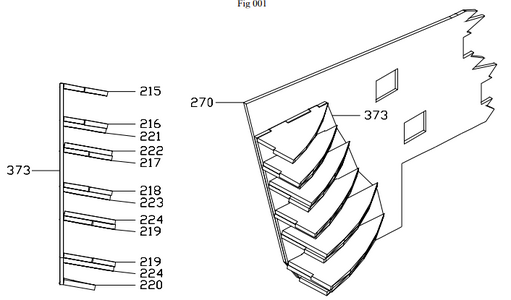
The instruction describe the next stage which is the addition of the stern galleries. I knew this was complex after watching Paul Vicker's YouTube movies (Movie 5). So, the first stage was to identify and cut out the various parts. These come from two walnut sheets which are 1.5 and 2.0 mm in thickness as per the instructions (as below).
Now, I also add a photo from one of Paul Vicker's movies below:
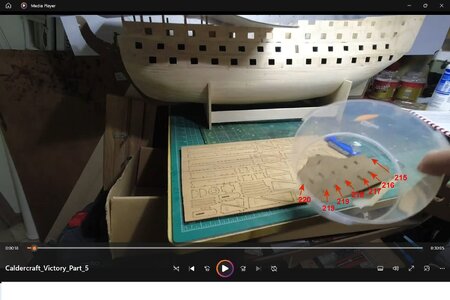
Please note the following (and I have added RED labels to the parts from the Instruction Manual to assist):
1. There are a total of SEVEN slot pairs for the required gallery partitions
2. There are TWO Part 219s (as labelled and in the instructions). The walnut sheet had FOUR of these (two for each side of the ship)
3. Note the SIZE of the cutout slots. These were 2mm in Paul's video and accommodated the 2mm thickness of the partitions correctly.
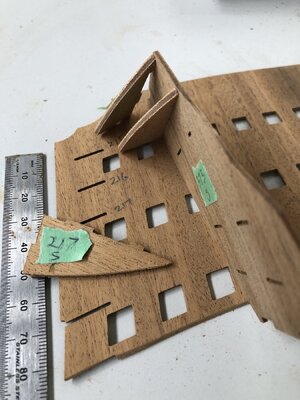
Now, I have the utmost respect for the Caldercraft kit, but see below the backing timber I received in my kit:
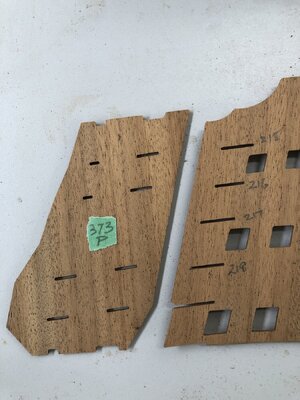
Note particularly:
1. The SAME part (373) as shown in Paul's video but in my kit had the following problems:
a) The slots present are about 1.0mm in width. These have to accommodate 2.0mm walnut partitions
b) Count the number of slot pairs. There are FOUR, whereas in Paul's there are FIVE. The missing slot pair is for Part 218 and has required me to cut my own slots. I just hope they are in the correct position. (Note in the photo above, the slots are offset by one too high).
c) The gaps for the extensions of the top and bottom partitions Parts 215 and 220, do not align. This means I had to cut the extensions to fit the slot width.
2. Notice the slot sizes on the rear gallery partition. This piece is perpendicular to Part 373 and runs across the rear of the ship. These slots are also 1.0mm in opening, again which has to accommodate 2.0mm partitions.
Now, I can enlarge the slot sizes to take the 2.0mm walnut partitions and this is what I have done, but for a kit with quality such as Caldercraft, this machining error should NOT be present.
I would be keen to know if any other kit users have experienced this problem. Although it can be overcome, by taking about 2 hours of unnecessary work, it should not be like this. Below I show how I have enlarged the slots and made it all fit, but is is messy.
Best Regards,
PeterG
Elapsed Time: 250 hours

Now, I also add a photo from one of Paul Vicker's movies below:

Please note the following (and I have added RED labels to the parts from the Instruction Manual to assist):
1. There are a total of SEVEN slot pairs for the required gallery partitions
2. There are TWO Part 219s (as labelled and in the instructions). The walnut sheet had FOUR of these (two for each side of the ship)
3. Note the SIZE of the cutout slots. These were 2mm in Paul's video and accommodated the 2mm thickness of the partitions correctly.
Now, I have the utmost respect for the Caldercraft kit, but see below the backing timber I received in my kit:

Note particularly:
1. The SAME part (373) as shown in Paul's video but in my kit had the following problems:
a) The slots present are about 1.0mm in width. These have to accommodate 2.0mm walnut partitions
b) Count the number of slot pairs. There are FOUR, whereas in Paul's there are FIVE. The missing slot pair is for Part 218 and has required me to cut my own slots. I just hope they are in the correct position. (Note in the photo above, the slots are offset by one too high).
c) The gaps for the extensions of the top and bottom partitions Parts 215 and 220, do not align. This means I had to cut the extensions to fit the slot width.
2. Notice the slot sizes on the rear gallery partition. This piece is perpendicular to Part 373 and runs across the rear of the ship. These slots are also 1.0mm in opening, again which has to accommodate 2.0mm partitions.
Now, I can enlarge the slot sizes to take the 2.0mm walnut partitions and this is what I have done, but for a kit with quality such as Caldercraft, this machining error should NOT be present.
I would be keen to know if any other kit users have experienced this problem. Although it can be overcome, by taking about 2 hours of unnecessary work, it should not be like this. Below I show how I have enlarged the slots and made it all fit, but is is messy.

Best Regards,
PeterG
Elapsed Time: 250 hours
Wait ill you try and fit the gun deck. That was a lot of modification and sweating for me per bulkhead. Have fun!
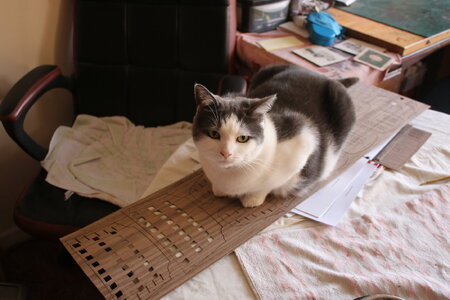
Thanks for the 'heads up', I guess it's time to check my newly arrived kit. Being CNC cut rather than laser, means no charcoal to sand off, so one job less. BUT - I found another job that needs doing, the plywood sheets have unsanded surfaces, so first task will be to get out my finishing sander & smooth each sheet before cutting out the parts. Here's 'The Admiral' doing her check.

Last edited:
Very nice first planking job Peter. This signals a very high quality build.Well, as they say in the classics - " I'm baaaaack......". Returned from travels in Africa, Zambia, Zimbabwe then a ship cruise to Western Australia before returning home in the southeast. A great holiday, but now back to the Victory.
Since returning, I have completed the first planking (as below). I have used a number of spoilers towards the stern and a couple at the bow, but overall I am pleased with how it has turned out. Considerable sanding with course and then finer paper has produced a good uniform planked finish. The kit's limewood provides an excellent wood medium as it relatively pliable, strong and soft enough to shape with judicious sanding where a joint or seam may be fractionally proud. I have NOT used any filler with the planks and have achieved a good base for the second planking when it comes time. It is a testament to the quality of this Caldercraft kit that it has gone so well. Note in every plank over every bulkhead, after shaping and gluing, sometimes with some soaking/bending, I have used a small drill and small brass nail to secure the plank. Leaving the brass nail head proud allowed each bulkhead crossing to have the nail removed easily after the glue had dried and secured the plank.
View attachment 435207
You can see in the photo below, the tight plank folding after the last bulkhead to shape the stern. These planks had to be soaked and heated into position before nailing and holding with clamps (where I could). Note too, that after this first planking, the rear central spine of the keel (where the sternpost will be positioned, had to be smoothed and sanded back to only 3mm in thickness. The sternpost walnut is 5mm and with the second planking, having a 1mm thickness, will bring the plank ends to abut the sternpost at 5mm final thickness.
View attachment 435208
After the completion of the first planking and the sanding etc, the next task is to add the stern galleries which I will post next.
Best Regards,
PeterG
Estimated Elapsed Time = 235 hours
Thank you for posting. I look forward to future updates.


