-

Win a Free Custom Engraved Brass Coin!!!
As a way to introduce our brass coins to the community, we will raffle off a free coin during the month of August. Follow link ABOVE for instructions for entering.
-

PRE-ORDER SHIPS IN SCALE TODAY!
The beloved Ships in Scale Magazine is back and charting a new course for 2026!
Discover new skills, new techniques, and new inspirations in every issue.
NOTE THAT OUR FIRST ISSUE WILL BE JAN/FEB 2026
You are using an out of date browser. It may not display this or other websites correctly.
You should upgrade or use an alternative browser.
You should upgrade or use an alternative browser.
HMS Victory - Caldercraft-Jotika - 1/72. Build log
- Thread starter PeterG
- Start date
- Watchers 66
-
- Tags
- caldercraft jotika victory
A major milestone to get the 2nd planking finished on such a large model well doneFitting of the Quarter Deck internal gun port templates again was tricky as the horizontal AND vertical positioning required an alignment through the ports to allow port linings to be fitted correctly. As it happens a tip from Paul Vickers (thanks Paul) was to use some available 6mm plywood strips which could then be passed through the Quarter Deck to allow a direct, through hull fitting position of the Gun Port templates on both the port and starboard sides (see below).
View attachment 454453
As it happens I had to cut a few millimetres off the bottom of these templates to enable them to fit neatly and at the correct height. Once in place, it was an easy process to glue the bulwark faces and fix the templates in place.
View attachment 454454
Once the templates were correctly positioned and glued, I could then start fitting the linings to the eight gun ports which have no recess to the hull as these ports have no swinging gun port doors. These are the only ports on the Quarter Deck that have this arrangement. The rest (two forward and four aft), which have the swinging gun doors.
View attachment 454455
When completed, I added some additional walnut planks to extend the height of the second planking. As I went, I had to cut out the gun ports for each level, and this took considerable time to do correctly and accurately. A lot of scalpel and sharp knife work!! With the use of the drill to initially mark out the gun port margins, they came out OK, but it takes some time. The final process is to use a fine flat wood file to ensure all surfaces and outer hull planking are aligned and smooth.
Elapsed time: 520 hours
Best Regards,
PeterG
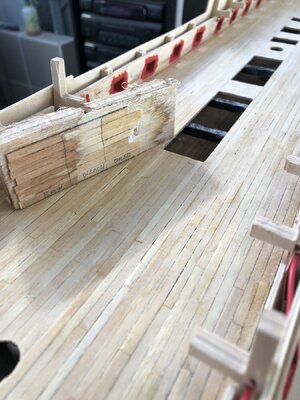
With the upper planking complete (to Upper Gun Deck level), gun ports cut out, and lining of Upper Gun Deck (no door) gun ports finished, I can now commence planking the Upper Gun Deck. As for the Lower Gun Deck, I used the 4 - plank shift with 86mm full planks (equating to about 20 feet in actual length). For this scale this equates to the full ship scale length and so the 1/4, 1/2 and 3/4 lengths for offset equate to 21.5 mm, 43 mm and 64.5 mm. For each Tanganyika plank (supplied in the kit), I used B pencil to mark the side edges before gluing into place and this looks the part when each plank is laid adjoining its next deck plank.
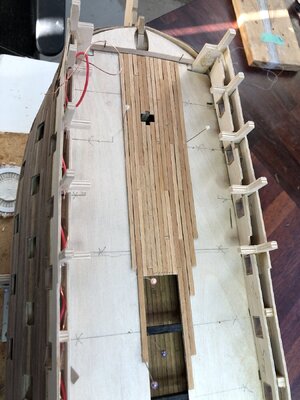
I started at the bow and worked along the centreline and then out to port and starboard. For those planks which were not as tight a fit as I would like, a pin was used until the PVA glue was hardened. In the image above, you can see the LED lights wiring in the port side so I can tap into it wherever I need to. The wiring lies between the outer hull and the inner Gun Port template so will be encased, unseen when enclosed by the top of the Upper Gun Deck bulwark covering.
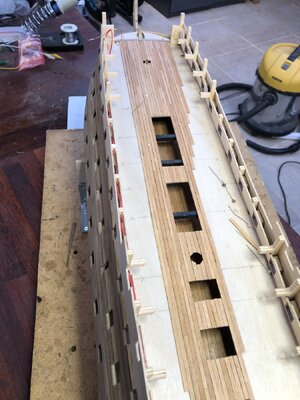
Progress of the planking is slow, but it will be seen from the upper decks so it needs to be done correctly. The final finish will be a sanding and then flat varnish and burnishing oil. For each plank joint, the end tree nail positions have to be added. I did a few as an experiment and they look OK, but they would be better if done after the first coat of varnish so they are protected.
Elapsed time: 545 hours
Regards,
PeterG

I started at the bow and worked along the centreline and then out to port and starboard. For those planks which were not as tight a fit as I would like, a pin was used until the PVA glue was hardened. In the image above, you can see the LED lights wiring in the port side so I can tap into it wherever I need to. The wiring lies between the outer hull and the inner Gun Port template so will be encased, unseen when enclosed by the top of the Upper Gun Deck bulwark covering.

Progress of the planking is slow, but it will be seen from the upper decks so it needs to be done correctly. The final finish will be a sanding and then flat varnish and burnishing oil. For each plank joint, the end tree nail positions have to be added. I did a few as an experiment and they look OK, but they would be better if done after the first coat of varnish so they are protected.
Elapsed time: 545 hours
Regards,
PeterG
Last edited:
Fantastic precision work. Great build Peter. All looking very shipshape.
- Joined
- Jun 5, 2021
- Messages
- 165
- Points
- 88

Travail bien précis, avec des finitions exemplaires.
Merci pour les photos
Marco
Very precise work, with exemplary finishes.
Thank you for the photos
Mark
Merci pour les photos
Marco
Very precise work, with exemplary finishes.
Thank you for the photos
Mark
very good progress -> 

Always a pleasure to see your work Peter! I hope all is well with you!
Many thanks for your support everybody. Always good to hear from you too Paul. I have noted your Kingfisher build and see the standard is as high as ever!! Unbelievably precise and accurate structural framing of the ship. My only comment is that at 126 pages (so far !!), you are well on track to exceed the Vasa page number total!!!
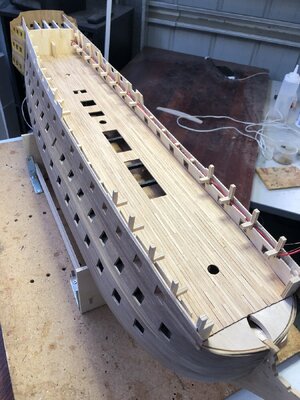
I have now completed the Upper Gun Deck planking as below:
While I am happy with the kit timber available (Tanganyika), I show an example of it below:
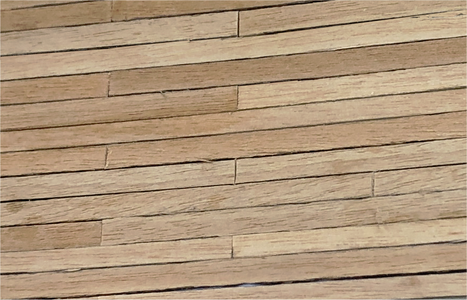
So, the timber, as sanded, is a brown/orange colour with some variation to a lighter brown. When painted with a matt varnish or burnishing oil, it becomes darker brown/orange. The appearance is quite attractive as a finished timber, but how realistic is it as the sun and sea spray affected deck of HMS Victory? These decks too were scrupulously and religiously scrubbed using holy stone as part of the means of keeping the crew 'busy' and the boatswains of the day were very effective of ensuring this was done. If we look at some of the images of the exposed decking of the actual ship, the deck planking is nearly white or at worst light grey (see below). Any Google search for coloured images of the Victory deck, especially when photographed (obviously in colour), but with good sunlight, shows the upper decks to be almost white/grey with bleaching (see below).
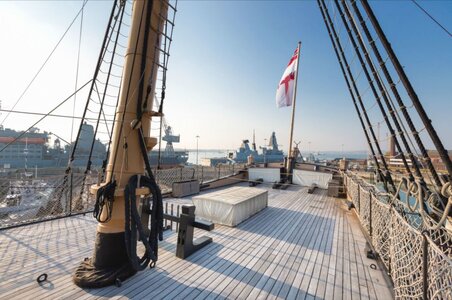
This must be a problem encountered in numerous models as most kits would supply basswood or other timbers similar in colour to the Tanganyika used here, but be quite unrealistic in the sun- and salt-bleached life of an actual ship.
How then can I make the Tanganyika timber, as used, the bleached colour of the real ship and then be coated with a varnish or finish that retains this colour? There appears to be three methods which I have tried and have experimented on some used offcut timber glued down in the same process as the model decking:
1. Use household bleach. Just wipe on, leave until it bleaches the timber and wipe/wash with water. This is cheap, easily applied, and works effectively, lightening the timber to almost white - Until you coat with a finish, and then the original colour seems to reappear. So, household bleach works, but does not actually 'change' the colour of the underlying wood.
2. Apply oxalic acid. Like household bleach, its easy to obtain, nasty to use as once applied it has to then be neutralised or it will destroy the timber. Application of a vinegar wash neutralises the acid action. Oxalic acid works really well for removing stains and whitening the wood surface to a lighter colour, but, like household bleach, it does not change the actual color of the wood.
3. Use a two-part chemical process. These products can be commercially bought and definately DO change the colour of the timber. Fundamentally the two chemicals used are Parts A and B - Usually Sodium Hydroxide (caustic soda), followed about 10 minutes later by Hydrogen Peroxide. The commercial variants of these can be quite expensive and purchased in the volumes of litres/gallons etc, which was way too expensive for one model's decking. So, I opted to purchase the two chemical compounds from local hardware and chemist stores.
The application of the two part mix, definately changes the colour of the timber and while it darkens with oil or varnish, it is still a 'white/grey' finish with the timber grain very much evident. This would appear to be a reasonable application to both model realism, but also to model enhancement practically.
Application of these chemical is something to be done with safety in mind and gloves/mask/PPE/goggles etc are recommended because the chemicals can burn. Precautions ARE necessary, so do a little Google searching before application!!
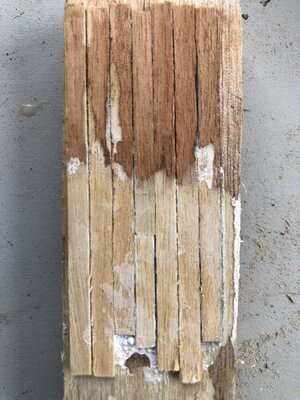
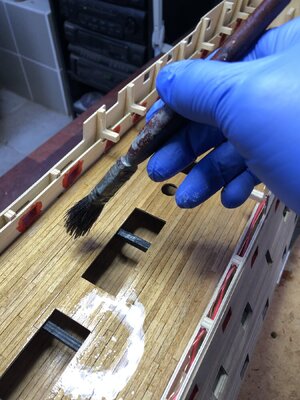
Below is the small, experimental planking used to 'test' the two-part bleach. The upper section is the upper, raw Tanganyika timber and below is after application of the Parts A/B with two applications of Hydrogen Peroxide over the Caustic Soda wash. I haven't been particularly careful with the edge between the two and as it dries it leaves a bit of residue around the outside. Below this image is the application of Part A to the finished and sanded decking of the Upper Gun Deck. It looks a bit more 'radical' than it actually is, although having wetness and water running through your model is not especially desirable. To control this, I attempted to keep the amount of fluid applied to a minimum. In the photo, you can see the small bubbles being given off from the chemical bleach reaction that is occurring.
I will post an update of the finished decking when it dries out....
Best Regards,
PeterG
Elapsed Time: 640 hours
I have now completed the Upper Gun Deck planking as below:

While I am happy with the kit timber available (Tanganyika), I show an example of it below:

So, the timber, as sanded, is a brown/orange colour with some variation to a lighter brown. When painted with a matt varnish or burnishing oil, it becomes darker brown/orange. The appearance is quite attractive as a finished timber, but how realistic is it as the sun and sea spray affected deck of HMS Victory? These decks too were scrupulously and religiously scrubbed using holy stone as part of the means of keeping the crew 'busy' and the boatswains of the day were very effective of ensuring this was done. If we look at some of the images of the exposed decking of the actual ship, the deck planking is nearly white or at worst light grey (see below). Any Google search for coloured images of the Victory deck, especially when photographed (obviously in colour), but with good sunlight, shows the upper decks to be almost white/grey with bleaching (see below).

This must be a problem encountered in numerous models as most kits would supply basswood or other timbers similar in colour to the Tanganyika used here, but be quite unrealistic in the sun- and salt-bleached life of an actual ship.
How then can I make the Tanganyika timber, as used, the bleached colour of the real ship and then be coated with a varnish or finish that retains this colour? There appears to be three methods which I have tried and have experimented on some used offcut timber glued down in the same process as the model decking:
1. Use household bleach. Just wipe on, leave until it bleaches the timber and wipe/wash with water. This is cheap, easily applied, and works effectively, lightening the timber to almost white - Until you coat with a finish, and then the original colour seems to reappear. So, household bleach works, but does not actually 'change' the colour of the underlying wood.
2. Apply oxalic acid. Like household bleach, its easy to obtain, nasty to use as once applied it has to then be neutralised or it will destroy the timber. Application of a vinegar wash neutralises the acid action. Oxalic acid works really well for removing stains and whitening the wood surface to a lighter colour, but, like household bleach, it does not change the actual color of the wood.
3. Use a two-part chemical process. These products can be commercially bought and definately DO change the colour of the timber. Fundamentally the two chemicals used are Parts A and B - Usually Sodium Hydroxide (caustic soda), followed about 10 minutes later by Hydrogen Peroxide. The commercial variants of these can be quite expensive and purchased in the volumes of litres/gallons etc, which was way too expensive for one model's decking. So, I opted to purchase the two chemical compounds from local hardware and chemist stores.
The application of the two part mix, definately changes the colour of the timber and while it darkens with oil or varnish, it is still a 'white/grey' finish with the timber grain very much evident. This would appear to be a reasonable application to both model realism, but also to model enhancement practically.
Application of these chemical is something to be done with safety in mind and gloves/mask/PPE/goggles etc are recommended because the chemicals can burn. Precautions ARE necessary, so do a little Google searching before application!!
Below is the small, experimental planking used to 'test' the two-part bleach. The upper section is the upper, raw Tanganyika timber and below is after application of the Parts A/B with two applications of Hydrogen Peroxide over the Caustic Soda wash. I haven't been particularly careful with the edge between the two and as it dries it leaves a bit of residue around the outside. Below this image is the application of Part A to the finished and sanded decking of the Upper Gun Deck. It looks a bit more 'radical' than it actually is, although having wetness and water running through your model is not especially desirable. To control this, I attempted to keep the amount of fluid applied to a minimum. In the photo, you can see the small bubbles being given off from the chemical bleach reaction that is occurring.


I will post an update of the finished decking when it dries out....
Best Regards,
PeterG
Elapsed Time: 640 hours
Last edited:
I like the third option. In pulp and paper industries, the mixture can be apply simultaneously witn light Buffer made with Epson Salt and EDTA. Sodium hydroxide increase pH around 9,5 by memory.Many thanks for your support everybody. Always good to hear from you too Paul. I have noted your Kingfisher build and see the standard is as high as ever!! Unbelievably precise and accurate structural framing of the ship. My only comment is that at 126 pages (so far !!), you are well on track to exceed the Vasa page number total!!!
I have now completed the Quarterdeck planking and while I am happy with the kit timber available (Tanganyika), I show an example of it below:
View attachment 456148
So, the timber, as sanded, is a brown/orange colour with some variation to a lighter brown. When painted with a matt varnish or burnishing oil, it becomes darker brown/orange. The appearance is quite attractive as a finished timber, but how realistic is it as the sun and sea spray affected deck of HMS Victory? These decks too were scrupulously and religiously scrubbed using holy stone as part of the means of keeping the crew 'busy' and the boatswains of the day were very effective of ensuring this was done. If we look at some of the images of the exposed decking of the actual ship, the deck planking is nearly white or at worst light grey (see below). Any Google search for coloured images of the Victory deck, especially when photographed (obviously in colour), but with good sunlight, shows the upper decks to be almost white/grey with bleaching (see below).
View attachment 456149
This must be a problem encountered in numerous models as most kits would supply basswood or other timbers similar in colour to the Tanganyika used here, but be quite unrealistic in the sun- and salt-bleached life of an actual ship.
How then can I make the Tanganyika timber, as used, the bleached colour of the real ship and then be coated with a varnish or finish that retains this colour? There appears to be three methods which I have tried and have experimented on some used offcut timber glued down in the same process as the model decking:
1. Use household bleach. Just wipe on, leave until it bleaches the timber and wipe/wash with water. This is cheap, easily applied, and works effectively, lightening the timber to almost white - Until you coat with a finish, and then the original colour seems to reappear. So, household bleach works, but does not actually 'change' the colour of the underlying wood.
2. Apply oxalic acid. Like household bleach, its easy to obtain, nasty to use as once applied it has to then be neutralised or it will destroy the timber. Application of a vinegar wash neutralises the acid action. Oxalic acid works really well for removing stains and whitening the wood surface to a lighter colour, but, like household bleach, it does not change the actual color of the wood.
3. Use a two-part chemical process. These products can be commercially bought and definately DO change the colour of the timber. Fundamentally the two chemicals used are Parts A and B - Usually Sodium Hydroxide (caustic soda), followed about 10 minutes later by Hydrogen Peroxide. The commercial variants of these can be quite expensive and purchased in the volumes of litres/gallons etc, which was way too expensive for one model's decking. So, I opted to purchase the two chemical compounds from local hardware and chemist stores.
The application of the two part mix, definately changes the colour of the timber and while it darkens with oil or varnish, it is still a 'white/grey' finish with the timber grain very much evident. This would appear to be a reasonable application to both model realism, but also to model enhancement practically.
Application of these chemical is something to be done with safety in mind and gloves/mask/PPE/goggles etc are recommended because the chemicals can burn. Precautions ARE necessary, so do a little Google searching before application!!
I will post some images of the final result when the final finish is applied.
Best Regards,
PeterG
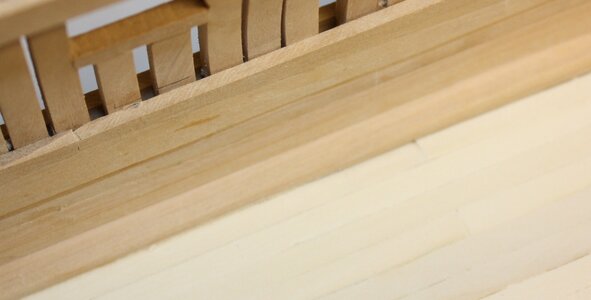
I truly hate to present ideas that involve spending money, but I have used holly for deck planking on a number of occasions. I have no idea if it is readily available in Oz, but maybe something to consider for the future.How then can I make the Tanganyika timber, as used, the bleached colour of the real ship and then be coated with a varnish or finish that retains this colour?
An example follows that shows the contrast between the holly deck and surrounding spirketting which is calycophyllum multiflorum (castello).
Allan
Last edited:
Thank you both AllanKP69 and Fish & Chip.
From Fish and Chip's comments, yes, I was aware of the alternative of combining the Sodium Hydroxide and Hydrogen Peroxide and applying simultaneously. I did try this, but what I found was that, although it did bleach the timber, it required a few (4-5) applications before the timber lightened in colour to the necessary degree. By using the Parts A/B approach, this can also be done with multiple applications, but you only have to add the Hydrogen Peroxide in additional brushing/wiping once the caustic soda has been applied. This seemed to give me better control and used less material to lighten the timber to the degree required. Also, by applying the Sodium Hydroxide once only and letting it sit for 8-10 minutes, it appears to soak in to the wood to a deeper depth so sanding does not get down to the older colour level of unbleached timber.
** For your interest Fish and Chip, here in New South Wales, Australia, we have a train called the "Fish and Chips" which runs each evening as a commuter train from central Sydney to carry office workers to the Blue Mountains, about 40 km west of Sydney.
Allan, thank you too. Your deckwork is exacting and looks excellent. You have obviously found that the best solution is to use an alternative timber for lighter coloured decking planks. I would have difficulty obtaining holly (in any case it is too late for this build), but it appears to have served your purpose beautifully. The holly appearance looks to be slightly yellow more so than white/grey, as is typical of salt and sea-affected oak as per the planking on Victory (not to mention the hollystoning that would have been applied - no pun intended), but it nevertheless looks lovely and clean. Castello is not a timber I am at all familiar with, but the contrast with the holly is striking.
Regards,
PeterG
Last edited:
Thanks you so Much for comment. Australia is far, too far to go with my wife with electric wheelchair. But I have my imagination....Thank you both AllanKP69 and Fish & Chip.
From Fish and Chip's comments, yes, I was aware of the alternative of combining the Sodium Hydroxide and Hydrogen Peroxide and applying simultaneously. I did try this, but what I found was that, although it did bleach the timber, it required a few (4-5) applications before the timber lightened in colour to the necessary degree. By using the Parts A/B approach, this can also be done with multiple applications, but you only have to add the Hydrogen Peroxide in additional brushing/wiping once the caustic soda has been applied. This seemed to give me better control and used less material to lighten the timber to the degree required. Also, by applying the Sodium Hydroxide once only and letting it sit for 8-10 minutes, it appears to soak in to the wood to a deeper depth so sanding does not get down to the older colour level of unbleached timber.
** For your interest Fish and Chip, here in New South Wales, Australia, we have a train called the "Fish and Chips" which runs each evening as a commuter train from central Sydney to carry office workers to the Blue Mountains, about 40 km west of Sydney.
Allan, thank you too. Your deckwork is exacting and looks excellent. You have obviously found that the best solution is to use an alternative timber for lighter coloured decking planks. I would have difficulty obtaining holly (in any case it is too late for this build), but it appears to have served your purpose beautifully. The holly appearance looks to be slightly yellow more so that white/grey as is typical of salt and sea-affected oak as per the planking on Victory (not to mention the hollystoning that would have been applied - no pun intended), but it nevertheless looks lovely and clean. Castello is not a timber I am at all familiar with, but the contrast with the holly is striking.
Regards,
PeterG
You made great experiments. With Buffer, peroxyde react as a radical, not an ion. So you found different result because IT was not the same Chemical reaction. IT is great to see so valuable info on SoS. Diversity of knowledge share between good peoples.
While I am at the point of altering the decking of the Quarterdeck colour (see above discussions), I am also nearing the point where I am going to have to make decisions regarding the overall colour scheme of the ship. Obviously the black and red are not too contentious, but the yellow/pink/terracotta got me to do some research which opens up the direction to go, but forces you to think about the timing of 'colour changes' that have been undertaken affecting the ship's appearance. By way of comparison, below are some images of the ship's variation in colour (subject to the vagaries of light, photography and time):
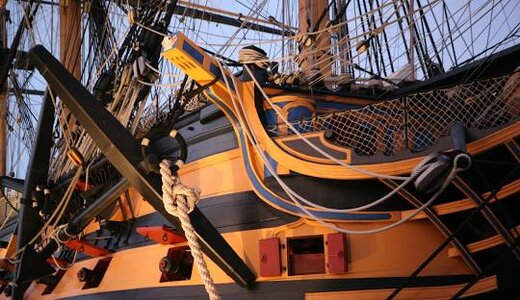
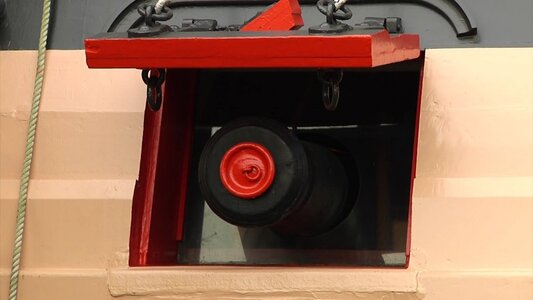
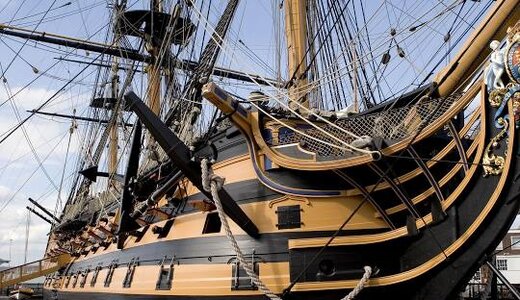
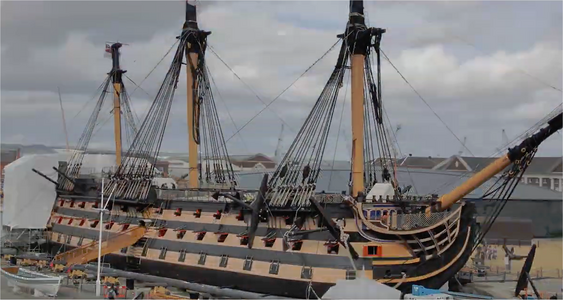
There is a virtual mountain of information regarding this topic but I have extracted two articles from forums which seem to best summarise the colours used on Victory over her time since 1759 to today. There is also a very interesting YouTube film on the subject here. References to these forums I present as links at the top of each extract:
Taken from a post from Chris P here:
“HMS Victory is a unique and extremely complex archaeological artefact; her fabric retains evidence of the ship’s construction, modification, repair and conservation between 1759 and the present day. As such her timbers are artefacts and an incredibly rich source with literally dozens of layers of paint which have been analysed…Combining the archaeological evidence from the ship with the evidence contained in historical documents has allowed us to establish beyond reasonable doubt the ship’s appearance when Nelson flew his flag in her.
Victory’s appearance has changed on numerous occasions since the Battle of Trafalgar. At the end of the Napoleonic Wars, the yellow and black chequer so familiar to Nelson was replaced by a white and black scheme intended to be cheaper to maintain. During the ship’s restoration in the 1920s, the Society for Nautical Research undertook extensive research in an attempt to recreate an accurate yellow for the ship’s side. The decision was made to use chrome yellow, a very bright pigment that was in fact introduced in the 1820s - after the Battle of Trafalgar. This colour scheme was used until the 1990s when chrome yellow was banned and the existing colour was introduced. Over the past twenty years, the colour has changed slightly as different manufacturers have been used to supply the paint.
By combining the archaeological evidence supplied by Crick-Smith and the original accounts for Victory’s stores, held by the National Museum, we have been able to pinpoint precisely the colours worn by Victory at the Battle of Trafalgar. Although the pigments used originally are no longer available – containing lead they were highly toxic – we have been able to recreate the colours using modern paints.
The resulting colour has been something of a surprise – we actually expected the colour to be a creamy hue, what we have found is that Victory was painted in bands of graphite grey and a colour that ranges from a creamy-orange to almost salmon pink in certain lights; It’s a radical change in the ship’s appearance, and we’ll be interested to hear what visitors to the ship think of this historically accurate paint scheme.”
But this is followed by some comments of Bob Ellis in:
"I disagree with the conclusions of the analysis of the colour. Having followed the methods and procedure the effect of oxidation and sunlight over time as well as a salt water environment don't appear to have been considered and factored in. The present paint job is unpleasant (to say the least) and I cannot believe Nelson would have been satisfied with it.
Peter Goodwin had copies of the manifest and the colours carried. Obviously colour mixes would not be standardised to today's degree however they would be well mixed and matched. I agree with Peter on this one. Meantime the residents of Portsmouth (including Peter and I!!) have to suffer the revolting consequences of the 'new broom'!"
And a second informative article posted January 7, 2019 by Morgan:
"Across a number of threads there has been considerable debate about the new colour scheme for HMS Victory, most recently on Dafi’s Victory build. There are supports and doubters. Doubts as to the change mainly arise because there isn’t much material out there other than to say we looked at some old paint samples and worked out what’s what.
To see if I could get some further information to help inform the debate and assist in deciding which colour scheme to go with I thought I’d go to the man who should know, Andrew Baines, Deputy Director of Heritage and Curator at the National Museum of the Royal Navy.
I emailed Andrew with the following queries:
‘Firstly, there is a degree of scepticism as to the voracity of the research behind the new colour scheme. Despite the information in the public’s domain from Crick-Smith the opposition to accepting the result centres around extrapolating the tests from the various samples to the entire ship. Is there any data that could be shared to demonstrate the applicability of the tests across the fabric of the ship?
Secondly, how does the certainty arise to say ‘this layer’ of a given sample is from c1805?’
Andrew kindly responded in some detail earlier today with the following:
”I'm afraid that anything associated with Victory tends to be subject to significant debate, much of it ill-informed.
I think the first point to bear in mind is that Victory has changed colour innumerable times since 1922, we have simply been honest about what we have done, and based the change on all available evidence.
From 1816 or so until 1922, Victory was painted black and white. During the 1922-1927 restoration, the SNR and RN desired to return the ship to her Trafalgar appearance. It was believed that Victory's sides were painted 'bright' yellow, and so the brightest available yellow - chrome yellow- was used. Unfortunately, chrome yellow became available only in the second decade of the twentieth century, so this colour was demonstrably incorrect for 1805. Through the twentieth century, the colour changed slightly as the use of heavy metals in paints became unacceptable. When manufacture of the paint for Victory ceased to be undertaken in the dockyard, a trade paint was adopted, and the nearest available colour to that provided by the dockyard recipe was adopted. It was actually quite late into the 1990s before the colour was fixed to a RAL. This colour was not arrived at by archaeological or archival evidence.
We undertook the archaeological paint research not with the intention of changing the colour in which Victory was painted, but to better understand the way in which the ship has been repaired over her long life; there are approximately 33,000 individual elements in the ship, and some 800 rase marks - marks cut into timber as part of the conversion process, and which frequently include the date at which the timber entered the yard, or was converted. As we know the dates of Victory's repairs, we are able to discern the date at which these pieces of timber was placed into the ship. The first layer of paint on that timber element can therefore be dated with some degree of accuracy. We are then able to extend the paint stratigraphy across other timber elements that do not carry a date mark - if those timber elements have paint layers under the layer identified on our dated piece of timber, we know that they date to an earlier repair, if later, we know they date to a later repair. By extending this technique to other dated timbers, one is able to build an extensive timeline of paint treatments for each part of the ship, accurate to a period of five years or so. This accuracy can be improved on by understanding dirt between layers and similar - when the ship is laid up, the dirt layers tend to be very thin, or indeed negligible, when she is at sea, the dirt layers can be quite thick. It's also possible to understand when several coats of paint have been applied in short succession, as dirt layers do not exist.
In addition to the extensive historic paint surfaces on board the ship, we also have the archaeological archive of material removed from the ship between 1960 and 2005. This material can help fill in gaps or give greater understanding where areas on board have been subjected to extensive stripping in preparation for new coats of paint.
Beyond the archaeological evidence, we have details of what paint was carried on board Victory, and the quantities in which it was consumed. The accounts of carpenters stores for Victory in the run up to Trafalgar also gives details of use of paint, and some indication of how it was mixed, but this is actually quite difficult to decipher due to the manner in which the quantities are recorded against the work undertaken.
Further afield from Victory, there is archival evidence for paint used by other ships, and indeed how other ships were painted at the time of Trafalgar. Captain Duff of the Mars, wrote to his wife on October 10th 1805, that ‘I am sorry the rain has begun to-night, as it will spoil my fine work, having been employed for this week past to paint the Ship à la Nelson, which most of the Fleet are doing.' We know from Mars' carpenter's accounts: ‘Painting ship double sides, and repairing the paint work of the Captain’s cabin: paint, white, 109lbs; yellow, 100lbs.’ Allowing 9lbs paint for repairs to the captain’s cabin, this indicates a ratio of 1:1 for the mixture of yellow: white. One can argue that more than 9lbs was needed for the captain's cabin, but the figures are, nevertheless, indicative.
From the surviving carpenters' accounts of British ships at Trafalgar, we can discern that ship's sides were either painted with pure yellow (Prince, Temeraire), used a mix of two or three parts yellow to one part white (Ajax and Revenge prior to the battle) or used a mixture that was (or was close to) equal parts yellow:white (Mars, Thunderer).
Specific to Victory, a survey of carpenter’s stores dated 12th May 1804 records that Victory carried 2cwt 3q 15lb of Venetian (presumably red) paint, 3cwt 0q 17lb of yellow and 2cwt 2q and 1lb of Port Red (dry) paint. Ten months later, in March 1805, a further survey records identical quantities of Venetian and port red, 93lbs of yellow paint and 1,137lbs of white lead paint.
I am sure you will be aware of Peter Goodwin's 2013 article in Mariner's Mirror, in which he documents Nelson's desire to see the ships of his fleet painted in a pale yellow: Goodwin states ‘…Nelson authorised a six-to-one mix of white and yellow, which would be so light as to verge on the colour cream.'. Unfortunately, this is not entirely accurate, as Nelson was not at liberty to authorise such a change. Rather, in late September 1805, Nelson submitted a proposal to Commissioner Middleton at Gibraltar Dockyard that private ships were to be painted three, and flagships four, times per year, the proportion of white paint to yellow to be 6lbs to 1lb.; This proposal was referred to London where it was reviewed in December 1806. The Navy's decision was that the old regulation was to stand, and Nelson’s proposal was not to be carried into effect.
In summary, the manuscript evidence is as follows:
1. Yellow ochre as supplied to ships was a dark colour that was commonly mixed with white (1804 handbook of instruction for RN officers). It must be borne in mind that this was an earth pigment and the actual colour varied widely.
2. The shade of yellow paint employed by the British fleet prior to Trafalgar appears to have varied from ship to ship. Some ships used yellow neat, others mixed yellow with white in a ratio of 2:1 or 3:1, whilst others mixed yellow and white at 1:1.
3. Whilst there is primary source evidence of Nelson’s desire to employ a pale yellow on the topsides of the ships of the Mediterranean fleet, the evidence is also conclusive in confirming that the proposal was rejected. No manuscript evidence supports the mixing of a shade with more white than yellow.
4. The evidence from Victory’s carpenter’s accounts suggests very strongly that the shade of yellow employed was obtained by mixing white and yellow in equal parts.
The archival evidence when combined with the archaeological material provides, therefore, compelling evidence that Victory's colour in 2013 was not correct to the time of Trafalgar (I don't know of anyone who seriously suggested it was) and that we were able to say with some degree of confidence that it was possible to return to a Victory much closer to that Nelson would have known (admittedly he wanted it lighter, but didn't get his way).
All of the available evidence was reviewed by the Victory Technical Committee, then chaired by Martyn Heighten the then Director of National Historic Ships UK, also a member (and still a member) was Jonathan Coad, who had served on the Victory Committee for almost forty years at that point. The recommendation to change the colour was not, therefore, made on an ad-hoc basis, but subject to extensive scrutiny before the Board of the HMS Victory Preservation Company took the decision to change colours when the ship was next repainted.”
This certainly changes some of my thoughts, and corrects some misinformation.
I thought I’d post this information here rather than on a specific build thread to make it easier for people to search for and retrieve the information."
===================================================================================================
Clearly the ship has undergone a series of colour changes in here life. Everything from white, ochre and terracotta most recently. So, this leaves me with the thinking that perhaps the best way to go is to honour Admiral Nelson and use the colours as were present at Trafalgar at the time of the battle but also to allow me the option of what I find most pleasing to the eye, even if different to the current colour used on the ship as she currently stands (and undergoes restoration). I therefore think the broad use of the Yellow Ochre is likely the way to go, as for me personally, I find this the most aesthetic. The red and black obviously are assumed.
Happy to have people comment on this issue as it is contentious. I went through a similar exercise on my last build (the Vasa) where blue was used historically for many model kits, but later Vasamuseet research found red was the topside colour used. It's an interesting topic and clearly defines the models we build, but in the end, if it has the personal appeal we prefer, perhaps that is the most compelling reason to paint and adopt the colours for our models in a particular way, while attempting to honour its history, at least to some degree.
Best Regards,
PeterG
Last edited:
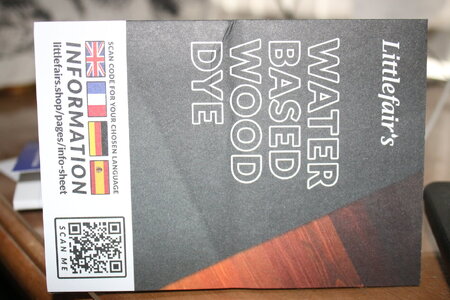
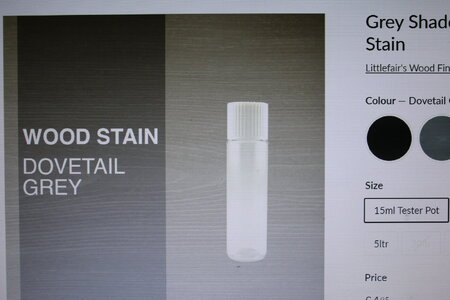
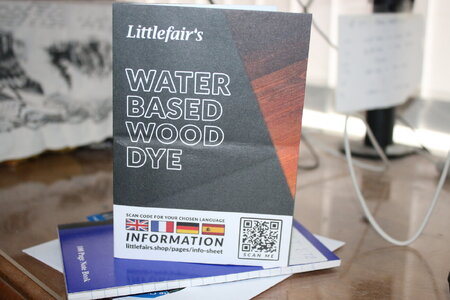
I entered a similar post regarding the colour of the exposed decks on my scratch American Schooner. Here's details of the dye I use, it's produced be Littlefair's Wood Finishing Products Ltd (Made in Lancashire!). I believe they export going by the flyer. Dovetail grey is the one I used, they also do a Seawashed white, but is available in 15ml tester pots or starting at 2.5L. The testers do quite a lot.Many thanks for your support everybody. Always good to hear from you too Paul. I have noted your Kingfisher build and see the standard is as high as ever!! Unbelievably precise and accurate structural framing of the ship. My only comment is that at 126 pages (so far !!), you are well on track to exceed the Vasa page number total!!!
I have now completed the Upper Gun Deck planking as below:
View attachment 456479
While I am happy with the kit timber available (Tanganyika), I show an example of it below:
View attachment 456148
So, the timber, as sanded, is a brown/orange colour with some variation to a lighter brown. When painted with a matt varnish or burnishing oil, it becomes darker brown/orange. The appearance is quite attractive as a finished timber, but how realistic is it as the sun and sea spray affected deck of HMS Victory? These decks too were scrupulously and religiously scrubbed using holy stone as part of the means of keeping the crew 'busy' and the boatswains of the day were very effective of ensuring this was done. If we look at some of the images of the exposed decking of the actual ship, the deck planking is nearly white or at worst light grey (see below). Any Google search for coloured images of the Victory deck, especially when photographed (obviously in colour), but with good sunlight, shows the upper decks to be almost white/grey with bleaching (see below).
View attachment 456149
This must be a problem encountered in numerous models as most kits would supply basswood or other timbers similar in colour to the Tanganyika used here, but be quite unrealistic in the sun- and salt-bleached life of an actual ship.
How then can I make the Tanganyika timber, as used, the bleached colour of the real ship and then be coated with a varnish or finish that retains this colour? There appears to be three methods which I have tried and have experimented on some used offcut timber glued down in the same process as the model decking:
1. Use household bleach. Just wipe on, leave until it bleaches the timber and wipe/wash with water. This is cheap, easily applied, and works effectively, lightening the timber to almost white - Until you coat with a finish, and then the original colour seems to reappear. So, household bleach works, but does not actually 'change' the colour of the underlying wood.
2. Apply oxalic acid. Like household bleach, its easy to obtain, nasty to use as once applied it has to then be neutralised or it will destroy the timber. Application of a vinegar wash neutralises the acid action. Oxalic acid works really well for removing stains and whitening the wood surface to a lighter colour, but, like household bleach, it does not change the actual color of the wood.
3. Use a two-part chemical process. These products can be commercially bought and definately DO change the colour of the timber. Fundamentally the two chemicals used are Parts A and B - Usually Sodium Hydroxide (caustic soda), followed about 10 minutes later by Hydrogen Peroxide. The commercial variants of these can be quite expensive and purchased in the volumes of litres/gallons etc, which was way too expensive for one model's decking. So, I opted to purchase the two chemical compounds from local hardware and chemist stores.
The application of the two part mix, definately changes the colour of the timber and while it darkens with oil or varnish, it is still a 'white/grey' finish with the timber grain very much evident. This would appear to be a reasonable application to both model realism, but also to model enhancement practically.
Application of these chemical is something to be done with safety in mind and gloves/mask/PPE/goggles etc are recommended because the chemicals can burn. Precautions ARE necessary, so do a little Google searching before application!!
Below is the small, experimental planking used to 'test' the two-part bleach. The upper section is the upper, raw Tanganyika timber and below is after application of the Parts A/B with two applications of Hydrogen Peroxide over the Caustic Soda wash. I haven't been particularly careful with the edge between the two and as it dries it leaves a bit of residue around the outside. Below this image is the application of Part A to the finished and sanded decking of the Upper Gun Deck. It looks a bit more 'radical' than it actually is, although having wetness and water running through your model is not especially desirable. To control this, I attempted to keep the amount of fluid applied to a minimum. In the photo, you can see the small bubbles being given off from the chemical bleach reaction that is occurring.
View attachment 456480
View attachment 456481
I will post an update of the finished decking when it dries out....
Best Regards,
PeterG
Elapsed Time: 640 hours
Last edited:
Amazing dedication to authenticity.Many thanks for your support everybody. Always good to hear from you too Paul. I have noted your Kingfisher build and see the standard is as high as ever!! Unbelievably precise and accurate structural framing of the ship. My only comment is that at 126 pages (so far !!), you are well on track to exceed the Vasa page number total!!!
I have now completed the Upper Gun Deck planking as below:
View attachment 456479
While I am happy with the kit timber available (Tanganyika), I show an example of it below:
View attachment 456148
So, the timber, as sanded, is a brown/orange colour with some variation to a lighter brown. When painted with a matt varnish or burnishing oil, it becomes darker brown/orange. The appearance is quite attractive as a finished timber, but how realistic is it as the sun and sea spray affected deck of HMS Victory? These decks too were scrupulously and religiously scrubbed using holy stone as part of the means of keeping the crew 'busy' and the boatswains of the day were very effective of ensuring this was done. If we look at some of the images of the exposed decking of the actual ship, the deck planking is nearly white or at worst light grey (see below). Any Google search for coloured images of the Victory deck, especially when photographed (obviously in colour), but with good sunlight, shows the upper decks to be almost white/grey with bleaching (see below).
View attachment 456149
This must be a problem encountered in numerous models as most kits would supply basswood or other timbers similar in colour to the Tanganyika used here, but be quite unrealistic in the sun- and salt-bleached life of an actual ship.
How then can I make the Tanganyika timber, as used, the bleached colour of the real ship and then be coated with a varnish or finish that retains this colour? There appears to be three methods which I have tried and have experimented on some used offcut timber glued down in the same process as the model decking:
1. Use household bleach. Just wipe on, leave until it bleaches the timber and wipe/wash with water. This is cheap, easily applied, and works effectively, lightening the timber to almost white - Until you coat with a finish, and then the original colour seems to reappear. So, household bleach works, but does not actually 'change' the colour of the underlying wood.
2. Apply oxalic acid. Like household bleach, its easy to obtain, nasty to use as once applied it has to then be neutralised or it will destroy the timber. Application of a vinegar wash neutralises the acid action. Oxalic acid works really well for removing stains and whitening the wood surface to a lighter colour, but, like household bleach, it does not change the actual color of the wood.
3. Use a two-part chemical process. These products can be commercially bought and definately DO change the colour of the timber. Fundamentally the two chemicals used are Parts A and B - Usually Sodium Hydroxide (caustic soda), followed about 10 minutes later by Hydrogen Peroxide. The commercial variants of these can be quite expensive and purchased in the volumes of litres/gallons etc, which was way too expensive for one model's decking. So, I opted to purchase the two chemical compounds from local hardware and chemist stores.
The application of the two part mix, definately changes the colour of the timber and while it darkens with oil or varnish, it is still a 'white/grey' finish with the timber grain very much evident. This would appear to be a reasonable application to both model realism, but also to model enhancement practically.
Application of these chemical is something to be done with safety in mind and gloves/mask/PPE/goggles etc are recommended because the chemicals can burn. Precautions ARE necessary, so do a little Google searching before application!!
Below is the small, experimental planking used to 'test' the two-part bleach. The upper section is the upper, raw Tanganyika timber and below is after application of the Parts A/B with two applications of Hydrogen Peroxide over the Caustic Soda wash. I haven't been particularly careful with the edge between the two and as it dries it leaves a bit of residue around the outside. Below this image is the application of Part A to the finished and sanded decking of the Upper Gun Deck. It looks a bit more 'radical' than it actually is, although having wetness and water running through your model is not especially desirable. To control this, I attempted to keep the amount of fluid applied to a minimum. In the photo, you can see the small bubbles being given off from the chemical bleach reaction that is occurring.
View attachment 456480
View attachment 456481
I will post an update of the finished decking when it dries out....
Best Regards,
PeterG
Elapsed Time: 640 hours
Stuart_Little, Mudlark and Richard O, many thanks for your comments.
Stuart, I liked your post and although I have applied Option 3 for the bleaching process on the Upper Gun Deck planking, I am not a fan of the method. Placing copious amounts of even small quantities of 'not very nice' chemicals (caustic soda and acids etc) into my model is NOT a preferred way to go. It is messy, smells, and now that it has dried out, although it has bleached the timber, it has also left a crystal residue which can be removed by wiping, adding vinegar etc, but again, it is adding yet more chemicals to the mix.
Below is an image of the bleached deck with my experimental block of the same planking in Raw, Bleached and Bleached plus varnish/oil form. You can see the effect of the bleaching, and it has certainly worked OK and even when oiled, although lighter in colour, it is still a lot darker than the Bleached only product.
So, what to do - Well I very much like Stuart-Little's suggestion of using LittleFair's Dovetail Grey as a water-based stain. I have ordered some (from the UK) through Amazon and it should get here in a couple of weeks (overseas import can be slow in Oz!!). I will trial it and I expect it to give a much better finished result without the messy use of harmful chemicals. Many, many thanks Stuart.
While I am waiting for the stain to arrive, I have decided to move on to the wales which have to be placed around the hull. There are THREE sets of wales and they have to be placed accurately and using the CORRECT timber strips. SO, the instructions give the specifications of:
Upper (Topmost) Wale: Three walnut strips using 1 x 3.5mm
Middle Wale: Three walnut strips using 1 x 3.5mm
Bottom (Lowest) Wale: Four walnut strips being uppermost 0.5 x 4mm, then three strips below this of 1 x 5mm.
Now, you would think that is relatively straight forward, which in theory it is. You simply mark off the uppermost or lowermost placements along the hull from, mainly Plan Sheet 2 and then position the strips and glue down. The instructions say to use CA glue but for me, with the rapidity that CA operates, I did not feel I had enough time to correctly place and position these strips. As I have been using for all my second and later hull planking, I have used contact cement. This allows me a lot longer to apply the strips plus when applied, there is some reasonable wiggle time to position accurately.
My approach was to mark the correct upper positions for each wale with pencil (using the 1:1 Plan Sheet 2) and measuring along the hull above or below the corners of various gun ports. This gave me a series of pencil lines to position the walnut strips BUT, as I was using contact cement, I did not want the glue all over the hull, so I initially laid down an accurately placed edge of masking tape as a template for the wale strips, but also to protect the hull from over zealous application of the contact cement. See below for how this worked.
This was a relatively simple but effective approach and worked well BUT:
A MAJOR WORD OF CAUTION
The Caldercraft Victory kit comes with a HUGE amount of walnut (and other strip timber). If you look at the Inventory (see below), you can see a vast array of timber with walnut strips ranging in size by about 0.5 mm up to rectangular 4 x 4 mm. The other complication is that the Strip Timber comes in a combined couple of bundles. This means all the sizes are mixed up together. The consequence of this is that it is VERY easy to select what you think is the correct pieces of timber, but you can easily get it wrong. Even when you use a micrometer to measure the dimensions of the timber, a piece of 1 x 3.5mm strip is never exact, it is always 1.22 x 3.71mm or similar with considerable variation (not surprisingly). When I selected the timber for the Middle Starboard wale (requiring 3 pieces of 1 x 3.5mm), I initially selected 0.5 x 3.5mm) just simply because the thickness measured 0.72 x 3.7mm!! This could have been a disaster had I not realised my error in time.
I strongly therefore advise that you spend the time and undo the strip bundles to unseparate each strip piece and check and place it into it's own marked bundle, which in some cases will only have 2 or 3 strips in it. In fact on doing this, I have NOW found the number of strips and required inventory do NOT match the Instructions list (as below):
I don't know what will happen when I require a particular piece of strip wood and it is not in the kit. For example, there are supposed to be 30 pieces of 0.5 x 3mm, but I can only find 21!! I will have to address that problem when I get to it.
Regards,
PeterG
Elapsed Time: 680 hours
Stuart, I liked your post and although I have applied Option 3 for the bleaching process on the Upper Gun Deck planking, I am not a fan of the method. Placing copious amounts of even small quantities of 'not very nice' chemicals (caustic soda and acids etc) into my model is NOT a preferred way to go. It is messy, smells, and now that it has dried out, although it has bleached the timber, it has also left a crystal residue which can be removed by wiping, adding vinegar etc, but again, it is adding yet more chemicals to the mix.
Below is an image of the bleached deck with my experimental block of the same planking in Raw, Bleached and Bleached plus varnish/oil form. You can see the effect of the bleaching, and it has certainly worked OK and even when oiled, although lighter in colour, it is still a lot darker than the Bleached only product.

So, what to do - Well I very much like Stuart-Little's suggestion of using LittleFair's Dovetail Grey as a water-based stain. I have ordered some (from the UK) through Amazon and it should get here in a couple of weeks (overseas import can be slow in Oz!!). I will trial it and I expect it to give a much better finished result without the messy use of harmful chemicals. Many, many thanks Stuart.
While I am waiting for the stain to arrive, I have decided to move on to the wales which have to be placed around the hull. There are THREE sets of wales and they have to be placed accurately and using the CORRECT timber strips. SO, the instructions give the specifications of:
Upper (Topmost) Wale: Three walnut strips using 1 x 3.5mm
Middle Wale: Three walnut strips using 1 x 3.5mm
Bottom (Lowest) Wale: Four walnut strips being uppermost 0.5 x 4mm, then three strips below this of 1 x 5mm.
Now, you would think that is relatively straight forward, which in theory it is. You simply mark off the uppermost or lowermost placements along the hull from, mainly Plan Sheet 2 and then position the strips and glue down. The instructions say to use CA glue but for me, with the rapidity that CA operates, I did not feel I had enough time to correctly place and position these strips. As I have been using for all my second and later hull planking, I have used contact cement. This allows me a lot longer to apply the strips plus when applied, there is some reasonable wiggle time to position accurately.
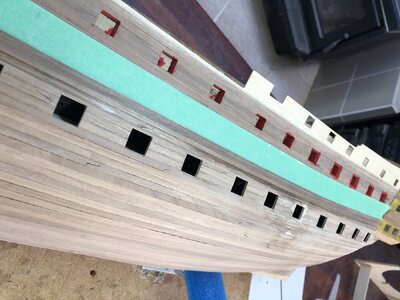
My approach was to mark the correct upper positions for each wale with pencil (using the 1:1 Plan Sheet 2) and measuring along the hull above or below the corners of various gun ports. This gave me a series of pencil lines to position the walnut strips BUT, as I was using contact cement, I did not want the glue all over the hull, so I initially laid down an accurately placed edge of masking tape as a template for the wale strips, but also to protect the hull from over zealous application of the contact cement. See below for how this worked.

This was a relatively simple but effective approach and worked well BUT:
A MAJOR WORD OF CAUTION
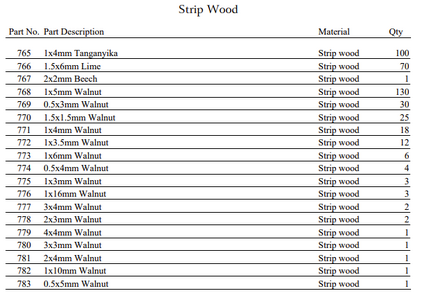
The Caldercraft Victory kit comes with a HUGE amount of walnut (and other strip timber). If you look at the Inventory (see below), you can see a vast array of timber with walnut strips ranging in size by about 0.5 mm up to rectangular 4 x 4 mm. The other complication is that the Strip Timber comes in a combined couple of bundles. This means all the sizes are mixed up together. The consequence of this is that it is VERY easy to select what you think is the correct pieces of timber, but you can easily get it wrong. Even when you use a micrometer to measure the dimensions of the timber, a piece of 1 x 3.5mm strip is never exact, it is always 1.22 x 3.71mm or similar with considerable variation (not surprisingly). When I selected the timber for the Middle Starboard wale (requiring 3 pieces of 1 x 3.5mm), I initially selected 0.5 x 3.5mm) just simply because the thickness measured 0.72 x 3.7mm!! This could have been a disaster had I not realised my error in time.
I strongly therefore advise that you spend the time and undo the strip bundles to unseparate each strip piece and check and place it into it's own marked bundle, which in some cases will only have 2 or 3 strips in it. In fact on doing this, I have NOW found the number of strips and required inventory do NOT match the Instructions list (as below):

I don't know what will happen when I require a particular piece of strip wood and it is not in the kit. For example, there are supposed to be 30 pieces of 0.5 x 3mm, but I can only find 21!! I will have to address that problem when I get to it.
Regards,
PeterG
Elapsed Time: 680 hours
Thanks, Peter. Incidently, I have no 'connection' to Littlefairs, other than customer.Stuart_Little, Mudlark and Richard O, many thanks for your comments.
Stuart, I liked your post and although I have applied Option 3 for the bleaching process on the Upper Gun Deck planking, I am not a fan of the method. Placing copious amounts of even small quantities of 'not very nice' chemicals (caustic soda and acids etc) into my model is NOT a preferred way to go. It is messy, smells, and now that it has dried out, although it has bleached the timber, it has also left a crystal residue which can be removed by wiping, adding vinegar etc, but again, it is adding yet more chemicals to the mix.
Below is an image of the bleached deck with my experimental block of the same planking in Raw, Bleached and Bleached plus varnish/oil form. You can see the effect of the bleaching, and it has certainly worked OK and even when oiled, although lighter in colour, it is still a lot darker than the Bleached only product.
View attachment 458395
So, what to do - Well I very much like Stuart-Little's suggestion of using LittleFair's Dovetail Grey as a water-based stain. I have ordered some (from the UK) through Amazon and it should get here in a couple of weeks (overseas import can be slow in Oz!!). I will trial it and I expect it to give a much better finished result without the messy use of harmful chemicals. Many, many thanks Stuart.
While I am waiting for the stain to arrive, I have decided to move on to the wales which have to be placed around the hull. There are THREE sets of wales and they have to be placed accurately and using the CORRECT timber strips. SO, the instructions give the specifications of:
Upper (Topmost) Wale: Three walnut strips using 1 x 3.5mm
Middle Wale: Three walnut strips using 1 x 3.5mm
Bottom (Lowest) Wale: Four walnut strips being uppermost 0.5 x 4mm, then three strips below this of 1 x 5mm.
Now, you would think that is relatively straight forward, which in theory it is. You simply mark off the uppermost or lowermost placements along the hull from, mainly Plan Sheet 2 and then position the strips and glue down. The instructions say to use CA glue but for me, with the rapidity that CA operates, I did not feel I had enough time to correctly place and position these strips. As I have been using for all my second and later hull planking, I have used contact cement. This allows me a lot longer to apply the strips plus when applied, there is some reasonable wiggle time to position accurately.
My approach was to mark the correct upper positions for each wale with pencil (using the 1:1 Plan Sheet 2) and measuring along the hull above or below the corners of various gun ports. This gave me a series of pencil lines to position the walnut strips BUT, as I was using contact cement, I did not want the glue all over the hull, so I initially laid down an accurately placed edge of masking tape as a template for the wale strips, but also to protect the hull from over zealous application of the contact cement. See below for how this worked.
View attachment 458398
This was a relatively simple but effective approach and worked well BUT:
A MAJOR WORD OF CAUTION
The Caldercraft Victory kit comes with a HUGE amount of walnut (and other strip timber). If you look at the Inventory (see below), you can see a vast array of timber with walnut strips ranging in size by about 0.5 mm up to rectangular 4 x 4 mm. The other complication is that the Strip Timber comes in a combined couple of bundles. This means all the sizes are mixed up together. The consequence of this is that it is VERY easy to select what you think is the correct pieces of timber, but you can easily get it wrong. Even when you use a micrometer to measure the dimensions of the timber, a piece of 1 x 3.5mm strip is never exact, it is always 1.22 x 3.71mm or similar with considerable variation (not surprisingly). When I selected the timber for the Middle Starboard wale (requiring 3 pieces of 1 x 3.5mm), I initially selected 0.5 x 3.5mm) just simply because the thickness measured 0.72 x 3.7mm!! This could have been a disaster had I not realised my error in time.
I strongly therefore advise that you spend the time and undo the strip bundles to unseparate each strip piece and check and place it into it's own marked bundle, which in some cases will only have 2 or 3 strips in it. In fact on doing this, I have NOW found the number of strips and required inventory do NOT match the Instructions list (as below):
View attachment 458399
I don't know what will happen when I require a particular piece of strip wood and it is not in the kit. For example, there are supposed to be 30 pieces of 0.5 x 3mm, but I can only find 21!! I will have to address that problem when I get to it.
Regards,
PeterG
Elapsed Time: 680 hours
Thanks Stuart - There was no implication of a 'connection' with Littlefair's, just a thank you for alerting me to them and the water stain product.
Interesting that you comment on the amount of CNC 'dust' in the box. I have often wondered why the manufacturers don't do this and blow out the dust before packing. I wouldn't have thought it was such a big process, yet they expect us to do it.
Regards,
PeterG
Interesting that you comment on the amount of CNC 'dust' in the box. I have often wondered why the manufacturers don't do this and blow out the dust before packing. I wouldn't have thought it was such a big process, yet they expect us to do it.
Regards,
PeterG
They do it because it would cost time and money to remove it so making an expensive kit even more out of reachThanks Stuart - There was no implication of a 'connection' with Littlefair's, just a thank you for alerting me to them and the water stain product.
Interesting that you comment on the amount of CNC 'dust' in the box. I have often wondered why the manufacturers don't do this and blow out the dust before packing. I wouldn't have thought it was such a big process, yet they expect us to do it.
Regards,
PeterG
I would sooner have the dust than have to clean off laser char


