HMS Victory - Caldercraft-Jotika - 1/72. Build log

Thank you for your comment Paul. It's scary when you think back at the history in this hobby you and I have!! However, you are correct, the aesthetic appeal is probably the most important, but so too is accuracy to honour the original, which after all, we are trying to emulate. So I asked myself the question you asked, and the answer was 'No!! I am not happy with it." This meant a rethink and so a bit more research was required and as you said, there is a LOT of controversy about it.

"HMS Victory is undergoing a major refit and renovation at the moment. As part of this exercise, there has been some intense research to determine the exact colours she was at Trafalgar. She has now received her new coat of paint, and this has left many somewhat surprised. Despite wearing the common yellow ochre for many years, her stripes are now a pale pink ("salmon", "peach", "pale red" depending on your perception). This is not a joke - the best estimate is this is the colour she showed in 1805. A smaller change is that the font used for her name on the stern will also be modified."

An interesting forum discussion about the re colouring here.

I guess this poses a challenge for all those models of Victory out there, especially those that have taken great pains to depict the ship as she was at Trafalgar. UK readers can see a TV report on the Meridian TV website, but I don't think that is available outside the UK.

For example, one post has the colours as:

Revell 36135 Flesh for the new light (yellow) bands on the hull
Revell 36109 Anthracite for the 'black' bands on the hull.
Humbrol 71 Oak for the masts and
Humbrol 132 Satin Red for the cannon ports.

A second is "This is the basis of our choice: a reply from the (Victory) restoration team to our colour request.
"The pantone colour codes, as supplied by the Historic Ships Conservation Team for the hull are below. You can view the shades for reference at:
http://ncscolour.com/products "

Victory Hull Ochre. NCS S 3020-Y40R
The hull black is : NCS S 8500-N

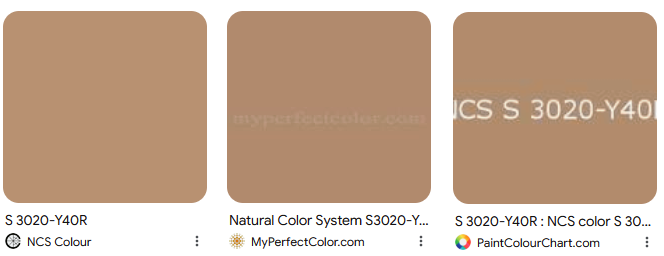
Now if you Google search NCS S 3020-Y40R, you get the colour image as below:
1723248123889.png

To me, these are ALL too brown, given the Yellow and Brown Ochre typically quoted as the ship colour of today. We also have to be mindful of the colours the ship has been over time. At the time of Trafalgar, eg from the Portsmouth Historic Dockyard in 2015 "Careful research has shown that she was painted externally in a combination of pale yellow and dark grey at the time of her famous victory, when Admiral Lord Nelson was fatally wounded. It would have been the Captain, Thomas Hardy, Nelson's trusted right-hand man, who was responsible for the painting of the ship."
An older (10 years old) article of interest is: The bumble-bee stripes of orangey brown and black of one of the most famous ships in the world, Horatio Nelson's HMS Victory on which he fought and died at the battle of Trafalgar in 1805, may have to be repainted after a team of historic paint detectives recovered hundreds of fragments of the original paint surfaces.

"What you see today is largely an early 20th century invention of what an 18th century warship looked like," said Michael Crick-Smith, a founder with his partner Ian Crick-Smith of the conservation institute at Lincoln University specialising in historic decorative finishes.

The pair claim that the colour they describe as "that hideous orange" is part of much later attempts to restore the ship when it had become a symbol of British naval power. The cherished legend is that it was repainted in his favourite colours at Nelson's orders, when the already elderly ship, launched in the 1760s when he was just a school boy, was refitted as his flagship.
But the Crick-Smiths' analysis – which in some places involved disentangling 72 layers of paint – suggests the hull was originally mostly black, with a lot of varnished timber above the water line. It was later partly repainted in an ochre shade, probably before Nelson took it over, but a much paler colour than the present vivid shade.

The orlop deck, where desperate attempts were made to save Nelson's life after a French sniper's bullet went through his shoulder and lungs and lodged in his spine, leaving him drowning in his own blood, was a pale creamy stone colour. The surgeon's cabin and the other small cabins on that deck were a surprisingly grand two shades of blue – good quality paint, compared to the cheap limewash and poor quality oil paint used in much of the ship.

The spaces now shown as Nelson's admiral's cabin, and the captain's cabin of Thomas Hardy (the "kiss me, Hardy" in whose arms Nelson died) are entirely comparatively modern reconstructions, but the Crick-Smiths are convinced from contemporary sources that they would have been much plainer, and probably painted a light blue.

"These were working spaces, not country houses at sea as they appear now," Michael Crick-Smith said.

The good news for the current guardians of the ship, the National Museum of the Royal Navy at Portsmouth Historic Dockyard, is that the Crick-Smiths discovered a remarkable amount of original material.

The upper decks are almost entirely reconstructions, but on the lower decks they discovered mainly original timber and hundreds of patches of original paint, dating all the way back to the very first paint scheme in 1765.

They also picked through a warehouse full of thousands of samples of timber removed from the ship in generations of repairs, and found many more. One sample of the ochre paint – "diabolical quality", Ian Crick-Smith said - came from an old capstan which was once used as a plinth for a bust of Nelson at Windsor Castle.

The Crick-Smiths came to the project after a heated Twitter exchange about some of the most unusual objects ever brought to the BBC's Antiques Roadshow: two battered wooden columns, claimed to have been taken from Victory at the period of the battle. Unfortunately their work demolished the claim: the timbers are from a ship, but not Victory.Their research is part of the most comprehensive restoration project since the ship was built at Chatham and the findings of the research will be taken into account.


For an excellent photo montage of HMS Victory with photos taken on a very bright sunny day is the album link here by Rob Durant.
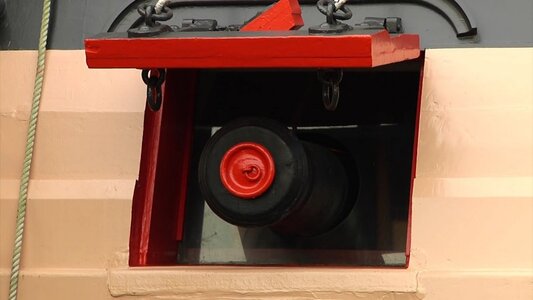
Below is the current restoration colour which you can see is quite different to the NCS colour scheme Ochre above, but also very different to the hull colour ochre as in the terracotta ochre images before about 2017:
1723248891169.jpeg

1723249210638.jpeg

OK, so where does that leave me and my painting? Aesthetically, I am not happy, so I think a lighter, more yellow finish is to be applied. I will post some images as I go.

Best Regards,

PeterG
 
Last edited:
Thanks for you post Chestcutter (Michael). I have sent off an order for two sets of 35 cannons for 3D printing (thanks to files provided to me by AllanPK69). I have chosen 35 x 12 pounders and 35 x 32 pounders. I have selected these two types as these are the ones on the Quarterdeck and Upper Gun Deck and so are most visible. Scaling of the guns is by 1/72 (as is the kit scale) which applies to the overall size of the actual guns as documented by the National Museum of the Royal Navy.

1723250902536.png
The request is for black plastic using PETG Standard. I will let you know the 3D Service provider and show some pictures of the finished product when I receive them. They claim to produce them in about 10 days so we will see. I don't want to be mentioning a private company if I am not happy with their product, so let's wait until I get their product.

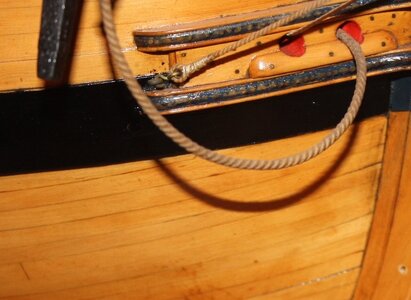
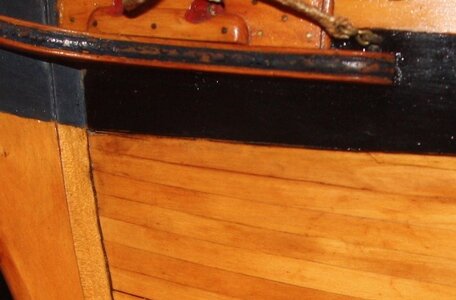
Also thank you (again) AllanKP69 for your comments regarding the wales. I have followed the Instruction Manual by Caldercraft fairly rigourously with their rabbet and wale placement and nowhere can I find reference to the need to taper the ends of the wales to fit in to the rabbet. In fact, the rabbet as initially outlined (in Plan 1) for their kit, does not extend the rabbet up to the area where the wales come to the bow. I can see what you are saying and and I agree it would have been a good suggestion (perhaps to be added to the Instructions), but at this stage, I have not and really cannot, allow for it. The best I could do would be to sand down the thickness of the wales approaching the bow and hence reduce their thickness that way.

Best Regards,

PeterG
 
Thank you for your comment Paul. It's scary when you think back at the history in this hobby you and I have!! However, you are correct, the aesthetic appeal is probably the most important, but so too is accuracy to honour the original, which after all, we are trying to emulate. So I asked myself the question you asked, and the answer was 'No!! I am not happy with it." This meant a rethink and so a bit more research was required and as you said, there is a LOT of controversy about it.

"HMS Victory is undergoing a major refit and renovation at the moment. As part of this exercise, there has been some intense research to determine the exact colours she was at Trafalgar. She has now received her new coat of paint, and this has left many somewhat surprised. Despite wearing the common yellow ochre for many years, her stripes are now a pale pink ("salmon", "peach", "pale red" depending on your perception). This is not a joke - the best estimate is this is the colour she showed in 1805. A smaller change is that the font used for her name on the stern will also be modified."

An interesting forum discussion about the re colouring here.

I guess this poses a challenge for all those models of Victory out there, especially those that have taken great pains to depict the ship as she was at Trafalgar. UK readers can see a TV report on the Meridian TV website, but I don't think that is available outside the UK.

For example, one post has the colours as:

Revell 36135 Flesh for the new light (yellow) bands on the hull
Revell 36109 Anthracite for the 'black' bands on the hull.
Humbrol 71 Oak for the masts and
Humbrol 132 Satin Red for the cannon ports.

A second is "This is the basis of our choice: a reply from the (Victory) restoration team to our colour request.
"The pantone colour codes, as supplied by the Historic Ships Conservation Team for the hull are below. You can view the shades for reference at:
http://ncscolour.com/products "

Victory Hull Ochre. NCS S 3020-Y40R
The hull black is : NCS S 8500-N

Now if you Google search NCS S 3020-Y40R, you get the colour image as below:

View attachment 463938

To me, these are ALL too brown, given the Yellow and Brown Ochre typically quoted as the ship colour of today. We also have to be mindful of the colours the ship has been over time. At the time of Trafalgar, eg from the Portsmouth Historic Dockyard in 2015 "Careful research has shown that she was painted externally in a combination of pale yellow and dark grey at the time of her famous victory, when Admiral Lord Nelson was fatally wounded. It would have been the Captain, Thomas Hardy, Nelson's trusted right-hand man, who was responsible for the painting of the ship."
An older (10 years old) article of interest is: The bumble-bee stripes of orangey brown and black of one of the most famous ships in the world, Horatio Nelson's HMS Victory on which he fought and died at the battle of Trafalgar in 1805, may have to be repainted after a team of historic paint detectives recovered hundreds of fragments of the original paint surfaces.

"What you see today is largely an early 20th century invention of what an 18th century warship looked like," said Michael Crick-Smith, a founder with his partner Ian Crick-Smith of the conservation institute at Lincoln University specialising in historic decorative finishes.

The pair claim that the colour they describe as "that hideous orange" is part of much later attempts to restore the ship when it had become a symbol of British naval power. The cherished legend is that it was repainted in his favourite colours at Nelson's orders, when the already elderly ship, launched in the 1760s when he was just a school boy, was refitted as his flagship.
But the Crick-Smiths' analysis – which in some places involved disentangling 72 layers of paint – suggests the hull was originally mostly black, with a lot of varnished timber above the water line. It was later partly repainted in an ochre shade, probably before Nelson took it over, but a much paler colour than the present vivid shade.

The orlop deck, where desperate attempts were made to save Nelson's life after a French sniper's bullet went through his shoulder and lungs and lodged in his spine, leaving him drowning in his own blood, was a pale creamy stone colour. The surgeon's cabin and the other small cabins on that deck were a surprisingly grand two shades of blue – good quality paint, compared to the cheap limewash and poor quality oil paint used in much of the ship.

The spaces now shown as Nelson's admiral's cabin, and the captain's cabin of Thomas Hardy (the "kiss me, Hardy" in whose arms Nelson died) are entirely comparatively modern reconstructions, but the Crick-Smiths are convinced from contemporary sources that they would have been much plainer, and probably painted a light blue.

"These were working spaces, not country houses at sea as they appear now," Michael Crick-Smith said.

The good news for the current guardians of the ship, the National Museum of the Royal Navy at Portsmouth Historic Dockyard, is that the Crick-Smiths discovered a remarkable amount of original material.

The upper decks are almost entirely reconstructions, but on the lower decks they discovered mainly original timber and hundreds of patches of original paint, dating all the way back to the very first paint scheme in 1765.

They also picked through a warehouse full of thousands of samples of timber removed from the ship in generations of repairs, and found many more. One sample of the ochre paint – "diabolical quality", Ian Crick-Smith said - came from an old capstan which was once used as a plinth for a bust of Nelson at Windsor Castle.

The Crick-Smiths came to the project after a heated Twitter exchange about some of the most unusual objects ever brought to the BBC's Antiques Roadshow: two battered wooden columns, claimed to have been taken from Victory at the period of the battle. Unfortunately their work demolished the claim: the timbers are from a ship, but not Victory.Their research is part of the most comprehensive restoration project since the ship was built at Chatham and the findings of the research will be taken into account.


For an excellent photo montage of HMS Victory with photos taken on a very bright sunny day is the album link here by Rob Durant.
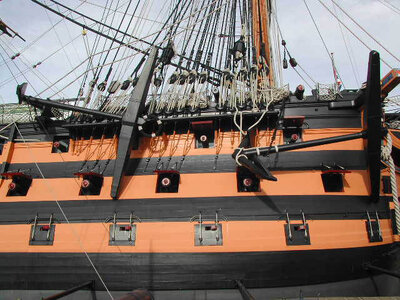
Below is the current restoration colour which you can see is quite different to the NCS colour scheme Ochre above, but also very different to the hull colour ochre as in the terracotta ochre images before about 2017:
View attachment 463939

View attachment 463941

OK, so where does that leave me and my painting? Aesthetically, I am not happy, so I think a lighter, more yellow finish is to be applied. I will post some images as I go.

Best Regards,

PeterG
An excellent excursus on the color question. I'm sure this post will be helpful to many members! I'm looking forward to seeing where this takes you, Peter. As always, a joy and privilege to follow your work!
 
Thank you Paul - a compliment indeed, coming from you....

I have also been giving some thought to how much detail to add to the Upper Gun Deck, while it is open and accessible. The Caldercraft kit includes the cannons of course, cannonballs around gratings, steps/ladders and supports for skid beams. However, there are modellers who have modelled individual decks throughout the Victory. Below is a model (from another Paul), who provides an excellent example of the detailed Upper Gun Deck with room partitions and guns etc.

1723679796856.jpeg

Obviously in the full ship model, much of this detail would not be visible as the Quarterdeck covers the Upper Gun Deck. There are some vantage viewing points through the skid beam, open area, but the fore and aft areas could not be seen from above. They could however be seen through the gun ports on either side, so is this level of detail warranted, on a full ship model with enclosed Quarterdeck? I am intending to add deck lighting (under the Quarterdeck), and these gun ports ARE open to see into the inner Upper Gun Deck area, albeit quite obscured by cannon barrels etc. I will give it some more thought, but scratch building the partitions etc would not be too difficult for the Admiral's cabin aft or the storage/trades areas forward.

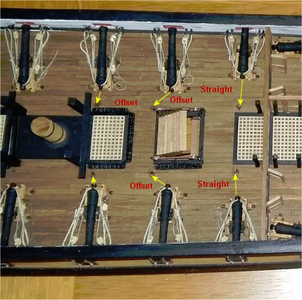
Another thing that came up while reading Paul's detailed deck modelling approach, I noticed that inboard at the rear of each cannon truck, there is the necessary deck-mounted rings for securing the ropes/blocks to pull the guns inboard for cleaning/reloading. In the picture of the detailed deck below from Paul, I noticed that some of the deck rings were offset from the gun trucks while others were directly behind for a straight pull.

1723680554781.png

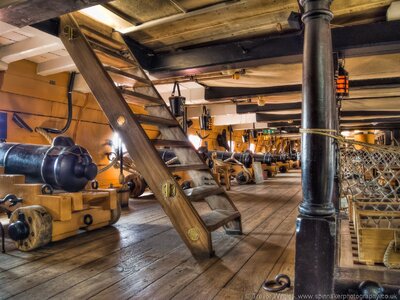
So, did Paul get this wrong? Hauling and man-handling a gun and truck weighing many hundreds of pounds, using back pulley ropes at an angle would have been extremely difficult. I thought I would check, and so brought up some images of the actual Upper Gun Deck on the real ship. To see the deck mounted rings is hard as not many photos show these, but, Yes, it does appear as though at least some of the rings were NOT mounted in a straight pull-line, directly behind the gun trucks (see below). In this case, a ladder is in the way, and so the pull deck ring is mounted offset from the gun truck:

1723680833539.jpeg

An interesting bit of technical information which will probably apply, not only to the Upper Gun Deck, but also the Quarterdeck as similar deck features will get in the way for the deck ring mountings.

Lots of food for thought here. I would be interested in what others thought.

Oh, by the way, I am still waiting on my 3D printed cannons. They have been produced, they are in the mail!!

Regards,


PeterG
 
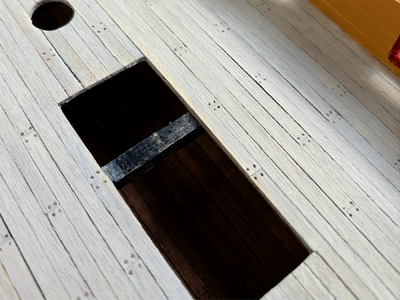
Something which I was wanting to do was make the decision as to whether to add 'tree nails' for the decking on the Upper Gundeck. I decided I would experiment using a method I employed in adding tree nails to the outer hull planking of my Vasa. This method entails using a thin syringe needle (which is hollow), and then cutting the sharp point off (take care with this as the points are extremely sharp), and then filing with a metal file so the end is flat and perpendicular. Then by heating the tip of the round syringe 'tube' with a small butane burner, you can carefully position and burn the 4 x outlines of the tree nails into the joins of the decking planks. I show an example below. Note how the tube has burnt a neat circle into the decking simulating the tree nail. Where too much burning/heating has been applied, by lightly sanding, you can get back to the circle required.

1723860818682.png

Note too that this planking is after treatment using the Littlefair's Dove Gray staining (refer to earlier post). This stain has done an excellent job of 'holly stoning' the appearance of the originally light brown timber (Tanganyika timber from the Caldercraft kit).

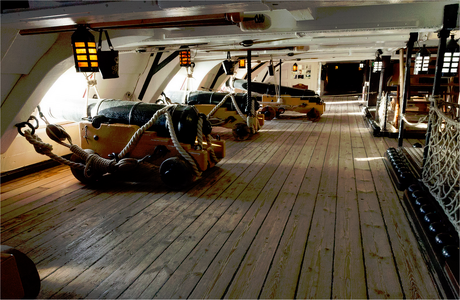
Another little detail which I am working on and which came from an idea on the MSW forum, is the overhead lighting of the Upper Gundeck. These lights will be visible beneath the skid beams and some of the bulkheads and so I wanted them to be reasonably realistic. A picture of the actual Upper Gundeck shows the overhead lighting.

1723861333235.png

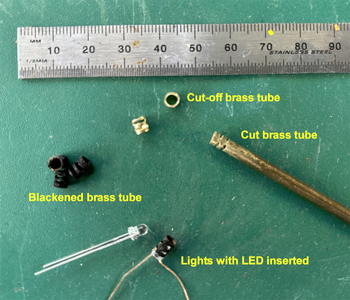
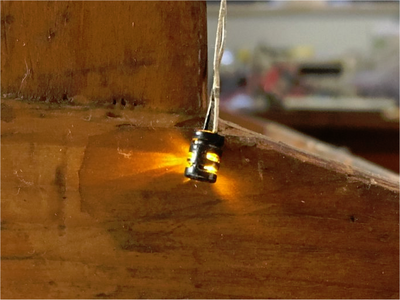
So a method of reproducing these types of lights using LEDs (as suggested on the MSW forum), is to take some 3mm brass tubing, set a thin diamond blade at about 1.0mm cut height and then slice the tubing with four parallel cuts (two on each side). After final cut-off for length, and when suitably filed and cleaned out, the resulting brass 'light' can have a 3mm candle-flickering LED inserted and this results in a very realistic hanging light for mounting as required under the skid beams and the bulwarks. I provide a couple of pictures below to show how I made these. I used Birchwood Brass Black to blacken the brass lights and a small CA drop to fix the LED into the brass tube.

1723861892464.png

And the finished product:

1723862383878.png

It will not be a difficult exercise to wire these and hide them under the skid beams and in places with the wiring embedded into support timbers.

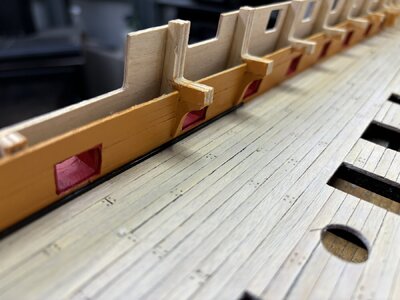
And a final detail which I have added is 1 x 1 mm strip along the deck edge where the decking meets the painted bulwark wall (see below). I noticed this subtle detail from some of the picture of the ship. If you look at the image 3 x above (where I show the lighting inside the Upper Gundeck), you can clearly see the black edge striping where the deck planking meets the bulwark wall. I used Evergreen 1 x 1 mm strips for this, after painting, as it is accurately sized and the plastic Evergreen product bends well to fit into the corner of the decking.

IMG_2074.JPG
Best Regards,


PeterG

Elapsed Time = 805 hours
 
Last edited:
Something which I was wanting to do was make the decision as to whether to add 'tree nails' for the decking on the Upper Gundeck. I decided I would experiment using a method I employed in adding tree nails to the outer hull planking of my Vasa. This method entails using a thin syringe needle (which is hollow), and then cutting the sharp point off (take care with this as the points are extremely sharp), and then filing with a metal file so the end is flat and perpendicular. Then by heating the tip of the round syringe 'tube' with a small butane burner, you can carefully position and burn the 4 x outlines of the tree nails into the joins of the decking planks. I show an example below. Note how the tube has burnt a neat circle into the decking simulating the tree nail. Where too much burning/heating has been applied, by lightly sanding, you can get back to the circle required.

View attachment 465200

Note too that this planking is after treatment using the Littlefair's Dove Gray staining (refer to earlier post). This stain has done an excellent job of 'holly stoning' the appearance of the originally light brown timber (Tanganyika timber from the Caldercraft kit).

Another little detail which I am working on and which came from an idea on the MSW forum, is the overhead lighting of the Upper Gundeck. These lights will be visible beneath the skid beams and some of the bulkheads and so I wanted them to be reasonably realistic. A picture of the actual Upper Gundeck shows the overhead lighting.

View attachment 465201

So a method of reproducing these types of lights using LEDs (as suggested on the MSW forum), is to take some 3mm brass tubing, set a thin diamond blade at about 1.0mm cut height and then slice the tubing with four parallel cuts (two on each side). After final cut-off for length, and when suitably filed and cleaned out, the resulting brass 'light' can have a 3mm candle-flickering LED inserted and this results in a very realistic hanging light for mounting as required under the skid beams and the bulwarks. I provide a couple of pictures below to show how I made these. I used Birchwood Brass Black to blacken the brass lights and a small CA drop to fix the LED into the brass tube.

View attachment 465204

And the finished product:

View attachment 465205

It will not be a difficult exercise to wire these and hide them under the skid beams and in places with the wiring embedded into support timbers.

And a final detail which I have added is 1 x 1 mm strip along the deck edge where the decking meets the painted bulwark wall. I noticed this subtle detail from some of the picture of the ship. If you look at the image 3 x above (where I show the lighting inside the Upper Gundeck), you can clearly see the black edge striping where the deck planking meets the bulwark wall. I used Evergreen 1 x 1 mm strips for this, after painting, as it is accurately sized and the plastic Evergreen product bends well to fit into the corner of the decking.

Best Regards,


PeterG

Elapsed Time = 805 hours
Good morning Peter. Very good work. Thanks for the process detail- definitely some worthwhile tips here. Cheers Grant
 
I have followed the Instruction Manual by Caldercraft fairly rigourously
Hi Peter
Regarding the wales thickness, understood, The fact that you went to the trouble of sanding down the thickness at the bow is great. Kudos!! You are right, the instructions should include a comment or instruction but this kind of thing takes research and research costs money, so the kit makers are limited in what they can do and provide a reasonably priced product. The below photos may be of some help to your build log followers for future consideration. Note the fore edge of the wales are in alignment with the surrounding planking and seat in the rabbet.
Allan
Wales Taper 2.PNG.jpgWales taper 3.jpgWales Taper 4.jpg
 
Last edited:
Hallo Peter,

Schön, dein Bautagebuch und ich werde es mit großer Freude verfolgen. Sieht bisher alles super aus. Deine Tipps und Tricks werde ich gerne annehmen und hoffen, nur halb so gut zu werden, wie du es hier zeigst. Die Victroy werde ich auch im Maßstab 1/84 bauen. Allerdings werde ich sie im Zustand 1765 und 1785 bauen. Also vor dem großen Umbau 1803, wie du sie baust.
Auch sind alle Tipps willkommen.

Freundliche Grüße Günter
PS Bitte entschuldigen Sie mein schlechtes Englisch.:)


Hello Peter,

Great, your construction diary and I will follow it with great pleasure. Everything looks great so far. I will gladly accept your tips and tricks and hope to be half as good as you show here. I will also build the Victroy in 1/84 scale. However, I will build it in the 1765 and 1785 condition. So before the big conversion in 1803, as you are building it.
All tips are welcome too.

Kind regards, Günter
PS Please excuse my bad English.:)
 
Last edited by a moderator:
Thank you all (Byrian, Uwe, Grant, Allan, Paul, Mike and Günter). Your English is just fine Günter. I understand perfectly and best of luck with your Victory. Have you a Build Log?

Allan, thanks again for your comments regarding the wales. As I said before, this is not something I had allowed for (as the instructions do not allude to the rabbett allowing for the wales thickness). It is a good point however and something which builders of any ship should be aware of not just Victory.

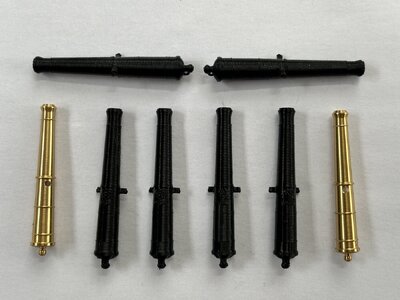
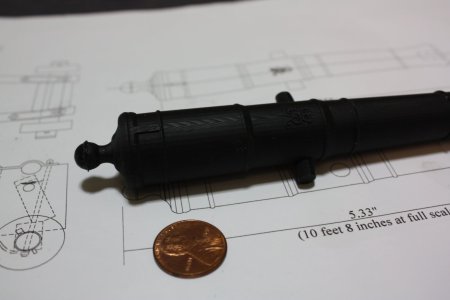
On another issue Allan, as you know, I have used your cannon STL files to have 70 gun barrels created by a 3D printing service, here in Australia. Well, the product has arrived and production was very fast. The product quality is excellent with correct barrel length for my 1/72 scale and in black plastic which negates the need for painting. Cost worked out (including delivery), at about A$0.82 per gun - Not expensive. Below is an image of the made barrels, along with some of the brass equivalents included in the Caldercraft kit.

Img_2098.jpg
You will note in the picture above, that:

- The cannon barrels have the trunnion correctly located and off centre from the centreline of the barrel
- The cascable (the ring) at the rear of the cannon is correctly located and of the required size for the breeching tackle
- There is a 'touch' hole' or vent over the breech which I wasn't aware of in the file - A bonus.
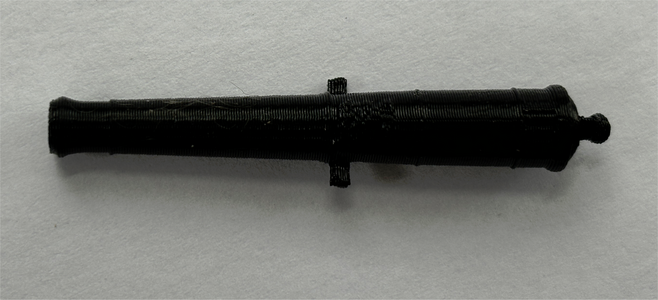
- The Royal Crest on the barrels is present (see below), but it is hard to see as it is black on black. I think I may need to 'dry brush/paint' these with a grey to highlight them.

1724372641323.png

However, a problem - You can see in the picture, that the 3D building of plastic resin along and around the barrels has left a 'rippling' as it builds up the cannon. You only see it when you are 'up close' so it may not be such a problem as is obvious in the above image. Also, the plastic is relatively shiny, and definately not a matt finish. I am going to have to deal with these issues somehow.

One thing I have tried and it seems effective, is to spay the barrel with a matt varnish finish. I have used Testors spray matt finish and it appears to infill the rippling 'lows' and evens out the surface, as well as reduces the shininess to be a matt appearance. This may be my answer. I certainly could not sand or try and remove the rippling as it would destroy the detail of the crest and the ring reinforcing etc.

This barrel production was always ever an experiment, and thanks to Allan, I have been able to carry it through without too much expense. The 3D printing has produced an enhanced and more detailed product, but with the downside of the 'rippling' surface appearance. I still have the kit-provided brass barrels which will have:

- To have the trunnions added
- No Royal Crest
- No cascable at the breech
- No blacking so would need some brass blackening treatment

So if I can hide the rippling, the made 3D barrels will be superior. Many thanks again Allan.

Best Regards,

PeterG
 
One thing I have tried and it seems effective, is to spay the barrel with a matt varnish finish. I have used Testors spray matt finish and it appears to infill the rippling 'lows' and evens out the surface, as well as reduces the shininess to be a matt appearance. This may be my answer. I certainly could not sand or try and remove the rippling as it would destroy the detail of the crest and the ring reinforcing etc.
Hi, Peter
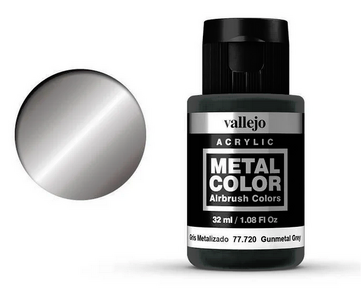
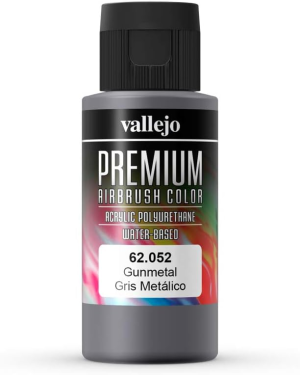
Try using the surface primer, you may be able to even the 'ripping'. I found a perfect primer made by Mr.Color or Vallejo. Both have black color mate. Also, I would recommend painting using the Vallejo 'Gunmetal' acrylic polyurethane, it is yield an amazing results,
 
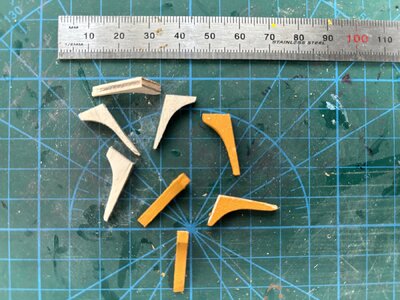
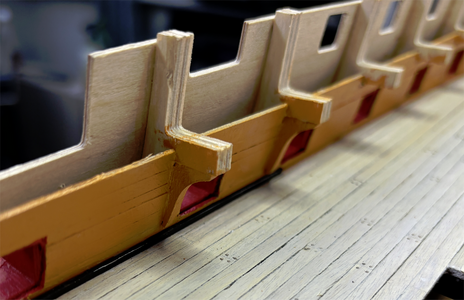
While waiting for the cannons to arrive (and personally, putting off the next stage of the build - the copper plating), I decided to add some additional detail to the Upper Gundeck (which I enjoy doing). Things I have done:

1. I have added bulwark bracing which will be seen from the Quarterdeck opening and adds a bit of extra detail (see below). These I made out of walnut plywood and shaped and painted. The fitting is simply to PVA glue beneath the overhead bracing for the Quarterdeck (second picture below):

IMG_2073.JPG

1724373969685.png

I have only added two bulwark elbows fore and aft (both sides), as behind and forward of this there is internal cabin walls which hide additional viewing.

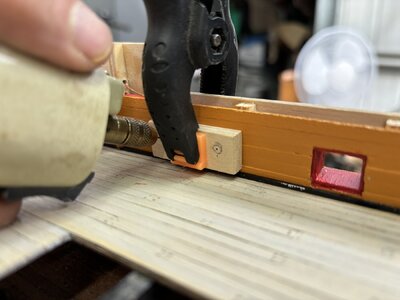
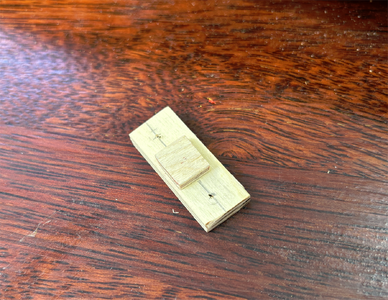
2. I drilled the locations of breeching eyebolts beside each gunport. This used a simple jig with a piece of plywood (cut to the size (see below) of the gunport openings), and two horizontally placed drillholes where required to keep the eyebolts level and evenly positioned:

IMG_2076.JPG

1724374259286.png

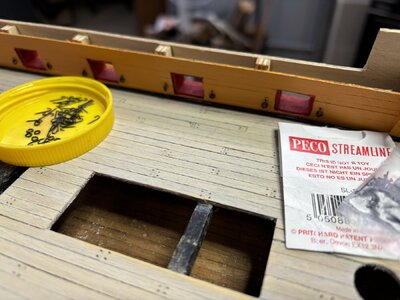
3. With the gunport eyebolt holes drilled, I made the large number of eyebolts and rings. The eye bolt itself is simply a 'hook' shape which I made out of some model railroad (Peco brand) track laying nails (see below) which are already black, and then I made the rings out of copper wire and simply would around a suitably sized (1/8") drill bit and silver soldered to secure the ends of the ring. By then inserting the hooked track nails (with the head cut off) into the bulwark pre-drilled holes, I placed a ring over the hook, then pushed the nail into the bulwark timber until it formed a ring holding the eye-bolt ring. You can see the finished product below on each side of the gunports.

IMG_2079.JPG

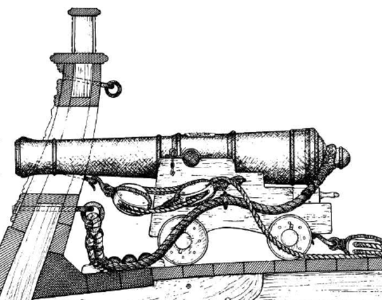
Interestingly, on board the real Victory, the above eyebolts were used to secure the breeching tackle. However, there is a second ring on each side of each gun, which is not an eyebolt, but simply a ring, which was used for the hook of the loading tackle.

1724374893801.jpeg 1724374938936.png

Lots to consider and lots more that can be added. I am currently doing some research on the internal cabin partitions for the Captain's quarters, day room, dining room etc as well as Pursers quarters forward. These details, although not easily seen, may be a good addition when internal lights and viewing through the gunports is possible.

Best regards,

PeterG

Elapsed time = 856 hours
 
Hi, Peter
Try using the surface primer, you may be able to even the 'ripping'. I found a perfect primer made by Mr.Color or Vallejo. Both have black color mate. Also, I would recommend painting using the Vallejo 'Gunmetal' acrylic polyurethane, it is yield an amazing results,

Jimsky, many thanks. This could be a much better solution. I checked on the Vallejo product (as below) and it is sprayable, will be matt finish and the only question is whether although 'hiding' the ripples, it might also hide the Royal Crest. If so, I may be able to wipe away the paint after spraying, from the crest and finer detail where required. There also doesn't seem to be a black colour, so I would have to add some Vallejo Colour Air black to tone it down to the correct gun barrel colour. Definately worth the experiment. Many thanks, I will trial it.

1724375528141.png

Best Regards,

PeterG
 
Last edited:
Jimsky, many thanks. This could be a much better solution. I checked on the Vallejo product (as below) and it is sprayable, will be matt finish and the only question is whether although 'hiding' the ripples, it might also hide the Royal Crest. If so, I may be able to wipe away the paint after spraying, from the crest and finer detail where required. There also doesn't seem to be a black colour, so I would have to add some Vallejo Colour Air black to tone it down to the correct gun barrel colour. Definately worth the experiment. Many thanks, I will trial it.

View attachment 466549

Best Regards,

PeterG
This one works as well, but it is a bit lighter in color. I mentioned this one

1724378113435.png

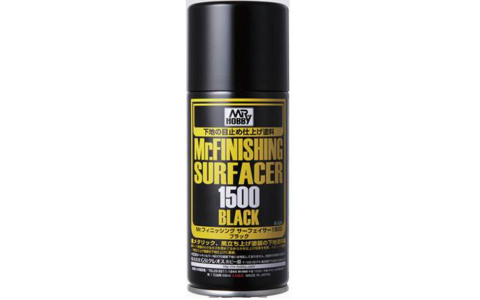
...and surface primer. It was my mistake naming it incorrectly, It is Mr.Hobby, I would run 1 coat of surface 1000, and then 1500.

1724378230115.png
 
You can see in the picture, that the 3D building of plastic resin along and around the barrels has left a 'rippling' as it builds up the cannon.
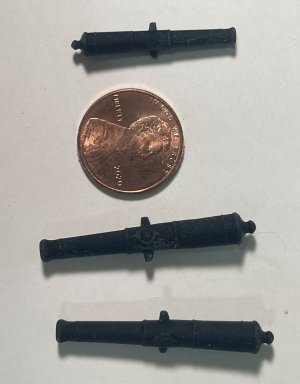
That is strange. I have seen very slight flow marks but nothing like this. Below is a large (1:24) scale Armstrong Frederick barrel and it has some flow marking that you can see in the first reinforce. The smaller scaled barrels I have had made had virtually no such marks. The second photo are 1:64 Commonwealth pattern barrels. I believe the barrels I had made were printed at an angle whereas yours looks like it may have been vertical. I have no experience in 3D printing so hopefully some of the 3D experts here can address this. Maybe post a thread where more folks will see your photo and can advise why this has happened.
Thank you very much for posting your photo. Maybe we connect the fellow that does my printing with your fellow in Australia to discuss directly. PM me if you want his name and address.
Allan
1724408881996.jpeg
1724409157350.jpeg
 
Thank you all (Byrian, Uwe, Grant, Allan, Paul, Mike and Günter). Your English is just fine Günter. I understand perfectly and best of luck with your Victory. Have you a Build Log?

Allan, thanks again for your comments regarding the wales. As I said before, this is not something I had allowed for (as the instructions do not allude to the rabbett allowing for the wales thickness). It is a good point however and something which builders of any ship should be aware of not just Victory.

On another issue Allan, as you know, I have used your cannon STL files to have 70 gun barrels created by a 3D printing service, here in Australia. Well, the product has arrived and production was very fast. The product quality is excellent with correct barrel length for my 1/72 scale and in black plastic which negates the need for painting. Cost worked out (including delivery), at about A$0.82 per gun - Not expensive. Below is an image of the made barrels, along with some of the brass equivalents included in the Caldercraft kit.

View attachment 466535
You will note in the picture above, that:

- The cannon barrels have the trunnion correctly located and off centre from the centreline of the barrel
- The cascable (the ring) at the rear of the cannon is correctly located and of the required size for the breeching tackle
- There is a 'touch' hole' or vent over the breech which I wasn't aware of in the file - A bonus.
- The Royal Crest on the barrels is present (see below), but it is hard to see as it is black on black. I think I may need to 'dry brush/paint' these with a grey to highlight them.

View attachment 466536

However, a problem - You can see in the picture, that the 3D building of plastic resin along and around the barrels has left a 'rippling' as it builds up the cannon. You only see it when you are 'up close' so it may not be such a problem as is obvious in the above image. Also, the plastic is relatively shiny, and definately not a matt finish. I am going to have to deal with these issues somehow.

One thing I have tried and it seems effective, is to spay the barrel with a matt varnish finish. I have used Testors spray matt finish and it appears to infill the rippling 'lows' and evens out the surface, as well as reduces the shininess to be a matt appearance. This may be my answer. I certainly could not sand or try and remove the rippling as it would destroy the detail of the crest and the ring reinforcing etc.

This barrel production was always ever an experiment, and thanks to Allan, I have been able to carry it through without too much expense. The 3D printing has produced an enhanced and more detailed product, but with the downside of the 'rippling' surface appearance. I still have the kit-provided brass barrels which will have:

- To have the trunnions added
- No Royal Crest
- No cascable at the breech
- No blacking so would need some brass blackening treatment

So if I can hide the rippling, the made 3D barrels will be superior. Many thanks again Allan.

Best Regards,

PeterG
Thank you for posting these photos of the 3D printed canons. I share in your disappointment over the ripples and the subtlety of the KG3 emblem.

The canons that Allan has printed have a nicer finish.

I would like to see how your canons finish up after trying to fill in the valleys with a painted product.

Your jig for standardizing the gun port hardware is very nice.
 
Back
Top