-

Win a Free Custom Engraved Brass Coin!!!
As a way to introduce our brass coins to the community, we will raffle off a free coin during the month of August. Follow link ABOVE for instructions for entering.
-

PRE-ORDER SHIPS IN SCALE TODAY!
The beloved Ships in Scale Magazine is back and charting a new course for 2026!
Discover new skills, new techniques, and new inspirations in every issue.
NOTE THAT OUR FIRST ISSUE WILL BE JAN/FEB 2026
You are using an out of date browser. It may not display this or other websites correctly.
You should upgrade or use an alternative browser.
You should upgrade or use an alternative browser.
HMY Fubbs by AEW [COMPLETED BUILD]
- Thread starter aew
- Start date
- Watchers 19
-
- Tags
- completed build fubbs
First things first, thanks for the likes and the feedback.
Almost at the finishing line – but with quite a few little jobs to do.
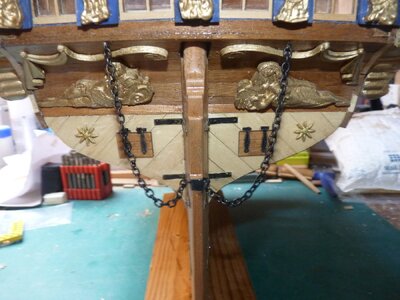
The first of them was at the stern, the rudder chains and some additions to the dummy gun port hinges:
PICT_F_2901
Still at the stern, it was decision time. One lantern or two?
Looking at the other build logs for comparison purposes, I could only see the single light options. I quite liked the idea of dual lights so that’s the option I chose.
Here’s the kit of parts:
PICT_F_2902
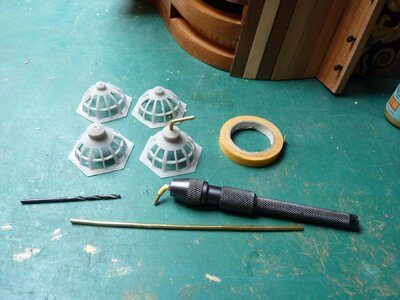
The masking tape was used to mark how much of the brass rod went into the resin casting.
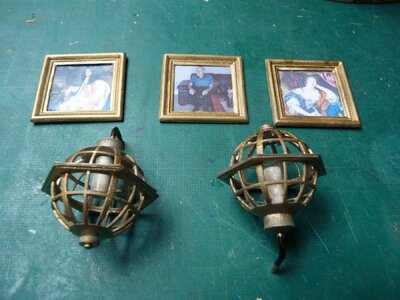
Whilst I was painting the lanterns, I also painted the three picture frames.
I looked for pictures of old ships lanterns, without a great deal of success, but I did find one with vague similarities. It had some form of burner inside it, so I added a short length of white painted dowel to each of them. (They needed a second coat!):
PICT_F_2903
Here’s how they look when glued together:
PICT_F_2904
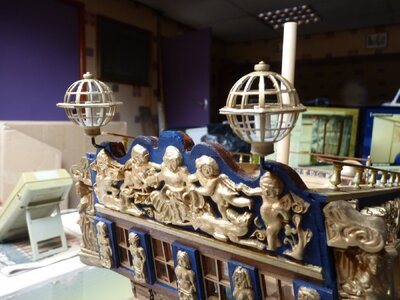
And here they are in place:
PICT_F_2905
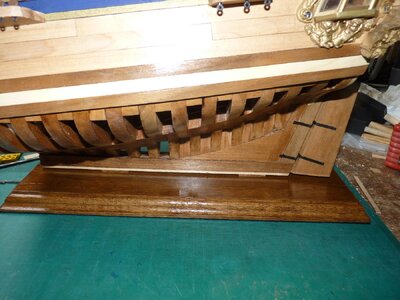
Time to start work on a better baseboard.
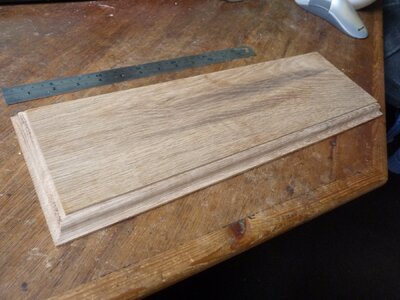
After some work with a sander, followed by a visit to the router table this piece of oak will do nicely:
PICT_F_2906
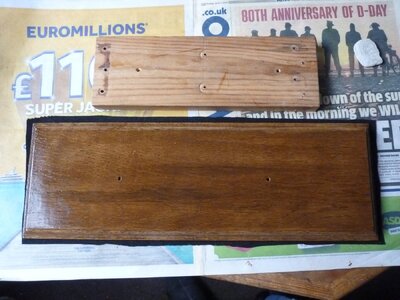
The next picture shows both the old and new bases. The old base was used to mark and drill the new mounting holes.
I would normally use a piece of green baize as a backing, but I didn’t have a long enough piece left – so the new base has a black backing:
PICT_F_2907
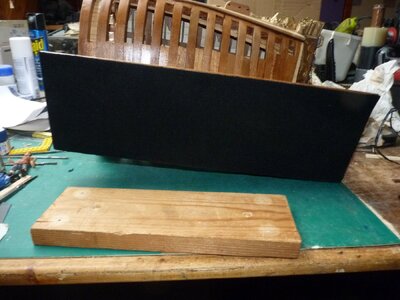
All that’s required now is to trim off the excess material, screw it in place and retire the old temporary base:
PICT_F_2908
And here’s how it fits:
PICT_F_2909
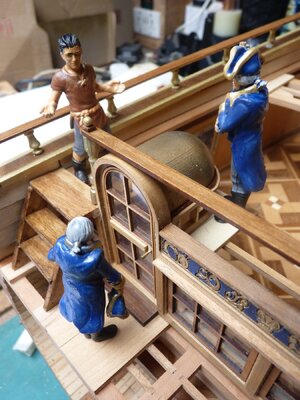
The furniture hasn’t been fitted yet, but this guy doesn’t seem to want the job:
PICT_F_2910
Almost at the finishing line – but with quite a few little jobs to do.
The first of them was at the stern, the rudder chains and some additions to the dummy gun port hinges:
PICT_F_2901

Still at the stern, it was decision time. One lantern or two?
Looking at the other build logs for comparison purposes, I could only see the single light options. I quite liked the idea of dual lights so that’s the option I chose.
Here’s the kit of parts:
PICT_F_2902

The masking tape was used to mark how much of the brass rod went into the resin casting.
Whilst I was painting the lanterns, I also painted the three picture frames.
I looked for pictures of old ships lanterns, without a great deal of success, but I did find one with vague similarities. It had some form of burner inside it, so I added a short length of white painted dowel to each of them. (They needed a second coat!):
PICT_F_2903
Here’s how they look when glued together:
PICT_F_2904

And here they are in place:
PICT_F_2905

Time to start work on a better baseboard.
After some work with a sander, followed by a visit to the router table this piece of oak will do nicely:
PICT_F_2906

The next picture shows both the old and new bases. The old base was used to mark and drill the new mounting holes.
I would normally use a piece of green baize as a backing, but I didn’t have a long enough piece left – so the new base has a black backing:
PICT_F_2907

All that’s required now is to trim off the excess material, screw it in place and retire the old temporary base:
PICT_F_2908

And here’s how it fits:
PICT_F_2909

The furniture hasn’t been fitted yet, but this guy doesn’t seem to want the job:
PICT_F_2910

Beautiful work Arthur. I’m keen to see how the furniture goes in. Cheers GrantFirst things first, thanks for the likes and the feedback.
Almost at the finishing line – but with quite a few little jobs to do.
The first of them was at the stern, the rudder chains and some additions to the dummy gun port hinges:
PICT_F_2901
View attachment 466399
Still at the stern, it was decision time. One lantern or two?
Looking at the other build logs for comparison purposes, I could only see the single light options. I quite liked the idea of dual lights so that’s the option I chose.
Here’s the kit of parts:
PICT_F_2902
View attachment 466401
The masking tape was used to mark how much of the brass rod went into the resin casting.
Whilst I was painting the lanterns, I also painted the three picture frames.
I looked for pictures of old ships lanterns, without a great deal of success, but I did find one with vague similarities. It had some form of burner inside it, so I added a short length of white painted dowel to each of them. (They needed a second coat!):
PICT_F_2903
Here’s how they look when glued together:
PICT_F_2904
View attachment 466404
And here they are in place:
PICT_F_2905
View attachment 466405
Time to start work on a better baseboard.
After some work with a sander, followed by a visit to the router table this piece of oak will do nicely:
PICT_F_2906
View attachment 466406
The next picture shows both the old and new bases. The old base was used to mark and drill the new mounting holes.
I would normally use a piece of green baize as a backing, but I didn’t have a long enough piece left – so the new base has a black backing:
PICT_F_2907
View attachment 466407
All that’s required now is to trim off the excess material, screw it in place and retire the old temporary base:
PICT_F_2908
View attachment 466408
And here’s how it fits:
PICT_F_2909
View attachment 466409
The furniture hasn’t been fitted yet, but this guy doesn’t seem to want the job:
PICT_F_2910
View attachment 466410
What to do with the three figures was something I hadn't decided. The arrangement shown in picture 2910 looked OK but they were just stood there, unsecured in any way,
I decided to try using double sided sticky tape so that I could change their positions if I wanted to.
The first tape I tried was a thin type, about the thickness of a sheet of paper. It appeared to work OK but by the following morning he’d fallen into the bilges. (Actually even further than that!)
I removed the tape and tried standing him up without any tape and found it was quite a delicate balancing act. I carefully sanded the soles of his boots, which made a big difference.
Second attempt was to use a thicker tape:
PICT_F_3001
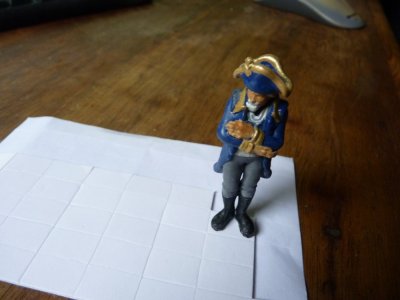
After trimming the tape to the shape of his boots I needed to blacken the edges. I used a sharpie which did a quick and easy job and stuck him in position.
PICT_F_3002
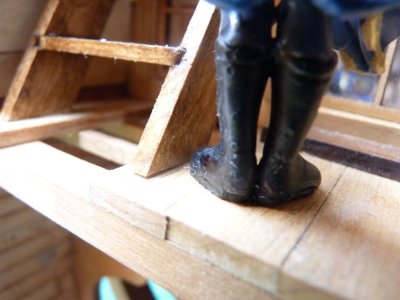
Big mistake!
Sticking him in place was a success, but the ink from the sharpie had left an outline on the deck planks. Fortunately, the varnish on the planks had protected the wood from the stain and I was able to clean off the planks.
I used black paint for the other figures!
One last job was to fit some bands to the mast.
I used some masking tape which I blackened with a sharpie. I blackened a long section on the reel and put it aside until the following day!
PICT_F_3003
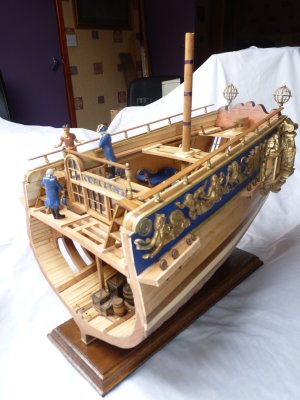
I decided to try using double sided sticky tape so that I could change their positions if I wanted to.
The first tape I tried was a thin type, about the thickness of a sheet of paper. It appeared to work OK but by the following morning he’d fallen into the bilges. (Actually even further than that!)
I removed the tape and tried standing him up without any tape and found it was quite a delicate balancing act. I carefully sanded the soles of his boots, which made a big difference.
Second attempt was to use a thicker tape:
PICT_F_3001

After trimming the tape to the shape of his boots I needed to blacken the edges. I used a sharpie which did a quick and easy job and stuck him in position.
PICT_F_3002

Big mistake!
Sticking him in place was a success, but the ink from the sharpie had left an outline on the deck planks. Fortunately, the varnish on the planks had protected the wood from the stain and I was able to clean off the planks.
I used black paint for the other figures!
One last job was to fit some bands to the mast.
I used some masking tape which I blackened with a sharpie. I blackened a long section on the reel and put it aside until the following day!
PICT_F_3003

Beautiful work Arthur. I’m keen to see how the furniture goes in. Cheers Grant
I've now posted a selection of 'Completed' images.
Click here to view them.
Looking very good - Congratulations for completing this fine model
And clever idea with the fixing of the figurines
And clever idea with the fixing of the figurines
Wonderful job! Makes me want to see the entire ship, though!  Too bad that kit is no longer available; it really looks interesting.


