Definitely subscribing to your review, and of course, I’ll get to see your finished models too. From what I’ve managed to check out so far – the doors are really well done!
Kingfisher 1770 1:48 POF
- Thread starter dockattner
- Start date
- Watchers 144
Thanks, Sergey. And welcome.Definitely subscribing to your review, and of course, I’ll get to see your finished models too. From what I’ve managed to check out so far – the doors are really well done!
- Joined
- Oct 9, 2020
- Messages
- 1,925
- Points
- 488

do wine coolers in the back of the fridge count?I have two or three bottles stashed away in the back of a kitchen cupboard somewhere. I can see that I'm going to have to up my game ...
Beautiful wine cellars, btw.
If you have to ask you already know the answerdo wine coolers in the back of the fridge count?


 .
.Thanks, everyone, for all the likes and nice posts while I was away.
Unfortunately, my return to the real world was met with some real-world challenges so I have been slow to resume my Kingfisher build. Plus (and this is quite uncharacteristic of me), my mind has begun to wander in the direction of a future build. I'm not one for having multiple projects on the bench at the same time but my imagination got the best of me, and I have started doing some research so I can order the necessary supplies. Details to follow.
When we last spoke about ship modeling, I had just wrapped up the bulkhead that sits at the aft edge of the forecastle deck. There are two additional bulkheads under the quarter deck, and these are joined by a wall running between them. These three are the subject of this post.
The lengthwise joining wall is fairly straightforward so I'll show some of the steps in case anyone is interested in my approach.
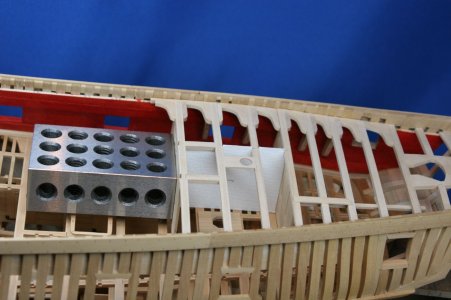
First a cardstock template:
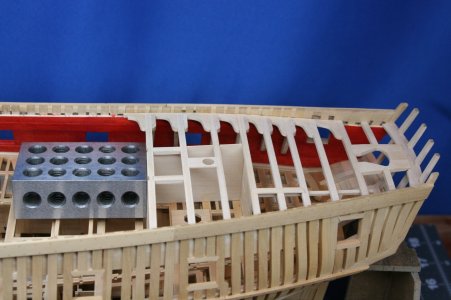
I then converted that into a panel made from boxwood veneer:
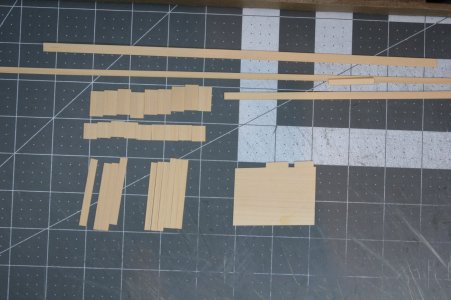
In the following image notice the small panels on the left that will eventually become the raised paneling of the bulkhead. These will eventually be shaped into parallelograms, but I have learned that if I establish their precise width they can be used as spacers when laying in the vertical boards. This saves a step in shaping the panels and assures their precise fit (at least for their width):
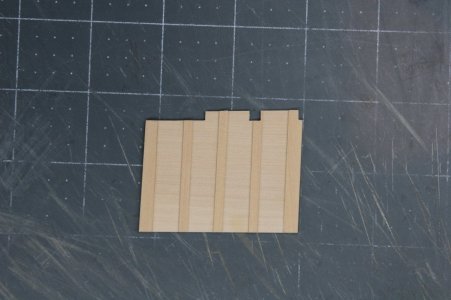
Now the vertical boards are installed (the location of these was guided by the panels I just mentioned:
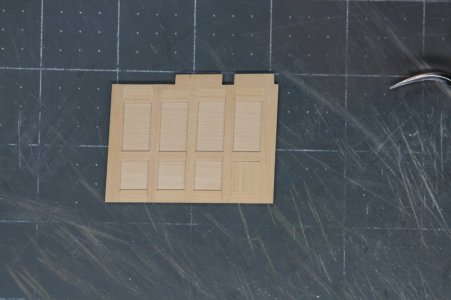
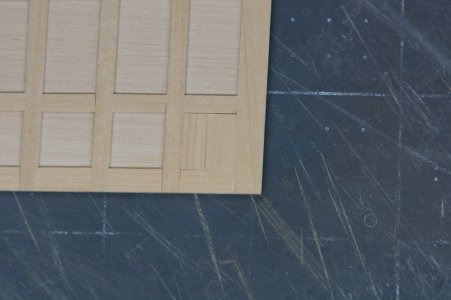
The horizontal boards were then installed and now you can see the parallelogram that needs to be filled in 16 times (remember there is a front and a back to these bulkheads). You can also see the first panel fit into place on the lower right:
Here all the panels have been fit into place:
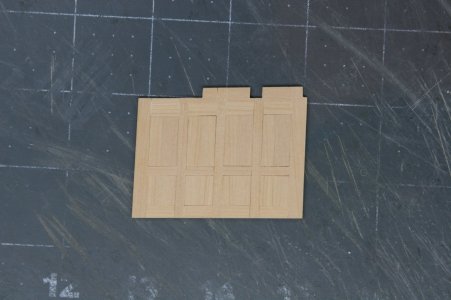
And now those inserts have been beveled to simulate raised panels:
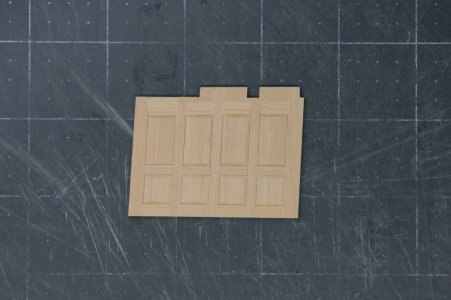
Finally, everything is sanded smooth and the first coat of wipe-on-poly has been applied:
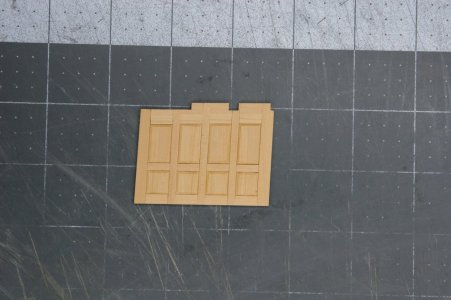
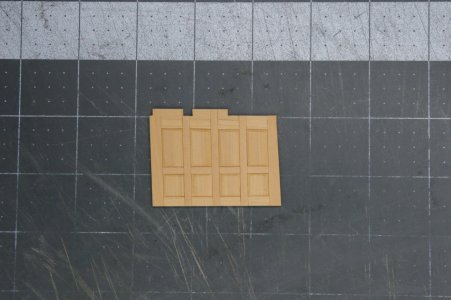
And the reverse side:
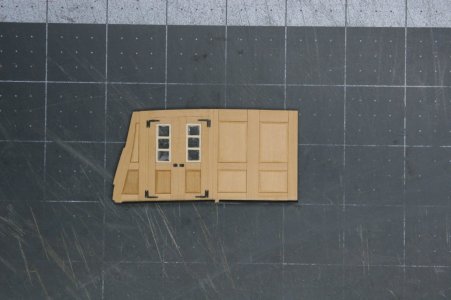
I mentioned there are two bulkheads under the quarter deck. Here is the more aft of these:
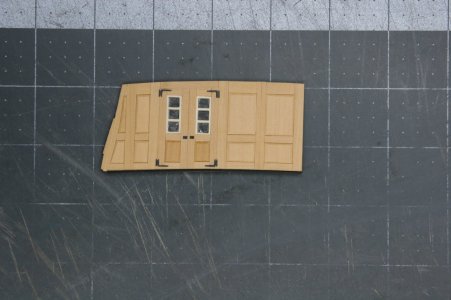
And the more forward one:
Whew! That was a lot of work to make the bulkheads the way I am doing it! But the whole process is fairly controlled and every single one of you could do these if the opportunity arises and you want to add some scratch details...
It's not easy to show these elements on the model but here goes:
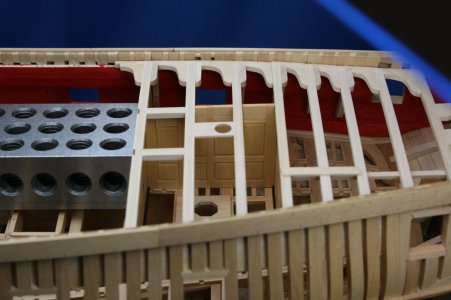
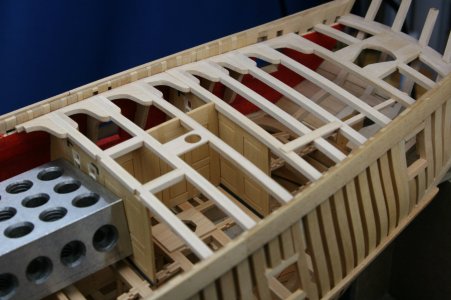
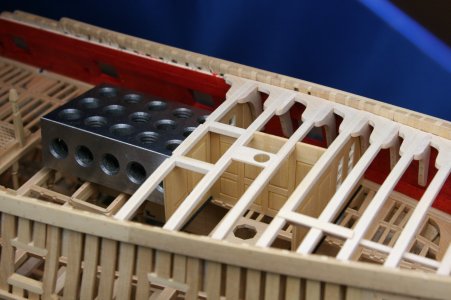
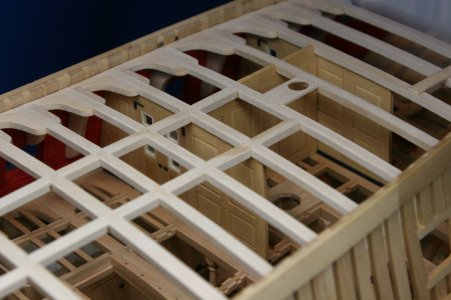
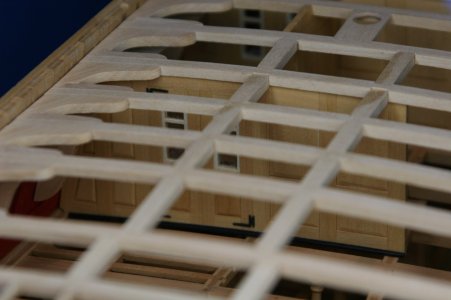
And there you have it.
This hobby has gotten so expensive I am selling my summer car ! But if a man needs pearwood boards for his next build... sacrifices must be made
  . So long, dear friend, we've had some great times together...
Thanks for stopping by!
Unfortunately, my return to the real world was met with some real-world challenges so I have been slow to resume my Kingfisher build. Plus (and this is quite uncharacteristic of me), my mind has begun to wander in the direction of a future build. I'm not one for having multiple projects on the bench at the same time but my imagination got the best of me, and I have started doing some research so I can order the necessary supplies. Details to follow.
When we last spoke about ship modeling, I had just wrapped up the bulkhead that sits at the aft edge of the forecastle deck. There are two additional bulkheads under the quarter deck, and these are joined by a wall running between them. These three are the subject of this post.
The lengthwise joining wall is fairly straightforward so I'll show some of the steps in case anyone is interested in my approach.
First a cardstock template:

I then converted that into a panel made from boxwood veneer:

In the following image notice the small panels on the left that will eventually become the raised paneling of the bulkhead. These will eventually be shaped into parallelograms, but I have learned that if I establish their precise width they can be used as spacers when laying in the vertical boards. This saves a step in shaping the panels and assures their precise fit (at least for their width):

Now the vertical boards are installed (the location of these was guided by the panels I just mentioned:

The horizontal boards were then installed and now you can see the parallelogram that needs to be filled in 16 times (remember there is a front and a back to these bulkheads). You can also see the first panel fit into place on the lower right:


Here all the panels have been fit into place:

And now those inserts have been beveled to simulate raised panels:

Finally, everything is sanded smooth and the first coat of wipe-on-poly has been applied:

And the reverse side:

I mentioned there are two bulkheads under the quarter deck. Here is the more aft of these:

And the more forward one:

Whew! That was a lot of work to make the bulkheads the way I am doing it! But the whole process is fairly controlled and every single one of you could do these if the opportunity arises and you want to add some scratch details...
It's not easy to show these elements on the model but here goes:


And there you have it.
This hobby has gotten so expensive I am selling my summer car
 . So long, dear friend, we've had some great times together...
Thanks for stopping by!
Nice wheels.......Also nice work fitting those panels in place.
This hobby has gotten so expensive I am selling my summer car! But if a man needs pearwood boards for his next build... sacrifices must be made
. So long, dear friend, we've had some great times together...


 ... I mean, this is also a car, and it is for sale! It could be your all-season friend, not just summer.

Wonderful panels, absolutely great.
Very neat work PaulThanks, everyone, for all the likes and nice posts while I was away.
Unfortunately, my return to the real world was met with some real-world challenges so I have been slow to resume my Kingfisher build. Plus (and this is quite uncharacteristic of me), my mind has begun to wander in the direction of a future build. I'm not one for having multiple projects on the bench at the same time but my imagination got the best of me, and I have started doing some research so I can order the necessary supplies. Details to follow.
When we last spoke about ship modeling, I had just wrapped up the bulkhead that sits at the aft edge of the forecastle deck. There are two additional bulkheads under the quarter deck, and these are joined by a wall running between them. These three are the subject of this post.
The lengthwise joining wall is fairly straightforward so I'll show some of the steps in case anyone is interested in my approach.
First a cardstock template:
View attachment 476461
I then converted that into a panel made from boxwood veneer:
View attachment 476462
In the following image notice the small panels on the left that will eventually become the raised paneling of the bulkhead. These will eventually be shaped into parallelograms, but I have learned that if I establish their precise width they can be used as spacers when laying in the vertical boards. This saves a step in shaping the panels and assures their precise fit (at least for their width):
View attachment 476463
Now the vertical boards are installed (the location of these was guided by the panels I just mentioned:
View attachment 476464
The horizontal boards were then installed and now you can see the parallelogram that needs to be filled in 16 times (remember there is a front and a back to these bulkheads). You can also see the first panel fit into place on the lower right:
View attachment 476465
View attachment 476466
Here all the panels have been fit into place:
View attachment 476467
And now those inserts have been beveled to simulate raised panels:
View attachment 476468
Finally, everything is sanded smooth and the first coat of wipe-on-poly has been applied:
View attachment 476470
And the reverse side:
View attachment 476471
I mentioned there are two bulkheads under the quarter deck. Here is the more aft of these:
View attachment 476472
And the more forward one:
View attachment 476473
Whew! That was a lot of work to make the bulkheads the way I am doing it! But the whole process is fairly controlled and every single one of you could do these if the opportunity arises and you want to add some scratch details...
It's not easy to show these elements on the model but here goes:
View attachment 476474
View attachment 476475
View attachment 476476
View attachment 476477
View attachment 476479
And there you have it.
This hobby has gotten so expensive I am selling my summer car! But if a man needs pearwood boards for his next build... sacrifices must be made
. So long, dear friend, we've had some great times together...
View attachment 476460
Thanks for stopping by!
Next, I believe you are going to rebuild your kitchen cabinets using the same approach
Take care
- Joined
- Aug 8, 2019
- Messages
- 5,029
- Points
- 738

So when I see my dentist driving an old car, he is probably also active in shipmodeling.And there you have it.
This hobby has gotten so expensive I am selling my summer car! But if a man needs pearwood boards for his next build... sacrifices must be made
. So long, dear friend, we've had some great times together...

Good morning Paul. I don't get your modelling skills. How you manage to execute everything so "perfectly", in scale and visually rewarding is beyond me, I will just sit and admire.Thanks, everyone, for all the likes and nice posts while I was away.
Unfortunately, my return to the real world was met with some real-world challenges so I have been slow to resume my Kingfisher build. Plus (and this is quite uncharacteristic of me), my mind has begun to wander in the direction of a future build. I'm not one for having multiple projects on the bench at the same time but my imagination got the best of me, and I have started doing some research so I can order the necessary supplies. Details to follow.
When we last spoke about ship modeling, I had just wrapped up the bulkhead that sits at the aft edge of the forecastle deck. There are two additional bulkheads under the quarter deck, and these are joined by a wall running between them. These three are the subject of this post.
The lengthwise joining wall is fairly straightforward so I'll show some of the steps in case anyone is interested in my approach.
First a cardstock template:
View attachment 476461
I then converted that into a panel made from boxwood veneer:
View attachment 476462
In the following image notice the small panels on the left that will eventually become the raised paneling of the bulkhead. These will eventually be shaped into parallelograms, but I have learned that if I establish their precise width they can be used as spacers when laying in the vertical boards. This saves a step in shaping the panels and assures their precise fit (at least for their width):
View attachment 476463
Now the vertical boards are installed (the location of these was guided by the panels I just mentioned:
View attachment 476464
The horizontal boards were then installed and now you can see the parallelogram that needs to be filled in 16 times (remember there is a front and a back to these bulkheads). You can also see the first panel fit into place on the lower right:
View attachment 476465
View attachment 476466
Here all the panels have been fit into place:
View attachment 476467
And now those inserts have been beveled to simulate raised panels:
View attachment 476468
Finally, everything is sanded smooth and the first coat of wipe-on-poly has been applied:
View attachment 476470
And the reverse side:
View attachment 476471
I mentioned there are two bulkheads under the quarter deck. Here is the more aft of these:
View attachment 476472
And the more forward one:
View attachment 476473
Whew! That was a lot of work to make the bulkheads the way I am doing it! But the whole process is fairly controlled and every single one of you could do these if the opportunity arises and you want to add some scratch details...
It's not easy to show these elements on the model but here goes:
View attachment 476474
View attachment 476475
View attachment 476476
View attachment 476477
View attachment 476479
And there you have it.
This hobby has gotten so expensive I am selling my summer car! But if a man needs pearwood boards for his next build... sacrifices must be made
. So long, dear friend, we've had some great times together...
View attachment 476460
Thanks for stopping by!
What.....!! Paul you have truly been captured by the sirens of the modelling fraternitymy mind has begun to wander in the direction of a future build. I'm not one for having multiple projects on the bench at the same time but my imagination got the best of me, and I have started doing some research so I can order the necessary supplies. Details to follow.
 .
.Ha....I have a feeling another four wheel summer friend is coming along. Paul if you need some cash for more box and pear wood just sell some of those Bordeaux belnd Saute-Loup reserves in that wonderful collection of yours..This hobby has gotten so expensive I am selling my summer car! But if a man needs pearwood boards for his next build... sacrifices must be made
. So long, dear friend, we've had some great times together...
 .
.Cheers Grant
Beautiful work Paul! Don’t get rid of your car, chop down a few trees… 

WOW! Beautiful work Paul. Save the license plates, great message.
Thanks so much for the mini-workship on panel making!Thanks, everyone, for all the likes and nice posts while I was away.
Unfortunately, my return to the real world was met with some real-world challenges so I have been slow to resume my Kingfisher build. Plus (and this is quite uncharacteristic of me), my mind has begun to wander in the direction of a future build. I'm not one for having multiple projects on the bench at the same time but my imagination got the best of me, and I have started doing some research so I can order the necessary supplies. Details to follow.
When we last spoke about ship modeling, I had just wrapped up the bulkhead that sits at the aft edge of the forecastle deck. There are two additional bulkheads under the quarter deck, and these are joined by a wall running between them. These three are the subject of this post.
The lengthwise joining wall is fairly straightforward so I'll show some of the steps in case anyone is interested in my approach.
First a cardstock template:
View attachment 476461
I then converted that into a panel made from boxwood veneer:
View attachment 476462
In the following image notice the small panels on the left that will eventually become the raised paneling of the bulkhead. These will eventually be shaped into parallelograms, but I have learned that if I establish their precise width they can be used as spacers when laying in the vertical boards. This saves a step in shaping the panels and assures their precise fit (at least for their width):
View attachment 476463
Now the vertical boards are installed (the location of these was guided by the panels I just mentioned:
View attachment 476464
The horizontal boards were then installed and now you can see the parallelogram that needs to be filled in 16 times (remember there is a front and a back to these bulkheads). You can also see the first panel fit into place on the lower right:
View attachment 476465
View attachment 476466
Here all the panels have been fit into place:
View attachment 476467
And now those inserts have been beveled to simulate raised panels:
View attachment 476468
Finally, everything is sanded smooth and the first coat of wipe-on-poly has been applied:
View attachment 476470
And the reverse side:
View attachment 476471
I mentioned there are two bulkheads under the quarter deck. Here is the more aft of these:
View attachment 476472
And the more forward one:
View attachment 476473
Whew! That was a lot of work to make the bulkheads the way I am doing it! But the whole process is fairly controlled and every single one of you could do these if the opportunity arises and you want to add some scratch details...
It's not easy to show these elements on the model but here goes:
View attachment 476474
View attachment 476475
View attachment 476476
View attachment 476477
View attachment 476479
And there you have it.
This hobby has gotten so expensive I am selling my summer car! But if a man needs pearwood boards for his next build... sacrifices must be made
. So long, dear friend, we've had some great times together...
Thanks for stopping by!
- Joined
- Oct 9, 2020
- Messages
- 1,925
- Points
- 488

I know. You are correct. lolIf you have to ask you already know the answer

.
true storyWOW! Beautiful work Paul. Save the license plates, great message.
An easy thing and two hard things...
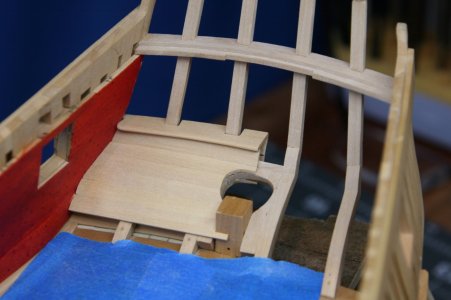
Moving now to the back of the ship I have planked the inside surface of the counter (an easy thing) and added a sill for the stern lights. The sill qualifies for a hard thing. It has to be level to the keel, account for the curved shape of the lower transom, and fit around the counter timbers. I was able to achieve a pretty nice fit where the sill will be visible - and the window frames will hide the areas where I wasn't able to get a good fit on the sides of the transom timbers:
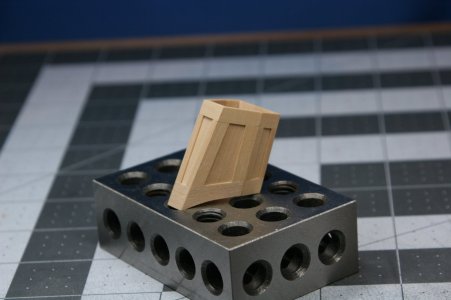
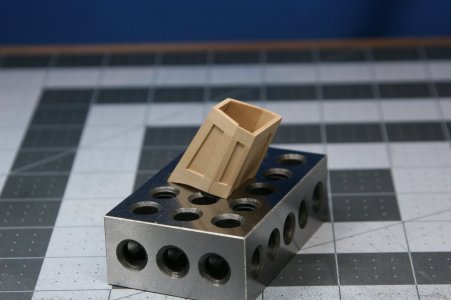
The other hard thing was the rudder trunk. This mini-construction has too many planes and curves intersecting in three dimensions for it to be even remotely enjoyable to fabricate. A responsible forum member would have taken pictures during the construction, but I have failed you in this regard.
Here is what I ended up with:
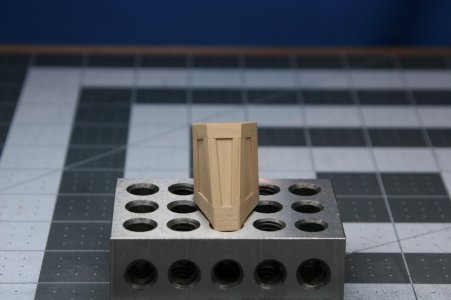
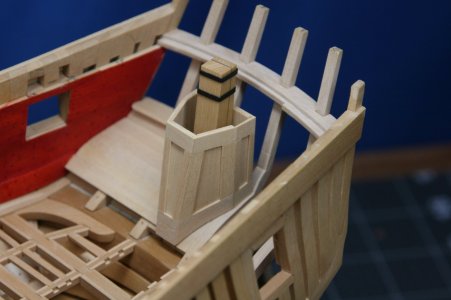
All in all, I'm satisfied with this outcome.
And yes, it does have a bit of an Iron Man vibe :
:

Moving now to the back of the ship I have planked the inside surface of the counter (an easy thing) and added a sill for the stern lights. The sill qualifies for a hard thing. It has to be level to the keel, account for the curved shape of the lower transom, and fit around the counter timbers. I was able to achieve a pretty nice fit where the sill will be visible - and the window frames will hide the areas where I wasn't able to get a good fit on the sides of the transom timbers:

The other hard thing was the rudder trunk. This mini-construction has too many planes and curves intersecting in three dimensions for it to be even remotely enjoyable to fabricate. A responsible forum member would have taken pictures during the construction, but I have failed you in this regard.
Here is what I ended up with:


All in all, I'm satisfied with this outcome.
And yes, it does have a bit of an Iron Man vibe
 :
: 


