As we close out 2024 one of the things I’m really looking forward to in 2025 is the continuation of your wonderful log and fine workmanship. Happy New Year to you and your family Paul.
You are using an out of date browser. It may not display this or other websites correctly.
You should upgrade or use an alternative browser.
You should upgrade or use an alternative browser.
Kingfisher 1770 1:48 POF
- Thread starter dockattner
- Start date
- Watchers 143
Thank you, Roger. Best wishes to you and your gang as well!
Hello Friends! Happy New Year!In January of 1766 the Royal Navy ordered two ships to be built conforming to a new design developed by the Surveyor of the Navy, Sir John Williams. The first of these was launched in November 1767 (Swan) and the second (Kingfisher) was launched in July of 1770 (but not completed until November 1770). As a curiosity many English records show the name of this second ship as Kings Fisher (or Kingsfisher).
Twenty-three more ships were ordered to the same design between 1773 and 1779. You are probably familiar with some of them: Fly, Pegasus, Swift (Vulture, Atalanta, Thorn) as they have appeared on this forum and others as kit or scratch builds.
Swan-class sloops were rated at 14 guns though from the very beginning they were designed with 16 gunports. In time, the additional two guns were added but the nominal rating was left unchanged.
Swan-class sloops were the ‘standard’ ship design of the British Navy during the American Revolutionary War during which eleven of them were lost (including Kingfisher). Surviving vessels went on to serve during the French Revolutionary War and the Napoleonic War.
It is necessary to identify this ship as the Kingfisher 1770 because there are at least 13 additional ships of this name listed in the records of the Royal Navy. There is even a Kingfisher class of ship built during the 20th century.
The Kingfisher 1770 was built by master shipwright Joseph Harris at the Chatham Dockyard, sailed for America in August of 1771, and notably participated in the blockade of Delaware Harbor and the Battle of Turtle Gut Inlet. She was burned by her own crew to avoid capture (by the French) on 7 August 1778 in Narragansett Bay during the Battle of Rhode Island.
Here are her vitals:
Wikipedia says this: The Swan class sloops were unusually attractive for the type of vessel. Not only did they have sleek hull lines, but they also carried an unusual amount of decoration for their size. They were built just before the Admiralty issued orders that all vessels (especially lesser rates and unrated vessels) should have minimal decoration and carvings to save on costs.
- Length: 96 ft 8 ½ in (29.5 m) (gundeck), 78 ft 10 ½ in (24.0 m) (keel)
- Beam: 26 ft 10 in (8.2 m)
- Depth of hold: 12 ft 10 in (3.91 m)
- Tons burthen: 302 bm
- Complement: 125
- Armament: 14x 6 Pound Guns, 16x ½ Pound Swivel Guns
View attachment 348679
View attachment 348680
Attribution: Painting. [Model of HMS] KINGFISHER, Sloop 14 Guns. Model made by Joseph Williams; Painting by Josh Marshall - 1775. Oil on panel in gilt frame. Perspective paintings at 45 degree angle from Navy Board original plans. Commissioned by King George III as part of a series of paired bow and stern paintings of British warship models, one example of each class of ship in the naval establishment.
Construction will begin in a few weeks. I have been reorganizing my workspace, reading everything I can find on swan class ships, ordering supplies to supplement the build, and adding some needed tools to my workshop.
You are all welcome to pull up a chair and join me on this multi-year project. It's going to be a blast!
January 1 happens to mark the birthday/anniversary of this build report.
Now two years into it I have learned a lot about modeling from this POF build. My understanding of ships has grown, and I have become much more comfortable using benchtop machines to add some precision to the fabrication of certain parts. Still, the hobby for me is just as much about making things with my hands and hand tools so that will remain the central part of my work habit (as well as a source of great satisfaction in the artistic sense).
Along the way I have made many forum friends; these relationships are a critical part of the hobby for me. I would not find as much enjoyment in the work if it was completed in isolation. Plus, I have often been challenged to improve my work by so many of you - I am grateful for you and the opportunities you provide to pursue (my version of) excellence in model building.
I have been fiddling with the head structures, and they have been frustratingly difficult. I'll report on those efforts in another post when I have sorted through a few of the challenges.
But for now, I think I'd like to celebrate two years of progress on the Kingfisher. What follows are images taken at one year followed by images taken today at two years.
January 1, 2024
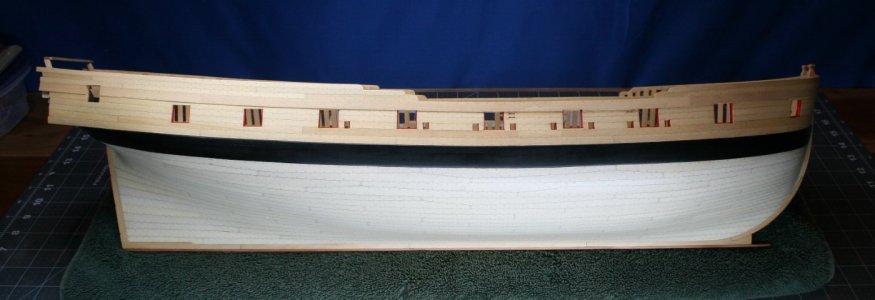
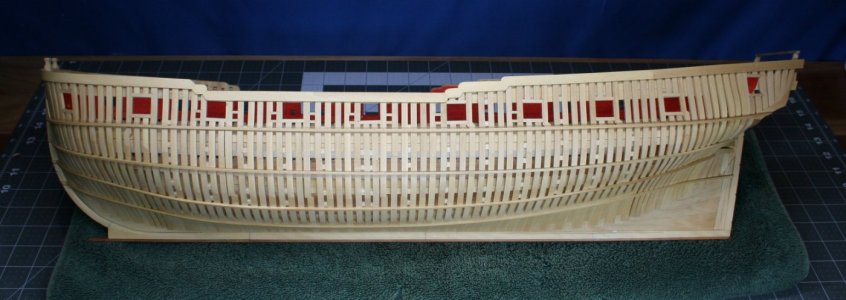
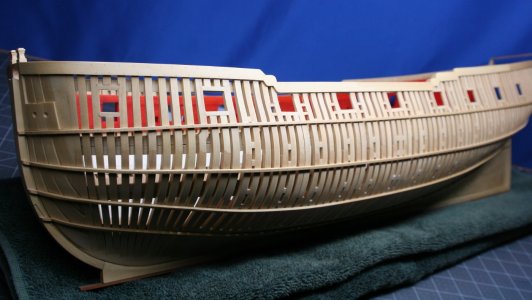
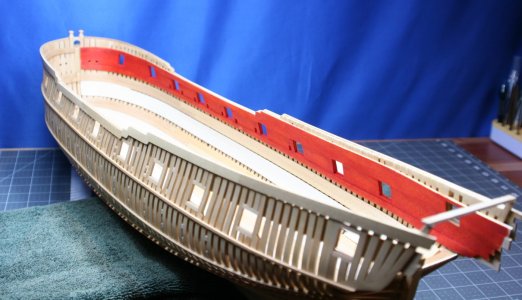
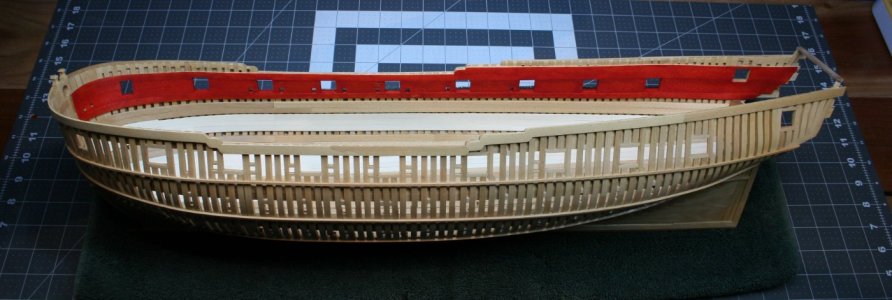
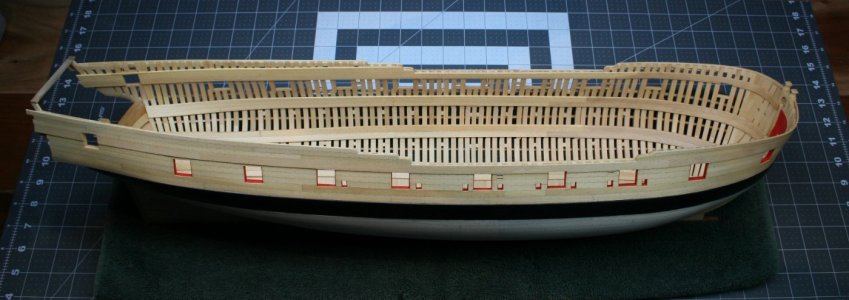
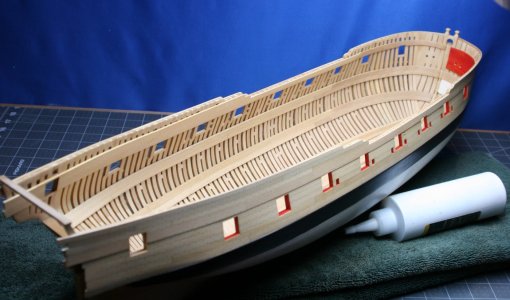
January 1, 2025
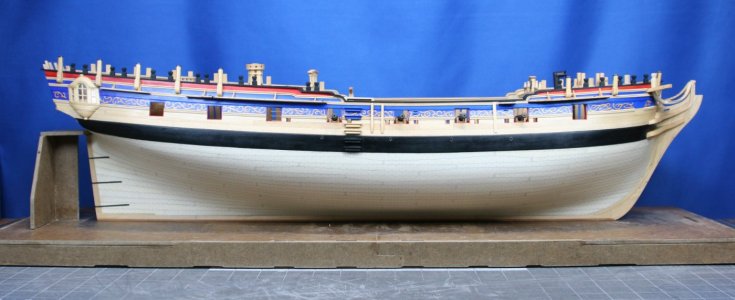
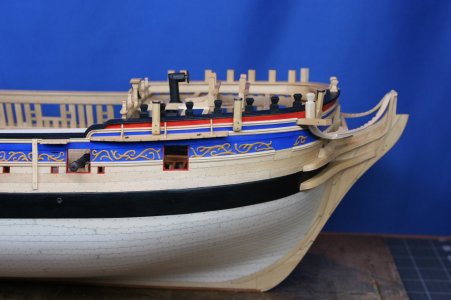
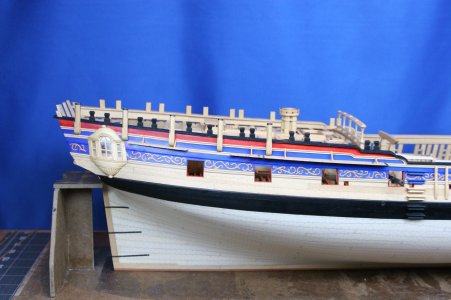
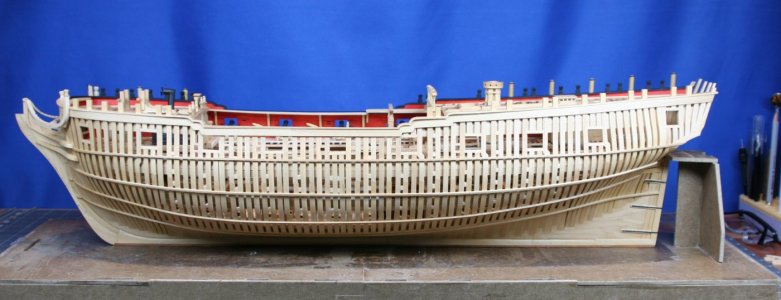
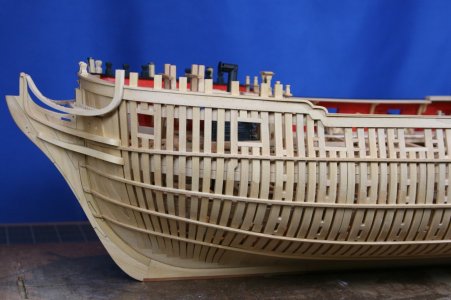
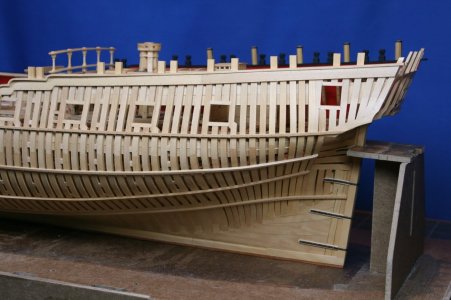
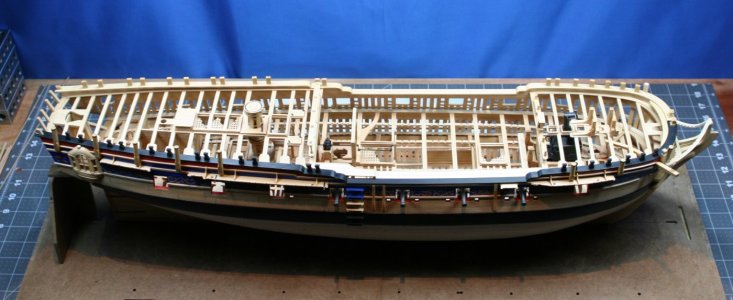
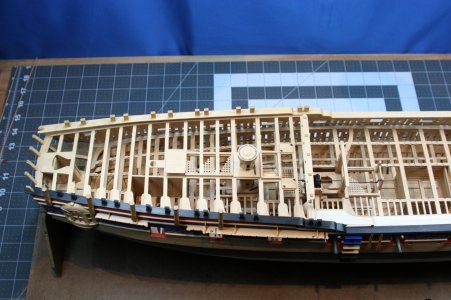
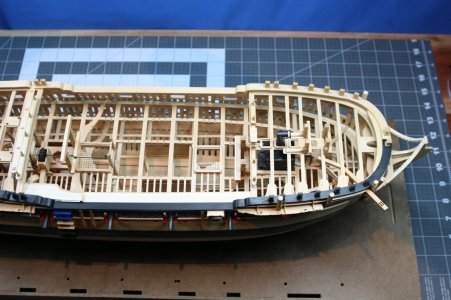
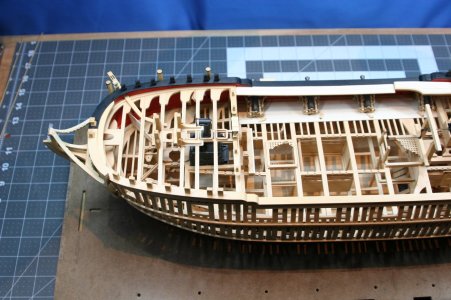
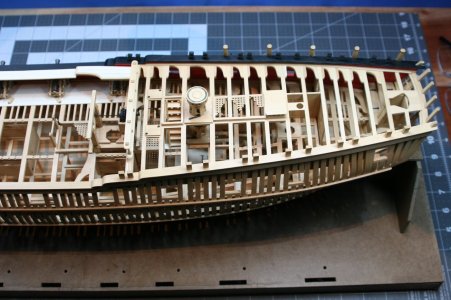
Thanks for joining me along the way and for your encouraging likes and posts. Onward into the new year!
Happy New Year, Mon Ami, and Happy Anniversary KF!!
... and why am I so in love with your model?
... and why am I so in love with your model?
Happy Birthday Kingfisher 

- Joined
- Jul 18, 2024
- Messages
- 316
- Points
- 278

It takes time to achieve perfection: to see what can be learned and achieved in two years is quite inspiring.
Congratulations.
Congratulations.
What a progress in this 2nd year, Paul. A nice input for the 3rd. Till now you can be proud: for this result and for your input in your log and this SoS.Hello Friends! Happy New Year!
January 1 happens to mark the birthday/anniversary of this build report.
Now two years into it I have learned a lot about modeling from this POF build. My understanding of ships has grown, and I have become much more comfortable using benchtop machines to add some precision to the fabrication of certain parts. Still, the hobby for me is just as much about making things with my hands and hand tools so that will remain the central part of my work habit (as well as a source of great satisfaction in the artistic sense).
Along the way I have made many forum friends; these relationships are a critical part of the hobby for me. I would not find as much enjoyment in the work if it was completed in isolation. Plus, I have often been challenged to improve my work by so many of you - I am grateful for you and the opportunities you provide to pursue (my version of) excellence in model building.
I have been fiddling with the head structures, and they have been frustratingly difficult. I'll report on those efforts in another post when I have sorted through a few of the challenges.
But for now, I think I'd like to celebrate two years of progress on the Kingfisher. What follows are images taken at one year followed by images taken today at two years.
January 1, 2024
View attachment 492785
View attachment 492784
View attachment 492788
View attachment 492789
View attachment 492787
View attachment 492786
View attachment 492790
January 1, 2025
View attachment 492791
View attachment 492792
View attachment 492793
View attachment 492799
View attachment 492800
View attachment 492801
View attachment 492794
View attachment 492795
View attachment 492796
View attachment 492797
View attachment 492798
Thanks for joining me along the way and for your encouraging likes and posts. Onward into the new year!
Regards, Peter
Happy 2025 Paul and happy birthday Kingfisher….So cool to see the progression which we often loose in the build logs. Besides the crafting of your Kingfisher, I love the way you have presented her with plenty look through and open structures. Hopefully you will not be including too much upper decking. Cheers GrantHello Friends! Happy New Year!
January 1 happens to mark the birthday/anniversary of this build report.
Now two years into it I have learned a lot about modeling from this POF build. My understanding of ships has grown, and I have become much more comfortable using benchtop machines to add some precision to the fabrication of certain parts. Still, the hobby for me is just as much about making things with my hands and hand tools so that will remain the central part of my work habit (as well as a source of great satisfaction in the artistic sense).
Along the way I have made many forum friends; these relationships are a critical part of the hobby for me. I would not find as much enjoyment in the work if it was completed in isolation. Plus, I have often been challenged to improve my work by so many of you - I am grateful for you and the opportunities you provide to pursue (my version of) excellence in model building.
I have been fiddling with the head structures, and they have been frustratingly difficult. I'll report on those efforts in another post when I have sorted through a few of the challenges.
But for now, I think I'd like to celebrate two years of progress on the Kingfisher. What follows are images taken at one year followed by images taken today at two years.
January 1, 2024
View attachment 492785
View attachment 492784
View attachment 492788
View attachment 492789
View attachment 492787
View attachment 492786
View attachment 492790
January 1, 2025
View attachment 492791
View attachment 492792
View attachment 492793
View attachment 492799
View attachment 492800
View attachment 492801
View attachment 492794
View attachment 492795
View attachment 492796
View attachment 492797
View attachment 492798
Thanks for joining me along the way and for your encouraging likes and posts. Onward into the new year!
- Joined
- Oct 23, 2018
- Messages
- 736
- Points
- 353

Wow, you made a lot of progress last year. Friday is build log one year old and I haven't finished the backbone of my model.
If you hold your speed you can start rigging the model at the end of this year. For such a complicated model you are really fast.
If you hold your speed you can start rigging the model at the end of this year. For such a complicated model you are really fast.
This is a wonderful post Paul. The POF model of the Kingfisher by dockattner is now legendary and demonstrates the artisanal level of skill you have attained. It remains a thing of extreme beauty and inspiration to all who gaze upon it here at SoS.
You are, and should be extremely proud of what you have achieved to date and I suspect we all look forward to seeing what the next year of the kattner shipyard will bring in 2025. I certainly am, as your log has become a major source of joy for me in this hobby I love.
Happy New Year of modeling, don’t stop.
Michael.
- Joined
- Jan 9, 2020
- Messages
- 10,522
- Points
- 938

Dear Paul. When I first learned that you had bought this kit, I knew it would be something special. Obviously, I use the word "kit" in the loosest possible terms, because your effort has far transcended that of a kit-build. What we have here is a build which personality echoes that of its builder to a T. And that, my dear friend is a very hard thing to find and a very rare occurrence to experience. Despite the challenges which are part and parcel of all builds, it is obvious from your work that Paul is in a good space - and that is a beautiful thing to see!
Your building skills aside, your photography skills are remarkable. Taking the time to present the model, the background and the lighting are all well thought out. Well done sir.
Hi Paul,
What a progress in the few years. Just wonderful to see your model growing but also your skills.
Looks like you will be finishing her in 2025 and then I hope you will go scratch all the way.
What a progress in the few years. Just wonderful to see your model growing but also your skills.
Looks like you will be finishing her in 2025 and then I hope you will go scratch all the way.
Thanks, Jim! Happy New Year to you as well. Kingfisher loves you tooHappy New Year, Mon Ami, and Happy Anniversary KF!!
... and why am I so in love with your model?
Thank you, Tobias. I think one of your builds is two years old as well? Of course, I am only working on one model at a time, so you still winHappy Birthday Kingfisher
 .
.Many thanks, Marco. Honestly, I can't say if two years is a long time or a short time. I suppose it's a long time to work on a single project - but it would be even longer if I remade every part I think I could make better... There are several builds I really admire and several of them are going into their second decade - that's not for me.It takes time to achieve perfection: to see what can be learned and achieved in two years is quite inspiring.
Congratulations.
Much appreciated, Peter. You are always so kind to post encouraging things. For interested modelers - what I do is play the notes in front of me (a music reference) - if you want to see what a composer can do, please check out Peter's current build report:What a progress in this 2nd year, Paul. A nice input for the 3rd. Till now you can be proud: for this result and for your input in your log and this SoS.
Regards, Peter
BALDER, Vlaardingen Herring Lugger from 1912, scratch build scale 1:50 Plate-On-Frame
It's time for a new build-log. Towards the end of the build of my Bluenose, there was the thought of what to build. Of course, that had to be a challenge (again). I had already suggested building a Vlaardingen herring sail lugger from around 1900. My place of birth is Vlaardingen, and my...
shipsofscale.com
Happy New Year to you and your gang as well, Grant! The upper decking as you see it is now completed.Happy 2025 Paul and happy birthday Kingfisher….So cool to see the progression which we often loose in the build logs. Besides the crafting of your Kingfisher, I love the way you have presented her with plenty look through and open structures. Hopefully you will not be including too much upper decking. Cheers Grant
Thank you, Christian. According to the fable...the tortoise wins the raceWow, you made a lot of progress last year. Friday is build log one year old and I haven't finished the backbone of my model.
If you hold your speed you can start rigging the model at the end of this year. For such a complicated model you are really fast.
As always you are so very kind in your posts, Michael.This is a wonderful post Paul. The POF model of the Kingfisher by dockattner is now legendary and demonstrates the artisanal level of skill you have attained. It remains a thing of extreme beauty and inspiration to all who gaze upon it here at SoS.
You are, and should be extremely proud of what you have achieved to date and I suspect we all look forward to seeing what the next year of the kattner shipyard will bring in 2025. I certainly am, as your log has become a major source of joy for me in this hobby I love.
Happy New Year of modeling, don’t stop.
Michael.
Thanks, Allan. And thank you for keeping me on my toes since you joined us over here on SoS...Happy happy Paul, Thank you very much for sharing your hard work via this build log. It is an inspiration to all of us.
Allan
What a wonderfully encouraging post, Heinrich. Yes, I remember you being excited that I had acquired one of Mr. Hunt's kits. I have tried to make the most of the privilege and opportunity to work with this rare (and now discontinued) kit.Dear Paul. When I first learned that you had bought this kit, I knew it would be something special. Obviously, I use the word "kit" in the loosest possible terms, because your effort has far transcended that of a kit-build. What we have here is a build which personality echoes that of its builder to a T. And that, my dear friend is a very hard thing to find and a very rare occurrence to experience. Despite the challenges which are part and parcel of all builds, it is obvious from your work that Paul is in a good space - and that is a beautiful thing to see!
Hello Ron! I believe you also try to present your models in the way that allows people to see what you have done. I have never been shy to present my work in a way that it can be seen - for good or for bad.Your building skills aside, your photography skills are remarkable. Taking the time to present the model, the background and the lighting are all well thought out. Well done sir.
Greetings, Maarten! Yes, I suspect she will be done in 2025. And while I am still considering options for my next project - a limited scratch build is one of the possibilities.Hi Paul,
What a progress in the few years. Just wonderful to see your model growing but also your skills.
Looks like you will be finishing her in 2025 and then I hope you will go scratch all the way.
I'm feeling a little nostalgic tonight, so I'll share with you and everyone else that there was a time during my Vasa build that I was feeling rather discouraged by my inability to work through a particular challenge. You, and Nigel (@NMBROOK), and Jim (@Jimsky), spoke into my failings and presented me with a path forward. Without your collective help I would likely have quit and tried another hobby. What a shame that would have been. My thanks for your friendship.
Happy New Year Paul to you and your family.
Superlative work, you seem to have moved mountains in a very short space of time!
Superlative work, you seem to have moved mountains in a very short space of time!
While I don't think the headworks are the hardest thing I have done on this ship model (hawse timbers still hold that place of pride), but they are making a case for their inclusion near the top of that list.
The problems are legion - but counted among them are the many planes of space that need to be simultaneously balanced (nothing is square) - and the fact that nothing should be fixed (glued) until future components are fabricated. Indeed, TFFM (Antscherl) suggests that fabricated parts just be pinned in place and then everything is taken apart later in preparation for final assembly. I am aware of three swan class ship builds that followed this model precisely.
As it turns out you are not reading a fourth.
Following the permanent installation of the upper and lower cheeks (no problem with doing that) comes the fabrication of the main rail. Antscherl dedicates several pages to this complicated piece but then says to just pin it in place while you fabricate the head beam (runs athwartships just like a deck beam) and the knees (just like lodging knees). And then go ahead and fabricate some carlings that terminate at a crosspiece (hey you, do NOT touch that bottle of glue). Next, make a lower rail which has to be precisely fit in place so that you can fabricate the head timbers (several more pages of instruction) which it passes through. Whatever you do DON'T glue anything yet.
Now, take everything apart and glue it all in place in reverse order.
Well, "that dog don't hunt" (an American colloquialism that my international friends will hopefully take the meaning of).
The main rail was fabricated and pinned in place (I was still following the instructions at this point):
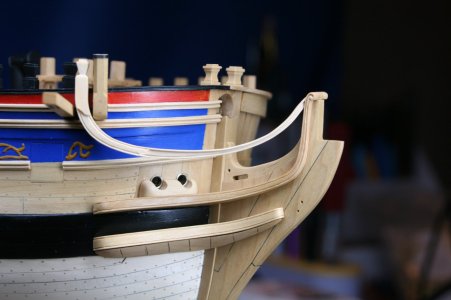
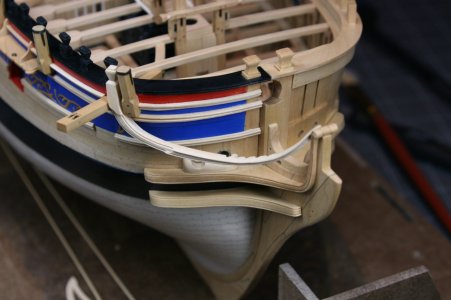
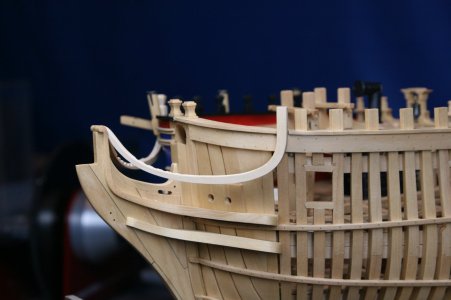
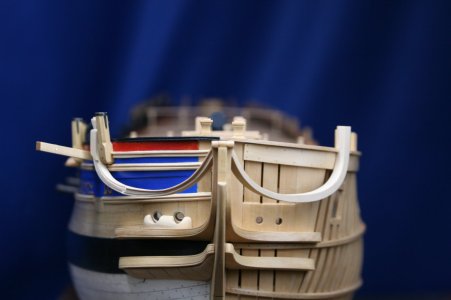
It was during the fabrication of the head beam that I realized this "fit it in place and glue it together later" approach wasn't going to work for me. I permanently cemented the main rails and carried on...
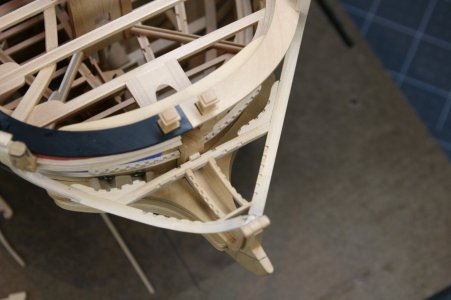
In the following image you can see the athwartships head beam - the carlings - the crosspiece (forward end of the carlings) and notched battens attached to the hull:
So far so good.
But then it came time to fabricate and install the head timbers. There were four of these on the Pegasus (that's the sample ship highlighted in TFFM) but only three on the Kingfisher. The head timbers sit on the upper cheek and support the main rail.
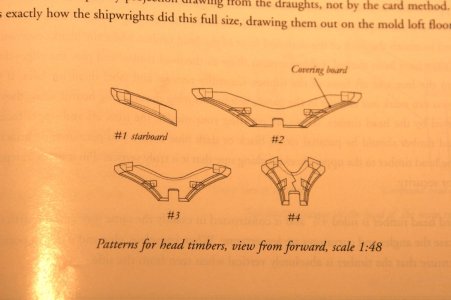
Not only do the head timbers sit on the upper cheek, but they should also sit over the top of (saddle over) the standard that sits on the knee of the head. The problem is you can't install these parts if you have cemented other things in place...
My solution (and in fairness, a solution that I did not invent) was to cut the head timbers into two pieces. I did attempt to make these appear as if they were a single piece via scarf joints, but that was a comprehensive failure.
These six little pieces represent a full day of work...(really Paul? a FULL day? Yes, an eight hour day on these six pieces and I don't even know yet if they will be usable until I sort out the lower rail...).
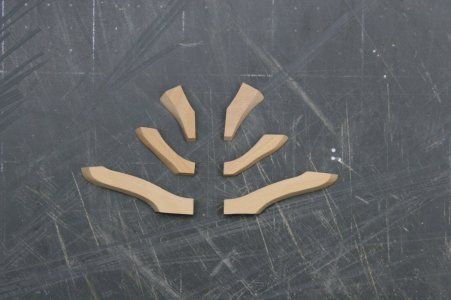
And now I need to figure out how to run a lower rail through these head timbers.
I should have chosen a different hobby: maybe gardening, or genealogy... my dad collected coins...
The problems are legion - but counted among them are the many planes of space that need to be simultaneously balanced (nothing is square) - and the fact that nothing should be fixed (glued) until future components are fabricated. Indeed, TFFM (Antscherl) suggests that fabricated parts just be pinned in place and then everything is taken apart later in preparation for final assembly. I am aware of three swan class ship builds that followed this model precisely.
As it turns out you are not reading a fourth.
Following the permanent installation of the upper and lower cheeks (no problem with doing that) comes the fabrication of the main rail. Antscherl dedicates several pages to this complicated piece but then says to just pin it in place while you fabricate the head beam (runs athwartships just like a deck beam) and the knees (just like lodging knees). And then go ahead and fabricate some carlings that terminate at a crosspiece (hey you, do NOT touch that bottle of glue). Next, make a lower rail which has to be precisely fit in place so that you can fabricate the head timbers (several more pages of instruction) which it passes through. Whatever you do DON'T glue anything yet.
Now, take everything apart and glue it all in place in reverse order.
Well, "that dog don't hunt" (an American colloquialism that my international friends will hopefully take the meaning of).
The main rail was fabricated and pinned in place (I was still following the instructions at this point):


It was during the fabrication of the head beam that I realized this "fit it in place and glue it together later" approach wasn't going to work for me. I permanently cemented the main rails and carried on...
In the following image you can see the athwartships head beam - the carlings - the crosspiece (forward end of the carlings) and notched battens attached to the hull:

So far so good.
But then it came time to fabricate and install the head timbers. There were four of these on the Pegasus (that's the sample ship highlighted in TFFM) but only three on the Kingfisher. The head timbers sit on the upper cheek and support the main rail.

Not only do the head timbers sit on the upper cheek, but they should also sit over the top of (saddle over) the standard that sits on the knee of the head. The problem is you can't install these parts if you have cemented other things in place...
My solution (and in fairness, a solution that I did not invent) was to cut the head timbers into two pieces. I did attempt to make these appear as if they were a single piece via scarf joints, but that was a comprehensive failure.
These six little pieces represent a full day of work...(really Paul? a FULL day? Yes, an eight hour day on these six pieces and I don't even know yet if they will be usable until I sort out the lower rail...).

And now I need to figure out how to run a lower rail through these head timbers.
I should have chosen a different hobby: maybe gardening, or genealogy... my dad collected coins...
Last edited:
Thanks, Nigel. My best wishes to you and your family for a wonderful 2025!Happy New Year Paul to you and your family.
Superlative work, you seem to have moved mountains in a very short space of time!
Just step back and admire your workmanship, Paul.While I don't think the headworks are the hardest thing I have done on this ship model (hawse timbers still hold that place of pride), they are making a case for their inclusion near the top of that list.
The problems are legion - but counted among them are the many planes of space that need to be simultaneously balanced (nothing is square) - and the fact that nothing should be fixed (glued) until future components are fabricated. Indeed, TFFM (Antscherl) suggests that fabricated parts just be pinned in place and then everything is taken apart later in preparation for final assembly. I am aware of three swan class ship builds that followed this model precisely.
As it turns out you are not reading a fourth.
Following the permanent installation of the upper and lower cheeks (no problem with doing that) comes the fabrication of the main rail. Antscherl dedicates several pages to this complicated piece but then says to just pin it in place while you fabricate the head beam (runs athwartships just like a deck beam) and the knees (just like lodging knees). And then go ahead and fabricate some carlings that terminate at a crosspiece (hey you, do NOT touch that bottle of glue). Next, make a lower rail which has to be precisely fit in place so that you can fabricate the head timbers (several more pages of instruction) which it passes through. Whatever you do DON'T glue anything yet.
Now, take everything apart and glue it all in place in reverse order.
Well, "that dog don't hunt" (an American colloquialism that my international friends will hopefully take the meaning of).
The main rail was fabricated and pinned in place (I was still following the instructions at this point):
View attachment 492907
View attachment 492908
View attachment 492909
View attachment 492910
It was during the fabrication of the head beam that I realized this "fit it in place and glue it together later" approach wasn't going to work for me. I permanently cemented the main rails and carried on...
In the following image you can see the athwartships head beam - the carlings - the crosspiece (forward end of the carlings) and notched battens attached to the hull:
View attachment 492912
So far so good.
But then it came time to fabricate and install the head timbers. There were four of these on the Pegasus (that's the sample ship highlighted in TFFM) but only three on the Kingfisher. The head timbers sit on the upper cheek and support the main rail.
View attachment 492914
Not only do the head timbers sit on the upper cheek, but they should also sit over the top of (saddle over) the standard that sits on the knee of the head. The problem is you can't install these parts if you have cemented other things in place...
My solution (and in fairness, a solution that I did not invent) was to cut the head timbers into two pieces. I did attempt to make these appear as if they were a single piece via scarf joints, but that was a comprehensive failure.
These six little pieces represent a full day of work...(really Paul? a FULL day? Yes, an eight hour day on these six pieces and I don't even know yet if they will be usable until I sort out the lower rail...).
View attachment 492913
And now I need to figure out how to run a lower rail through these head timbers.
I should have chosen a different hobby: maybe gardening, or genealogy... my dad collected coins...
Except that you are such a clever photographer AND precise model builder, no-one else would notice your joins or scarfs in what will look just like a cleverly placed single piece. You are too hard on yourself (and just in case you are tempted, you don't get much out of eight hours doing genealogy!!)


