Kingfisher 1770 1:48 POF

There is always a possibility to glue a piece of the wood in place to start over a part. But I think there is enough wood to correct the face if you can't live with it (I know the feeling).
Show us a picture from the side, to see if the face not to far in front, in that case you can flat out things and do place them again. But the advice of Peter is also true.
I might chop off the head if I think I can hide the seam. The head is taped up right now so I can't take a photo - trying to preserve its perfection as I work on the torso ROTF.
 
Paul, I think your carving thus far is admirable for a beginner! Don't be too self critical of your work.
My critique of your work thus far is it is very soft. By that I mean you are obviously very comfortable with using dental bits in a rotary tool, however I would recommend you don't forget your micro chisel, gouges, files and xacto knife for sharp detail. I know the challenge at small scale, there is only so much detail you can achieve. I have found much success using an xacto knife for sharp detail on small scale carvings. That's because even micro gouges and chisels are too big for some cuts needed. Look into chip carving, its a technique to get depth with multiple cuts using a knife. I added the hair to my miniature bear on the NL ship by adding small lines with a xacto knife. I used the same technique on the trees for the bark, but they were achieved with two cuts at an angle (chip carving). Floral stuff is best done with a gouge for the main shape and an xacto for the veins in the leafs, etc. I am no expert myself, but I try to employ every tool available to me to achieve the proper geometry, there are no rules! I find my tiny rifler file to be invaluable on small scale stuff. I hope that helps and don't get discouraged, I think you have natural ability working in your favor, and once refined you will achieve great results. So hang in there and keep chiping away...pun intended. ;)
Thanks for taking the time to post your suggestions, Dean. As time has gone on, I have found myself using hand tools (those you suggest) more and more often. You mentioned riffler files but the ones I have are far too coarse for this work - but I have been using jeweler's files. I feel like I am progressing with generic shapes and bodies - but a realistic human face continues to elude me. And while I have really only been at carving for a few weeks, I ordinarily pick up things like this pretty quickly. Alas...
 
I have the tiny jewelers files as well, and the micro diamond coated files. The rifler file is my go to because it is triangular shaped with a curved tip to reach hard to get to areas. ;)
You should get a tiny diamond coated rifler file.
One last thing, I do portraits, and it requires you study faces and features that make them unique, and their locations relative to one another, etc. I would recommend at least drawing some faces to become proficient at drawing them prior to carving them. This may be rhetorical, but obviously you have to be intimately familiar with your subject prior to creating it in 3D. So if needed, take a step back and establish that first. ;)
 
Much better Paul
View attachment 510579
View attachment 510578

Michelangelo's first work wasn't David :-)

Thank you, Maarten. Yes, I suppose there has been improvement...


Hello Friends,

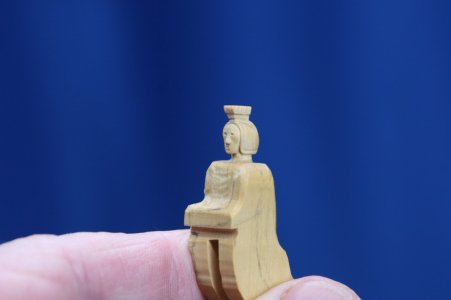
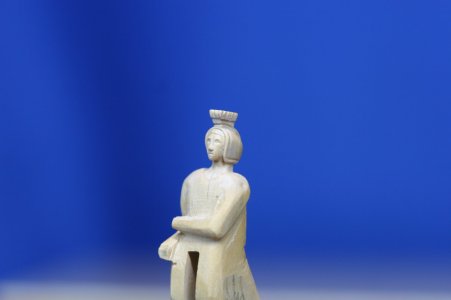
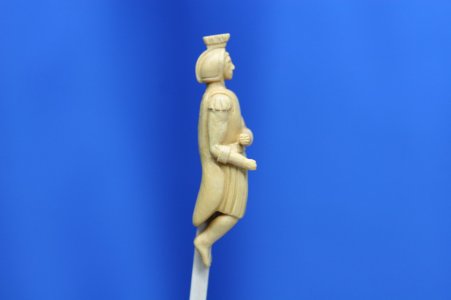
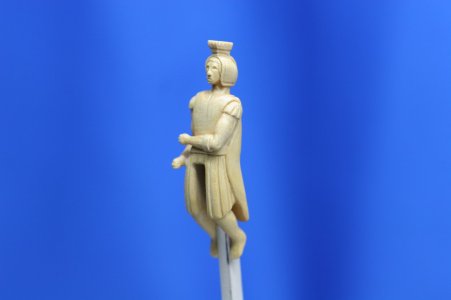
I gave myself over to the creation of the figurehead during the second half of this week. I had several days off so there are more hours invested than you might suspect given the fact that I only started this thing on Wednesday.

It's probably not quite done but it is at a stage that I can share it with you. It is impossible to pick it up and not see more things to work on; but it is no longer merely a head sitting on a block of wood.

Enough words...

IMG_1015.JPG

IMG_1016.JPG

IMG_1017.JPG

IMG_1018.JPG

IMG_1019.JPG

IMG_1020.JPG

Temporarily positioned on the model:

IMG_1030.JPG

IMG_1024.JPG

IMG_1025.JPG

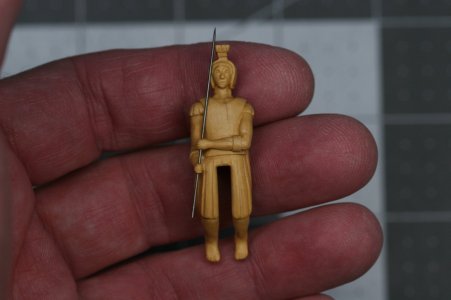
And now with a spear suitable for a king who fishes:

IMG_1031.JPG

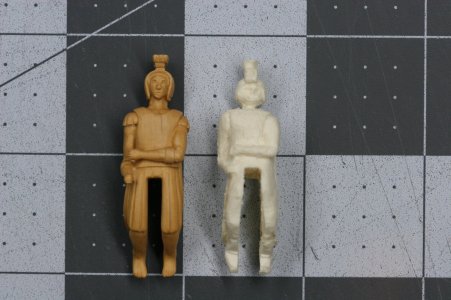
This is the figurehead provided with the kit:

IMG_1023.JPG

I'm sure I'll tweak a few things but at some point it just gets silly. Thanks to everyone who offered advice or encouragement.

Onward!

IMG_1032.JPG
 
Thank you, Maarten. Yes, I suppose there has been improvement...


Hello Friends,

I gave myself over to the creation of the figurehead during the second half of this week. I had several days off so there are more hours invested than you might suspect given the fact that I only started this thing on Wednesday.

It's probably not quite done but it is at a stage that I can share it with you. It is impossible to pick it up and not see more things to work on; but it is no longer merely a head sitting on a block of wood.

Enough words...

View attachment 510624

View attachment 510625

View attachment 510627

View attachment 510628

View attachment 510629

View attachment 510630

Temporarily positioned on the model:

View attachment 510634

View attachment 510632

View attachment 510633

And now with a spear suitable for a king who fishes:

View attachment 510635

This is the figurehead provided with the kit:

View attachment 510631

I'm sure I'll tweak a few things but at some point it just gets silly. Thanks to everyone who offered advice or encouragement.

Onward!

View attachment 510636
You deserved a very big WOW, Paul. Very stylish!
Regards, Peter
 
:) :cool: :D

A great improvement. Looking closely at all details you can see the hours of investment. Going through your post I was hoping you would include a picture holding the figurehead in your hand to see the actual size... and there it was. Very well done.
Thanks, Herman. Yes... many hours and it never seems to quite get finished. Already this morning I see more to do as I look again at the photos from last night. Of course, the photos show things the eye overlooks in real life.

Fantastic….
Thank you, Charlie.

Good morning Paul,
in my opinion, you've created a beautiful figurehead, 100 times better than the one included in the kit. You can be truly proud of yourself. Congratulations.
Much appreciated, Tobias. The learning curve is steep and somewhat unforgiving (you can always start over but to toss away 20 hours of work is no small thing for me). I'm happy to include it with my ship model. As I mentioned previously it will represent where I was at this stage of learning a new craft.

Welcome
I admire your work Paweł, you have a lot of courage to take on such a challenge as making a figure. You did it great. Greetings Mirek
Indeed, a big challenge to try to carve a human face and form with only a few weeks experience. I'm still trying to figure out what tools to use, but I'll keep pressing on.

Your new figurehead is looking much much better than the original one. Very well done.
Thank you, Christian. Yup, the one with the kit wasn't really usable. The resin it was made from is also very brittle now from age (?) and it almost crumbles if you try to cut it with an XActo blade.

Great result Paul. Far better then the kit supplied one.
Thanks for your help, Maarten. I've still got a way to go but I'm starting to figure out some good practices.

Great result Paul. Better then the one in the kit.
Thanks for your help as well, Stephan. I'll not surpass your work, but I'll do my best to sneak up on it :).

By the way, this is a species of true boxwood called buxus macowanii (Cape Box from South Africa). According to my supplier this is the closest thing he has seen to slow growth sempervirens (from the French Pyrenees). It is far superior to the Castello the kit is made from (or at least I assume that is what's in the kit). I had to sell one of my grandchildren to generate the cash needed to buy it, but I found it very nice to carve. You will notice it has a slightly more yellow tone than the kit supplied wood.
 
Back
Top