Kingfisher 1770 1:48 POF

Carving should be easy for you just drill like it is a cavity that needs cleaned out......

As for Mermaid scales, you might try using thin bridal net or other fine mesh held in place and apply thin wash or varnish over to leave a pattern to carve if you dare.
Thanks, Kurt. No scales on this little fish-lady.

Good afternoon Paul. Yep.

Eish. Drives me crazy but I know you will persevere with the figurehead Paul. Your stern gallery is impressive. First time carving or not it is really good. Cheers Grant
Thanks for the encouraging words, Grant. I am of the mind that most things can be learned. Maybe not in a week or two, but with time and experience... :).
 
Excellent results, so quickly!

Both your quick skill development AND the speed that this figurehead is appearing!

We're all looking forward to you nailing your first figurehead, so it does this superb Kingfisher model justice!
Thanks, Brad. When I look at the images side-by-side there are aspects that are better - but it still looks like a death mask to me. But its not for lack of effort!

For scales, what about using a piece of brass tubing and cut part of the tube off so you only have an arc on the end.
I did try that using a metal cannula but abandoned the effort for fear of ruining an otherwise acceptable piece.

Nice man-bun.
ROTF ROTF ROTF ROTF ROTF
 
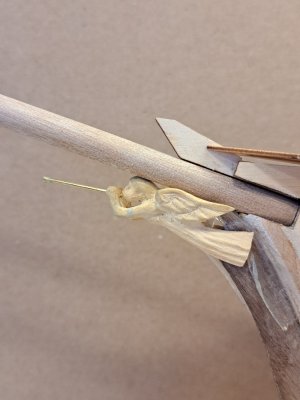
I had only built the skeleton of my Flying Cloud When I decided to have a go at carving her iconic clarion angel figurehead out of boxwood.
I had had some experience with sculpting over the years, but never anything like this, at this scale. Feeling that the Flying Clouds figure head is so iconically critical to the build I felt I had to get it right and at a level of artistry that would set the standard for the model to follow. So, you might say I am building the model around the figurehead.
I always feel I could do or could have done better. But at some point, you can't allow the perfect to be the enemy of the good. I have always felt that a perfectionist is a person who never completes a project. You can only do the best you can given the experience you possess when you try something new. The hope and ultimate goal is to have the next project be an improvement on the last. (IMHO).
I withhold any opinion (for whatever it's worth :rolleyes:) until you are satisfied with what you are crafting20230901_120902 (3).jpg20230901_120514 (2).jpg.
I used a combination of rotary burrs and mini carving chisels.
 
Last edited:
Paul! I think another shipmate mentioned this a few posts back - the secret to faces is counterintuitive. As an artist it took some time to learn and apply the basic formula for face proportions. Draw an oval. Bisect it vertically and horizontally. The eyes sit half way down the head at the horizontal line. Now draw a horizontal line that bisects the lower half of the oval. The top of that line is the bottom of the nose. Now draw another horizontal line that bisects the remaining part of the oval. The mouth sits on top of that line. Now you can learn to love faces again!

Here's a visual:Faces.jpg

Blessings.
Chuck
 
I had only built the skeleton of my Flying Cloud When I decided to have a go at carving her iconic clarion angel figurehead out of boxwood.
I had had some experience with sculpting over the years, but never anything like this, at this scale. Feeling that the Flying Clouds figure head is so iconically critical to the build I felt I had to get it right and at a level of artistry that would set the standard for the model to follow. So, you might say I am building the model around the figurehead.
I always feel I could do or could have done better. But at some point, you can't allow the perfect to be the enemy of the good. I have always felt that a perfectionist is a person who never completes a project. You can only do the best you can given the experience you possess when you try something new. The hope and ultimate goal is to have the next project be an improvement on the last. (IMHO).
I withhold any opinion (for whatever it's worth :rolleyes:) until you are satisfied with what you are craftingView attachment 510214View attachment 510215.
I used a combination of rotary burrs and mini carving chisels.
Thanks, Peter. You created a wonderful carving.
 
Paul! I think another shipmate mentioned this a few posts back - the secret to faces is counterintuitive. As an artist it took some time to learn and apply the basic formula for face proportions. Draw an oval. Bisect it vertically and horizontally. The eyes sit half way down the head at the horizontal line. Now draw a horizontal line that bisects the lower half of the oval. The top of that line is the bottom of the nose. Now draw another horizontal line that bisects the remaining part of the oval. The mouth sits on top of that line. Now you can learn to love faces again!

Here's a visual:View attachment 510262

Blessings.
Chuck
Thank you very much, Chuck. I truly appreciate that you and others are trying to help me out. This forum is the best!

I am familiar with the Loomis method but applying it is the challenge. There are several issues I am struggling with:
1. doing in 3D what is commonly presented in 2D
2. applying it subtractively (carving) rather than additively (modeling clay) or as a maquette
3. and while I have tried to avoid excuses related to scale - the truth is that what looks like the size of my thumb in the macro images is quite small (the head I have been showing is about the size of a pencil eraser).

I'm not that far off the requisite parameters:

IMG_1012c.jpg

Still looks like... meh...
 
Thank you very much, Chuck. I truly appreciate that you and others are trying to help me out. This forum is the best!

I am familiar with the Loomis method but applying it is the challenge. There are several issues I am struggling with:
1. doing in 3D what is commonly presented in 2D
2. applying it subtractively (carving) rather than additively (modeling clay) or as a maquette
3. and while I have tried to avoid excuses related to scale - the truth is that what looks like the size of my thumb in the macro images is quite small (the head I have been showing is about the size of a pencil eraser).

I'm not that far off the requisite parameters:

View attachment 510268

Still looks like... meh...
Balderdash and hogwash, Paul! - That's my response to "meh..." Only one of the few and the proud would try what you are doing!

Thank you for reminding me of the scale though - next time put a pencil the kind with the eraser at then end next to the King (or Knight) Fisher ;)

Here's my last 2 cents: the eyes are still too high - that is what is throwing things off IMHO. Here's where they should be (and please give me a friendly kick me under the table if you're not in the mood to hear it :)).

Blessings.
Chuck

Paul's carving.jpg
 
the eyes are still too high
Indeed. I lowered and deepened them as much as I could (from a previous iteration) based on feedback from Maarten and Stephan. FWIW: the line I drew is through the eyebrows not the eyes, but I agree they are too high.

I'm going to press on with the balance of the figurehead. If nothing else goes wrong I'm going to live with the face. If there is a second catastrophic failure I will be forced to start over. Frankly, I don't have much boxwood stock for a carving like this, so the pressure is on.
Well, my friend, I know you'll get it done, with skill and artistry! Prayers for a calm heart, and a steady hand!

Blesisngs.
Chuck
 
Thank you very much, Chuck. I truly appreciate that you and others are trying to help me out. This forum is the best!

I am familiar with the Loomis method but applying it is the challenge. There are several issues I am struggling with:
1. doing in 3D what is commonly presented in 2D
2. applying it subtractively (carving) rather than additively (modeling clay) or as a maquette
3. and while I have tried to avoid excuses related to scale - the truth is that what looks like the size of my thumb in the macro images is quite small (the head I have been showing is about the size of a pencil eraser).

I'm not that far off the requisite parameters:

View attachment 510268

Still looks like... meh...
If you 're not happy with it, toss it in the bin and take some time making maybe just heads to scale for practice. When you have that in hand go for the full figure. My figure head as you see it in the picture I had to reduce in size several times, cutting away a portion of the body until it got closer to 6 1/2 scale feet rather than eight! The actual one was probably smaller than that! I would have liked more detail (in particular the eyes.) But the photos are all very illusory. It works a whole lot better in the flesh (or boxwood) seen from a scale 100' away.
The old MS instruction book for the 1:192 scale "Young America", ca.1955, advises simplification. " The model isn't judged by what isn't there, but by what is."
I suggest you get the figurehead to an overall pleasing full but unrefined state. Step back and mentally remove the next layer. Repeat until you get close enough that it works for the model. Not your ideal of the figurehead. Your other carving seems to be a pretty fair example. The mermaid is fine without the eyes or the scales. I bet the whole stern works better with the naked eye as opposed to the photography.
Remember, you joked that you tune in to my build log to see what do-over I'm undertaking next! Remember all the ship's boats? I have a fleet! :rolleyes:

Pete

Your model is turning into a masterwork! No hurry, Dude. Keep up the great work! Thumbsup;)
 
There is always a possibility to glue a piece of the wood in place to start over a part. But I think there is enough wood to correct the face if you can't live with it (I know the feeling).
Show us a picture from the side, to see if the face not to far in front, in that case you can flat out things and do place them again. But the advice of Peter is also true.
 
If you 're not happy with it, toss it in the bin and take some time making maybe just heads to scale for practice. When you have that in hand go for the full figure. My figure head as you see it in the picture I had to reduce in size several times, cutting away a portion of the body until it got closer to 6 1/2 scale feet rather than eight! The actual one was probably smaller than that! I would have liked more detail (in particular the eyes.) But the photos are all very illusory. It works a whole lot better in the flesh (or boxwood) seen from a scale 100' away.
The old MS instruction book for the 1:192 scale "Young America", ca.1955, advises simplification. " The model isn't judged by what isn't there, but by what is."
I suggest you get the figurehead to an overall pleasing full but unrefined state. Step back and mentally remove the next layer. Repeat until you get close enough that it works for the model. Not your ideal of the figurehead. Your other carving seems to be a pretty fair example. The mermaid is fine without the eyes or the scales. I bet the whole stern works better with the naked eye as opposed to the photography.
Remember, you joked that you tune in to my build log to see what do-over I'm undertaking next! Remember all the ship's boats? I have a fleet! :rolleyes:

Pete

Your model is turning into a masterwork! No hurry, Dude. Keep up the great work! Thumbsup;)
Thanks, Peter. Good advice.
 
Back
Top