Hello Friends,
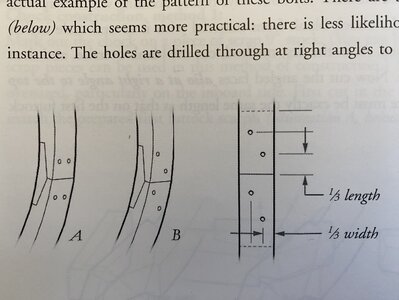
With the completion of the fairing, I turned my attention to the addition of trenails at the locations of the frame chocks. For anyone interested there is a nice discussion about trenails (treenails, trunnels) on Dean's build log. That conversation runs for several pages:
Nice save..Over here there's a saying about breasts and model trains; meant for kids but grown-up men are playing with them. Now this extends to Lego as well. I told my wife yesterday… the difference between a child building a model and a grown man building one, is the level of expertise! ROTF
shipsofscale.com
Issues raised include wood species, material options for the trenails, what is visible at a normal viewing distance (especially inside of a case), time commitment vs ROI, even the simple fact that once one begins there is really no turning back, etc. But at the crosshairs of that discussion was the issue of scale...
Well, for this Kingfisher build, the decision to add trenails was made long ago. Factors: 1. this is a POF build, and I really wanted to showcase the construction of the ship to the extent possible, 2. at 1:48 I believe trenails would be visible when examined at close range, 3. my earlier experiments with making trenails got me down to 0.56-0.58 mm (scaled to about 1.15 inches or 30 mm) which meant I could make 'true-to-size' trenails, 4. and finally, I like the look!
First job was to drill some holes. This was easier said than done as there is very little space inside the hull (that's where I began just in case this all went tragically wrong). I first tried to use a pin-vise type manual drill but that didn't work for me: the holes were too irregular - and I kept breaking the hardened metal drill bits. I ended up using a small, powered drill and never broke another drill bit:
View attachment 390423
The hole is just a bit under 0.6 mm... Test fitting a boxwood trenail:
View attachment 390424
Glued in (PVA):
View attachment 390427
Nipped off:
View attachment 390428
View attachment 390430
I learned that I needed to insert the trenails using my fingers and not a tool. The use of tweezers (or orthodontic pliers) tended to 'dent' the trenail and caused it to snap (yes, I broke lots of trenail strips using my fingers as well). Given the difficulty of creating trenails this small you can be confident that I used up every broken scrap I could

.
Here is the thickness of my trenail stock compared to a garden variety toothpick:
View attachment 390429
Anyway, here we are after installing the trenails:
View attachment 390431
And after sanding:
View attachment 390433
And with a little something on the wood to show what the trenails will look like after the addition of a finish coat of poly:
View attachment 390434
I am very happy with the size, shape, and uniformity of these trenails. I believe careful drilling, use of a draw plate to create trenail stock, and adequate sanding all contributed to the final appearance.
Next, I'll add the chock trenails to the outside of the hull - but first a short break. My bride and I are headed to Yellowstone / Glacier National Parks for some sightseeing and hiking. See you in a few weeks!


 .
.