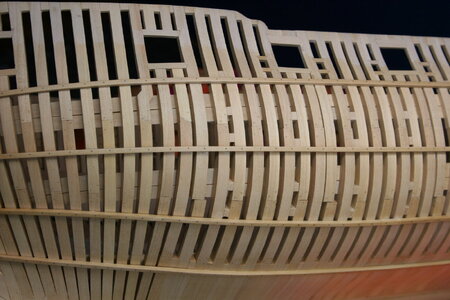
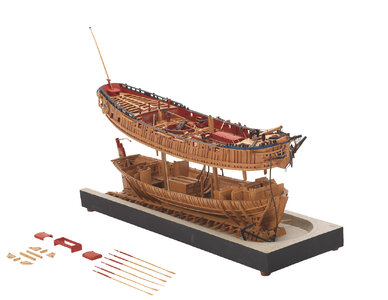
Kingfisher 1770 1:48 POF

And now, A Retrospective on what this relative newcomer (sorry, Ken, accomplished builder ROTF) has learned about trenails/treenails/trunnels.

1. Before you commit to anything on your ship - do a sample board with some SIZE to it. I sampled techniques, tested for size, material, finishes. All of it. But I did this in a very limited sense (a few short planks). What I failed to do was create a sizable sample board with hundreds of trenails and that would have been really helpful in making good choices.

2. Size matters. My goal was to get under 1 inch (25 mm) for wooden trenails. The best I could do with a drawplate (more about that in a moment) was about 1.1 inches (at scale that's 0.56-0.58 mm). Perhaps other accomplished builders :) can make wooden trenails smaller than that on a drawplate but I couldn't swing it. If that is your goal, then bypass hardwood and use bamboo (I could make bamboo trenails down to 0.52 mm, but they were darker than the boxwood version and I didn't like that on the holly strakes). I think @Peter Voogt used bamboo toothpicks with a drawplate on his Bluenose and they seemed to work nicely (building at 1:72 I think???).

Anyway, 1.1-inch trenails (28 mm) look a bit oversized to my eye at 1:48. If you are building at a smaller scale and are shooting for historical accuracy, be sure to think this through. Of course, there is much to be said for an artistic (rather than historic) representation of trenails at smaller scales as we have seen on many models (including my own Vasa) to great effect.

3. And if you want to use a drawplate then don't even bother if you don't have a Byrnes drawplate (yes, I know, sadly he is gone). Other drawplates are garbage compared to his. And jeweler's drawplates for metals don't work on wood; they compress the metal down to size rather than shave it (which is what you want for wood).

3b. Speaking of metals...you can make brass/copper trenails very (!) small - but that's a look you may (or may not) like. As an aside, I have recently learned that French construction alternates metal and wooden fasteners - curious, but fun (which, by the way, is an apt description of the French in general ROTF). My fantastic son-in-law is French so no hate mail...

4. I insisted on using a drawplate to create my trenail stock IN BULK in order to add some efficiency to the installation process. Others have used a sanding technique (Tobias and Sasha come to mind, but I'm sure there are others) to 're-point' each trenail prior to installation. I believe this will create smaller trenails (really only limited by the size of the drilled hole) but THE EFFORT TO DO THIS SHOULD NOT BE UNDERESTIMATED. Hand-working 6000 individual trenails was beyond me!

5. There is an inherent tension to the process of trenailing. Namely, the collision of high concentration when it comes to marking and drilling tiny holes - and the tedium of marking and drilling tiny holes (never mind the tedium of filling all those tiny holes with pegs of wood). Maintaining an operational level of concentration for precise placement is not easy over extended periods of time. But taking breaks every five minutes means weeks/months of trenailing rather than days/weeks of trenailing. Again, test before you commit!

6. Finally, don't underestimate the hand skills needed for miniature trenails. I suspect most everyone on this site can do it - but it needs to be said.

I hope this Retrospective might be helpful to someone out there...

And please add your own experiences so we can all learn together!

A further method is the "syringe-method" that worked nicely for my maple deck with maple trenails:


I have tried to mass produce pear trenails this way but with very limited succes. A lot of burning/broken trenails, ending up with a syringe filled with wood. Clean up and start over. That was even for me too time consuming.
Several months ago @Maarten took the initiative to unite several interested modelers over here to buy the Byrnes drawplates collectively and so reducing the transportation and customs handling costs per buyer. That drawplate is now waiting patiently for me.
 
And now, A Retrospective on what this relative newcomer (sorry, Ken, accomplished builder ROTF) has learned about trenails/treenails/trunnels.

1. Before you commit to anything on your ship - do a sample board with some SIZE to it. I sampled techniques, tested for size, material, finishes. All of it. But I did this in a very limited sense (a few short planks). What I failed to do was create a sizable sample board with hundreds of trenails and that would have been really helpful in making good choices.

2. Size matters. My goal was to get under 1 inch (25 mm) for wooden trenails. The best I could do with a drawplate (more about that in a moment) was about 1.1 inches (at scale that's 0.56-0.58 mm). Perhaps other accomplished builders :) can make wooden trenails smaller than that on a drawplate but I couldn't swing it. If that is your goal, then bypass hardwood and use bamboo (I could make bamboo trenails down to 0.52 mm, but they were darker than the boxwood version and I didn't like that on the holly strakes). I think @Peter Voogt used bamboo toothpicks with a drawplate on his Bluenose and they seemed to work nicely (building at 1:72 I think???).

Anyway, 1.1-inch trenails (28 mm) look a bit oversized to my eye at 1:48. If you are building at a smaller scale and are shooting for historical accuracy, be sure to think this through. Of course, there is much to be said for an artistic (rather than historic) representation of trenails at smaller scales as we have seen on many models (including my own Vasa) to great effect.

3. And if you want to use a drawplate then don't even bother if you don't have a Byrnes drawplate (yes, I know, sadly he is gone). Other drawplates are garbage compared to his. And jeweler's drawplates for metals don't work on wood; they compress the metal down to size rather than shave it (which is what you want for wood).

3b. Speaking of metals...you can make brass/copper trenails very (!) small - but that's a look you may (or may not) like. As an aside, I have recently learned that French construction alternates metal and wooden fasteners - curious, but fun (which, by the way, is an apt description of the French in general ROTF). My fantastic son-in-law is French so no hate mail...

4. I insisted on using a drawplate to create my trenail stock IN BULK in order to add some efficiency to the installation process. Others have used a sanding technique (Tobias and Sasha come to mind, but I'm sure there are others) to 're-point' each trenail prior to installation. I believe this will create smaller trenails (really only limited by the size of the drilled hole) but THE EFFORT TO DO THIS SHOULD NOT BE UNDERESTIMATED. Hand-working 6000 individual trenails was beyond me!

5. There is an inherent tension to the process of trenailing. Namely, the collision of high concentration when it comes to marking and drilling tiny holes - and the tedium of marking and drilling tiny holes (never mind the tedium of filling all those tiny holes with pegs of wood). Maintaining an operational level of concentration for precise placement is not easy over extended periods of time. But taking breaks every five minutes means weeks/months of trenailing rather than days/weeks of trenailing. Again, test before you commit!

6. Finally, don't underestimate the hand skills needed for miniature trenails. I suspect most everyone on this site can do it - but it needs to be said.

I hope this Retrospective might be helpful to someone out there...

And please add your own experiences so we can all learn together!
I am very pleased with your retrospective about treenailing, Paul.
I have indeed used the Byrnes drawplate for pointing the toothpicks. I don’t know if they where from bamboo. Just some boxes from the supermarket.
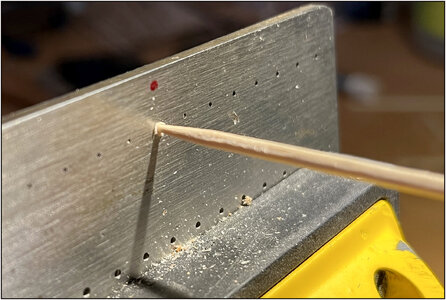
I used the Drawplate on the backside with some turning pressure on the toothpick:
IMG_9290.jpeg
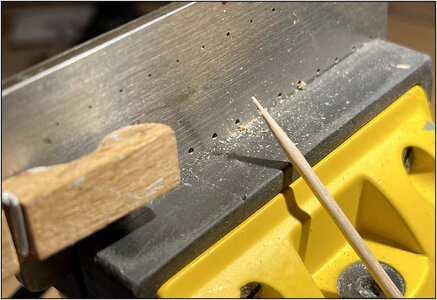
For my Bluenose in scale1:72 I used hole ‘26’. Using it from this side it does not compress the wood but made just a point because of the sharp edges on that side:
IMG_9291.jpeg
Just a little bit bigger then the drilled holes.
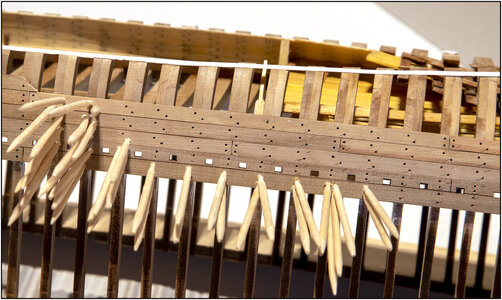
Then you can insert them into the holes with a little bit friction by turning them in:
IMG_9289.jpeg
Regards, Peter
 
Last edited:
And now, A Retrospective on what this relative newcomer (sorry, Ken, accomplished builder ROTF) has learned about trenails/treenails/trunnels.

1. Before you commit to anything on your ship - do a sample board with some SIZE to it. I sampled techniques, tested for size, material, finishes. All of it. But I did this in a very limited sense (a few short planks). What I failed to do was create a sizable sample board with hundreds of trenails and that would have been really helpful in making good choices.

2. Size matters. My goal was to get under 1 inch (25 mm) for wooden trenails. The best I could do with a drawplate (more about that in a moment) was about 1.1 inches (at scale that's 0.56-0.58 mm). Perhaps other accomplished builders :) can make wooden trenails smaller than that on a drawplate but I couldn't swing it. If that is your goal, then bypass hardwood and use bamboo (I could make bamboo trenails down to 0.52 mm, but they were darker than the boxwood version and I didn't like that on the holly strakes). I think @Peter Voogt used bamboo toothpicks with a drawplate on his Bluenose and they seemed to work nicely (building at 1:72 I think???).

Anyway, 1.1-inch trenails (28 mm) look a bit oversized to my eye at 1:48. If you are building at a smaller scale and are shooting for historical accuracy, be sure to think this through. Of course, there is much to be said for an artistic (rather than historic) representation of trenails at smaller scales as we have seen on many models (including my own Vasa) to great effect.

3. And if you want to use a drawplate then don't even bother if you don't have a Byrnes drawplate (yes, I know, sadly he is gone). Other drawplates are garbage compared to his. And jeweler's drawplates for metals don't work on wood; they compress the metal down to size rather than shave it (which is what you want for wood).

3b. Speaking of metals...you can make brass/copper trenails very (!) small - but that's a look you may (or may not) like. As an aside, I have recently learned that French construction alternates metal and wooden fasteners - curious, but fun (which, by the way, is an apt description of the French in general ROTF). My fantastic son-in-law is French so no hate mail...

4. I insisted on using a drawplate to create my trenail stock IN BULK in order to add some efficiency to the installation process. Others have used a sanding technique (Tobias and Sasha come to mind, but I'm sure there are others) to 're-point' each trenail prior to installation. I believe this will create smaller trenails (really only limited by the size of the drilled hole) but THE EFFORT TO DO THIS SHOULD NOT BE UNDERESTIMATED. Hand-working 6000 individual trenails was beyond me!

5. There is an inherent tension to the process of trenailing. Namely, the collision of high concentration when it comes to marking and drilling tiny holes - and the tedium of marking and drilling tiny holes (never mind the tedium of filling all those tiny holes with pegs of wood). Maintaining an operational level of concentration for precise placement is not easy over extended periods of time. But taking breaks every five minutes means weeks/months of trenailing rather than days/weeks of trenailing. Again, test before you commit!

6. Finally, don't underestimate the hand skills needed for miniature trenails. I suspect most everyone on this site can do it - but it needs to be said.

I hope this Retrospective might be helpful to someone out there...

And please add your own experiences so we can all learn together!
Paul,

This important message could not have been stated better.

Done right treenailing can add that authenticity to the model. Not done precisely has the equal and opposite effect. One key point that had me shaking my head in agreement is that challenge of maintaining that focus required to perform a precise placement of tiny things in tiny holes where the exercise itself is mind numbing. The numbing grows exponentially with time, increasing the probability of making a mistake. Your suggestion to "walk away" cannot be overstated. Learning when to walk sometimes takes a mistake being made (my own personal experience) ROTF

My hope is new builders find a way to read this before they start their treenailing tasks.

Thanks for sharing your experience and observations. Sage advice indeed.
 
Thanks, everyone, for your affirmation that my Retrospective might benefit someone! This forum is a great place to share experiences and techniques as well as a safe place for learning and pondering options that has helped me over and over again.

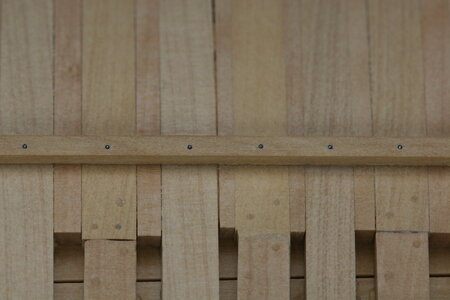
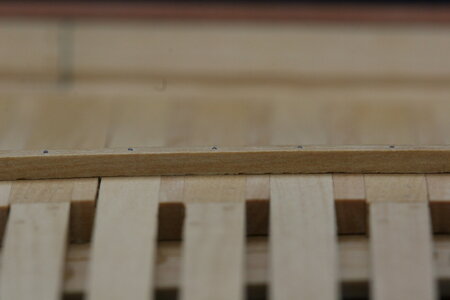
I needed a break from 'woodworking', so I crossed an item off my punch-list: adding nails to the ribands...

As I understand it, ribands were placed to properly position frames and provide some temporary support during the construction process, but as planks were added the ribands were removed. To that end the small nails that held them in place needed to be extracted. Here is my solution:

IMG_0077.JPG

IMG_0079.JPG

IMG_0077.JPG

IMG_0069.JPG

IMG_0072.JPG

At first I went for a faux solution (just 0.3 mm holes drilled into the ribands) but that was unconvincing. These 'nails' have a 0.4 mm rounded head and I have left them 'proud' of the surface.

In truth you have to get pretty close to the ship and wear reading glasses to see them so it may have been a wasted effort. But it's done now and I'm happy with the result.
 
Last edited:
In scale modeling, there is no such thing as a 'wasted' effort, IMHO. Everyone is building according to the own acceptance level. Self-satisfaction is the most important point of any hobby. I love your approach and the result of it!

What are the nails made from? How did you round the head?
 
Friends,

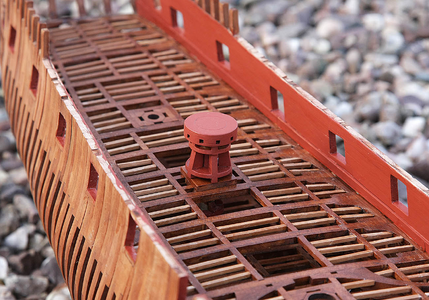
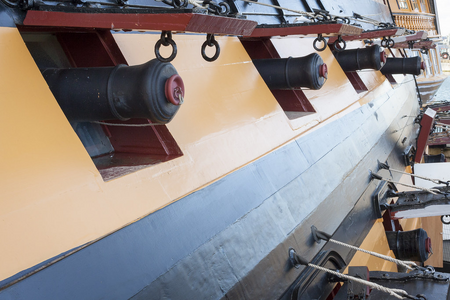
I have come to the time when I need to commit to a color...specifically the color of the inner planking of the bulwarks. I fancy something like the model @Uwek is using for inspiration on his brilliant Granado build...

l5780_003.jpg

@Ken has selected a similar color on his wonderful Blandford (perhaps just a bit more orange):

1702495435087.png

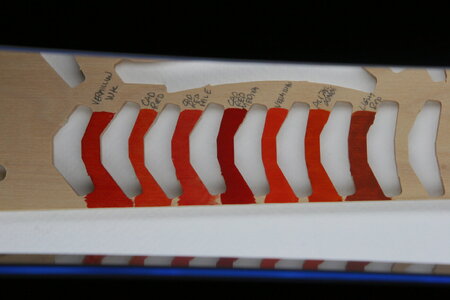
My small sample board:

IMG_0082.JPG

Hmm... Your thoughts?

And one more question... The topic is port stops (port linings). It seems most everyone does these with the stop/liner fitted on all four surfaces of the (inner) gun port frame. Antscherl says only on the lower sill and side walls. What do you think? What have you seen or done?

My thanks!
 
For my taste, I wouldn't color the inner bulwarks and continue with the magnificent trio (Pear, Boxwood, and Ebony or Black Hornbeam). However, to answer your question, I would choose between the first (Vermulian VK), the fourth, and the last) moving towards the first one as it looks not too bright and not too dark.

As for the sills, there should be enough as the fourth one may interfere with the hinges of port leads.

1702496899301.png
 
I'm cross eyed now, thanks. And for a few minutes I thought you were pulling a fast one, 2 & 3, being the same as 5 & 6. With that said, Cadmium Red Medium #4 would be my choice, if I were to color. I might put the board next to some of that Holly to see how much those brighter colors screamed out and maybe try and get to a short list of 3.
 
The nails on the ribbands are very good - and absolutely worth to make
Think about, that modelers like us are coming very close to the model in order to see all the details, so we will recognize this detail
Refering the colour of the bulkheads - I would not paint the inner bulkheads - your wood is so beautifull .....
I am here with Jim - and if paint, than I would choose a darker one, maybe this in the center
 
Nice job on the nails, like them. And a lot of work to do.

About the red color. In the mid ages till end ??th century they use oxblood to paint wood. Because of the protection against water. (Something to do with the red blood cells that dry up) And it was only red when still wet, after drying it turned almost brown/black. After a while they put minerals into the paint like clay to keep the red color. This color is still today popular under the name oxblood color. Brown red. The last sample on your right looks like that. Even the picture of Jim of the Victory is in that color. And looking to the post reply button while typing this message, there is another sample.
 
#6.
Vermilion doesn't look very good, artificial. See how the color changes in natural daylight. They are completely different colors.
Everyone likes a different red brights, it's best to choose it yourself.
 
Thank you, friends, for sharing your thoughts.

There were several votes for: do not paint anything and that is something I will seriously consider. Like treenails, once I start adding color it will be impossible to walk that decision back. Part of the problem is that I get something in my head and then seeing the wisdom in going another direction can be difficult. In response to do not paint anything I would say that only half of this model will be finished and adding the traditional colors would highlight the contrast between a finished ship and the other half left in frames. That said, the boxwood (and the holly) is really beautiful... Perhaps I'll only add color to the port linings?

But if I were to add some color your voting (thus far) has all been in the direction of the darker colors and more red tones. No one (so far) has preferred the more orange colors. That IS advice I will embrace as I was favoring the more orange tones. And Johann you mentioned coverage...I should share that I will be thinning down these water based paints and inks considerably. The finished surface (if I paint) will NOT look like opaque paint. While boxwood and holly have very little grain - you will be able to tell it is wood under the color...or that's my plan.
 
I want to repost a question I asked that was buried in a previous post...

With regard to port linings...most everyone lines all four surfaces of the gun port but my resources say the port lining (port stops) should only be placed on the lower sill and the two sides of the port. Jim posted his thoughts (three is good) - but I am interested in hearing from others since I don't recall ever seeing that on a model...
 
Thank you, friends, for sharing your thoughts.

There were several votes for: do not paint anything and that is something I will seriously consider. Like treenails, once I start adding color it will be impossible to walk that decision back. Part of the problem is that I get something in my head and then seeing the wisdom in going another direction can be difficult. In response to do not paint anything I would say that only half of this model will be finished and adding the traditional colors would highlight the contrast between a finished ship and the other half left in frames. That said, the boxwood (and the holly) is really beautiful... Perhaps I'll only add color to the port linings?

But if I were to add some color your voting (thus far) has all been in the direction of the darker colors and more red tones. No one (so far) has preferred the more orange colors. That IS advice I will embrace as I was favoring the more orange tones. And Johann you mentioned coverage...I should share that I will be thinning down these water based paints and inks considerably. The finished surface (if I paint) will NOT look like opaque paint. While boxwood and holly have very little grain - you will be able to tell it is wood under the color...or that's my plan.
To give you one more option: look for the Carmine Red. That’s a old fashion red.
And when you use Ink, ad it on the wood with a cloth. As I did with my Bluenose ……
Regards, Peter
 
if you were going to paint it, I would use the darker color as I think it is closer to the ox blood color. what about a dark red stain? But I'm of the opinion to not color it or maybe just do the side that is fully planked...

As far as the port linings, I've not seen any other documentation on it and Antscherl seems to have done quite a bit of research, so I would go with his direction. If nothing else, you have a source. :)
 
Back
Top