Lady Nelson - Amati 1:64 by Tangopapa - First time PoB Project [COMPLETED BUILD]

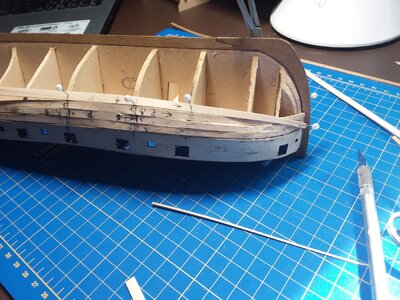
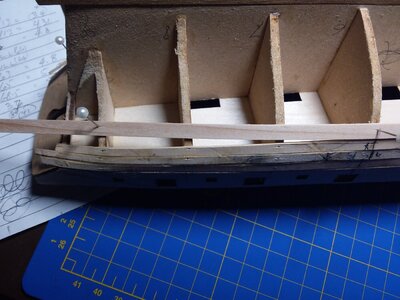
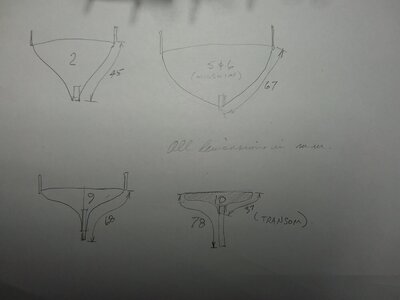
I found the third plank to bea beast to put in place. I can see the problem is that the forward end of the plank has to be bent upward to come to the edge of the second plank, which forcrd the free edge of plank 3 to tend to pop outwards. At the same time, the foremost bulkhead, no.2, starts to pinch in (as shown in the sketch below). Leon says to check after about 5 planks to see if the bottom edge of the fifth plank needs trimming to match a straight edge. I will have to do that now, after 3. I can salvage what I have with filler and sanding I think, but I need to make a straighter line to proceed with. The bottom of the bulwark yo start with has a fair bit of sheer so even the first plank needed to be bent slightly up at each end.

Now I need advice on a question of plank tapering. In the sketch below, with planks that average 5.1mm wide, and a mid ships bulkhead edge length of 66mm, I need about 13 planks. At the bow, station 2, with only a 46 or 47 mm edge length, those 13 planks need to be tapered to 3.5mm. Fair enough.

At the each bulkhead, he says to include the deadwood in the total edge length. In that case, 9 is 68 mm, and 10 is 78mm, so we will need wedges. But for reasons not apparent to me, Leon included only the 37mm edge length for station 10, that is the length from bottom of bulwark to top of deadwood. So the planks at the stern taper to 2.9mm or so. As a newbie, I accepted that with some puzzlement, but it seems to me the more I go that the planks will be too narrow at the stern and should maybe be full width. Otherwise I taper them, but don't force them together and fill with stealers as needed. Even so, the math for a 2.9mm tapered plank width at the stern doesn't seem right. I am 99% sure I am following Leon's method. He spends more time explaining the bow taper and says "and we do the same for the stern", but later mentions that we are taking 2.1 mm from the stern plank, so 5-2.1 = 2.9.

Help would be welcome.20201007_124807.jpg
 
Sorry, can't help you there. As a noob, I just used stealers and filled in where necessary. I was going to paint over it anyway. Could you show us some more pix of your progress? I'm looking forward to seeing how you make that work.
 
Sorry, can't help you there. As a noob, I just used stealers and filled in where necessary. I was going to paint over it anyway. Could you show us some more pix of your progress? I'm looking forward to seeing how you make that work.
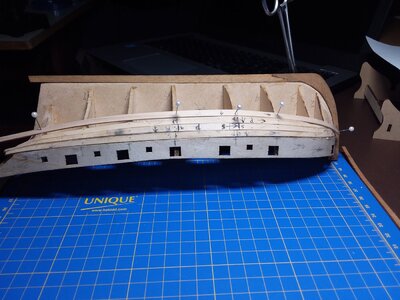
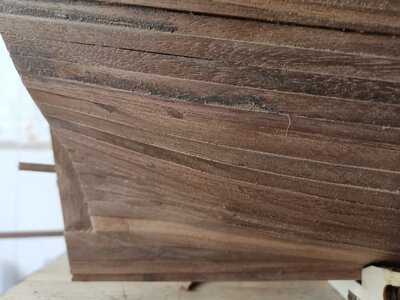
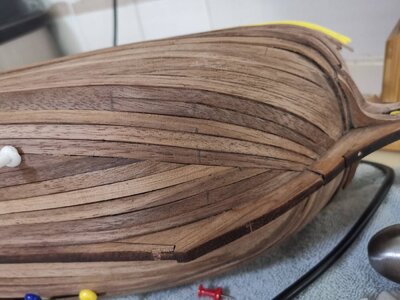
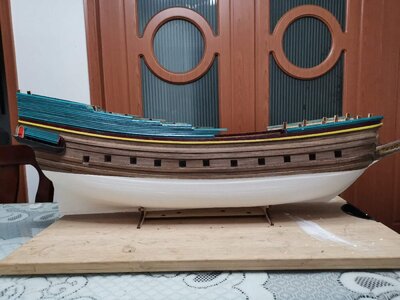
This is what I have now. I just took a plank, which is tapered as normal at the fwd end, on the top edge (top if the boat were right side up). I pinned it horizontal midship, parallel to the third plank and let it lie naturally. This is where it wants to go. I hope these photos help. They are bow, stern and the overall hull. Stern I could just insert a wedge, that's no concern. But the bow!20201007_140705.jpg20201007_140723.jpg20201007_140817.jpg
 
Last edited:
This is what I have now. I just took a plank, which is tapered as normal at the fwd end, on the top edge (top if the boat were right side up). I pinned it horizontal mishaps, parallel to the third plank and let it lie naturally. This is where it wants to go. I hope these photos help. They are bow, stern and the overall hull. Stern I could just insert a wedge, that's no concern. But the bow!View attachment 183983View attachment 183984View attachment 183985
Thanks. A picture is worth a thousand words. Mine were not as wide as your planks in proportion to the ship. I started a few lines on top till close to the water line. Then a laid a few along the keel on the bottom. And then I let one lie in the middle where it wanted. Then I worked out from the middle. That worked okay for this noob. I only had one layer of planks on the hull.
 
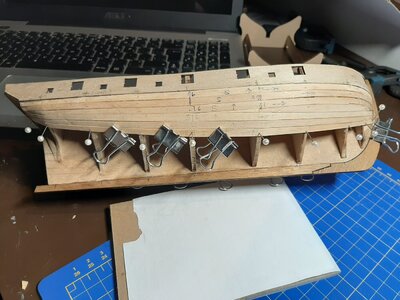
Well, no input from any voices of experience, but I was able to put in a "fixer" plank on each side, pointed at each end to reset the line of the planks and have added 3 planks per side since then. The larger than normal gap between 2 and 3 is what convinced me that remedial action was necessary. I don't know how I could have avoided this. I guess my plank front ends were just too wide. I need to figure it out though because the finish layer starts along the sheer line at the railing level also. If I don't tweak something I will be wrestling with those too.
20201011_104805.jpg
 
Last edited by a moderator:
I described in my log how I do planking, but there are many ways to accomplish this. You cannot follow someone else's measurements as your hull will be different, you need to do your own measurements.
I can see now you will need stealers at the stern as there is a larger area there to plank than anywhere else.
I would now turn it over and start planking from the keel and fill in as necessary, this is your first layer so there is not too much to worry about other than getting it filled. Some filler and sanding will eventually give you a nice smooth finish, you are doing fine.
 
I am getting ready to start my first build. It’s going to be a Lady Nelson as well but I am going to attempt it with just the plans so I will be checking your blog often. I am in Cornwall Ontario
 
I am too stupid to follow or understand all the measurements and mathematical calculations - to me that seems like a wholly unnatural way of doing the planking - in any case, that was not the way that the shipbuilders did it in the day. Lay down your first three or four planks normal width at the bow. Then taper them to approximately half width from that point onwards. The exact point along the hull where you start the tapering from though, is the tricky part. As Don said, only you can determine that. Plank to about half way and then start from the keel. That way you may end up with one odd plank somewhere on the underside of the ship where it won't really be visible.
 
I described in my log how I do planking, but there are many ways to accomplish this. You cannot follow someone else's measurements as your hull will be different, you need to do your own measurements.
I can see now you will need stealers at the stern as there is a larger area there to plank than anywhere else.
I would now turn it over and start planking from the keel and fill in as necessary, this is your first layer so there is not too much to worry about other than getting it filled. Some filler and sanding will eventually give you a nice smooth finish, you are doing fine.
I have done my own measurements, no worries there, but even so was getting a clip ker effect badly after two planks to the extent that after 3 I knew I needed an adjustment plank. That worked out ok for first layer but I hope to avoid it on the second layer. I measured each bulkhead, but basically tapered straight line from full width at bulkhead 5 down to the calculated width at bulkhead 2. I did try a plank (each side) just recently where I tapered at each bulkhead to the calculated width, it was not hard to do, but I dont know if that would have helped. Which do you do? You mention edge bending. Do you do this on a board before installing a la Chuck P, or as you pin it in place?

Some tutorials, for beginners, suggest that instead of calculating, you lay each subsequent plank over the prior one, see how much overlap there is at the bow (or stern), and mar, that on the current plank and trim accordingly.

On the second layer, did you just start planking at the top and work your way down from there? And, below the bulwark, trip according to the calcs?

Sorry to be a pest with a lot of questions. Your build looks great. I would like to come as close as I can.

Tim
 
I am too stupid to follow or understand all the measurements and mathematical calculations - to me that seems like a wholly unnatural way of doing the planking - in any case, that was not the way that the shipbuilders did it in the day. Lay down your first three or four planks normal width at the bow. Then taper them to approximately half width from that point onwards. The exact point along the hull where you start the tapering from though, is the tricky part. As Don said, only you can determine that. Plank to about half way and then start from the keel. That way you may end up with one odd plank somewhere on the underside of the ship where it won't really be visible.
Ok. Understood. The hull starts curving, as you say, after about 4 plank widths down, and I think if I start tapering more aggressively there from that point on, the planks will lie more quietly. You just taper in a straight line from the longest bulkhead to the end of the plank?
 
And -- not sure if I mentioned this -- I have installed the garboard plank on each side. That went well, I think. A lot of bevelling and tapering the thickness down, feathering the edge along th aft part of the keel, and the whole width of the plank at the stern. This is where my occasional wood carving practice over the years helps.

Oh and thank you Don and Heinrich for the comments. The voice of experience is much appreciated. Levmiller, I am not that far away from you in Eastern Ont -- outside downtown Ennismore on Pigeon Lake, NW of Peterborough. I hope you enjoy your build. How will you get the hull lines with just the Amati plans?
 
Last edited:
No, I did not taper the planks full length - that is the reason why so many people end up with stealers at the stern. Have a look at my Kolderstok Haarlem - single layer planking.

Build 367.jpg
At the stern, only one stealer on each side was required.

WeChat Image_20200723103223.jpg
Tapering at the bow. The black lines (determined by eye) show from where the tapering took place.

WeChat Image_20200901132225.jpg
The finished hull - sanded and painted.
 
Where can I get the pins to pin the planking, also what is the best thing to use to apply the glue is there an adapter to use or just carefully dab it on?
 
Where can I get the pins to pin the planking, also what is the best thing to use to apply the glue is there an adapter to use or just carefully dab it on?
The pins in my photos came from Staples. The kit came with small brass (temporary) nails, but I find these push pins less tricky to handle when you are trying to hold the hull, the plank and a pin. Also, they are very dine and leave a small hole and don't split the wood. There is a problem though: on a small number, I had to hammer them right home to get the plank to stay in the exact place. Often, when you pull on the plastic bead on the end of those embedded pins, the bead pulls off. Almost always, small pliers will, pull the metal shank out. On two cases, it was in too deep and is still there. I will have to deal with that before or during sanding. Because I am thrifty, I crazy glue the beads back on the pin.
 
I see you used midfield I am thinking of using Baltic birch plywood as I have found some in Ottawa do you think that will be a problem?
 
@Heinrich is right when he mentions about tapering at the stern, too much will result with the use of stealers. If you have ever spiled a plank or even seen laser cut planks you would notice that none of these have a straight taper. A plank, such as these, have several curves to them so this is what you are trying to imitate. Your options are limited as with kits there is only one width of planks and they typically are not wide enough to do this properly. So the other option is to taper and edge bend. Now if you were to measure each bulkhead, using a seamstress's tape or something capable of going around a curve, calculate the measurements then mark these on the plank and finally join all these points with a line you would then see there is no such thing as a straight taper from bow to stern or any point in between. Then even with all this edge bending maybe required, remember the surface you are planking is not flat.
I do all my edge bending on a board as you suggest.
On my second layer I did not begin tapering until around the area just below the bulwarks. And remember the calculations, if you decide to go this route, would need to be done again because now the surface area has now changed since the addition of the first layer of planking.
The method I use is very similar to Chuck P's but without the tick strip, his method is superior to mine but I am just a little too lazy to do it his way.
I do re-check my measurements throughout the planking process. When done right, and I'm not saying it is easy, each strake(row of planks) should begin and end at the bow and stern.
Hope this helps
 
Last edited:
I see you used midfield I am thinking of using Baltic birch plywood as I have found some in Ottawa do you think that will be a problem?
I used MDF because that is what the kit came with. I had no idea it was used in kits. Chris Wattonn speaks well of it because its thickness tolerance is far better than any plywood, so the fit of the bulkheads to false keel, for example, is much more precise. It doesn't warp. Once I got used to it I found it pretty easy to work, you just can't be too aggressive with your shaping. I would ask experienced scratch builders. You want plywood with several plies and excellent lamination adhesion and straight and flat. Measure the actual thickness before finalizing your slot cuts. I designed a great lakes schooner for my brother to make the hull for us, and I made the false keel and bulkheads in the scroll saw. I had what I thought was good plywood, 3/16" thk, that my wife had in stock at the house for craft work. Bad choice. It cut ok but then it warped, was prone to splinter.
 
Back
Top