I was afraid this was going to be your answer. My mill is more entry-level... (as am I@kuba91nt, Thanks. I'm glad it had some value to you. I will continue to share unique methods, but only if they have good results.
Thanks Uwek. I was thinking of buy 10 more green mats, like my buddy Stephan.They could improve my work results. But I forgot to put them on Santa's list. I can hear my Admiral now. "Why do you need TEN mats?!?" Does anyone have a good answer?
Thanks Stephan. I like the mica as it has an organic feel to it. I really need to work on my photography skills though. The mica shows some sort of glazing effect in the corners that is not really pronounced at all. The actual panes have a translucent, cloudy, not shiny look to them. The photos look like I spilled CA glue all over the place, which is not the case. I'll continue to work on my photography.
Along with Jim, I love this question Paul. I did not think of this point and hope the answer helps you and others. I can't imagine me wearing my reading glasses and putting my face 4 inches from a hand wheel to read it. One of the options Sherline mills have is DRO (Digital Read Out).
It tracks all 3 axis to 100ths of a mm. I chose Metric over Imperial. Both are available and can be order with a new mill or added as an upgrade to standard version.
It also provides a RPM readout. One of my favorite options is the Zero Out buttons. One press and your back to zero, very convenient!
So to answer your question. The plans show each small opening @ 4mm. I checked every window. The only deviation from 4mm was in the corners of the outer window complexes where the angle of the complex took the panes out of square. So it was EzPz.
Apologies if this is already known. From the perspective of the operator, X axis defines (width) Left to Right, Y axis, (depth) front to back.
So, if we know the panes need to be 4mm wide and high, then the inner measurement (between the cuts) needs to be the same. After the first cut, with the X axis zeroed out we turn the X wheel till the DRO reads the 4mm+diameter of the end mill, make the next pass, rinse and repeat. For this type of task, it is super easy. Most of the time invested is setting up. For this task the Y axis was not relevant.
View attachment 414044
The photo below shows the cuts making up 5 separate sets of window complexes, with 9mm space between them. I then separated each of the 5 and cut them into 0.9mm strips.
View attachment 414049
The cuts are exact in depth and width and I'm happy to say, may even be up to Paul standards.
The DRO functionality option, for me was a wise investment. I hope I answered your question clearly.
-

Win a Free Custom Engraved Brass Coin!!!
As a way to introduce our brass coins to the community, we will raffle off a free coin during the month of August. Follow link ABOVE for instructions for entering.
-

PRE-ORDER SHIPS IN SCALE TODAY!
The beloved Ships in Scale Magazine is back and charting a new course for 2026!
Discover new skills, new techniques, and new inspirations in every issue.
NOTE THAT OUR FIRST ISSUE WILL BE JAN/FEB 2026
You are using an out of date browser. It may not display this or other websites correctly.
You should upgrade or use an alternative browser.
You should upgrade or use an alternative browser.
Le Fleuron 1729 - 64 Gun Ship PoB Scratch Build in 1:48 - (Ancre Monograph-J. Boudriot/G. Delacroix)
- Thread starter Hoss6262
- Start date
- Watchers 54
-
- Tags
- ancre le fleuron pob
- Joined
- Jan 21, 2022
- Messages
- 884
- Points
- 403

Thanks Ken for this fantatstic tutorial. It clered many things for me. No need for apologies this post is very helpful and a great challenge to aim for.Hello Everyone,
As always, thank you for your likes, comments and above all your input.
In the past, I've posted/shared every idea and approach I have had before I did the work. I've done this so that many of the more knowledgeable modelers might point out flaws in my thinking and I'd save some time making novice mistakes. Going forward, I'll not be posting my ideas unless they result in a successful solution. Saving me posting time and more importantly you guys from reading about an idea that never comes to fruition.
I've had my head down working lately. As many know, many successes do not come without their failures.
So let me tell you about my last idea on the stern window fabrication...
View attachment 413856
Issues:
>It was impossible to process the brass/copper foil to the correct scale and to achieve a uniform result.
>The microscope slide covers were easily cut(I used one of those broken 0.6mm tungsten PCB drill bits that always break). However, being real glass it was impossible to "scuff" that transparent glass to achieve the translucent window pane I wanted. I might have been able to do so if I had a diamond honing plate, but I was not going to buy one for that sole purpose. Also, if you drop one of these, it's like dropping a contact lens. Get on your hands and knees!
Solution:
WAIT FOR IT.......construct windows the conventional way.
Window FramesSelected the hardest Pearwood I had. I chose Pear once again as I wanted the window frames black and only had one block of Black Hornbeam. I would dye the Pear black. I constructed the frames using the same basic method I used for gratings. This was challenging as the windows have some tricky geometry, following the horizontal curvature of deck/cross beams as well as a slight vertical angle, which was less pronounced.After a few unsatisfactory attempts, I settled on mill cutting 0.8mm slots 4.4mm, center on center to get the 4.0mm pane openings as in the plan.Important note: I wanted the length of each frame piece to follow the grain of the wood, for strength. Also, as a benefit, milling cross grain results in a cleaner cut.
I was smart enough to bookmark an Allied Express link Jimsky provided some time ago. Picked up a set of 4X 0.8mm, 2 flute carbide end mills for $14. Sorry Jim, you do not get a commission!After some testing, I found this little beast had no issues cutting a 1.6mm deep cut in one pass at a feed rate of about 1.5mm/sec.
Other end mills I've used would take 3X 0.5mm passes at a slower feed rate if I didn't want the tool to break.
View attachment 413863
Great results. Extremely crisp cuts.
I then took each piece and cross cut (perpendicular to the milled slots), 0.95mm strips on the Byrnes table saw. I could have cut thinner if I had the zero tolerance blade plate.So my slots were 0.8mm and the pieces themselves were 0.95mm. They wont fit together as is so I needed to remove 0.15mm uniformly from ever piece. Onto a milled flat piece of aluminum with double sided tape and into the Byrnes thicknesser they went.Assembly went smoothly, with 0.73mm (avg.) pieces fitting easily into 0.8mm slots. These did not result in a fit that was too loose at all and provided enough "play" to apply very slight pressure to achieve a progressive angle needed at the outer windows.Assembled, unprocessed.After rough processing.Final processing resulted in frames of 1.8mm thickness.Note:Each frame was custom fit into its specific opening on the stern structure(unglued). Only then when the correct angle was achieved was each intersection glued. Usually if I use CA glue with wood it is Medium or Thick in some cases. For this application it was not possible to apply the glue to each slot and then fit the next piece. This would only result in a mess.Once the frame was assembled dry and held in place, thin CA was applied at each intersection. This worked very well as the capillary action sucked the glue into the smallest of gaps. I was able to remove the frame from the form 5 sec. after the last application.Window GlassI went back to my favorite solution for scale glass, Mica. You can find this in processed sheets on eBay. Twenty USD will give you a supply for the rest of your modeling career.The Mica I have is completely transparent, with a very slight amber tint to it. It is flexible and easily cut with sharp scissors to any size.As I wanted translucent panes rather than transparent I lightly abraded each on some 3200grit micro mesh.As Mica is a mineral and formed in very thin micron thick layers it can be separated into thinner panes, if needed using a thin razor blade. Also, if handle too roughly the edges will separate slightly giving the panes a glazed look. I actually liked the effect.Assembled Stern Plate
After dying the frames, they were fit into their respective openings. The following photos are of the stern plate in its current state. I one off created the door to the great cabin and added my own "floret" (fleuron) as decoration.
View attachment 413888View attachment 413885View attachment 413884View attachment 413888
Apologies for such a long post, but I wanted to keep all of the relevant work together. I went into each step for the windows as there were requests to show how I made them.
The last piece of the stern plate is the Taffrail, which is complete but was not added as I want to see how everything comes to fit on the ship.
On another note, there was some damage on the port side of the hull where the stern plate will be attached. I will need to come up with a solution to fix IT and also the starboard side in order to achieve balance, and find a more secure space for it. During this stern task session, I've been considering the entire project, from the hull's perspective. It would not be too late for me to scrap the shell and construct a fully conventional hull, with every frame. It is intriguing and frightening at the same time. I need some time to ponder...
Next Up
After a 2 week back order delay on my 1/2 inch tool holder it is in hand. I'll get ready to profile the beakhead. After that I will have to make some difficult decisions.
Once again, thank you all for following along. I appreciate the support and all of your comments and input. I truly value the critiques more than the compliments. Although pats on the back are always nice and the fuel for further motivation.
Till next time...
Your post got me to deeper thinking, for which I am very grateful. I definitely must change principals and methods in my next build
- Joined
- Oct 15, 2017
- Messages
- 1,190
- Points
- 443

Paul, I am an entry level operator. The DRO option is simply a quality of life feature that I benefit from.I was afraid this was going to be your answer. My mill is more entry-level... (as am I).
- Joined
- Oct 15, 2017
- Messages
- 1,190
- Points
- 443

@WojtasS, I am happy you found the post helpful. I continue to learn from my own mistakes and more importantly from others here on SoS. I'm happy to be able to give something back.Thanks Ken for this fantatstic tutorial. It clered many things for me. No need for apologies this post is very helpful and a great challenge to aim for.
Your post got me to deeper thinking, for which I am very grateful. I definitely must change principals and methods in my next build
Last edited:
Hi Hoss, wonderful work, and many thanks for the tutorial(s) Despite all this being beyond my abilities or wildest imaginings I have learnt quite a few things from you and your attitude. All the best and Cheers.@kuba91nt, Thanks. I'm glad it had some value to you. I will continue to share unique methods, but only if they have good results.
Thanks Uwek. I was thinking of buy 10 more green mats, like my buddy Stephan.They could improve my work results. But I forgot to put them on Santa's list. I can hear my Admiral now. "Why do you need TEN mats?!?" Does anyone have a good answer?
Thanks Stephan. I like the mica as it has an organic feel to it. I really need to work on my photography skills though. The mica shows some sort of glazing effect in the corners that is not really pronounced at all. The actual panes have a translucent, cloudy, not shiny look to them. The photos look like I spilled CA glue all over the place, which is not the case. I'll continue to work on my photography.
Along with Jim, I love this question Paul. I did not think of this point and hope the answer helps you and others. I can't imagine me wearing my reading glasses and putting my face 4 inches from a hand wheel to read it. One of the options Sherline mills have is DRO (Digital Read Out).
It tracks all 3 axis to 100ths of a mm. I chose Metric over Imperial. Both are available and can be order with a new mill or added as an upgrade to standard version.
It also provides a RPM readout. One of my favorite options is the Zero Out buttons. One press and your back to zero, very convenient!
So to answer your question. The plans show each small opening @ 4mm. I checked every window. The only deviation from 4mm was in the corners of the outer window complexes where the angle of the complex took the panes out of square. So it was EzPz.
Apologies if this is already known. From the perspective of the operator, X axis defines (width) Left to Right, Y axis, (depth) front to back.
So, if we know the panes need to be 4mm wide and high, then the inner measurement (between the cuts) needs to be the same. After the first cut, with the X axis zeroed out we turn the X wheel till the DRO reads the 4mm+diameter of the end mill, make the next pass, rinse and repeat. For this type of task, it is super easy. Most of the time invested is setting up. For this task the Y axis was not relevant.
View attachment 414044
The photo below shows the cuts making up 5 separate sets of window complexes, with 9mm space between them. I then separated each of the 5 and cut them into 0.9mm strips.
View attachment 414049
The cuts are exact in depth and width and I'm happy to say, may even be up to Paul standards.
The DRO functionality option, for me was a wise investment. I hope I answered your question clearly.
Good morning Ken. Those green mats are a must…Hello Everyone,
As always, thank you for your likes, comments and above all your input.
In the past, I've posted/shared every idea and approach I have had before I did the work. I've done this so that many of the more knowledgeable modelers might point out flaws in my thinking and I'd save some time making novice mistakes. Going forward, I'll not be posting my ideas unless they result in a successful solution. Saving me posting time and more importantly you guys from reading about an idea that never comes to fruition.
I've had my head down working lately. As many know, many successes do not come without their failures.
So let me tell you about my last idea on the stern window fabrication...
View attachment 413856
Issues:
>It was impossible to process the brass/copper foil to the correct scale and to achieve a uniform result.
>The microscope slide covers were easily cut(I used one of those broken 0.6mm tungsten PCB drill bits that always break). However, being real glass it was impossible to "scuff" that transparent glass to achieve the translucent window pane I wanted. I might have been able to do so if I had a diamond honing plate, but I was not going to buy one for that sole purpose. Also, if you drop one of these, it's like dropping a contact lens. Get on your hands and knees!
Solution:
WAIT FOR IT.......construct windows the conventional way.
Window FramesSelected the hardest Pearwood I had. I chose Pear once again as I wanted the window frames black and only had one block of Black Hornbeam. I would dye the Pear black. I constructed the frames using the same basic method I used for gratings. This was challenging as the windows have some tricky geometry, following the horizontal curvature of deck/cross beams as well as a slight vertical angle, which was less pronounced.After a few unsatisfactory attempts, I settled on mill cutting 0.8mm slots 4.4mm, center on center to get the 4.0mm pane openings as in the plan.Important note: I wanted the length of each frame piece to follow the grain of the wood, for strength. Also, as a benefit, milling cross grain results in a cleaner cut.
I was smart enough to bookmark an Allied Express link Jimsky provided some time ago. Picked up a set of 4X 0.8mm, 2 flute carbide end mills for $14. Sorry Jim, you do not get a commission!After some testing, I found this little beast had no issues cutting a 1.6mm deep cut in one pass at a feed rate of about 1.5mm/sec.
Other end mills I've used would take 3X 0.5mm passes at a slower feed rate if I didn't want the tool to break.
View attachment 413863
Great results. Extremely crisp cuts.
I then took each piece and cross cut (perpendicular to the milled slots), 0.95mm strips on the Byrnes table saw. I could have cut thinner if I had the zero tolerance blade plate.So my slots were 0.8mm and the pieces themselves were 0.95mm. They wont fit together as is so I needed to remove 0.15mm uniformly from ever piece. Onto a milled flat piece of aluminum with double sided tape and into the Byrnes thicknesser they went.Assembly went smoothly, with 0.73mm (avg.) pieces fitting easily into 0.8mm slots. These did not result in a fit that was too loose at all and provided enough "play" to apply very slight pressure to achieve a progressive angle needed at the outer windows.Assembled, unprocessed.After rough processing.Final processing resulted in frames of 1.8mm thickness.Note:Each frame was custom fit into its specific opening on the stern structure(unglued). Only then when the correct angle was achieved was each intersection glued. Usually if I use CA glue with wood it is Medium or Thick in some cases. For this application it was not possible to apply the glue to each slot and then fit the next piece. This would only result in a mess.Once the frame was assembled dry and held in place, thin CA was applied at each intersection. This worked very well as the capillary action sucked the glue into the smallest of gaps. I was able to remove the frame from the form 5 sec. after the last application.Window GlassI went back to my favorite solution for scale glass, Mica. You can find this in processed sheets on eBay. Twenty USD will give you a supply for the rest of your modeling career.The Mica I have is completely transparent, with a very slight amber tint to it. It is flexible and easily cut with sharp scissors to any size.As I wanted translucent panes rather than transparent I lightly abraded each on some 3200grit micro mesh.As Mica is a mineral and formed in very thin micron thick layers it can be separated into thinner panes, if needed using a thin razor blade. Also, if handle too roughly the edges will separate slightly giving the panes a glazed look. I actually liked the effect.Assembled Stern Plate
After dying the frames, they were fit into their respective openings. The following photos are of the stern plate in its current state. I one off created the door to the great cabin and added my own "floret" (fleuron) as decoration.
View attachment 413888View attachment 413885View attachment 413884View attachment 413888
Apologies for such a long post, but I wanted to keep all of the relevant work together. I went into each step for the windows as there were requests to show how I made them.
The last piece of the stern plate is the Taffrail, which is complete but was not added as I want to see how everything comes to fit on the ship.
On another note, there was some damage on the port side of the hull where the stern plate will be attached. I will need to come up with a solution to fix IT and also the starboard side in order to achieve balance, and find a more secure space for it. During this stern task session, I've been considering the entire project, from the hull's perspective. It would not be too late for me to scrap the shell and construct a fully conventional hull, with every frame. It is intriguing and frightening at the same time. I need some time to ponder...
Next Up
After a 2 week back order delay on my 1/2 inch tool holder it is in hand. I'll get ready to profile the beakhead. After that I will have to make some difficult decisions.
Once again, thank you all for following along. I appreciate the support and all of your comments and input. I truly value the critiques more than the compliments. Although pats on the back are always nice and the fuel for further motivation.
Till next time...
 . Brilliant work and constructive tutorial. I think everyone has said it all…no easy feat and you owned it. Cheers Grant
- Joined
- Oct 15, 2017
- Messages
- 1,190
- Points
- 443

@ConsNZ, thank you for your kind words. I'm always trying to better my skills. I have SO far to go. I do my best and next time I try to do better. Thank you.Hi Hoss, wonderful work, and many thanks for the tutorial(s) Despite all this being beyond my abilities or wildest imaginings I have learnt quite a few things from you and your attitude. All the best and Cheers.
Hey Grant, Thank you sir. I do own my work, good and bad.Good morning Ken. Those green mats are a must…. Brilliant work and constructive tutorial. I think everyone has said it all…no easy feat and you owned it. Cheers Grant
 If it's real bad, I may refuse to own, at first and do it over. I think personal record is 6 versions the same thing, before I gave it a passing grade, not an A or a B, just passing. Some things I end up happy with. I'm sure I have a lot of company at SoS in this regard. And as we all know, we are not alone here at SoS and that offers comfort and confidence during the challenging times.
 Cheers mate!
- Joined
- Oct 15, 2017
- Messages
- 1,190
- Points
- 443

Jim, I only have 5 green mats, no 2 sizes the same. If someone guaranteed having 10 green mats would make my work 10 times better, I'd go straight onto Amazon and buy 20!!!


No green mat, no success!

I understand your concern, Ken, I do!im, I only have 5 green mats, no 2 sizes the same. If someone guaranteed having 10 green mats would make my work 10 times better, I'd go straight onto Amazon and buy 20!!!
- Joined
- Aug 8, 2019
- Messages
- 5,568
- Points
- 738

I have 20 mats in green. No risk on my work.Jim, I only have 5 green mats, no 2 sizes the same. If someone guaranteed having 10 green mats would make my work 10 times better, I'd go straight onto Amazon and buy 20!!!
Hi Ken,
Wonderfull solution for your windows.
Are you sure it is real mica, it looks so very clear and even. I once bought mica via internet from a modelshop which qas clearly no mica but transparent plastic sheet which looked like mica. Simple test is to put a lighter on it, mine melted .
.
Wonderfull solution for your windows.
Are you sure it is real mica, it looks so very clear and even. I once bought mica via internet from a modelshop which qas clearly no mica but transparent plastic sheet which looked like mica. Simple test is to put a lighter on it, mine melted
 .
.- Joined
- Oct 15, 2017
- Messages
- 1,190
- Points
- 443

Hi Maarten, Thanks for the comments. I've used a couple of things I learned from your RC log. I remember when I first read your log, I was truly impressed. I remember thinking, "I would love to be able to create something like that." 
 You put your own touch to that ship.
So, mica......I'm quite sure it is mica. The "glazing" you see in the corner of each window complex is the mica layers where they separated from handling too much. BUT, when looked at with the human eye it does not look like it does in the photo. I will try and take a photo, maybe with a low warm light behind the windows.
Mica is a mineral and forms geologically. I've found it many times as a boy when we hunted quartz and mica in a local limestone quarry. I did find mine on eBay and bought something like 6 3x4 inch sheets. I can only imagine how HUGE that formation must have been to get a clear sheets with those dimensions.
Mica really doesn't feel like plastic, to me at all. I don't need to put a flame to it to know that it is. Like many minerals that form over time mica consists of many layers. You can "flick" the corner with a little force and the layers start to separate. If you need a thinner piece than that of the purchased item, you can slide a thin razorblade and separate the layers. You can't do that with plastic or glass, obviously. Who knows, I may have tried that once, can't remember.
Below, you can see the corner where I separated the layers.
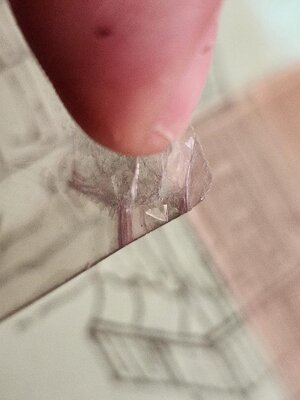
Even though I don't need to light it up. For you, my friend...
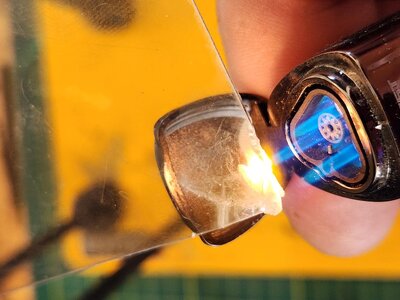
It glows as a hot stone might and then just cools off when the flame is taken away. I feel like a kid again, doing science experiments!

I got "that look" (the OMG what is he doing now) when I was carrying mica, lighter, 3rd hand to the table. It's amazing how much can be communicated from your loved one with a simple facial expression.

Cheers mate!
So, mica......I'm quite sure it is mica. The "glazing" you see in the corner of each window complex is the mica layers where they separated from handling too much. BUT, when looked at with the human eye it does not look like it does in the photo. I will try and take a photo, maybe with a low warm light behind the windows.
Mica is a mineral and forms geologically. I've found it many times as a boy when we hunted quartz and mica in a local limestone quarry. I did find mine on eBay and bought something like 6 3x4 inch sheets. I can only imagine how HUGE that formation must have been to get a clear sheets with those dimensions.
Mica really doesn't feel like plastic, to me at all. I don't need to put a flame to it to know that it is. Like many minerals that form over time mica consists of many layers. You can "flick" the corner with a little force and the layers start to separate. If you need a thinner piece than that of the purchased item, you can slide a thin razorblade and separate the layers. You can't do that with plastic or glass, obviously.
 Who knows, I may have tried that once, can't remember.
Below, you can see the corner where I separated the layers.

Even though I don't need to light it up. For you, my friend...

It glows as a hot stone might and then just cools off when the flame is taken away. I feel like a kid again, doing science experiments!

I got "that look" (the OMG what is he doing now) when I was carrying mica, lighter, 3rd hand to the table. It's amazing how much can be communicated from your loved one with a simple facial expression.
Cheers mate!
Last edited:
Certainly the real thing. Still looking for a good source for it here. Love the appearence of it as shipmodel glass.
- Joined
- Sep 14, 2020
- Messages
- 152
- Points
- 88

Beautiful job on the stern windows, I love your approach to building the casement frames and the use of mice for glass in the windows. Will add the process to my notes, if and when I ever reach your level of craftsmanship I will have a credible guide at hand.
I just popped in to have a look around and learned much more than hoped. Mica for glazing wonderful idea.
HAPPY HOLIDAYS to ALL
HAPPY HOLIDAYS to ALL
- Joined
- Oct 15, 2017
- Messages
- 1,190
- Points
- 443

I jumped out onto eBay to see if the same supplier was selling. I couldn't find. But I didn't look very hard. I'll take a look again one of these rainy days.Certainly the real thing. Still looking for a good source for it here. Love the appearence of it as shipmodel glass.
@The learner, Thank you for your nice comments. It took me 3 attempts before they were close to being acceptable. But the !mica is very easy to work with and does look like scale glass. Thanks for following along.Beautiful job on the stern windows, I love your approach to building the casement frames and the use of mice for glass in the windows. Will add the process to my notes, if and when I ever reach your level of craftsmanship I will have a credible guide at hand.
Thanks Will. Happy Holidays to you!I just popped in to have a look around and learned much more than hoped. Mica for glazing wonderful idea.
HAPPY HOLIDAYS to ALL
- Joined
- Oct 15, 2017
- Messages
- 1,190
- Points
- 443

Hello Again Mates,
Well, what is that old saying? "If it isn't something, it's something else!"
With the stern structure all but completed and put aside until it is installed on the ship, I moved my attention to the beakhead. I was planning on following Tobias' recommendation to profile the tapers on the beakhead on the mill. Unfortunately, after a couple of tests using a blank piece of oak cut to the exact dimensions of the beakhead, it became clear this approach would introduce too much risk and near impossible to complete accurate cuts. This is partially due to the size of the piece and size of the mill's table. Also, each side would need to be cut, hold downs repositioned and cut again. No way.
So I went back to my original thoughts of elevating the side to be narrowed with a jig and run it through the Byrne's thicknesser. It worked great. EXCEPT!?!?.....
 My inexperience came back to haunt me. When I pinned the pieces of the beakhead together for extra strength, one of them was done off center. Not thinking that I would later need to thin the beakhead and it was MOST important for that pin to be centered, I just let it go. Till it came back for a visit when I profiled the fore end of it.
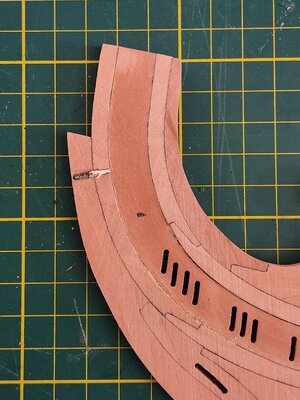
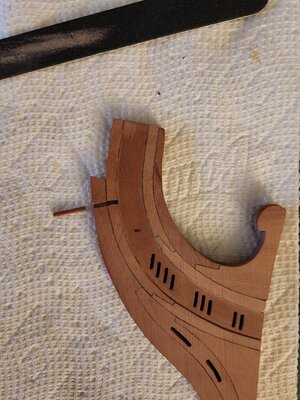
You can see the toothpick where it broke through. Well, one thing was certain. I was not rebuilding the entire beakhead for the 3rd time. I have two options; 1) repair to the best of my ability and leave the natural tone I was planning on, 2) Repair and paint the top half of the beakhead black along the lines of the main wales.
I'm not really sweating it, besides the toothpick being a wart on an otherwise beautiful face. This is because most, if not all of that area will be covered by the lower cheek.
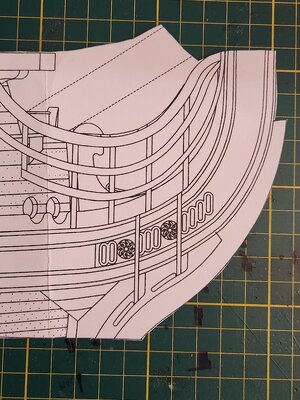
Need to stop whining and get moving. With micro chisels from my Russian friend I cut out the entire toothpick and graphite tinted glue till I got to clean pearwood. I then took a few small pieces of pear from the same stock and made my own toothpick.
Made sure the new toothpick was a tight, tight fit as gaps stick out like just another wart. Sand down slowly and carefully. With #3 scalpel blade, cut a join line through the filling piece and finish up with steel wool.
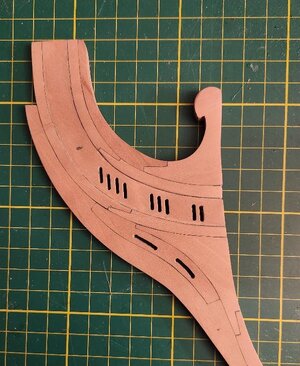
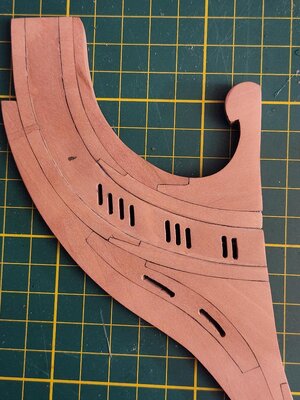
I can live with the repair. The tapers are complete and I'll put this aside till it's ready to install, hopefully soon. I've had my fill of drama on this project. Any more and I'll have to move to Hollywood.
Ok, so I'm sure there are a few folks following my log thinking, " Ken, this is SoS (SHIPS), where's the ship?!? I'm getting there. Now that the stem and stern are done, I need to address that thing that connects them, and the fix I've been putting off for a while, the keel and the gap. Well, nothing progresses till I fix that now.
Another lesson learned. Where there is a will, there is a way. I'm not smart enough to quite. Thanks for dropping in.
Till next time...
Well, what is that old saying? "If it isn't something, it's something else!"
With the stern structure all but completed and put aside until it is installed on the ship, I moved my attention to the beakhead. I was planning on following Tobias' recommendation to profile the tapers on the beakhead on the mill. Unfortunately, after a couple of tests using a blank piece of oak cut to the exact dimensions of the beakhead, it became clear this approach would introduce too much risk and near impossible to complete accurate cuts. This is partially due to the size of the piece and size of the mill's table. Also, each side would need to be cut, hold downs repositioned and cut again. No way.
So I went back to my original thoughts of elevating the side to be narrowed with a jig and run it through the Byrne's thicknesser. It worked great. EXCEPT!?!?.....
 My inexperience came back to haunt me. When I pinned the pieces of the beakhead together for extra strength, one of them was done off center. Not thinking that I would later need to thin the beakhead and it was MOST important for that pin to be centered, I just let it go. Till it came back for a visit when I profiled the fore end of it.
You can see the toothpick where it broke through. Well, one thing was certain. I was not rebuilding the entire beakhead for the 3rd time. I have two options; 1) repair to the best of my ability and leave the natural tone I was planning on, 2) Repair and paint the top half of the beakhead black along the lines of the main wales.
I'm not really sweating it, besides the toothpick being a wart on an otherwise beautiful face.

Need to stop whining and get moving. With micro chisels from my Russian friend I cut out the entire toothpick and graphite tinted glue till I got to clean pearwood. I then took a few small pieces of pear from the same stock and made my own toothpick.

Made sure the new toothpick was a tight, tight fit as gaps stick out like just another wart. Sand down slowly and carefully. With #3 scalpel blade, cut a join line through the filling piece and finish up with steel wool.


I can live with the repair. The tapers are complete and I'll put this aside till it's ready to install, hopefully soon. I've had my fill of drama on this project. Any more and I'll have to move to Hollywood.
Ok, so I'm sure there are a few folks following my log thinking, " Ken, this is SoS (SHIPS), where's the ship?!? I'm getting there. Now that the stem and stern are done, I need to address that thing that connects them, and the fix I've been putting off for a while, the keel and the gap. Well, nothing progresses till I fix that now.
Another lesson learned. Where there is a will, there is a way. I'm not smart enough to quite.
 Thanks for dropping in.
Till next time...
Last edited:


