-

Win a Free Custom Engraved Brass Coin!!!
As a way to introduce our brass coins to the community, we will raffle off a free coin during the month of August. Follow link ABOVE for instructions for entering.
-

PRE-ORDER SHIPS IN SCALE TODAY!
The beloved Ships in Scale Magazine is back and charting a new course for 2026!
Discover new skills, new techniques, and new inspirations in every issue.
NOTE THAT OUR FIRST ISSUE WILL BE JAN/FEB 2026
You are using an out of date browser. It may not display this or other websites correctly.
You should upgrade or use an alternative browser.
You should upgrade or use an alternative browser.
Le Fleuron 1729 - 64 Gun Ship PoB Scratch Build in 1:48 - (Ancre Monograph-J. Boudriot/G. Delacroix)
- Thread starter Hoss6262
- Start date
- Watchers 54
-
- Tags
- ancre le fleuron pob
- Joined
- Oct 15, 2017
- Messages
- 1,190
- Points
- 443

Yes, Uwek, nothing I could do once it was done. Make lemonade out of lemons and all that stuff.My like was given, because I love how you deal with this behaviour of your puppy. A great way to handle such an accident.
And in some years you will still remember this situation with love towards your dog
You will repair this small thing in very short time
Paul, no need at all to feel for me here. A re-do on a model ship is nothing compared to the unconditional love of a dog.Reason number 773 for not having a pet. I feel vindicated (but sad for you).

Thanks Jim. I think you and I think alike, quite often. Absolutely, this was all MY fault. To be honest, those portals bothered me quite a bit and I gave a long, hard thought of redoing them. At that time though I had just finished the stern plate, with a good deal of time invested and was ready to move on. So in a small way, very, very small way, I'm glad it happened..........(did I really just type that????)Sorry to hear the trouble..., Ken. Yes, I think the animals are not guilty of our carelessness. It is purely our fault. On the bright side, the dog actually helped you to identify a weak area of your model, that you have to redo.Imagine it cracked once you already plank the transom...
I am sure with your experience, you will do it better this time.

Ken, thanks mate! Very gracious of you. I will bounce back and show some rework with renewed vigor. After a little while.Hi Ken, very neat, very nice work, it’s a pleasure to see, thanks for showing in such detail.

- Joined
- Oct 15, 2017
- Messages
- 1,190
- Points
- 443

Thanks @WojtasS! I'm just glad we don't have both dogs AND cats.Sorry to hear that Ken, I'm sure you'll have no problem with re-do. A little comforting is you weren't hit by a kitty hurricane(like most of us), but a doggy storm
- Joined
- Oct 15, 2017
- Messages
- 1,190
- Points
- 443

So, before I moved onto the stem and allow stern pressure to decompress, I have to leave the stern work at a logical segue point where I can pick it back up after a little time off.
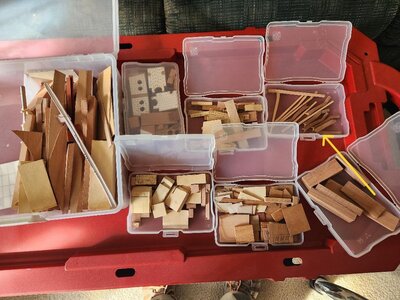
I, like many of us keep scraps. Typically, I make more pieces of items in case I break them. That way I don't have to go back and set everything up again. So, I opened up my scrap boxes and guess what I found???? The box with the yellow arrow....extra upper and lower counter timbers!!
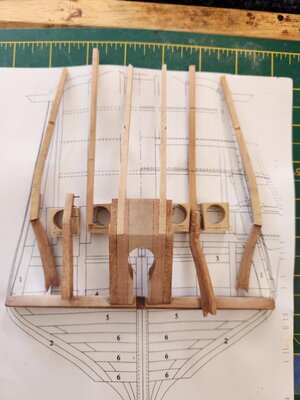
So, I cut new portals, this time out of boxwood and packed the pieces away to pick up after I finish the stem.
I feel better already! Later mates!
I, like many of us keep scraps. Typically, I make more pieces of items in case I break them. That way I don't have to go back and set everything up again. So, I opened up my scrap boxes and guess what I found???? The box with the yellow arrow....extra upper and lower counter timbers!!

So, I cut new portals, this time out of boxwood and packed the pieces away to pick up after I finish the stem.

I feel better already! Later mates!
- Joined
- Aug 8, 2019
- Messages
- 5,568
- Points
- 738

Kurt Konrath
Kurt Konrath
Hey Doc, do you consider fish in a tank as Pets.Reason number 773 for not having a pet. I feel vindicated (but sad for you).
Lunch...Hey Doc, do you consider fish in a tank as Pets.
- Joined
- Oct 15, 2017
- Messages
- 1,190
- Points
- 443

End good al good.
And never blame the dog, they can't help it.
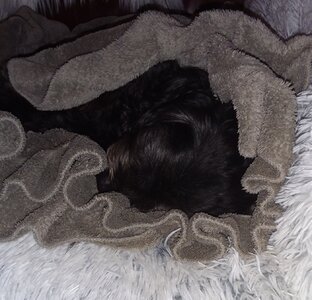
I never blamed my dog, she never did something wrong because sleeping almost 90% of a day under a blanket.
View attachment 405414
Sometimes I forget that I have a dog
Ps. The Black spot in the middle of the picture is the head of here.
 Stephan, does he/she get up to eat? I'm hoping Shia 7months old, grows up to calm, maybe not quite as calm as yours, but calm.
 Kurt, if you don't have to walk it or take it out to go poop, or clean a litter box, it's not a pet!! Oh, and if you get tired of it you can flush it down the toilet, it's not a pet!Hey Doc, do you consider fish in a tank as Pets.

Paul, it doesn't surprise me, you eating healthy! At least you know you're getting your Omega3,6,9s!Lunch...
- Joined
- Aug 8, 2019
- Messages
- 5,568
- Points
- 738

That are the 10 % of moving on a day. From the pillow to the nap and back.Stephan, does he/she get up to eat?
- Joined
- Oct 15, 2017
- Messages
- 1,190
- Points
- 443

Hello Everyone, First off, thank you for all the likes, feedback and support. It really does make a difference. 

I was so happy to find extra counter pieces to replace the ones broken that I almost started to rework the stern, but decided to focus on the stem, as it was my first inclination and with me usually the right choice.
With new found energy, I've logged 14
 hours cutting out the different elements of the stem, all from Swiss Pear, with the exception of the decorative inlayed element, which I fabricated both from Swiss and regular Pearwood. As we've seen many stem elements cut and pieced together as a puzzle on the site, I will not spend a lot of time photographing every step. Just a few photos where I think there are distinctions between Le Fleuron and other ships.
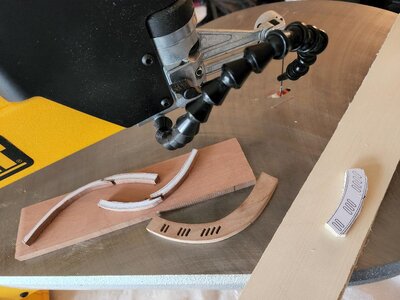
Photo below shows the decorative inlayed piece (regular Pearwood)which I fabricated in both regular and Swiss Pearwood. The regular Pearwood is ah, less pink, whiter in shade. I should have done a side by side, but it is too late now. I thought maybe a contrast would be appealing. It was not. I opted for the Swiss. The decorative slots are just that, decorative. They serve no function on the ship. I milled them on the Sherline mill.
The next photo shows the stem element that contains the gammoning holes, which were also milled on the Sherline. For this type of small milling work I just use a chuck to hold the end mills as it is very light work and much faster change process compared to a mill end holder, which I use for heavier wood work and metal work.
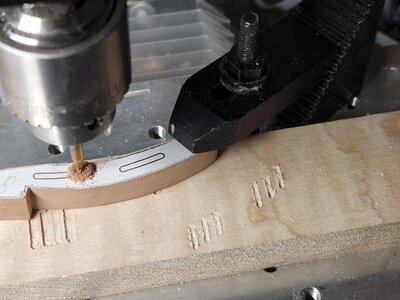
I've already finished the first stage of finished sanding as you can see on the piece above. I highlighted the word "sanding" as I did not really sand every edge. In order to get tight fit on the joins between pieces, I used a scraper with each piece being held in a vice. The understanding is the edges of each piece need to be sharp and as close to 90 degrees (perpendicular) in order to achieve the thin tight join we are looking for. This, for me at least, is almost impossible to achieve sanding the pieces as sanding tends to result in rounded edges.
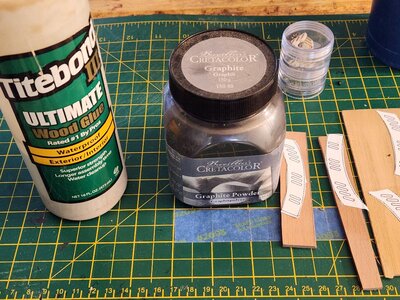
Quite some time ago I experimented with different join methods shown by many modelers to represent calking between the pieces. Some use black paper. Some color PVA glue with black or brown dyes or water based paint. Others use graphite powder with PVA, while some few even use soldering irons with very thin tips to burn a thin line. The last option is for those with the steady hands of a surgeon, not my 67 year old arthritic sausage fingers. So that option is OUT!
I didn't like adding water based dyes or paints to the PVA. It resulted in diluting the PVA and weaken the PVA's adhesion properties and the joint itself. I liked both the look of black paper and graphite, but under stress the paper join was considerably weaker than that of the join using graphite + PVA. So that's what I settled on.
I opted for the materials below. Ratio used, 1 part graphite, 4 parts PVA. It did thicken the PVA slightly, but to it was still very workable. It yielded a nice look and very strong join. The stem is currently in being cured to accelerate the process. I will share in a later post.
While the stem is drying and I have some time, I decided to work on the decorative elements on the stem. The floral discs are quite straight forward. The decorative rings are not quite as much. I've also decided to make 3 versions of the rings for appearance variations only. The first in Holly, which you can see already in the small storage container. The others in Swiss Pear (left) and Boxwood (right) in the photo above. I will only fabricate the Starboard side rings for each wood. Once I decide which to use, I'll create the remaining Port rings.
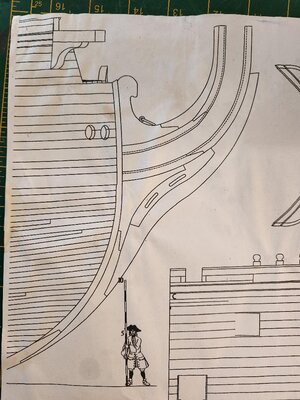
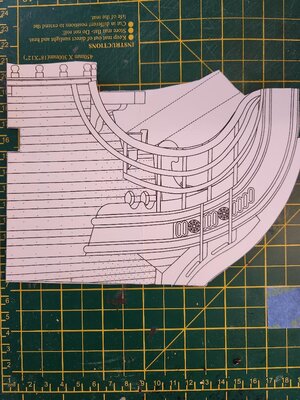
The stem of Le Fleuron is not the most complex, but it does have a pleasant look to it. Below, as shown in the plans you can see the different elements, functional and decorative.
The new energy I've found, along with a lot of coffee has fueled the 'spurt' in my progress that has given me some real satisfaction. What seemed like 2 hours working was actually 14 hours. They flew by.
Again, thanks for all the support and for following my journey.
Till next time...

I was so happy to find extra counter pieces to replace the ones broken that I almost started to rework the stern, but decided to focus on the stem, as it was my first inclination and with me usually the right choice.
With new found energy, I've logged 14
Photo below shows the decorative inlayed piece (regular Pearwood)which I fabricated in both regular and Swiss Pearwood. The regular Pearwood is ah, less pink, whiter in shade. I should have done a side by side, but it is too late now.

The next photo shows the stem element that contains the gammoning holes, which were also milled on the Sherline. For this type of small milling work I just use a chuck to hold the end mills as it is very light work and much faster change process compared to a mill end holder, which I use for heavier wood work and metal work.

I've already finished the first stage of finished sanding as you can see on the piece above. I highlighted the word "sanding" as I did not really sand every edge. In order to get tight fit on the joins between pieces, I used a scraper with each piece being held in a vice. The understanding is the edges of each piece need to be sharp and as close to 90 degrees (perpendicular) in order to achieve the thin tight join we are looking for. This, for me at least, is almost impossible to achieve sanding the pieces as sanding tends to result in rounded edges.
Quite some time ago I experimented with different join methods shown by many modelers to represent calking between the pieces. Some use black paper. Some color PVA glue with black or brown dyes or water based paint. Others use graphite powder with PVA, while some few even use soldering irons with very thin tips to burn a thin line. The last option is for those with the steady hands of a surgeon, not my 67 year old arthritic sausage fingers.
 So that option is OUT!
I didn't like adding water based dyes or paints to the PVA. It resulted in diluting the PVA and weaken the PVA's adhesion properties and the joint itself. I liked both the look of black paper and graphite, but under stress the paper join was considerably weaker than that of the join using graphite + PVA. So that's what I settled on.
I opted for the materials below. Ratio used, 1 part graphite, 4 parts PVA. It did thicken the PVA slightly, but to it was still very workable. It yielded a nice look and very strong join. The stem is currently in being cured to accelerate the process. I will share in a later post.

While the stem is drying and I have some time, I decided to work on the decorative elements on the stem. The floral discs are quite straight forward. The decorative rings are not quite as much. I've also decided to make 3 versions of the rings for appearance variations only. The first in Holly, which you can see already in the small storage container. The others in Swiss Pear (left) and Boxwood (right) in the photo above. I will only fabricate the Starboard side rings for each wood. Once I decide which to use, I'll create the remaining Port rings.
The stem of Le Fleuron is not the most complex, but it does have a pleasant look to it. Below, as shown in the plans you can see the different elements, functional and decorative.


The new energy I've found, along with a lot of coffee has fueled the 'spurt' in my progress that has given me some real satisfaction. What seemed like 2 hours working was actually 14 hours. They flew by.
Again, thanks for all the support and for following my journey.
Till next time...
Hi Ken,
in a moment like that you feel anger and pain. The anger because you were so clumsy and the pain because it is broken. But you showed your little puppy your love in all the anger and pain and he thanks you for that every moment of his life.
Great job on the transom and I'm sure the spur will be fantastic again, I'm glad you found some time to work on the model again,
- Joined
- Oct 15, 2017
- Messages
- 1,190
- Points
- 443

Hello Everyone,
As always, thanks for following along, your input and likes!
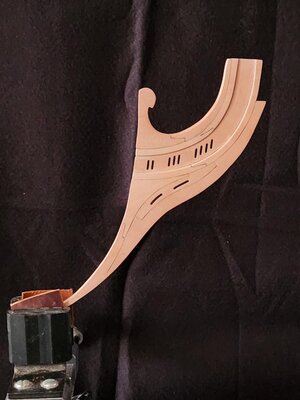
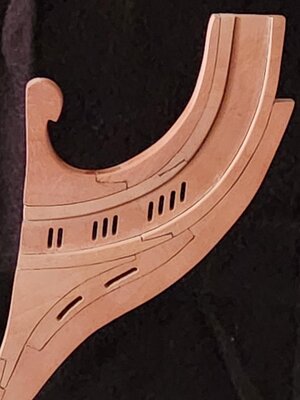
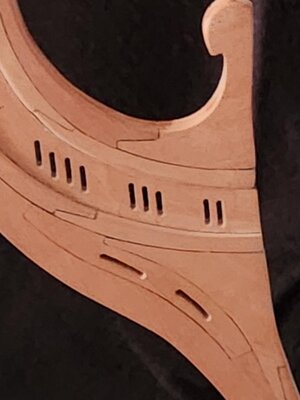
Construction on the stem has reach the first phase. Some of the joins are not as tight as I would have liked, but I'll continue to sharpen my skills.
As I shared in the last post, I've made 3 version of decorative rings, Holly, Pear and Boxwood, to get a feel for the contrast. I am attempting to go for somewhat of a realistic look, so big contrast may not be the best choice.
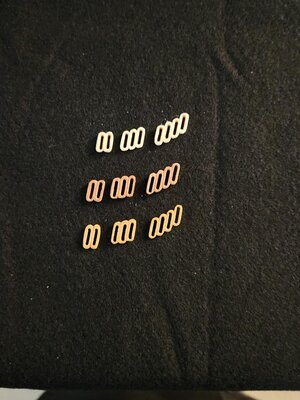
I temporarily dry fit them to the stem with double sided tape to get a sense of the finished look. Feel free to offer your input. I think it's down to a "2 ring" race.
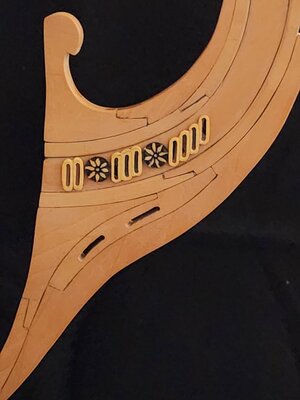
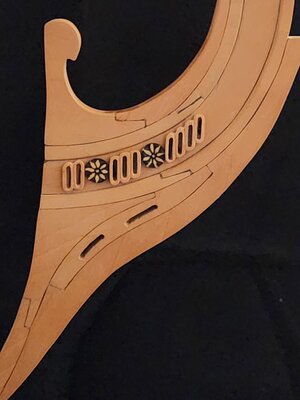
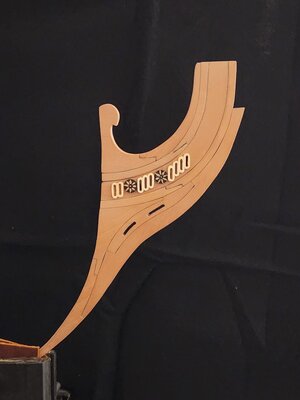
I need to trim the rings down a bit more, but wanted to post before the day ended. The Boxwood was definitely the most challenging to work with as it seemed to be very dry. It may have just been the piece of stock I chose.
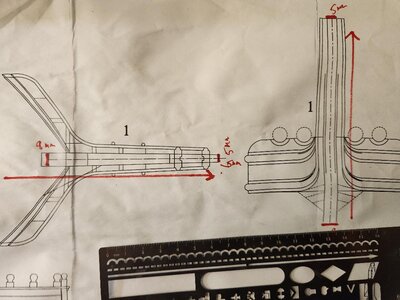
My next task will be to finalize the progressive narrowing of the stem, both aft to fore and keel to top of the beakhead. As you can see by the coffee stains and wrinkles on the plan sheet, I've been thinking about this for a while. The initial thought is to build a "sled", secure the piece on it and work it through the thickness sander. Of course I will make a prototype to the same dimensions and test this a few times.
Some more coffee and a good night's sleep will help. As always, thanks for following along!
Till next time...
As always, thanks for following along, your input and likes!
Construction on the stem has reach the first phase. Some of the joins are not as tight as I would have liked, but I'll continue to sharpen my skills.


As I shared in the last post, I've made 3 version of decorative rings, Holly, Pear and Boxwood, to get a feel for the contrast. I am attempting to go for somewhat of a realistic look, so big contrast may not be the best choice.

I temporarily dry fit them to the stem with double sided tape to get a sense of the finished look. Feel free to offer your input. I think it's down to a "2 ring" race.


I need to trim the rings down a bit more, but wanted to post before the day ended. The Boxwood was definitely the most challenging to work with as it seemed to be very dry. It may have just been the piece of stock I chose.

My next task will be to finalize the progressive narrowing of the stem, both aft to fore and keel to top of the beakhead. As you can see by the coffee stains and wrinkles on the plan sheet, I've been thinking about this for a while. The initial thought is to build a "sled", secure the piece on it and work it through the thickness sander. Of course I will make a prototype to the same dimensions and test this a few times.
Some more coffee and a good night's sleep will help. As always, thanks for following along!
Till next time...
Very nice stem. I must confess I am colorblind but I agree, keep the contrast of the rings to a minimum.
WOW!! Looks fabulous. Ken. I like the first one (boxwood), and then pear. However, the boxwood version looks a bit wider, maybe because of the contrast. But boxwood would be my first choice. The real question is will there be more boxwood elements in the stern?
Good morning Ken, very nice work. I would agree with Jim and think the boxwood version is the nicest. As Jim has also pointed out the stern of the Le Fleuron has a lot of carving and then it should all fit together.
If you have a mill I would use that to taper it. Here is a picture of how I did it for the rudder, for example.
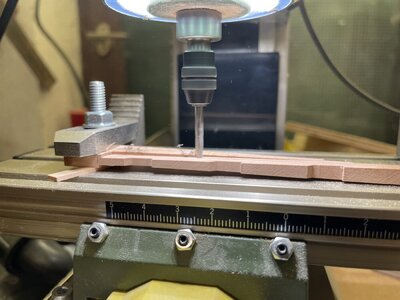

If you have a mill I would use that to taper it. Here is a picture of how I did it for the rudder, for example.

- Joined
- Dec 16, 2016
- Messages
- 1,178
- Points
- 493

Hi Ken. That looks very good indeed. I’m impressed with your work and your determination to get it as perfect as you can, also including your thought process within your log adds interest. I wouldn’t even attempt a project as complex, this level of build is beyond me for many reasons but I do enjoy following others in their endeavours. It’s a beautiful subject, perhaps the promised version from Modelship Dockyard could be the way for me to go, I could probably manage Le Fleuron from a kit.Hello Everyone,
As always, thanks for following along, your input and likes!
Construction on the stem has reach the first phase. Some of the joins are not as tight as I would have liked, but I'll continue to sharpen my skills.
View attachment 406388
View attachment 406387View attachment 406389
As I shared in the last post, I've made 3 version of decorative rings, Holly, Pear and Boxwood, to get a feel for the contrast. I am attempting to go for somewhat of a realistic look, so big contrast may not be the best choice.
View attachment 406390
I temporarily dry fit them to the stem with double sided tape to get a sense of the finished look. Feel free to offer your input. I think it's down to a "2 ring" race.
View attachment 406391View attachment 406393View attachment 406395
I need to trim the rings down a bit more, but wanted to post before the day ended. The Boxwood was definitely the most challenging to work with as it seemed to be very dry. It may have just been the piece of stock I chose.
View attachment 406397
My next task will be to finalize the progressive narrowing of the stem, both aft to fore and keel to top of the beakhead. As you can see by the coffee stains and wrinkles on the plan sheet, I've been thinking about this for a while. The initial thought is to build a "sled", secure the piece on it and work it through the thickness sander. Of course I will make a prototype to the same dimensions and test this a few times.
Some more coffee and a good night's sleep will help. As always, thanks for following along!
Till next time...
Last edited:
The stem looks fantastic Ken!
Wonderful work on that stem Ken, I admire your tenacious approach to “getting it right”. I think the other Ken said it well in his prior post. Lots of good how to’s in your log. I also enjoyed reading your rationale for the different methods of caulking too. The graphite and PVA solution is something I’ll put away in my mental filing cabinet.


