
-

SUBSCRIBE TO SHIPS IN SCALE TODAY!
The beloved Ships in Scale Magazine is back and charting a new course for 2026!
Discover new skills, new techniques, and new inspirations in every issue.
NOTE THAT OUR NEXT ISSUE WILL BE July/August 2026 -

Win a Free Custom Engraved Brass Coin!!!
As a way to introduce our brass coins to the community, we will raffle off a free coin during the month of August. Follow link ABOVE for instructions for entering.


You are using an out of date browser. It may not display this or other websites correctly.
You should upgrade or use an alternative browser.
You should upgrade or use an alternative browser.
Le Saint Philippe 1693 after Jean-Claude Lemineur (Ancre) in scale 1:48
- Thread starter dockattner
- Start date
- Watchers 101
-
- Tags
- 1:48 ancre saint philippe



Good morning Paul. I love this saying- not going to let my staff see it thoLet not the perfect become the enemy of the good.
 . Kudos on the band carvings- aesthetically look “perfect “
 . Cheers Grant
Good morning Paul. I love this saying- I’m not going to let my staff see it thoLet not the perfect become the enemy of the good.
. Kudos on the band carvings- aesthetically look “perfect “. Cheers Grant
Paul, your work may not be perfect for you, but it has soul and is unique. I wish I had that skill.
Miro
Thanks guys!Good morning Paul. I love this saying- not going to let my staff see it tho
Grant do you have a copyright on "Grant Perfect" or is that phrase still available in the public domain? Paul Perfect?

- Joined
- Aug 8, 2019
- Messages
- 5,878
- Points
- 738

My two cents on what I think about this whole discussion:
I don’t think you should focus too much on how the mirror decoration is constructed. The details are important, but the shape?? Maybe your interpretation is closer to the original than Lemineur’s. Who knows? After all, that ship hasn’t existed for over 300 years, and there’s no one left in the world who knows exactly what it looked like—let alone its exact dimensions. I think you’re well on your way to creating something beautiful, so don’t let yourself get stressed out over whether there’s more or less rounding in a gallery. Don’t forget that this is a hobby you’re supposed to enjoy. And when your stern is finished, your personal touch should be visible. And from what I’ve seen of your work so far, you’re doing just great.
In any case, I really enjoy the way you work with wood; actually, the way you pour your love into your work is an inspiration to me.
I don’t think you should focus too much on how the mirror decoration is constructed. The details are important, but the shape?? Maybe your interpretation is closer to the original than Lemineur’s. Who knows? After all, that ship hasn’t existed for over 300 years, and there’s no one left in the world who knows exactly what it looked like—let alone its exact dimensions. I think you’re well on your way to creating something beautiful, so don’t let yourself get stressed out over whether there’s more or less rounding in a gallery. Don’t forget that this is a hobby you’re supposed to enjoy. And when your stern is finished, your personal touch should be visible. And from what I’ve seen of your work so far, you’re doing just great.
In any case, I really enjoy the way you work with wood; actually, the way you pour your love into your work is an inspiration to me.
Thanks for this note, Stephan. It is true that sometimes I forget this is just a hobby - or at least I forget to enjoy myself along the way. Still, I am grateful to those who point out things that don't seem right - even though 'right' can be a bit vague at times.My two cents on what I think about this whole discussion:
I don’t think you should focus too much on how the mirror decoration is constructed. The details are important, but the shape?? Maybe your interpretation is closer to the original than Lemineur’s. Who knows? After all, that ship hasn’t existed for over 300 years, and there’s no one left in the world who knows exactly what it looked like—let alone its exact dimensions. I think you’re well on your way to creating something beautiful, so don’t let yourself get stressed out over whether there’s more or less rounding in a gallery. Don’t forget that this is a hobby you’re supposed to enjoy. And when your stern is finished, your personal touch should be visible. And from what I’ve seen of your work so far, you’re doing just great.
In any case, I really enjoy the way you work with wood; actually, the way you pour your love into your work is an inspiration to me.
I think it is interesting that you have noticed how I approach my work. Someone once contrasted my work with another builder's and how the other builder's ship felt alive and mine felt lifeless. I let the comment pass as this person clearly did not know me or how I work. It's good to be seen and known.

My great respect for your devotion to make a correct curved carved band, Paul. And the nice result is there. This one is looking very good from the different directions. Give yourself a well-deserved ‘pat on the back’.Work has continued on the (re)fabrication of the carved band of the quarter galleries.
I've decided that I'm just not that great at geometric/shape carving- and since I previously demonstrated that I'm also not that great at figure/anthropomorphic carving while building the Kingfisher
- it would seem this current project faces some significant headwinds
.
Nevertheless, onward we go...
View attachment 616113
View attachment 616114
View attachment 616115 View attachment 616116
View attachment 616117
View attachment 616118
I did apply a finish to this carved section just to see how it would look.
Here in the Netherland we give ‘a pat on the shoulder’.
Regards, Peter.
Thank you, Peter. I agree that this version is an improvement over the first attempt.My great respect for your devotion to make a correct curved carved band, Paul. And the nice result is there. This one is looking very good from the different directions. Give yourself a well-deserved ‘pat on the back’.
Here in the Netherland we give ‘a pat on the shoulder’.
Regards, Peter.


Paul,
just a spectator with question.
It's obvious that you carved "curved band" out of a single piece of wood - even down to the end grain around the corner aft.
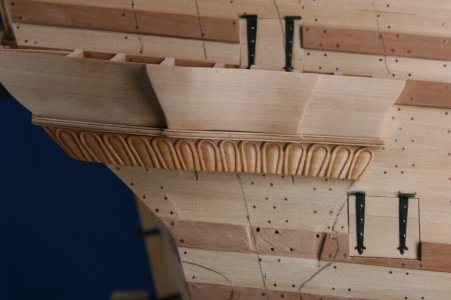
Were I doing this, without the benefit of dozens of voices chiming in, I would have carved each (for lack of better word) horseshoe individually and glued these to a backing, as I would imagine the original craftsmen must have done. The grain looks fabulous in the above - and for that reason alone, I love your choice. But , why did you not choose to fabricate the "bank" of carvings individually?
just a spectator with question.
It's obvious that you carved "curved band" out of a single piece of wood - even down to the end grain around the corner aft.
Were I doing this, without the benefit of dozens of voices chiming in, I would have carved each (for lack of better word) horseshoe individually and glued these to a backing, as I would imagine the original craftsmen must have done. The grain looks fabulous in the above - and for that reason alone, I love your choice. But , why did you not choose to fabricate the "bank" of carvings individually?
You caught mePaul,
just a spectator with question.
It's obvious that you carved "curved band" out of a single piece of wood - even down to the end grain around the corner aft.
View attachment 616365
Were I doing this, without the benefit of dozens of voices chiming in, I would have carved each (for lack of better word) horseshoe individually and glued these to a backing, as I would imagine the original craftsmen must have done. The grain looks fabulous in the above - and for that reason alone, I love your choice. But , why did you not choose to fabricate the "bank" of carvings individually?
!Actually, I wasn't trying to fool anyone
.I did consider making individual 'horseshoes' and applying them. During an early trial I milled a long strip of pearwood into a horseshoe profile and then tried to section off each individual horseshoe as a slice. But the pearwood slices just snapped into pieces when I ran them through the table saw. I have some boxwood but wasn't sure I wanted to use that here (I was afraid I would end up with something that looked like a candy cane since the boxwood is more yellow - plus, a failure in box is more expensive than a failure in pear).
I guess I never considered carving them individually. I certainly think that could have worked with boxwood but I'm not so sure pearwood would have survived the handling necessary. The best solution would probably be to make them via CNC but that is still beyond me.
At the end of the day I'm hoping the current pear-on-pear look will fit into the decor of the stern section. That is, it will fade into the background it deserves to fade into in light of the more significant carvings yet to come.
And I thank you very kindly for asking.
Last edited:
While responding to another post, where I had to look up how I installed my pin rails, I found myself two pages away from my notes on making the "eyebrows" for Conny. The technique I used to make these is very similar to what you described above. The difference is that I used a band saw - not a table saw.I did consider making individual 'horseshoes' and applying them. During an early trial I milled a long strip of pearwood into a horseshoe profile and then tried to section off each individual horseshoe as a slice. But the pearwood slices just snapped into pieces when I ran them through the table saw.
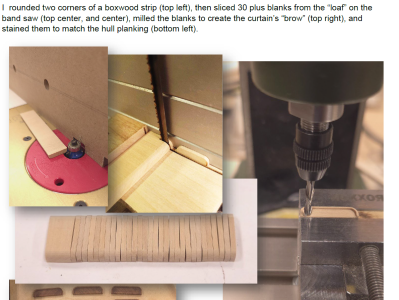
Should you ever contemplate a do-over, which I would certainly not recommend, you might try this approach. If you don't have a bandsaw, swing on by my shipyard and I'll set you up.
A nice solution, Peter. I have a bandsaw but failed to think of it as a solution. I love how this forum provides us with these sorts of exchanges.
For the record... I have to make a countless number of fleur-de-lys... I wonder if this might be a viable option...
For the record... I have to make a countless number of fleur-de-lys... I wonder if this might be a viable option...
Definitely copywriter….Thanks guys!
Grant do you have a copyright on "Grant Perfect" or is that phrase still available in the public domain? Paul Perfect?
- no one else would want it anyway. Cheers Grant
- Joined
- Oct 15, 2017
- Messages
- 1,207
- Points
- 443

Sitting here waiting for church to start and I just realized I failed to post this update...
...from 12 hours ago...
Well, I got myself into quite a funk this past week! It is my policy to not build anything until I understand everything. While I often fail in this regard (most recently evidenced by the error uncovered by our colleague Wojtas), the exercise of figuring out every detail on the complicated stern of the Saint Philippe sent me into a tailspin.
Rather than setting this model aside I have decided to just carry on and stop being such a baby. I will certainly make more mistakes now, but so be it. This is only my third ship model and first scratch attempt, so I need to stop taking myself and this build so seriously. I think I forgot this is a hobby...
I've fabricated lights (windows) before so I thought I might be able to do that while I sorted out the quarter galleries and stern balconies. The lower level of lights are round/oval and it was my thought to build the windows as squares and then place a panel in front of them simulating their round/oval shape. The first attempt ended in the bin - a day long struggle with window frames and muntins (these divide panes of glass within a window) that left me in a lower place than I was at the start of the effort.
Renewed by a restful night I changed directions and decided to build the face panel first.
Here we go with a photo essay that should provide some sense of my workflow...
This is where we begin - these openings need to appear round/oval:
View attachment 600925
A template:
View attachment 600926
The resultant rough-cut panel (still needs to be curved into place):
View attachment 600927
Each circle/oval needs to be framed. I decided to do that with a molding. I traced each circle onto a bit of fake boxwood and roughly cut out the inside with a hand saw (ooh, look at me rack up points with the we used to do everything without power tools crowd):
View attachment 600928
These rough-cut moldings were then glued to the panel (no small challenge getting them centered):
View attachment 600929
Next, the excess was removed from the inside of the molding using a spindle sander (thus forfeiting all my accumulated points):
View attachment 600930
That looked good but not great - which led to spending a really unthinkable amount of time making these moldings look more delicate:
View attachment 600931
View attachment 600932
View attachment 600933
Next up - back to the workbench to create light divides (muntins) and get them into these openings...
View attachment 600934
Thanks for visiting.
Onward!
Hi Paul, I hope all is well with you and yours! Congratulations on your 4th Grandbaby, Teddy. I have now caught up on your SP build and, as always, very impressed.I'll be keeping what I have even if it is not quite perfect.
With this said, sometimes I think you are an insane, crazy person.
You, of all people should know perfection is unachievable. Don't get me wrong, I'm guilty of the logic, if I reach for the stars and come up short, at least I won't end up with a handful of mud.This hobby, for the most part is cathartic and therapeutic for me. Sometimes, when challenged, it is the reason for therapy.
 This is when I know it's time to take a breath and a break and live vicariously through the many talented modelers' logs, including yours.
Happiness and joy is found elsewhere, through God, family and Grandbabies.
I truly enjoy all the aspects of your log, even the trials and tribulations, of late, around the stern and quarter galleries. Nothing and no one is perfect. (one exception) Your "not good enough" is good enough for about 98% of the rest of us. I know you'll achieve the solution that satisfies YOU, and that's all that matters. Take it easy on Paul, will ya. He's a friend of mine.
On another note, regarding the naysayers, God made sure there was no shortage of them, to challenge us daily. There is a great book out there, by Mel Robbins, The Let Them Theory, a good read. And, finally, to those who are envious, a quote from my Mom; "If you don't have anything nice to say, don't say anything at all."
"Endeavor to persevere", my friend. Great work, as always!


Hi Paul,A nice solution, Peter. I have a bandsaw but failed to think of it as a solution. I love how this forum provides us with these sorts of exchanges.
For the record... I have to make a countless number of fleur-de-lys... I wonder if this might be a viable option...
This is not the solution for the horse shoe shape as every individual shape is different. For the fleur the lys it can be a solution. The current result is more than perfect.
Greetings, Ken! I told the boys you were still alive and now you have proven itHi Paul, I hope all is well with you and yours! Congratulations on your 4th Grandbaby, Teddy. I have now caught up on your SP build and, as always, very impressed.
With this said, sometimes I think you are an insane, crazy person.
This hobby, for the most part is cathartic and therapeutic for me. Sometimes, when challenged, it is the reason for therapy.
Happiness and joy is found elsewhere, through God, family and Grandbabies.
I truly enjoy all the aspects of your log, even the trials and tribulations, of late, around the stern and quarter galleries. Nothing and no one is perfect. (one exception) Your "not good enough" is good enough for about 98% of the rest of us. I know you'll achieve the solution that satisfies YOU, and that's all that matters. Take it easy on Paul, will ya. He's a friend of mine.
On another note, regarding the naysayers, God made sure there was no shortage of them, to challenge us daily. There is a great book out there, by Mel Robbins, The Let Them Theory, a good read. And, finally, to those who are envious, a quote from my Mom; "If you don't have anything nice to say, don't say anything at all."
"Endeavor to persevere", my friend. Great work, as always!
. I loved the generational picture you posted - congratulations right back at you!As always, you write with great wisdom - my thanks for this.
As for the flavor of my build report: some people post in order to teach or help others, some people post only outcomes (presumably to impress the neighbors), I tend to post that the journey might be shared - the good, along with the bad, and often accompanied by whatever thought bubble happens to be occupying my head that day. Rest assured that my joy is not found in this hobby.
As for my detractors, they have mostly skulked off to that sad place of judgement that fuels their unhappiness - I pray for them often (really). One still references me (indirectly) but his level of self-deception does not appear to be redeemable. Alas...
Oh, I am familiar with Mel's books... she's a bit too me-centric for my tastes but often has some very helpful things to say that can be culled.
Glad you stopped by, Ken!

I think the new carving looks great Paul. Keep up the good work!
Thanks, Dean. BTW, your last plane turned out great! That was a nicer kit than some...I think the new carving looks great Paul. Keep up the good work!
Today's update brings this ship back to the place it was when deconstruction commenced. I'll keep it brief...
Port side:
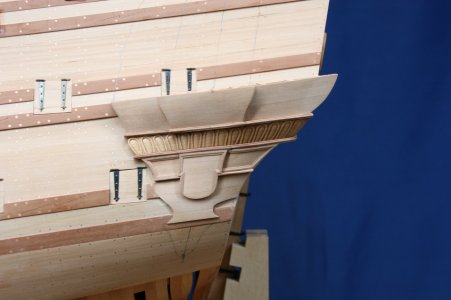
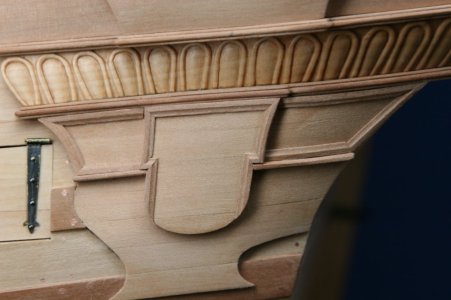
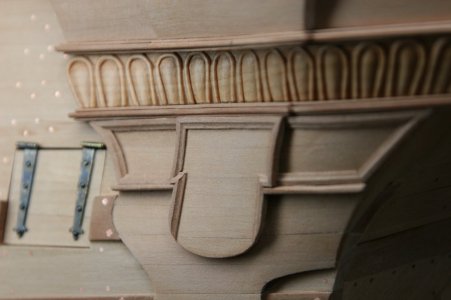
Starboard side:
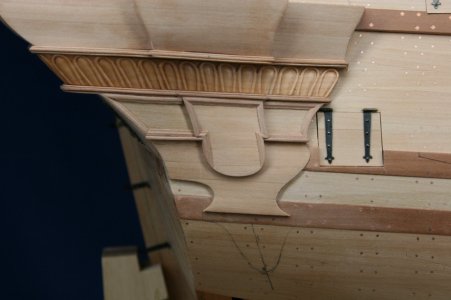
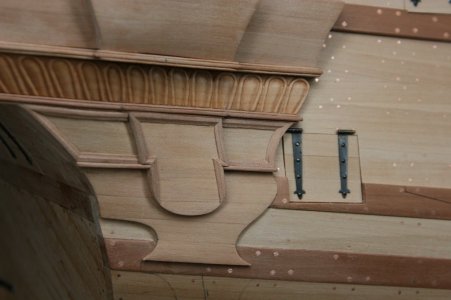
A curious observation... Here is a side-by-side comparison of the first attempt (left) and the second attempt (right).
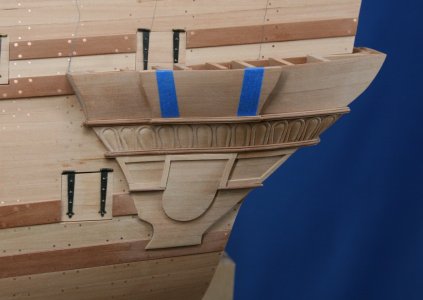
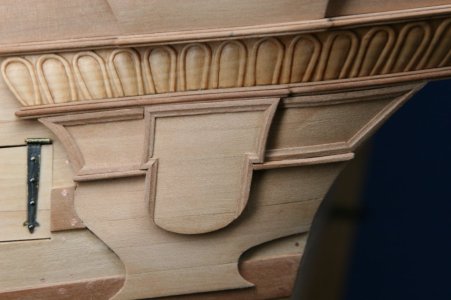
Take a look at the moldings around the raised shield and lateral to it.
At the time of the photo on the left, I was still undecided as to whether or not I was keeping that work. Indeed, I was hopeful that as more parts were added the shortcomings of that attempt would fade into the background. But somewhere in my psyche I knew this work just wasn't good enough and the effort I put in to create nice moldings was pretty pathetic.
Compare that to the effort I put in on the right.
What an odd creature I am .
Port side:
Starboard side:
A curious observation... Here is a side-by-side comparison of the first attempt (left) and the second attempt (right).
Take a look at the moldings around the raised shield and lateral to it.
At the time of the photo on the left, I was still undecided as to whether or not I was keeping that work. Indeed, I was hopeful that as more parts were added the shortcomings of that attempt would fade into the background. But somewhere in my psyche I knew this work just wasn't good enough and the effort I put in to create nice moldings was pretty pathetic.
Compare that to the effort I put in on the right.
What an odd creature I am
.
- Joined
- Oct 9, 2020
- Messages
- 2,561
- Points
- 538

Fantastic looking details. You know what they say, if you can carve, carve, if you can't 3D print.