• LUCZORAMA SHIPWRECK SCAVENGER HUNT GIVEAWAY. 4 Weeks of Fun • 1 Legendary Prize ((OcCre’s Fram Ship)) • Global Crew Welcome!
    **VIEW THREAD HERE**

L'Orenoque Mamoli 1:100 scale

What ho, shipmates!

At last! Here it comes! Yes! Yes!! YES!!!!

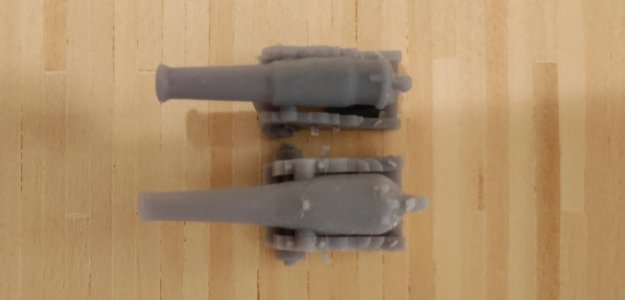
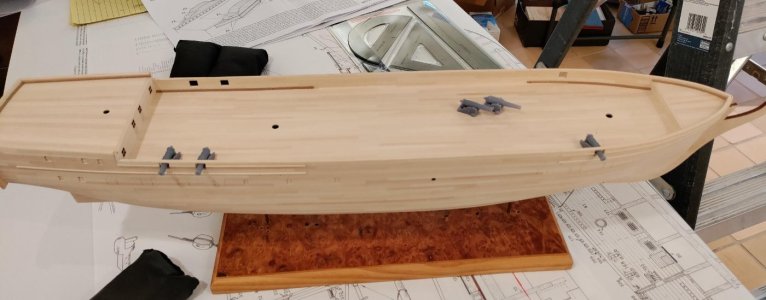
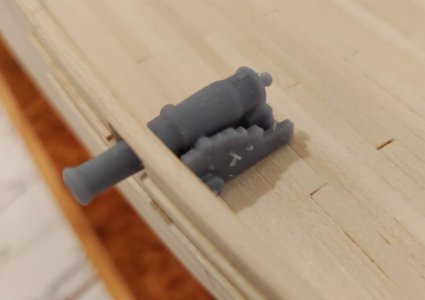
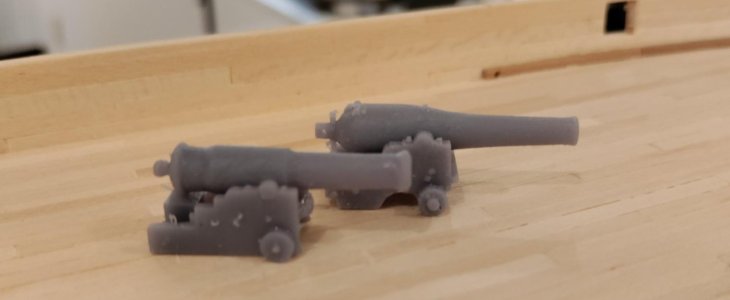
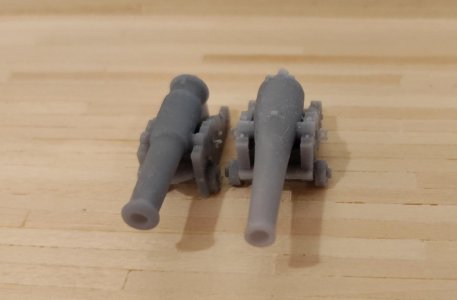
You guessed it - guns by Jerry Todd - chartered armaments manufacturer to scale governments around the world. In this case, Napoleon III's France. I give you now, for the first time in this hemisphere - Paixhans canon-obusier of 80 No. 1 22 cm shell guns. Thank you for making your magic, Jerry!!!!ExplosionExplosionExplosionExclamation-MarkGold StarGold StarGold Star Frankly, I don't know if I will ever be able to build another ship from this era without you :D!

Below a series of shots showing Jerry's IX Dahlgren and the Paixhans canon-obusier. Keep in mind the the Paixhans is 1:100 and the Dahlgren is 1:96. Aside from marvelling at the amazing detail Jerry put into these guns, it seems that the Paixhans was a very robust size gun.
LO guns 4.jpgLO guns 3.jpgLO guns 8.jpg

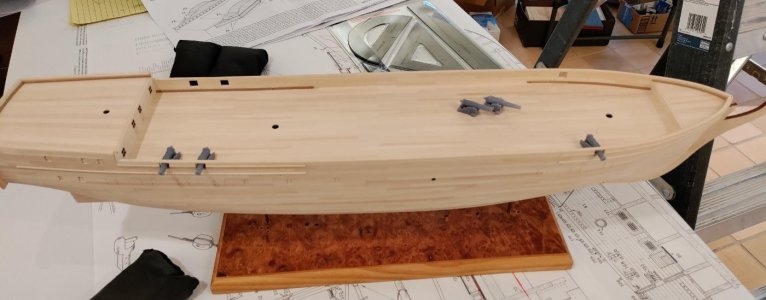
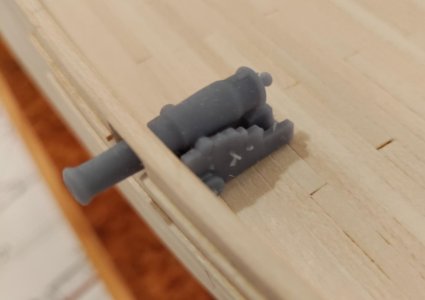
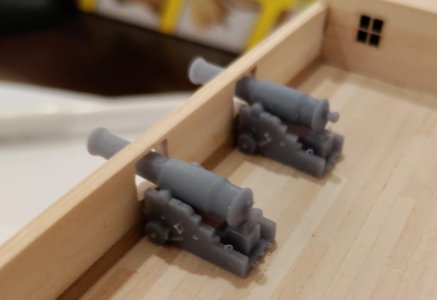
Views of the guns placed

LO guns 1.jpgLO guns 2.jpgLO guns 7 aft.jpg

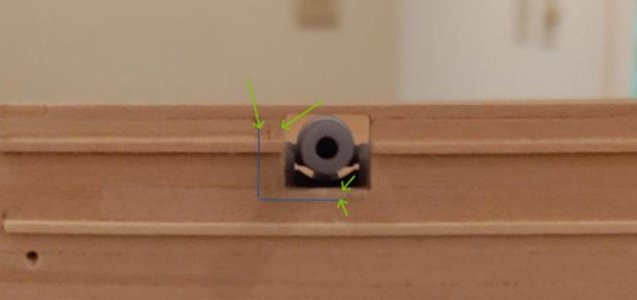
Now to get back to the crazy notion that I have any skill worth mentioning - some how, I managed to get the starboard forward port a full 1/8" off from its proper location. I didn't notice this until I placed guns in both forward ports:eek: Happily, its made of wood and can easily fixed. Also, becauseof the flairing of the muzzel on the Paixhans and their thickness at the business end, I needed to raise the height of every port 1/32" to get the guns to sit square. Glad I hadn't let my inner 8-year-old convince me to oil and paint yet.
LO guns 5 detail.jpg

Blessings. Peace. Gratitude.
Chuck

LO guns 1.jpg

LO guns 2.jpg
 
Last edited:
I've never seen a long "tube" below the seats of east for this period. However, it does give new meaning to the term "poop chute"!!! :D :D

in my limited knowledge, I though the box emptied straight down to the sea. Gravity negated the need for a messy chute or tube???

She's looking good and I look forward to seeing how you color/texture the cannons.

Thanks for sharing.
Brad! If you were the 1st Lieutenant of the ship and you were at anchor or sweating out the doldrums would you like it if gravity left all of the poop on the stem and bows ROTF

Thank's for the compliment, shipmate! I'm not sure about the color yet. Of course the tubes will be black, but I may take liberties with the carriages. Based on available data, mainly hitorical models or current models of this era in the French navy, particularly the models that have been shared in this thread, the livery inboard was white-light ochre inboard for the bulwarks, and "walls" with black for rails. This is pretty austere IMHO, almost like a tuxedo which is excellent in itself and elegant. But I usually wear a bright red flower (rose or carnation) as a boutonierre as just a little of my swagger. So, rather than painting the carriages dark wood color, which I think is accurate, I am thinking about a dark red or an olive green which, I think, may not be inaccurate. How's that for double-talkROTF With any luck one of our shipmates will see this exchange and give me some much needed advice or direction.

Blessings.
Chuck
 
Last edited:
What ho, shipmates!

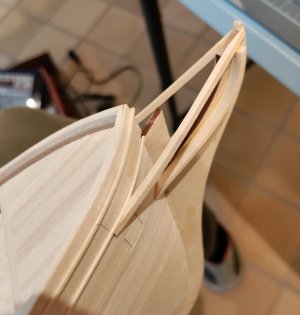
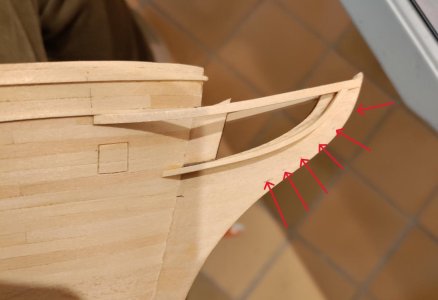
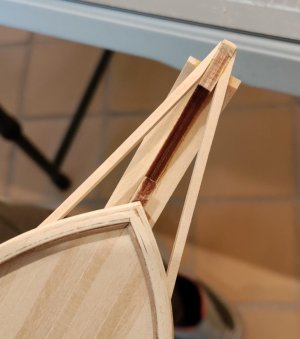
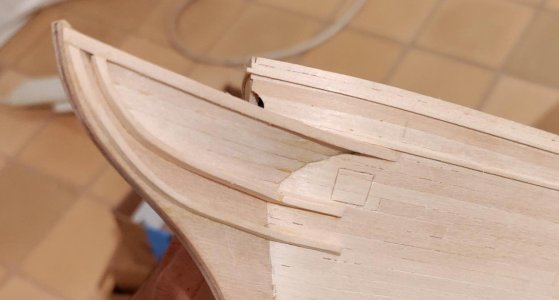
I finished the hard part of the head! Not perfect. But then, what is? I took great advantage from seeing the pics of Constellation that Jerry shared as well as his very very nice modelling of the complex curving of the planking covering the timbers between the main rail and the upper cheek.

Using L'Orenouqe's plans to determine wood dimensions, I made the main rails of 1/8" square stock and heat hent them just a bit to achieve a slight curve. The cheeks are 1/16" x 3/16". I decided to thin them once the Titebond II had dried over night - the additional width gave ne a better handle for placement. I heat bent these pieces as well. The timbers and planks are all 1/8" x 1/32" stock. I know the timbers would have been much stouter, but I couldn't get anything thicker to take the curves necessary to form the landing spots for the planks and at 1:100 scale it's a tight fit in there. Also, let's be honest, this construction will be covered with grating and will be painted black:cool:. I'm pretty happy how things came out!

LO head main rail upper cheek 1.jpg

The dotted line is the line of the lower cheek based on the plans - 1/16" in from the front of the stem.

LO head main rail upper cheek 2.jpg

LO main rail upper cheek 4.jpg

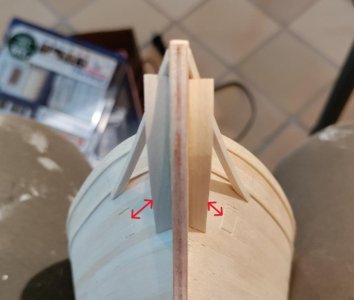
Now you can see that I bad mathROTF I don't know how I managed to get the port side forward chase port wrong. But I managed it. I'm going to measure twice cut once a lot more going forward on this build.

LO main rail upper cheek 3.jpg

LO head stbd lower.jpg

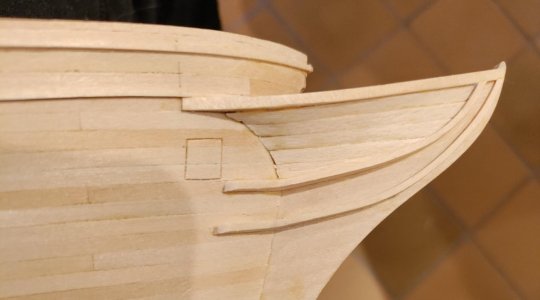
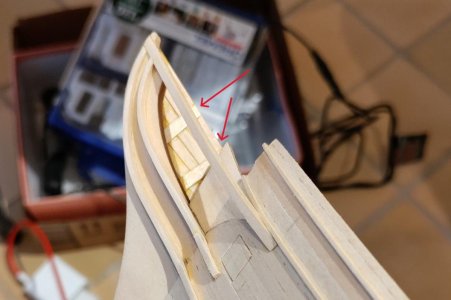
Since the starboard side isn't the money shot for display purposes, I did my experimenting on that side. Here you see 2 of 3 timbers notched into the top of the main rail. The timber farthest aft that you can't see I notche into the bottom of the rail - I really can't explain that choice. I think that choice accounts for the gap between the aft end of the top plank and the main rail. On the port side, no pics, I notched all of the timbers into the top of the rail and had better luck with the gap.

LO head port lower.jpg

Ta da!!!

LO head port lower done.jpg

Next placement of the grating - the kit part is nightmarishly thick - we'll see what happens with that. Then the upper head framing and planking and finally ornamentation. Maybe this all happens in the next couple of days!!!!! :D

Thank you for looking at this, commenting on it and mainly for contributing to it!

Blessings. Peace. Gratitude.
Chuck
 
What ho, shipmates!

I finished the hard part of the head! Not perfect. But then, what is? I took great advantage from seeing the pics of Constellation that Jerry shared as well as his very very nice modelling of the complex curving of the planking covering the timbers between the main rail and the upper cheek.

Using L'Orenouqe's plans to determine wood dimensions, I made the main rails of 1/8" square stock and heat hent them just a bit to achieve a slight curve. The cheeks are 1/16" x 3/16". I decided to thin them once the Titebond II had dried over night - the additional width gave ne a better handle for placement. I heat bent these pieces as well. The timbers and planks are all 1/8" x 1/32" stock. I know the timbers would have been much stouter, but I couldn't get anything thicker to take the curves necessary to form the landing spots for the planks and at 1:100 scale it's a tight fit in there. Also, let's be honest, this construction will be covered with grating and will be painted black:cool:. I'm pretty happy how things came out!

View attachment 533945

The dotted line is the line of the lower cheek based on the plans - 1/16" in from the front of the stem.

View attachment 533946

View attachment 533944

Now you can see that I bad mathROTF I don't know how I managed to get the port side forward chase port wrong. But I managed it. I'm going to measure twice cut once a lot more going forward on this build.

View attachment 533943

View attachment 533948

Since the starboard side isn't the money shot for display purposes, I did my experimenting on that side. Here you see 2 of 3 timbers notched into the top of the main rail. The timber farthest aft that you can't see I notche into the bottom of the rail - I really can't explain that choice. I think that choice accounts for the gap between the aft end of the top plank and the main rail. On the port side, no pics, I notched all of the timbers into the top of the rail and had better luck with the gap.

View attachment 533949

Ta da!!!

View attachment 533947

Next placement of the grating - the kit part is nightmarishly thick - we'll see what happens with that. Then the upper head framing and planking and finally ornamentation. Maybe this all happens in the next couple of days!!!!! :D

Thank you for looking at this, commenting on it and mainly for contributing to it!

Blessings. Peace. Gratitude.
Chuck
This is lovely, precise work, Chuck! Way to go!
 
Hey Chuck,

I'm totally impressed. It looks very good and also very cleanly finished. I'm totally curious to see how it looks with the paddle wheel. I'll stay tuned to your build report. Simply great!

Greetings

Günther Ship-1
 
What ho, shipmates!

I finished the hard part of the head! Not perfect. But then, what is? I took great advantage from seeing the pics of Constellation that Jerry shared as well as his very very nice modelling of the complex curving of the planking covering the timbers between the main rail and the upper cheek.

Using L'Orenouqe's plans to determine wood dimensions, I made the main rails of 1/8" square stock and heat hent them just a bit to achieve a slight curve. The cheeks are 1/16" x 3/16". I decided to thin them once the Titebond II had dried over night - the additional width gave ne a better handle for placement. I heat bent these pieces as well. The timbers and planks are all 1/8" x 1/32" stock. I know the timbers would have been much stouter, but I couldn't get anything thicker to take the curves necessary to form the landing spots for the planks and at 1:100 scale it's a tight fit in there. Also, let's be honest, this construction will be covered with grating and will be painted black:cool:. I'm pretty happy how things came out!

View attachment 533945

The dotted line is the line of the lower cheek based on the plans - 1/16" in from the front of the stem.

View attachment 533946

View attachment 533944

Now you can see that I bad mathROTF I don't know how I managed to get the port side forward chase port wrong. But I managed it. I'm going to measure twice cut once a lot more going forward on this build.

View attachment 533943

View attachment 533948

Since the starboard side isn't the money shot for display purposes, I did my experimenting on that side. Here you see 2 of 3 timbers notched into the top of the main rail. The timber farthest aft that you can't see I notche into the bottom of the rail - I really can't explain that choice. I think that choice accounts for the gap between the aft end of the top plank and the main rail. On the port side, no pics, I notched all of the timbers into the top of the rail and had better luck with the gap.

View attachment 533949

Ta da!!!

View attachment 533947

Next placement of the grating - the kit part is nightmarishly thick - we'll see what happens with that. Then the upper head framing and planking and finally ornamentation. Maybe this all happens in the next couple of days!!!!! :D

Thank you for looking at this, commenting on it and mainly for contributing to it!

Blessings. Peace. Gratitude.
Chuck
That looks very nice with all those curved parts, Chuck. Well done!
Regards, Peter
 
Back
Top