• LUCZORAMA SHIPWRECK SCAVENGER HUNT GIVEAWAY. 4 Weeks of Fun • 1 Legendary Prize ((OcCre’s Fram Ship)) • Global Crew Welcome!
    **VIEW THREAD HERE**

L'Orenoque Mamoli 1:100 scale

well, you're getting proper stuck in !;)

Certainly does have a big hole in the deck !

Everything french i've got from that period has rake to the main and mizzen, at least. You can see clearly on the new york/descartes plans , and frankly i have never seen a ship without some rake on these masts. Maybe the fore could be 90°, galeons were raked forard on this mast, but i would be inclined to give it a degree or so.
Martin! Good eye on the New Yorck/Descartes plans. The main has a slight rake and the mizzen a tad bit more. I will try to print and determine the angle.

As to the deck - next steps include thickening the structural beams to support the deck near the hole and closing the hole completely.
i had not seen these before. quite ingenious.
Yes! Shipmodell.com had the plans which clearly match the L'Orenoque plans. In fact, I will simply build the paddle wheel housing from scratch based on the historical ship. I look forward to the metal work!!!
 
Last edited:
sorry about the hospital stuff, my mistake, not sure where that came from. just troop transport and prisoners of war.
Excellent, Martin! I thought I had gone mad for a moment ROTF. In the end, although I may put the name L'Orenoque on her stern, she will combine elements of Descartes, Panama and Magellan, because I have access to historical information about how these ships looked inboard and how they were actually rigged and armed.
 
Last edited:
Welcome to the wonderful world of building Mamoli. The "Google" English translations are, as I said, practically whimsical and "spare" is the kindest word I can think of to describe their detail and complexity. Looks like they gave you (almost) enough bulkheads to create a halfway decent hull around them. The discrepancies you are discovering as you proceed with your assembly are typical of Mamoli kits. An awful lot of research and kit bashing are required (at least in all three cases in my experience) to build the ship ostensibly offered by the company, even with Dusek's considerable (and in many ways effective) efforts to improve their product line.
A lot more could be done. But they have to remain cost effective in order to stay in business. Looks like they are doing fairly well. I wish them success in a narrow, competitive and selective field.
I wish to be transparent, but not unkind. I have thought enough of their products to have a go at three, (with one more in my stash) if only because they offer ships that I want to build currently unavailable from other manufacturers.
Actually, starting from scratch would be far less challenging and frustrating in many ways. (See the build logs from the Lumberyard For model ships.) Nothing to correct first thing out of the box. At least you are in full control from the get-go.
caveat: IMHO

Pete
 
If you are set up I'll get back to my garden , for a while. Can't manage much modeling at the moment, i have to keep flying back to England to sort out my mothers estate, and when i get back the veggies are overgrown again ! i will look in when i can and if i get anything juicy i'll post it on to you. Happy modelling.
 
Welcome to the wonderful world of building Mamoli. The "Google" English translations are, as I said, practically whimsical and "spare" is the kindest word I can think of to describe their detail and complexity. Looks like they gave you (almost) enough bulkheads to create a halfway decent hull around them. The discrepancies you are discovering as you proceed with your assembly are typical of Mamoli kits. An awful lot of research and kit bashing are required (at least in all three cases in my experience) to build the ship ostensibly offered by the company, even with Dusek's considerable (and in many ways effective) efforts to improve their product line.
A lot more could be done. But they have to remain cost effective in order to stay in business. Looks like they are doing fairly well. I wish them success in a narrow, competitive and selective field.
I wish to be transparent, but not unkind. I have thought enough of their products to have a go at three, (with one more in my stash) if only because they offer ships that I want to build currently unavailable from other manufacturers.
Actually, starting from scratch would be far less challenging and frustrating in many ways. (See the build logs from the Lumberyard For model ships.) Nothing to correct first thing out of the box. At least you are in full control from the get-go.
caveat: IMHO

Pete
Pete! I hear you! I'm not set up for scratch building. So, given my interest in these sidewheel warships I have to work with and enjoy what's on offer :D. This kit will turn out great and I remain excited about building her even though there are a lot of errors that make the kit something other than a relatively accurate representation of a historical ship.

Blessings. Peace. Gratitude.
Chuck
 
If you are set up I'll get back to my garden , for a while. Can't manage much modeling at the moment, i have to keep flying back to England to sort out my mothers estate, and when i get back the veggies are overgrown again ! i will look in when i can and if i get anything juicy i'll post it on to you. Happy modelling.
Martin! Thank you for all of your input! I am pretty well set up at this point thanks to you! I am sorry to learn about your loss. I hope you are successful sorting out your mother's estate with little cost to your spirit or your pocket - I had to do the same thing back in 2009. On another note, if you stop giving your veggies steroids they won't be overgrown when you get back to themROTF

Blessings. Peace. Gratitude.
Chuck
 
What ho, shipmates!

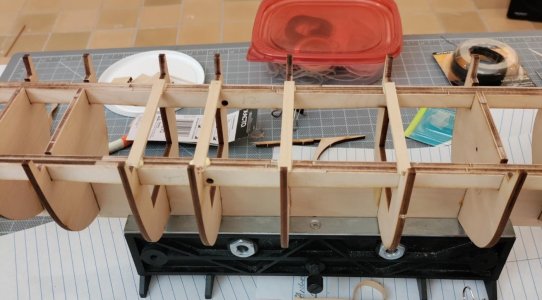
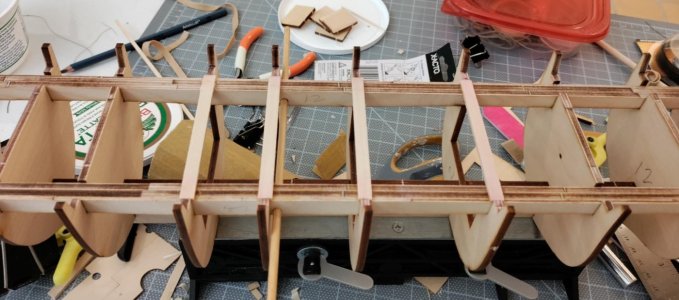
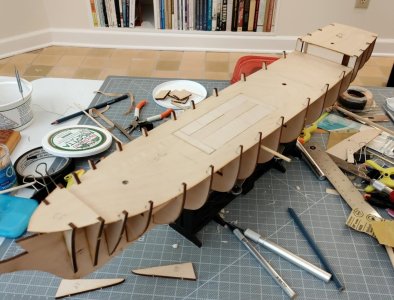
This is a really short one - too late to deal with the pictures, etc. tonight. Briefly, all of the framing is attached, the stiffening beams are attached, the additional beams to support the deck are attached, the Huge hole in the deck is closed, and I have made and attached the mast steps at the correct (I think) rakes - on that note I sincerely apologize to Mamoli/Dusek for saying that the masting instructions directed one to rake the foremast forward a bit and leave the main and mizzen at 90 degrees to the keel. The instructions actually say:

LO Masting Instructions.jpg

I took measurements from a plan for the Descartes (oddly the only plan that I have found that shows the masts raked rather than at 90 degrees to the keel) that I had printed today. Foremast rake 1 degree aft. Mainmast rake 3 degrees aft. Mizzen mast rake 4 degrees aft. I'm sure that I would have had all of the masts vertical, but my version of "slightly bent towards the poop" might have been off half a degree or so ROTF

I'll post pics of all of the fun soon - maybe even tomorrow - we'll see . . . .

Blessings. Peace. Gratitude.
Chuck
 
What ho, shipmates!

Did it ever happen to you that you got so focused on making things work regardless of the instructions that you cut off all communication with the outside world?:eek: Well, something like that happened with me on this build. I have made enough progress in making things work that I am back :). You'll be hearing all about it soon!

Blessings. Peace. Gratitude.
Chuck
 
Good morning Chuck. I can definitely relate :D. Cheers Grant
Good morning Chuck,

I'm keeping my fingers crossed for you and you'll rock it!!!
Stay on the ball and we'll be amazed at how well you've done...

Good luck and I love watching your progress.

Cheers Günther Ship-1
Grant! Thank you! In part I was mulling whether I could pull off a Grant Tyler build of this kit ala Grant's Xebec ROTF . Although my skills aren't there yet, true story, I decided to make it mine regardless of the instructions, the plans, non-existent parts, massive deviations from the available historical record and the near total absence of a historical record.:D

Gunther! I apologize for the missing umlaut. I appreciate the sentiments very much! I'm getting there. Promise! "Don't Give Up The Ship!"

Blessings. Peace. Gratitude.
Chuck
 
What ho, shipmates!

I've done my morning chores and am taking a moment to start updating you on the build before I get back to building the build!

So, what happened was . . .

It's hard to say it aloud, but I became amazingly frustrated. There are several reasons for reaching this impasse. First, the bug of historical accuracy pit me pretty hard on my Harriet Lane build. As you know, I was late to discover her plans and was ultimately able to make her resemble more closely the ship Webb designed as opposed to the ship built according to the kit instructions. Thanks to many of you, particularly Jerry @JerryTodd and Pete @Peter Gutterman, I had ready resources for a result that could not otherwise be achieved - Jerry's guns for example are simply next level! And Pete's build of the old MS Harriet Lane kit in a much small scale convinced me to be audacious with the addition of detail. So, off I went in search of plans, books, pictures. What I found told me that this kit was very far from the truth of the real ship. So far so good. Harriet Lane taught me that I could deal with the differences between the kit and the ship - so long as there is good reference material. The reference material for this class of French side wheel steam frigates is sadly thin even with the information Martin @ROUGHLY MARTIN so kindly helped source with his French connections.:)

Second, the kit is almost complete fiction. I think Pete remarked, and I'm paraphrasing, I'd be cussing a lot (true story), disappointed (true story), and in many respects involved in a demi-scratch build (true story). I must say, however, that the bones for an accurate model are there. My scaled plans of the actual ship fit right over the kit plans with near perfection. That, however, is as good as it gets. Nevertheless, the instructions in English verge on nonsense where they exist. The illustrations are not particularly helpful and . . .:eek::eek::eek:

Finally, bet you thought I'd never stop this rant, I really, really, really dislike working with plywood! There is quite a bit of fairing to do for and aft on this kit. The frames have no markings to indicate the faring points - very old school use of a plank to see if it lays properly. Okay. Can do. BUT that plywood is terrible stuff to fair IMHO. No blade I used seemed sharp enough and trying to sand it on the hull by hand was taking years off my life. Okay. Basta! You get the picture.

So, I plunged forward (after swallowing a lot of bile) and ended up deciding that I will make her as good as I can with what I have!:D

Blessings. Peace. Gratitude.
Chuck
 
Last edited:
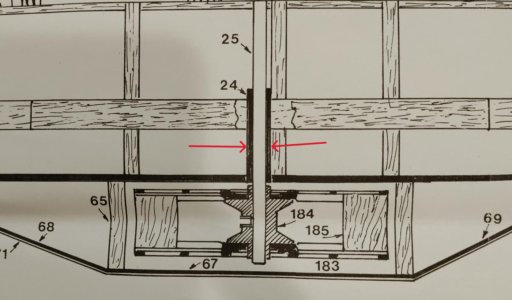
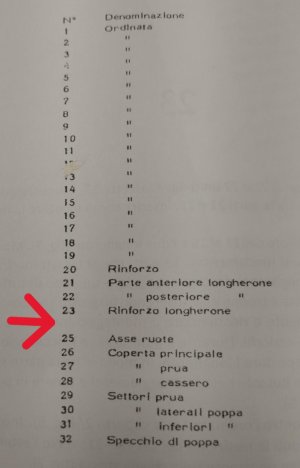
In this kit parts on the wooden fret are numbered on the plans, but not on the parts themselves. So, transfer the info from the plans to the parts. Check! Next, according to the instructions, the build proceeds in order of part number. Check! Parts 1 - 23 get you to the point where the keel is assembled, the frames are aboard, and the structural beams are aboard. Check! On this kit, the paddle wheel's are complete wheels set on an axel that passes through holes in the structural beams (make sure these are properly aligned!). That axel is part 25. The instructions refer to a "bushing" called "part 24." So, I began looking for "part 24." I'm not saying that the search for "part 24" stalled the build, but it really bothered me. "Part24" appeared on the plans as a further support for the ends of the axel just behind the planking. On the other hand, the parts list doesn't list a "part 24"

This gives some idea of the quality of the instructions.

Part 24 a.jpg
Part 24b.jpg

So, despite the instructions and the plans. "Part 24" does not exist - at least as far as the parts list is concernedROTF

Part 24 c.jpg

So, I decided to get by without "part 24." I don't think it is a necessary part. The axel is very stiff and fits through the holes in the structural beams and in the hull planking without problem. So if you find yourself building this kit, like the parts list, just skip "part 24" and move on.:cool:
 
Ah, Chuck ! Some years ago a nice chap bought me a Cutty Sark kit for christmas. A very generous gift ! But as my second ever build,(and first for twenty years) highly unsuitable ! A crazy scale to start with,1/115, for such a complex build, i would never have bought it myself.
This was the ship that taught me to NEVER trust the slightest piece of information in a kit form ! It also taught me the frustration of building a ship from the "age of photography" and still in existance, as these horrible subjects have to be built perfectly as we can compare them to the originals ! I now much prefer something from an age where there is a bit of leeway in the information as i can relax and enjoy the build instead of restarting for the sixth time because a new photo turns up !
Sometimes i build complete fantasy, sometimes do the best i can, but i know now that i build representations , and not reproductions. I am an artist rather than an artisan. And no less proud of it.
One thing i have also learned is that French subjects are a case apart. The english ships almost always have admiralty plans available somewhere on line but if you live in france you get used to their filing system , and i have learned to stop looking when nothing turns up as you are off down the rabbithole with no magic potion !
So, my humble advice is build it as you see it, remember that no-one will be taking a tour of the L'Orenoque in drydock nowadays, and enjoy your beautiful steamship build !
 
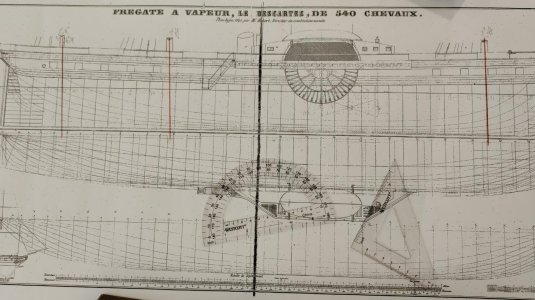
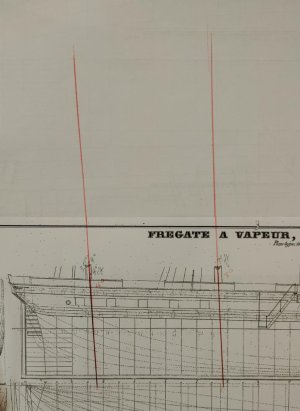
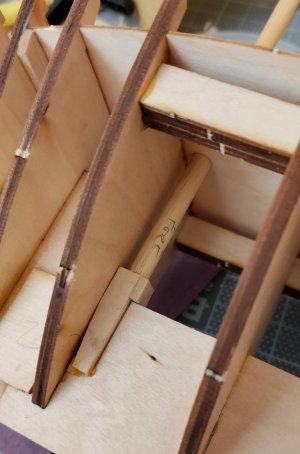
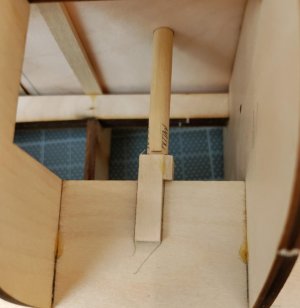
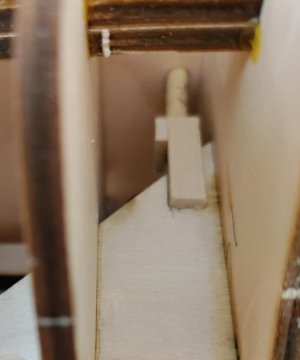
I'm not going into detail about the mystery of the rake of the masts - here's how I determined the rake and what I did to make sure that the masts had steps so that once aboard they would keep their angles:

First pick is a plan of the Descartes showing the rake of her masts. Again - strange to me that no other plans I could find including L'Orenoque show the rake. Second pic shows the relative extremity of the rake, particularly the mizzen.

LO mast rake Descartes.jpgLO mast rake Descartes 1.jpg

Future builders - be sure to build the mast steps! The instructions say nothing about this necessary connection point to make sure that the masts take the correct angle of rake and maintain it. The steps also secure the masts to the keel. Otherwise, what? You put a bunch of glue through the hole in the deck and hope for the best?LO mast step fore.jpgLO mast step main.jpgLO Mast step mizzen.jpg


LO Mast step mizzen.jpg

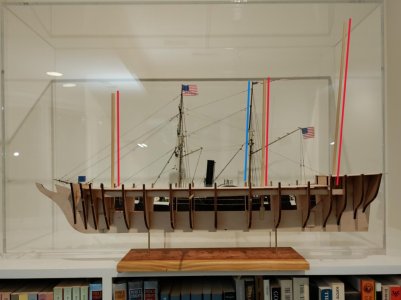
Here's what it looks like all aboard. The red lines are to help see the masts. L'O is in front of Harriet Lane. The are set at almost the same height and you get a good idea of how much bigger L'O was. The blue line helps see that the rake of Harriet Lane's main and L'O's main are very similar.


LO masts aboard.jpg
 
Ah, Chuck ! Some years ago a nice chap bought me a Cutty Sark kit for christmas. A very generous gift ! But as my second ever build,(and first for twenty years) highly unsuitable ! A crazy scale to start with,1/115, for such a complex build, i would never have bought it myself.
This was the ship that taught me to NEVER trust the slightest piece of information in a kit form ! It also taught me the frustration of building a ship from the "age of photography" and still in existance, as these horrible subjects have to be built perfectly as we can compare them to the originals ! I now much prefer something from an age where there is a bit of leeway in the information as i can relax and enjoy the build instead of restarting for the sixth time because a new photo turns up !
Sometimes i build complete fantasy, sometimes do the best i can, but i know now that i build representations , and not reproductions. I am an artist rather than an artisan. And no less proud of it.
One thing i have also learned is that French subjects are a case apart. The english ships almost always have admiralty plans available somewhere on line but if you live in france you get used to their filing system , and i have learned to stop looking when nothing turns up as you are off down the rabbithole with no magic potion !
So, my humble advice is build it as you see it, remember that no-one will be taking a tour of the L'Orenoque in drydock nowadays, and enjoy your beautiful steamship build !
Martin! Brilliantly said! Thank you for the reminder - I am indeed trying to make art.

Blessings.
Chuck
 
I wonder why masts would need to be glued in place. Mast steps I get, not the masts
Jerry! I get your point. These fit quite snugly in their steps and the masts are in line and properly raked. The shrouds should do the work of holding them down without glue. Nevertheless, I glue them in the steps and at the deck - I don't trust myself not to dislodge them during the rigging process. ROTF

Blessings.
Chuck
 
Finally - fixing the unnecessary hole in the deck.

Unless you're planning to motorize the paddle wheels, the huge rectangular hole in the deck and the way the frames under the hole are cut out serve no purpose that I can tell. There is a large deckhouse, according to the kit, that covers this hole. But still, why such a big hole with no support for the structure you're supposed to cover the hole with?

In my case these mysteries (I know one of you will say the explanation is cost of manufacturing the kit ROTF) need no answer. I'm not including the fictional deck house complex. So - close the hole and install support beams for the deck.

LO hole beams 1.jpgLO hole beams 2.jpg

I was able to piece together enough material from the leftovers of frets of the same thickness as the deck. I used some left over material 1/32" thick material from Harriet Lane as backing for the upper layer. BTW - you probably already know, but one should keep the "excess" material from earlier kits (unless it's plywood:mad: ) because it might come in handy in some future build;)

LO deck hole closed.jpg
 
Back
Top