Still looks great and very clean. I am not sure if I can match you and our polish friend WEEL DONE MATES.an update: I wrapped up the bow. the grate on that took me hours and hours and I still need to loop back and do some repair work. So I'm giving it a break and started working on the deck features. Fiddly but fun.
View attachment 221032View attachment 221033

-

SUBSCRIBE TO SHIPS IN SCALE TODAY!
The beloved Ships in Scale Magazine is back and charting a new course for 2026!
Discover new skills, new techniques, and new inspirations in every issue.
NOTE THAT OUR NEXT ISSUE WILL BE July/August 2026 -

Win a Free Custom Engraved Brass Coin!!!
As a way to introduce our brass coins to the community, we will raffle off a free coin during the month of August. Follow link ABOVE for instructions for entering.
You are using an out of date browser. It may not display this or other websites correctly.
You should upgrade or use an alternative browser.
You should upgrade or use an alternative browser.
Montanes by OcCre 1:70
- Thread starter Scott Shilling
- Start date
- Watchers 27

Time for an update. I have been focused on the deck equipment and features. Grates, posts, railings etc... This evening I want to try to get all of this finish to free me up to tackle the officers quarters over the weekend. The wife is going to go be staining those posts on the second deck today and doing some touch up in other areas. I need to fix the bell holder. It's a bit crooked. Typical me, I was so focused on getting the base flat on the lower deck that I did not notice that it was not quite straight up and down. Oh well.
For those if us that are a little older. Remember the song "They're going to take me away". In the end I think I'll just go check myself in!!!
We are really liking the Red Chestnut stain. So much so we made the decision to use it for the masts and yards.
Here are some deck pics:


For those if us that are a little older. Remember the song "They're going to take me away". In the end I think I'll just go check myself in!!!
We are really liking the Red Chestnut stain. So much so we made the decision to use it for the masts and yards.
Here are some deck pics:
Weekend update. Work continues on the deck.
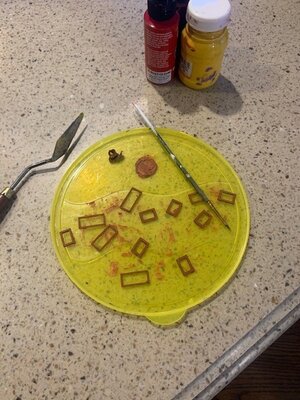
Officers quarters started. It took my wife 4 hours and two revisions to get the decorative painting done on the brass back plate. I see that older versions of this model had a much more detailed feature. Our version is a bit disappointing. She found that if you just painting the entire thing black then use the other end of a paint brush to essentially scrape the back paint off to expose the brass worked best. That initial twist I had in the frame showed it head once again, and made gluing the back plate on a challenge.
Got the little aft cabins done. No real issues there.
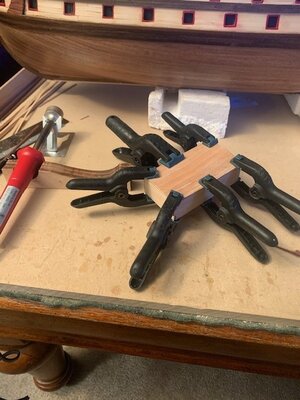
Starting working on the primary deck cabin. It's going well. I decided to but on some pine strips for the roof. We'll see what that looks like once it's varnished.
This evening I'll finish the cabin.


Officers quarters started. It took my wife 4 hours and two revisions to get the decorative painting done on the brass back plate. I see that older versions of this model had a much more detailed feature. Our version is a bit disappointing. She found that if you just painting the entire thing black then use the other end of a paint brush to essentially scrape the back paint off to expose the brass worked best. That initial twist I had in the frame showed it head once again, and made gluing the back plate on a challenge.
Got the little aft cabins done. No real issues there.
Starting working on the primary deck cabin. It's going well. I decided to but on some pine strips for the roof. We'll see what that looks like once it's varnished.
This evening I'll finish the cabin.
Attachments
Time for an update. I have been focused on the deck equipment and features. Grates, posts, railings etc... This evening I want to try to get all of this finish to free me up to tackle the officers quarters over the weekend. The wife is going to go be staining those posts on the second deck today and doing some touch up in other areas. I need to fix the bell holder. It's a bit crooked. Typical me, I was so focused on getting the base flat on the lower deck that I did not notice that it was not quite straight up and down. Oh well.
For those if us that are a little older. Remember the song "They're going to take me away". In the end I think I'll just go check myself in!!!
We are really liking the Red Chestnut stain. So much so we made the decision to use it for the masts and yards.
Here are some deck pics:
View attachment 221622View attachment 221623View attachment 221624View attachment 221625
will come back laterWeekend update. Work continues on the deck.
Officers quarters started. It took my wife 4 hours and two revisions to get the decorative painting done on the brass back plate. I see that older versions of this model had a much more detailed feature. Our version is a bit disappointing. She found that if you just painting the entire thing black then use the other end of a paint brush to essentially scrape the back paint off to expose the brass worked best. That initial twist I had in the frame showed it head once again, and made gluing the back plate on a challenge.
Got the little aft cabins done. No real issues there.
Starting working on the primary deck cabin. It's going well. I decided to but on some pine strips for the roof. We'll see what that looks like once it's varnished.
This evening I'll finish the cabin. View attachment 222523View attachment 222524View attachment 222525View attachment 222528View attachment 222529
Finished up the deck cabin last night. OcCre did not provide enough of the door frames so I had to manufacture a couple using some 1mm by 1mm sapeli. Tonight I think I'll put on some 1 X 3 limewood decking on the back side of the rear plate and we'll start building the cannon port doors.
For the cannon port doors, I was checking out how others handled the hinges, particularly how they connected them to the hull. Most people just bent the back end a bit and called it good, Bilal on the other hand is clearly in a class of his own here. Even looking at his incredible close ups of his jig I am still not real sure how to do this. AND, there are no extra hinges to play around with.
I also agree with most others that just having them wide open is not the way to go. So we'll keep them horizontal.
Good fun stuff
It looks very clean and well builds, Only the deckhouse windows and doors are somewhat out of scale. I did not use them, as well as Mirek Poland-but a well build anyhowFinished up the deck cabin last night. OcCre did not provide enough of the door frames so I had to manufacture a couple using some 1mm by 1mm sapeli. Tonight I think I'll put on some 1 X 3 limewood decking on the back side of the rear plate and we'll start building the cannon port doors.
For the cannon port doors, I was checking out how others handled the hinges, particularly how they connected them to the hull. Most people just bent the back end a bit and called it good, Bilal on the other hand is clearly in a class of his own here. Even looking at his incredible close ups of his jig I am still not real sure how to do this. AND, there are no extra hinges to play around with.
I also agree with most others that just having them wide open is not the way to go. So we'll keep them horizontal.
Good fun stuff
View attachment 222747


Started the cannon door assembly line. After studying Bilal's approach to these I decided to do mine exactly the same ") , sans jigs. I'll eyeball them. Luckily I have a set of needle nose pliers that are indeed "needle" nose. The tip is small enough that I can create the end with ease. We'll get them finished this evening and hopefully a few of them actually mounted on the boat.
, sans jigs. I'll eyeball them. Luckily I have a set of needle nose pliers that are indeed "needle" nose. The tip is small enough that I can create the end with ease. We'll get them finished this evening and hopefully a few of them actually mounted on the boat.
A couple pics below.


, sans jigs. I'll eyeball them. Luckily I have a set of needle nose pliers that are indeed "needle" nose. The tip is small enough that I can create the end with ease. We'll get them finished this evening and hopefully a few of them actually mounted on the boat.A couple pics below.
Continuing with Cannon port doors. These things take a ton of time. Mostly adding the nail heads, the hinge holes need to be drilled out and inserting the nail heads is fiddly. Only 112 more to go. Last night I was tinkering around trying to figure out a good way to build them but when it gets down to it ya just gotta slog through. Tonight I'll try to get 10 more done then another ten tomorrow night.
I'll need to order more of the eye rings. According to the inventory there should be 140 of these. Of which we'll need 30 of them for the doors. This is over and above what the instructions require.
Another task for this evening is hunting down one of the hinges as it got away from me and flew off on it's own adventure.
Couple pics below
Well - this is my last post for the next 4 to 6 weeks. Tomorrow I am heading over to the VA for a much needed shoulder operation. A reverse total replacement. It's a pretty big operation that will have me one armed for a while. I am paying for my athletic youth for sure. I tossed in a picture below.
Boat Report:
Over the last couple of days I managed to get all of the cannon doors completed. Sheesh!! That took me three times longer then I figured it wood. But they are done and look pretty good on the boat. I still need to get the ropes finalized but that will have to wait.
We purchased some black metallic paint for the cannons. It looks great!! I see that I need to re-varnish the sapeli on the aft section.
And with that folks I am signing off for a while. I'll pop back on in a day or two to let everyone know how it went. But in the mean time the model is covered up and put away.
I'll be back

We are praying for your successful surgery and fast recovery thereafter! Good luck!
Get well soon, Scott. I wish you a fast recovery thereafter.Well - this is my last post for the next 4 to 6 weeks. Tomorrow I am heading over to the VA for a much needed shoulder operation. A reverse total replacement. It's a pretty big operation that will have me one armed for a while. I am paying for my athletic youth for sure. I tossed in a picture below.
Boat Report:
Over the last couple of days I managed to get all of the cannon doors completed. Sheesh!! That took me three times longer then I figured it wood. But they are done and look pretty good on the boat. I still need to get the ropes finalized but that will have to wait.
We purchased some black metallic paint for the cannons. It looks great!! I see that I need to re-varnish the sapeli on the aft section.
And with that folks I am signing off for a while. I'll pop back on in a day or two to let everyone know how it went. But in the mean time the model is covered up and put away.
I'll be back
View attachment 224048View attachment 224049View attachment 224050View attachment 224052View attachment 224051
Hey Scott, Praying for a successful operation and smooth recovery. One handed boat building is not a thing.
Wish you all the best and a fast recovery
- Joined
- Oct 15, 2017
- Messages
- 1,197
- Points
- 443

Yes, sir, that is some major hardware in that illustration. I ended up with 2 new knees, courtesy of my college football days, but no pain at all any longer. I hope yours does as well. Get well mate! On another note, your project looks super, clean and well executed.Well - this is my last post for the next 4 to 6 weeks. Tomorrow I am heading over to the VA for a much needed shoulder operation. A reverse total replacement. It's a pretty big operation that will have me one armed for a while. I am paying for my athletic youth for sure. I tossed in a picture below.
Boat Report:
Over the last couple of days I managed to get all of the cannon doors completed. Sheesh!! That took me three times longer then I figured it wood. But they are done and look pretty good on the boat. I still need to get the ropes finalized but that will have to wait.
We purchased some black metallic paint for the cannons. It looks great!! I see that I need to re-varnish the sapeli on the aft section.
And with that folks I am signing off for a while. I'll pop back on in a day or two to let everyone know how it went. But in the mean time the model is covered up and put away.
I'll be back
View attachment 224048View attachment 224049View attachment 224050View attachment 224052View attachment 224051
Hello everyone - thanks for the nice comments. Here's an update:
Got through the surgery just fine with the doctors telling me that all went well and that I should expect a full recovery in just a few months. I am officially off the oxy and seems that indeed my movement is growing and the pain is certainly subsiding. But - a secondary issue popped up that I was not anticipating - terribly clogged plumbing!!! Sheesh.
On a side note: It looks like the CA glue was making me ill. !! At first I thought I just had a cold that would not go away or maybe some sort of allergy. Nope - it was the glue. Anyone else have an issue like this. I'll be switching to white glue once I start up again. And if I need CA I'll make sure the ventilate the daylights out of the room.
Scott
Glad to hear that your surgery went well. Ship building should be good therapy when the time comes.
Happy to hear that you're ok Scot.Hello everyone - thanks for the nice comments. Here's an update:
Got through the surgery just fine with the doctors telling me that all went well and that I should expect a full recovery in just a few months. I am officially off the oxy and seems that indeed my movement is growing and the pain is certainly subsiding. But - a secondary issue popped up that I was not anticipating - terribly clogged plumbing!!! Sheesh.
On a side note: It looks like the CA glue was making me ill. !! At first I thought I just had a cold that would not go away or maybe some sort of allergy. Nope - it was the glue. Anyone else have an issue like this. I'll be switching to white glue once I start up again. And if I need CA I'll make sure the ventilate the daylights out of the room.
Scott
Glad to know about successful surgery. Wishing you a fast recovery!