Oh my, but your negotiation skills are so large, you will succeedI had a chat with the Admiral about that scenario. She took a moment to think about it and
-

Win a Free Custom Engraved Brass Coin!!!
As a way to introduce our brass coins to the community, we will raffle off a free coin during the month of August. Follow link ABOVE for instructions for entering.
-

PRE-ORDER SHIPS IN SCALE TODAY!
The beloved Ships in Scale Magazine is back and charting a new course for 2026!
Discover new skills, new techniques, and new inspirations in every issue.
NOTE THAT OUR FIRST ISSUE WILL BE JAN/FEB 2026
You are using an out of date browser. It may not display this or other websites correctly.
You should upgrade or use an alternative browser.
You should upgrade or use an alternative browser.
Nikitin San Bartolome 1584 A.D. (Kit #35)
- Thread starter Pathfinder65
- Start date
- Watchers 85
Indeed, those are skills developed over the years.Oh my, but your negotiation skills are so large, you will succeed
- Joined
- Jan 9, 2020
- Messages
- 10,566
- Points
- 938

Oops!I had a chat with the Admiral about that scenario. She took a moment to think about it and
I think that means noon the Dining room table
Oh well I have another year or so on this build, there is a lot of time for further negotiations

Wow, what a great weekend, currently 91F/33C and not a cloud in the sky. Great excuse to work in the shipyard
Just finishing up the Latrine wale.
Three planks laminated together. The bow potion by the Latrine grate has a very interesting "S" bend. I bent the curves on each piece and clamped them in place individually to dry before the final gluing process began.
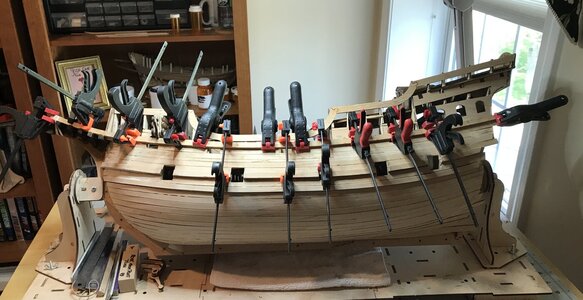
I think I'm using about 70% of my clamp inventory. I plan to cut out the gunport openings later this afternoon.
Jan
Just finishing up the Latrine wale.
Three planks laminated together. The bow potion by the Latrine grate has a very interesting "S" bend. I bent the curves on each piece and clamped them in place individually to dry before the final gluing process began.

I think I'm using about 70% of my clamp inventory. I plan to cut out the gunport openings later this afternoon.
Jan
Good morning Jan…are you all “clamped” out?Wow, what a great weekend, currently 91F/33C and not a cloud in the sky. Great excuse to work in the shipyard
Just finishing up the Latrine wale.
Three planks laminated together. The bow potion by the Latrine grate has a very interesting "S" bend. I bent the curves on each piece and clamped them in place individually to dry before the final gluing process began.
View attachment 376641
I think I'm using about 70% of my clamp inventory. I plan to cut out the gunport openings later this afternoon.
Jan
Lucky you 33C- my kind of weather. Down South here we are in full winter, it came early this year - cold fronts, rain, wind and 15c (cold for me…..freezing
 …not for you guys I know but us South Africans like it hot! ).
Cheers Grant
- Joined
- Nov 30, 2022
- Messages
- 132
- Points
- 113

Great jobWow, what a great weekend, currently 91F/33C and not a cloud in the sky. Great excuse to work in the shipyard
Just finishing up the Latrine wale.
Three planks laminated together. The bow potion by the Latrine grate has a very interesting "S" bend. I bent the curves on each piece and clamped them in place individually to dry before the final gluing process began.
View attachment 376641
I think I'm using about 70% of my clamp inventory. I plan to cut out the gunport openings later this afternoon.
Jan
She is looking great Jan 

I agree with our colleagues - this is really nice work Jan!
@pingu57, @GrantTyler, @giocomail, thank you for the comments.
@GrantTyler, Not to make you feel bad but I did float in our pool for a bit in the yesterday afternoon. Today is supposed to be the same as yesterday. Big family day today, Barbecue and time on the pool patio.
@GrantTyler, Not to make you feel bad but I did float in our pool for a bit in the yesterday afternoon. Today is supposed to be the same as yesterday. Big family day today, Barbecue and
 time on the pool patio.
Thanks for the compliment.I agree with our colleagues - this is really nice work Jan!
- Joined
- Nov 30, 2022
- Messages
- 132
- Points
- 113

Excellent workmanshipThe Latrine end crosspiece.
View attachment 376778
View attachment 376779
The dimensions on the Latrine crosspiece are 30x4x7.7mm. The photos also show the neat “S” bend of the Wale.
Good morning Jan. I am jealous.@pingu57, @GrantTyler, @giocomail, thank you for the comments.
@GrantTyler, Not to make you feel bad but I did float in our pool for a bit in the yesterday afternoon. Today is supposed to be the same as yesterday. Big family day today, Barbecue andtime on the pool patio.
THOSE PESKY GUNPORTS.
Step #1, assemble and sand into shape the gunport housing.
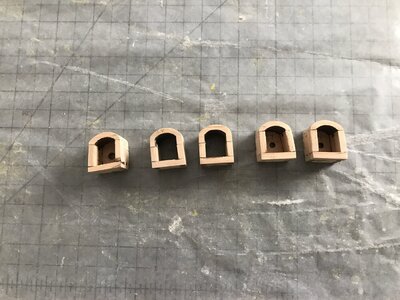
Step #2, place the plank, cut out out the space for the bottom of the gunport housing and dry fit the housing.
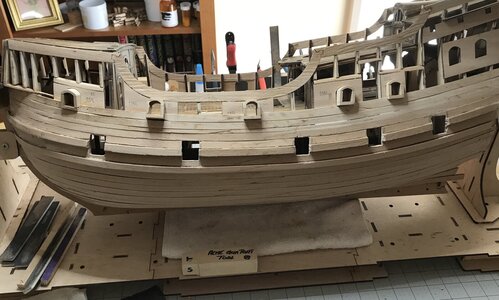
Step #3, place the upper wale (three pieces laminated) and cut, fit, whack at, file and sand the gunport openings and finally dry fit gunport housings.
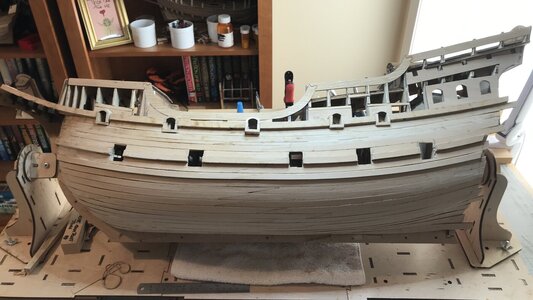
Step #4, place the next two upper planks and YUP, cut, fit, sand, whack at, file the upper portion of the gunport openings. Then dry fit the “whatchamacallits”.
Step #5, go to bank and get two rolls of Quarters. I owe the “Bad Word” jar big time. Probably should get four rolls of Quarters, because the Starboard side is next on the agenda.
Jan
Step #1, assemble and sand into shape the gunport housing.

Step #2, place the plank, cut out out the space for the bottom of the gunport housing and dry fit the housing.

Step #3, place the upper wale (three pieces laminated) and cut, fit, whack at, file and sand the gunport openings and finally dry fit gunport housings.

Step #4, place the next two upper planks and YUP, cut, fit, sand, whack at, file the upper portion of the gunport openings. Then dry fit the “whatchamacallits”.
Step #5, go to bank and get two rolls of Quarters. I owe the “Bad Word” jar big time. Probably should get four rolls of Quarters, because the Starboard side is next on the agenda.
Jan
- Joined
- Nov 30, 2022
- Messages
- 132
- Points
- 113

THOSE PESKY GUNPORTS.
Step #1, assemble and sand into shape the gunport housing.
View attachment 377131
Step #2, place the plank, cut out out the space for the bottom of the gunport housing and dry fit the housing.
View attachment 377132
Step #3, place the upper wale (three pieces laminated) and cut, fit, whack at, file and sand the gunport openings and finally dry fit gunport housings.
View attachment 377133
Step #4, place the next two upper planks and YUP, cut, fit, sand, whack at, file the upper portion of the gunport openings. Then dry fit the “whatchamacallits”.
Step #5, go to bank and get two rolls of Quarters. I owe the “Bad Word” jar big time. Probably should get four rolls of Quarters, because the Starboard side is next on the agenda.
Jan
Good morning Jan. Wow she is evolving into a stunning galleon. You must be chuffed how she is coming out. Full bad word jars and all. Just a note- for every one bad word jar you have I am allowed 19.7 using the Rand/dollar conversion.Gives me way more cussing latitudeTHOSE PESKY GUNPORTS.
Step #1, assemble and sand into shape the gunport housing.
View attachment 377131
Step #2, place the plank, cut out out the space for the bottom of the gunport housing and dry fit the housing.
View attachment 377132
Step #3, place the upper wale (three pieces laminated) and cut, fit, whack at, file and sand the gunport openings and finally dry fit gunport housings.
View attachment 377133
Step #4, place the next two upper planks and YUP, cut, fit, sand, whack at, file the upper portion of the gunport openings. Then dry fit the “whatchamacallits”.
Step #5, go to bank and get two rolls of Quarters. I owe the “Bad Word” jar big time. Probably should get four rolls of Quarters, because the Starboard side is next on the agenda.
Jan
 . Cheers Grant
Just a note- for every one bad word jar you have I am allowed 19.7 using the Rand/dollar conversion.Gives me way more cussing latitude. Cheers Grant
 That is funny. Maybe I should consider other currency conversions, could be a money saver
Good morning Jan. Wow she is evolving into a stunning galleon. You must be chuffed how she is coming out.
Yup, I can see the galleon coming together as I add planks. The forecast for the weekend is terrible for the outdoors. Heavy rain, high winds for Friday, Saturday and Sunday. Up to 4 inches / 10+mm of rain forecast. So the bad word jar will get a workout.
Jan
Another head scratcher moment.
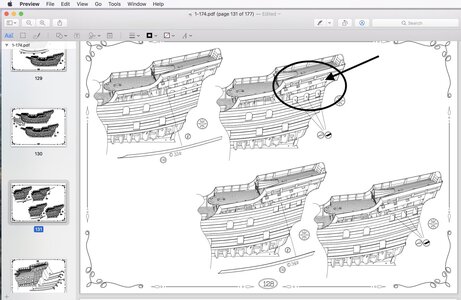
Trying to follow the video for marking the beam holes on plank #38 (Arrow). The plank fits over the openings off the beam holes (circle). BUT the holes are smaller than the dimensions of the beams.
@giocomail. How did you solve this part???
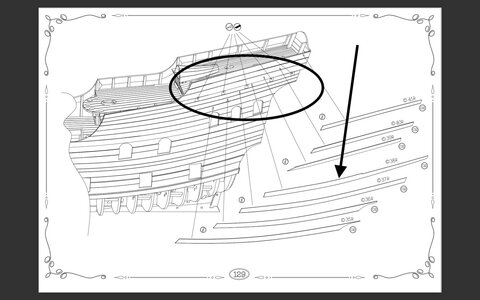
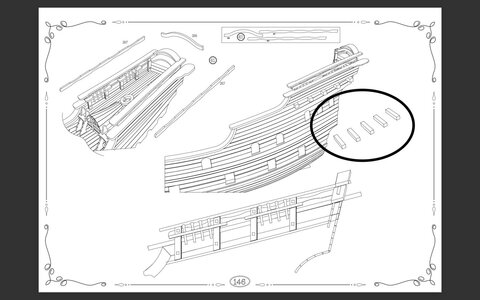
This build plan shows the beams "cut short" and not passing all the way through the hull. Previous plans show the beams inserted trough the hull.
So ..... ????
Jan
Trying to follow the video for marking the beam holes on plank #38 (Arrow). The plank fits over the openings off the beam holes (circle). BUT the holes are smaller than the dimensions of the beams.
@giocomail. How did you solve this part???

This build plan shows the beams "cut short" and not passing all the way through the hull. Previous plans show the beams inserted trough the hull.
So ..... ????


Jan
@GrantTyler. I meant to mention the weather this weekend. Last weekend it was in the 90'sF/32C, today it's almost 45F/7C and alternating between high wind bursts, heavy rain and Thunder noises. Good excuse to be in the shipyard, Eh.
The Forecastle planking completed on the Port side.
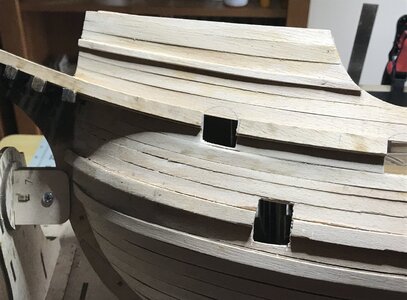
Final sanding has to wait until all the planking and framing the of gunports is done.
Jan
The Forecastle planking completed on the Port side.

Final sanding has to wait until all the planking and framing the of gunports is done.
Jan


