-

Win a Free Custom Engraved Brass Coin!!!
As a way to introduce our brass coins to the community, we will raffle off a free coin during the month of August. Follow link ABOVE for instructions for entering.
-

PRE-ORDER SHIPS IN SCALE TODAY!
The beloved Ships in Scale Magazine is back and charting a new course for 2026!
Discover new skills, new techniques, and new inspirations in every issue.
NOTE THAT OUR FIRST ISSUE WILL BE JAN/FEB 2026
You are using an out of date browser. It may not display this or other websites correctly.
You should upgrade or use an alternative browser.
You should upgrade or use an alternative browser.
Nikitin San Bartolome 1584 A.D. (Kit #35)
- Thread starter Pathfinder65
- Start date
- Watchers 85
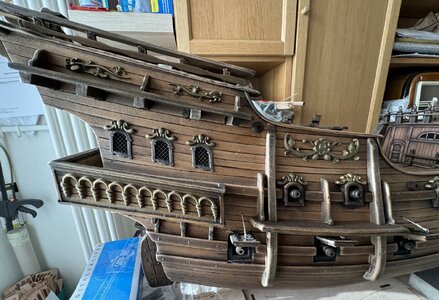
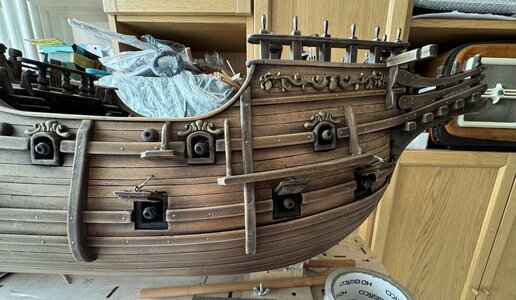
Wow, that looks superb. Nicely done. Masts and yardarms next???
Jan
Jan
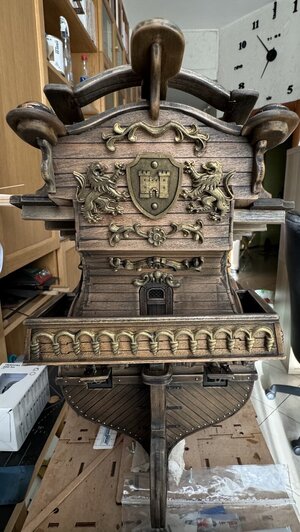
VERY nicely done! Love the brass look on the stern decorations too! Are they brass or painted? If painted, what did you use? I'd like that look on the carvings of my Granado.
- Joined
- Nov 30, 2022
- Messages
- 132
- Points
- 113

Thanks. This is precisely the problem, from the manual it is not clear how to proceed to build masts and yardarmsWow, that looks superb. Nicely done. Masts and yardarms next???
Jan
- Joined
- Nov 30, 2022
- Messages
- 132
- Points
- 113

Thanks. These are the resin decorations supplied with the kit, painted with an airbrush using Vallejo Old Gold paint and treated with a Vallejo black washVERY nicely done! Love the brass look on the stern decorations too! Are they brass or painted? If painted, what did you use? I'd like that look on the carvings of my Granado.
Last edited:
Wow, a great past two and half weeks, temperatures in the high 90's, Thunderstorms and large amounts of rain at one time and course summer company. I finally had an opportunity to do a bit of modeling.
I'm working on various bits and pieces while waiting for two replacement flats from Pavel's shop.
Parts ready for the paint shop
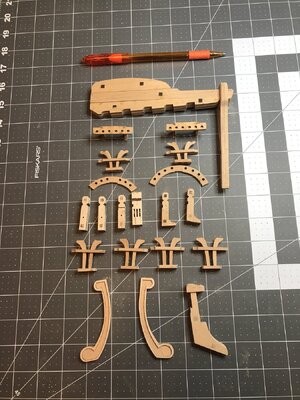
This is turning into one of my favorite tools. It's saving a lot of sore fingers.
The ULTIMATION Sander
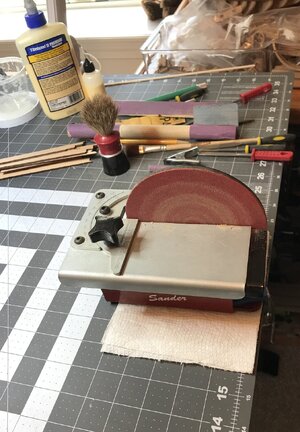
I find it does a great job cleaning the laser char without to much effort.
Jan
I'm working on various bits and pieces while waiting for two replacement flats from Pavel's shop.
Parts ready for the paint shop

This is turning into one of my favorite tools. It's saving a lot of sore fingers.
The ULTIMATION Sander

I find it does a great job cleaning the laser char without to much effort.
Jan
Looking great Jan. I have the same sander. Best purchase I have ever made. And if you don’t have the cutter that is a must have as well. The cuts are so much cleaner and you can cut much thicker stock than what those little mini ones do.Wow, a great past two and half weeks, temperatures in the high 90's, Thunderstorms and large amounts of rain at one time and course summer company. I finally had an opportunity to do a bit of modeling.
I'm working on various bits and pieces while waiting for two replacement flats from Pavel's shop.
Parts ready for the paint shop
View attachment 455311
This is turning into one of my favorite tools. It's saving a lot of sore fingers.
The ULTIMATION Sander
View attachment 455312
I find it does a great job cleaning the laser char without to much effort.
Jan
Yup I have both tools and the accessories. I had three of those mini cutters in the last few years. They were OK, but the precision of the Ultimation cutting tool is astonishing.Looking great Jan. I have the same sander. Best purchase I have ever made. And if you don’t have the cutter that is a must have as well. The cuts are so much cleaner and you can cut much thicker stock than what those little mini ones do.
Jan
Also the Ultimation sander doesn't throw dust all over the shop as power sanders do. My second best sander is the Byrnes variable speed reversible sander.
PS.Enjoying the Florida weather Jan ?
PS.Enjoying the Florida weather Jan ?
PS.Enjoying the Florida weather Jan ?

 NO,no,no. Not one bit. NOPE.
 Jan
Good morning Jan. The Ultimation tools are really cool. Your sander and the cutter are on my bucket list. Maybe get the kids to get me them for Christmas. Cheers GrantWow, a great past two and half weeks, temperatures in the high 90's, Thunderstorms and large amounts of rain at one time and course summer company. I finally had an opportunity to do a bit of modeling.
I'm working on various bits and pieces while waiting for two replacement flats from Pavel's shop.
Parts ready for the paint shop
View attachment 455311
This is turning into one of my favorite tools. It's saving a lot of sore fingers.
The ULTIMATION Sander
View attachment 455312
I find it does a great job cleaning the laser char without to much effort.
Jan
Wowzers, great "FLORIDA DAY" in Maine, 88F/31C, feels like 93F/34C with 60% humidity
What a great opportunity to sit in the shipyard and puzzle things out. I'm trying to figure out the next couple of steps in the Galleon build.
I think I'm looking at DIY steps.
#1
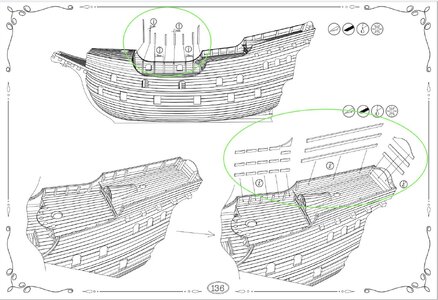
There are no part numbers for a kit flat, so I think I'm to scale these pieces off the full size plans.
#2
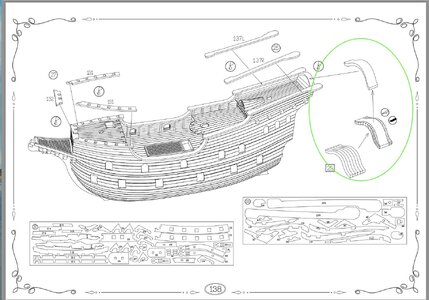
This one is confusing. Part kit part and Part DIY??
So you guys who have managed to get by this spot in the build. Please chime in.
Jan
What a great opportunity to sit in the shipyard and puzzle things out. I'm trying to figure out the next couple of steps in the Galleon build.
I think I'm looking at DIY steps.
#1

There are no part numbers for a kit flat, so I think I'm to scale these pieces off the full size plans.
#2

This one is confusing. Part kit part and Part DIY??
So you guys who have managed to get by this spot in the build. Please chime in.
Jan
My kind of weather Jan...Wowzers, great "FLORIDA DAY" in Maine, 88F/31C, feels like 93F/34C with 60% humidity
What a great opportunity to sit in the shipyard and puzzle things out. I'm trying to figure out the next couple of steps in the Galleon build.
I think I'm looking at DIY steps.
#1
View attachment 455517
There are no part numbers for a kit flat, so I think I'm to scale these pieces off the full size plans.
#2
View attachment 455518
This one is confusing. Part kit part and Part DIY??
So you guys who have managed to get by this spot in the build. Please chime in.
Jan
I really don’t care for the “Heat Wave Weather”. My preference is for low 70’sF/21’sC. But the Maine climate appears to be changing.My kind of weather Jan.... Good to see you contemplating the San Bartolome again.
The Galleon has been on the shelf gathering dust, waiting for “Summer”. I have quite a bit of cutting and sanding to do on the hull. I need to trim the overlap of planking at the stern, gun ports and bulwarks. Our outdoor patio is the ideal spot, but even working under an umbrella I had to quit. Being an “Old F**t” and taking maintenance meds, excessive heat is not my friend.
Jan
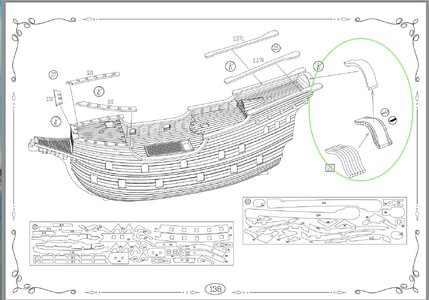
As best as I could tell the parts on page 136 were DIY, but the curved part at the stern on page 138 was present in box 25 preformed as part of the kit.Wowzers, great "FLORIDA DAY" in Maine, 88F/31C, feels like 93F/34C with 60% humidity
What a great opportunity to sit in the shipyard and puzzle things out. I'm trying to figure out the next couple of steps in the Galleon build.
I think I'm looking at DIY steps.
#1
View attachment 455517
There are no part numbers for a kit flat, so I think I'm to scale these pieces off the full size plans.
#2
View attachment 455518
This one is confusing. Part kit part and Part DIY??
So you guys who have managed to get by this spot in the build. Please chime in.
Jan
The build sequence on page 138 looks like the preformed part (from bin #25) has a top piece laminated in. Can't wrap my mind around that yet. Still thinking about itAs best as I could tell the parts on page 136 were DIY, but the curved part at the stern on page 138 was present in box 25 preformed as part of the kit.
Jan
Blame it on the Florida weatherOh boy I feel like and idiot. I've been looking at this drawing all day and the light bulb just went off.
View attachment 456125
The part in bin #25 shown on the plan is cut and filed into shape to fit the transom.Rookie Mistake
Jan
Yup that's the culprit, no doubt about it.Blame it on the Florida weather
85 feels like 90 again today. T-storms forecast for this evening.
Jan


