Nikitin San Bartolome 1584 A.D. (Kit #35)

Sometimes something takes a little time, but that way you get pride in your work, Jan. It looks nice with natural curves.
Regards, Peter
Yup, I've been very wary of this part of the build. No much of a chance of a Re-Do to cover up any mistakes. A lot of fitting, sanding, fitting and while slowly getting to the right shape. @Jagpilot has a great cover up fix for the unsightly seams of the pieces that make up these cap rails. If I had to do the rails again I would pay a lot more attention to eliminating the Laser char.

Jan
 
RO-OH moment, time to Fess Up.

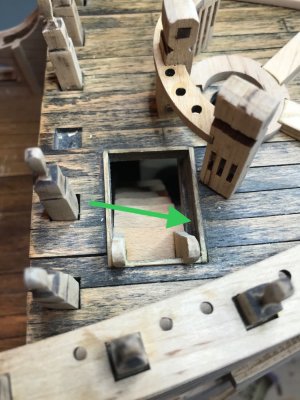
Dry fitting the stairs on the Foredeck was a little testy. I had to grind off quite a bit of the step edges to get a good fit. The stairwell openings was not wide enough. After a bit I managed to get a decent fit. It was then I noticed the "ROOKIE" mistake.

IMG_4576.jpeg

Back in the deck planking stage I managed not to line up the deck plank edges with the cross beam below (Green Arrow). That also explains why the belaying pin rack would not fit without some adjustment. :oops: Yup, my bad.:oops:

Jan
 
Last edited:
RO-OH moment, time to Fess Up.

Dry fitting the stairs on the Foredeck was a little testy. I had to grind off quite a bit of the step edges to get a good fit. The stairwell openings was not wide enough. After a bit I managed to get a decent fit. It was then I noticed the "ROOKIE" mistake.

View attachment 490332

Back in the deck planking stage I managed not to line up the deck plank edges with the cross beam below (Green Arrow). That also explains why the belaying pin rack would not fit without some adjustment. :oops: Yup, my bad.:oops:

Jan
Looking good Jan!
 
Dear Jan. Your SB is coming along in leap and bounds. You can be well pleased with your progress.
 
Dear Jan. Your SB is coming along in leap and bounds. You can be well pleased with your progress.
@Heinrich,

Thanks for taking the time to look at my build log.

Yup, I'm pleased with my progress. I have a mental list of all the "Oops" that I've managed to "FIX' as a I bumble along. I've learned to look at the plans and build instructions multiple times before starting the next build step.

Jan

A teaser for you. Grant has a BIG box under his Xmas tree. The Admiral convinced me to place an order for another great build (look at my signature), but it won't arrive until after Xmas. So no BIG box for me under our tree.
 
Great Jan - that is an exquisite gift. Funny enough, our Grades 1 and 2's just did a project on the Viking Leif Eriksson and built their own version of a Viking longboat! :) I am sure that you will have loads of fun - good luck with the clinker planking!
 
Great Jan - that is an exquisite gift. Funny enough, our Grades 1 and 2's just did a project on the Viking Leif Eriksson and built their own version of a Viking longboat! :) I am sure that you will have loads of fun - good luck with the clinker planking!
Yup, another adventure in ship modeling.

Jan
 
The Vikings are coming…
:DYUP:D

Actually there is quite a controversy in Maine lore that the Vikings may have made landfall in Maine a long time ago. A Viking "coin" and some runes were found in the 1950's up the coast close to Canada. The Yays and Nays have been at it since the 1950's to prove or disapprove that the Vikings may have been the first "European" tourists to visit that part of North America since there was a Viking presence in Newfoundland.

Jan
 
Last edited:
A continuation of the sanding marathon.


IMG_4585.jpeg

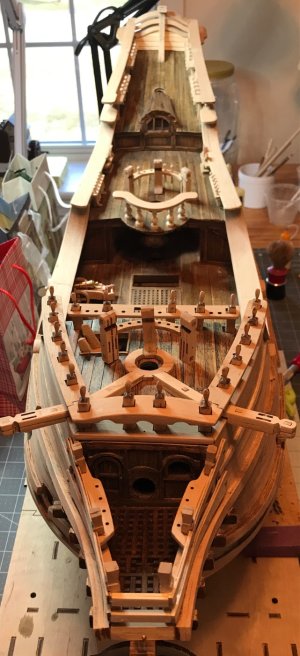
Except for several small parts, the topside bits and pieces are all done.
The two main deck cap rails (the right name??) were a challenge. I cut, fit, sanded, etc. the Port side until the dimensions roughly fit the plan and my bulwark(?? ), I used a compass to transfer and scribe the dimensions from that to the Starboard cap rail. Then it was cut, fit, sand, etc. until was satified with the fit. Quite a bit of 220 grit paper went into the waste bin.

Jan
 
Last edited:
A continuation of the sanding marathon.


View attachment 490819

Except for several small parts, the topside bits and pieces are all done.
The two main deck cap rails (the right name??) were a challenge. I cut, fit, sanded, etc. the Port side until the dimensions roughly fit the plan and my bulwark(?? ), I used a compass to transfer and scribe the dimensions from that to the Starboard cap rail. Then it was cut, fit, sand, etc. until was satified with the fit. Quite a bit of 220 grit paper went into the waste bin.

Jan
Looking great!!
 
A continuation of the sanding marathon.


View attachment 490819

Except for several small parts, the topside bits and pieces are all done.
The two main deck cap rails (the right name??) were a challenge. I cut, fit, sanded, etc. the Port side until the dimensions roughly fit the plan and my bulwark(?? ), I used a compass to transfer and scribe the dimensions from that to the Starboard cap rail. Then it was cut, fit, sand, etc. until was satified with the fit. Quite a bit of 220 grit paper went into the waste bin.

Jan
Good morning Jan. What they all said. You are owning this. Cheers Grant
 
A continuation of the sanding marathon.


View attachment 490819

Except for several small parts, the topside bits and pieces are all done.
The two main deck cap rails (the right name??) were a challenge. I cut, fit, sanded, etc. the Port side until the dimensions roughly fit the plan and my bulwark(?? ), I used a compass to transfer and scribe the dimensions from that to the Starboard cap rail. Then it was cut, fit, sand, etc. until was satified with the fit. Quite a bit of 220 grit paper went into the waste bin.

Jan
What some pieces of sandpaper can do to a model. Of course in your hands, Jan.
Regards, Peter
 
Back
Top