I fully agree with you, apart from many times they are not correctly inserted- nor tree nail nor metalAn interesting discussion over the last few posts about treenails. I thought long and hard about their aesthetic value at a model scale of 1:64 and decided against them, generally. However, I know there are some places where treenails also serve the purpose of providing better securing arrangements i.e. bonding to previously painted or treated surfaces. Selective treenailing I guess.
-

Win a Free Custom Engraved Brass Coin!!!
As a way to introduce our brass coins to the community, we will raffle off a free coin during the month of August. Follow link ABOVE for instructions for entering.
-

PRE-ORDER SHIPS IN SCALE TODAY!
The beloved Ships in Scale Magazine is back and charting a new course for 2026!
Discover new skills, new techniques, and new inspirations in every issue.
NOTE THAT OUR FIRST ISSUE WILL BE JAN/FEB 2026
You are using an out of date browser. It may not display this or other websites correctly.
You should upgrade or use an alternative browser.
You should upgrade or use an alternative browser.
NORSKE LOVE - Billing Boats 1:75 scale
- Thread starter Dean62
- Start date
- Watchers 74
-
- Tags
- billing boats norske lowe
- Joined
- Sep 3, 2021
- Messages
- 5,191
- Points
- 738

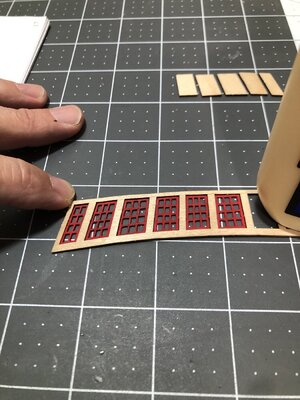
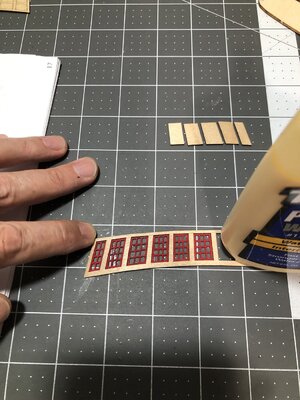
Not really sure I agree with your last statement. You only need one slightly overdone irregularity and it stands out like the proverbial sore thumb. Been there, seen that, done that, unfortunatelyI think the windows look very good Dean. I know that you are not satisfied with anything less than perfection, but I wouldn't change the construction method just yet. Because there are relatively few window frames at the moment, everything is highlighted. When viewed against the backdrop of a fully completed stern with all ornamentation, it will be a different story.
- Joined
- Sep 3, 2021
- Messages
- 5,191
- Points
- 738

These window frames just scream lights. Imagine some soft yellow, slightly flickering lights, shining through the windows. Your granddaughter would probably love them...Today’s side project…I had ordered more paints and needed to add another shelf to my stand I made…
View attachment 390206
Nothing fancy, just construction board with wood supports underneath.
View attachment 390208
But it does the job.I still need more …sigh! I might rebuild it in the future and make one longer and add a section for my dry brushing paints. Will make it out of wood.
But for now, I have windows to make…
View attachment 390212
Good morning Dean. So far the windows look mighty fine. I was kind of hoping you would make each one individually as I was keen to see how on earth you would have pulled that off- tiny pieces with all those angles…Thank you Heinrich, I appreciate the insight. You are correct…forest from the trees scenario!
With a dark background and the gold trim and carvings, the windows will not be the focal point. However they still need to be nice.
So far…
View attachment 390247
And then all of them also hinged ………I was kind of hoping you would make each one individually ……
No kidding: it’s going very well, Dean.
Regards, Peter
Hi Dean, just catching up on your build here. Interesting conversation about tree nails. I am on my fourth ship and have yet to add any treenails on a hull with the exception of my Vasa and that was only on the whalers like yours so far. I tend to agree with Nigel @NMBROOK, I would not tree nail anything smaller than 1:48 on a hull or any deck planking less than 4mm wide. However, I commend those that do and have the ability to do it well, someone such as yourself. The nails for the whalers on my Vasa are way too large for the correct scale but the relatively few that I used brought out a certain beauty in my opinion only.
Your canon ports look neat and precise, personally I 'm on the fence regarding nails in the frames, being dummy ports to me it might clutter the look.
Overall, your build is just magnificent to look at.
.
Your canon ports look neat and precise, personally I 'm on the fence regarding nails in the frames, being dummy ports to me it might clutter the look.
Overall, your build is just magnificent to look at.
.
Your photos make these window mullions (term?) look large, but I know how small those are and how incredibly fragile. Your plan is to mount them to the clear sheet and then add the face frame correct? That's what I would do as well - but it sure would be nice to be able to refine them (with a file for example) but secured to a larger piece for workability and strength. Catch 22.
Maybe hold them in a small vice and refine each edge in turn (moving the mullion piece as each surface is refined)? Probably more trouble than it's worth - they look d--- good as is.
Maybe hold them in a small vice and refine each edge in turn (moving the mullion piece as each surface is refined)? Probably more trouble than it's worth - they look d--- good as is.
Thank you for your suggestions Johan. Paper unfortunately warps when you paint it. But plastic is an alternative that would work.Paper an alternative, or evergreen plastic sheets?
Thank you Daniel, I appreciate the input and compliment.Hi Dean, just catching up on your build here. Interesting conversation about tree nails. I am on my fourth ship and have yet to add any treenails on a hull with the exception of my Vasa and that was only on the whalers like yours so far. I tend to agree with Nigel @NMBROOK, I would not tree nail anything smaller than 1:48 on a hull or any deck planking less than 4mm wide. However, I commend those that do and have the ability to do it well, someone such as yourself. The nails for the whalers on my Vasa are way too large for the correct scale but the relatively few that I used brought out a certain beauty in my opinion only.
Your canon ports look neat and precise, personally I 'm on the fence regarding nails in the frames, being dummy ports to me it might clutter the look.
Overall, your build is just magnificent to look at.
.
Thanks Peter!Nice self made paint rack and these red windows will pop on the stern of the ship!
Thanks Peter.And then all of them also hinged ………
No kidding: it’s going very well, Dean.
Regards, Peter
Thank you Paul. The micro shots never help flatter your work…lol.Your photos make these window mullions (term?) look large, but I know how small those are and how incredibly fragile. Your plan is to mount them to the clear sheet and then add the face frame correct? That's what I would do as well - but it sure would be nice to be able to refine them (with a file for example) but secured to a larger piece for workability and strength. Catch 22.
Maybe hold them in a small vice and refine each edge in turn (moving the mullion piece as each surface is refined)? Probably more trouble than it's worth - they look d--- good as is.
But they are very small, and to carve them without breaking, I have to carve them a little oversized and then carefully shave the inside edge of the frames with an xacto knife to narrow them down. Problem is the edges don’t line up perfectly because they are all done separately.
But I am actually getting better the more I do.
I may go back and narrow the inside more on the ones completed. I want the outside boards thicker and therefore the inside boards thinner. I even contemplated using wire for the inside boards.
Thanks Grant. It would be a frustratingly slow task…lol.Good morning Dean. So far the windows look mighty fine. I was kind of hoping you would make each one individually as I was keen to see how on earth you would have pulled that off- tiny pieces with all those angles…. Maybe another time. Cheers Grant
You would make the outer frame (4 pieces), then cut the vertical inner supports, by placing across the built outer frame, and then mark them with an xacto knife while holding over the outer frame. Then finish the cut on my work mat.
Glue the vertical supports in and then lay the horizontal boards across the frame and make a small cut to mark them with an xacto knife where they cross the vertical supports, and once again finish the cut and glue in place.
Hope that makes sense.
However cutting out 12 panes from a solid piece is no walk in the park either!

- Joined
- Sep 3, 2021
- Messages
- 5,191
- Points
- 738

You're welcome, Dean.Thank you for your suggestions Johan. Paper unfortunately warps when you paint it. But plastic is an alternative that would work.
Whenever I use paper, I use colored paper to avoid warping.
- Joined
- Jan 9, 2020
- Messages
- 10,566
- Points
- 938

I think you are doing an admirable job and once all the frames are completed, you can always make individual adjustments when needed. I understand your POA perfectly, seeing that the whole assembly still has to be given a curvature. Doing that with individually assembled pieces and only glue to hold them, will be well-nigh impossible, especially if you need moisture to facilitate the bends. I think you are on a winning ticket here. Just do as you have been doing!
Thanks Heinrich, you are correct, the wall will have to be bent, and with the frames a solid piece that is attached with an overlap on each side with the clear plastic behind them. That gives them the ability to hinge (so to speak) and not put flex on the frames themselves. That’s the plan.I think you are doing an admirable job and once all the frames are completed, you can always make individual adjustments when needed. I understand your POA perfectly, seeing that the whole assembly still has to be given a curvature. Doing that with individually assembled pieces and only glue to hold them, will be well-nigh impossible, especially if you need moisture to facilitate the bends. I think you are on a winning ticket here. Just do as you have been doing!
This is a sure-fire way to preserve the accuracy of all the various angles needed Dean, a great effort that will highlight the end result.Thank you Heinrich, I appreciate the insight. You are correct…forest from the trees scenario!
With a dark background and the gold trim and carvings, the windows will not be the focal point. However they still need to be nice.
So far…
View attachment 390247
Thank you Daniel!This is a sure-fire way to preserve the accuracy of all the various angles needed Dean, a great effort that will highlight the end result.


