That 'weathered deck' look has worked a treatGlued on the final coat of arms!
View attachment 270292View attachment 270293View attachment 270295View attachment 270296View attachment 270297

 |
As a way to introduce our brass coins to the community, we will raffle off a free coin during the month of August. Follow link ABOVE for instructions for entering. |
 |
 |
The beloved Ships in Scale Magazine is back and charting a new course for 2026! Discover new skills, new techniques, and new inspirations in every issue. NOTE THAT OUR FIRST ISSUE WILL BE JAN/FEB 2026 |
 |
That 'weathered deck' look has worked a treatGlued on the final coat of arms!
View attachment 270292View attachment 270293View attachment 270295View attachment 270296View attachment 270297


One thing's for sure; the Lion will be purring like a kitty tonight...Glued on the final coat of arms!
View attachment 270292View attachment 270293View attachment 270295View attachment 270296View attachment 270297
Thank you! She’s been a part of all my builds! So no worries.She's a cutie Dean, you must be proud. Bet you had a few anxious moments when she took to your NL with a brush though
Thank you Heinrich!Exquisite. I can't wait to start working on the construction of a new hull - you have really whetted my appetite.
Thanks Johan. I actually worked on the Lion some tonight. Reshaped the nose, defined claws more and started removing the crown. He can sleep now…lol.One thing's for sure; the Lion will be purring like a kitty tonight...
Thank you!That 'weathered deck' look has worked a treat
Dean-Im just blown away how you carve these by hand.I think I’m more afraid of making rope, than I am carving…lol. But you and Daniel have set the bar!So when the times comes to start rigging, it looks like I am going to learn!
Beautiful precision and well presented process of your skilled hands and SHARP blades. RIchGlued on the final coat of arms!
View attachment 270292View attachment 270293View attachment 270295View attachment 270296View attachment 270297
Thanks Grant! They are tiny, so I have to work with my magnifying glasses on!Thanks Paul! No two are exactly alike, but I can live with that!
Dean-Im just blown away how you carve these by hand.
Thanks Rich!Beautiful precision and well presented process of your skilled hands and SHARP blades. RIch
Fantastic! Thanks for the practicum, was wondering how you did that.Now for a little insight into the process…
View attachment 270280
After drawing it on a piece of wood (actually 3 glued together), I then cut out the border.
View attachment 270281
Now I carve a line around the edge of the shield, that I will cut and file to.
View attachment 270283
Now I start removing material around the shield to lower the floral pieces, crown, etc. And I start to cut around the lettering.
View attachment 270284
Then I use the rotary tool to carve inside the shield and around the letters. Then I come back and clean it up with an xacto knife.
View attachment 270285
Here the material is removed from around the letters and the floral pieces have been filed to lower the outer edges.
View attachment 270286
The rest of the carving and detail has been added at this point. Carving done.
View attachment 270287
Now I stain it.
View attachment 270288
Now I paint the inside of the shield black.
View attachment 270289
Now I lightly scrape and steel wool the highlights.
View attachment 270290
And finally I add a matte clear coat. This darkens the highlights and makes them more subtle and obviously protects the piece.
Ready to be glued on!
I kind of like it with the more pronounced highlights...hmmm...NO!
Thank you Daniel!Fantastic! Thanks for the practicum, was wondering how you did that.
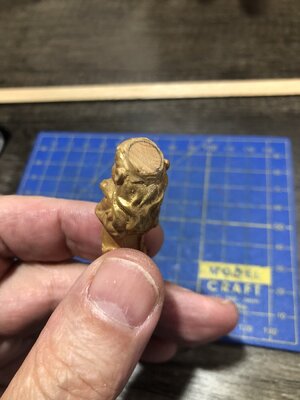
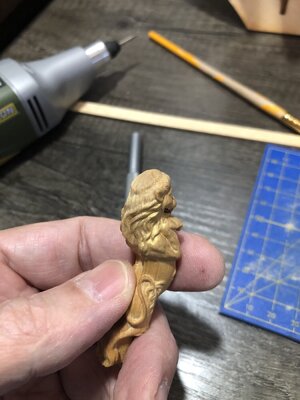

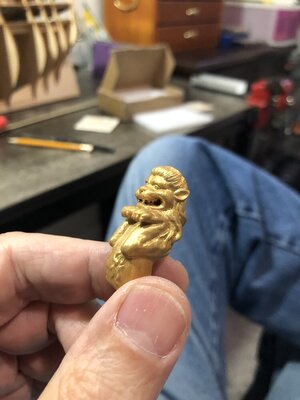
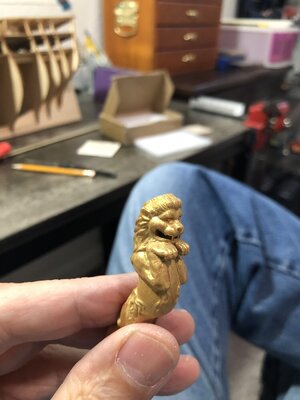
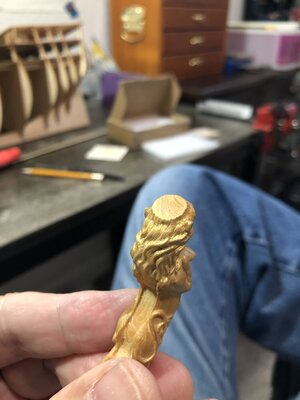
Looks like the Lion took a bit of your finger tip by the red mark. Great work fixing it up to receive new crown and carving.Preparing for the crown.
It was time to remove the crown from the top of the Lion. Then blend the hair to replace the carved out area around it.
View attachment 270366
First I filed and sanded the crown down, close to the top of the head. Then I marked the diameter of the new crown ( I have to carve) at the base. Then started carving the extra material off.
View attachment 270367View attachment 270368
Then I blended the hair into the carved surfaces, to continue up to where the new crown will sit.
View attachment 270369View attachment 270370View attachment 270371
Then I painted the changed areas gold.
Thank you Kurt! Good eye, yes I slipped with the xacto and the tip went into my finger! Dang Lion bit me!Looks like the Lion took a bit of your finger tip by the red mark. Great work fixing it up to receive new crown and carving.

Anxious how that's going to turn out, sitting on the edge of my chair.Reworked the hair at the crown to look more natural.
Now I have to start removing material for the slot to mount it on the keel.
View attachment 270380View attachment 270381
How it looked prior to crown removal, and embellishments…
View attachment 270382
This is the correct crown I have to carve and add…
View attachment 270383
It should be a fun little side project. I plan to turn the profile first, then carve all the details out of it.Anxious how that's going to turn out, sitting on the edge of my chair.

Aha, visualizing and planning ahead.It should be a fun little side project. I plan to turn the profile first, then carve all the details out of it.I will take pics of the process. I’ve already done it in my minds eye…lol. So I already know what steps I’m going to take and in what order.

