Thank you Heinrich! Even though this is an international forum, and some may care less, to those of you who are my friends, I thought I would share a little bit of what makes me…me!Thank you very much for the insight of what makes up certain parts of Dean. I find these type of stories fascinating to read and have always wished we could have a section - you can call it a biographic section for want of a better word - on our members. That way we can learn more about the person behind the models - which I'm sure will make for fascinating reading. Thank you very much for these two anecdotes Dean; I found them both to be highly interesting and informative.
-

Win a Free Custom Engraved Brass Coin!!!
As a way to introduce our brass coins to the community, we will raffle off a free coin during the month of August. Follow link ABOVE for instructions for entering.
-

PRE-ORDER SHIPS IN SCALE TODAY!
The beloved Ships in Scale Magazine is back and charting a new course for 2026!
Discover new skills, new techniques, and new inspirations in every issue.
NOTE THAT OUR FIRST ISSUE WILL BE JAN/FEB 2026
You are using an out of date browser. It may not display this or other websites correctly.
You should upgrade or use an alternative browser.
You should upgrade or use an alternative browser.
NORSKE LOVE - Billing Boats 1:75 scale
- Thread starter Dean62
- Start date
- Watchers 74
-
- Tags
- billing boats norske lowe
Call it instinct. We had a fellow who also was color blind. His job was mixing the inks for our screen printers. He couldn’t tell you if it was red or green but he was right on when matching colors. Go figure 
I too am color blind Dean. They say I'm red/green color blind. I think that is somewhat of a misnomer however, for me I can see red and green it's just if you place a red piece of cloth in the middle of a lush green yard, I would not see it unless I saw the shape first then the red might stand out. To me red belongs in the family of dark colors such as dark green, blue, or brown. It's interesting to not see certain numbers in a color circle but I can tell you what color each colored dot is in the circle.Since I am a bit off topic, I might as well go for broke...lol. One more story...
When I graduated high school, I wanted to join the Air Force and become a fighter pilot! I got with a recruiter, then I went and took the SAT test and physical, an all day event! I scored high on the SAT test, and did well on the physical. So next I'm sitting in front of a job counselor. He said what do you want to do in the Air Force? I said I wanted to be a fighter pilot! He looked at my test results and said, "I see here you are color blind!" It was true, I had bombed the color blind test...sigh! I could see a number with the blue and yellow dots, beyond that nothing...it all looked like a bunch of dots! He said you can't fly a fighter jet if you are color blind. There are many colored indicators you have to discern quickly...(why couldn't they use symbols).
But he said I could fly a cargo plane. It was like wanting to be a Formula One driver, and they give me an offer to drive the parts van!
Dreams crushed, I politely declined and joined college to become a Mechanical Engineer. Sometimes I regret not flying anything, as something would have been better than nothing...because I love planes! This was 1980 and maybe things have changed some, but I doubt it?
Anyway, I told you all that to say that I have one handicap as an artist, I am color blind, and that's how I found out! You see, I still see colors, just not the full range like normal people. So some colors look alike to me, dark green and brown, purple and black, etc. But my world is colorful, and I don't know what I am missing, because I only know what my world looks like, color wise. But because of it, I don't always do well mixing colors...lol. So if you see me using colors straight out of the bottle...well...you know...God has a sense of humor!I am a colorblind artist! But it hasn’t really limited me that much. And when it comes to carving, being colorblind will not be a problem at all. So we must learn to work within our limitations.

So now we know the rest of the story, as Paul Harvey would say in parting. RIchI am going to share a story with you, the reason will eventually become obvious. Hopefully it won't be too long....lol!
Since I have started carving recently, and employing some rotary carving as well, I can now put to use my dental bits! I probably have over 50 assorted dental bits. These I was given by a friend, who owns a dental lab. In the past he asked if I would be interested working for him on the weekends for extra money and he would pay me by the case, or crown. He thought I would be good at it because I am an artist. Why? Because once upon a time, you had to build and carve crowns out of wax!
Nowadays they have 3d scans and printed teeth!
This was the old school process...
The dentist would prep the tooth that needed a crown and take impressions of the upper and lower teeth. We would then receive the impressions from the dentist. I would take the impressions and pour the model work, upper and lowers. The bite would be established between the upper and lower teeth and hot glued together in a few spots.
Then they were glued to an articulator (metal hinged framework to simulate the biting motion). Then the hot glue was removed). Now you had a working model of the teeth and the patients mouth. You could usually tell by the size of the teeth and wear facets, the age of the patient!
Then we painted on two thin coats of clear on the tooth that was prepped for a crown. This was to ensure the thickness of adhesive to mount the crown was accounted for, and thus the margin of the crown would seat properly on the tooth when adhesive was applied by the dentist when installing it. An important step! Then the model of the prepped tooth was used to make a crown that was sculpted and carved with wax. If it was a porcelain crown, then a thin frame with a shelf above the margin was built to lay porcelain on, which has to be mixed, color matched, brushed on and backed in an oven, layer by layer. An art in and of itself! If it was a gold crown, the full tooth had to be built and carved in wax. My favorite...lol.
You heated a metal tool over a burner and dipped it in the wax to get some hot wax on the tip of the tool and spread that on the model, layer by layer. You had to work fast or the wax would harden on you. You could however reheat it with the tool to smooth out the geometry of the tooth. All carving was done with metal carving tools. You could actually wave the wax tooth over the burner quickly to smooth out geometry as well. There were many techniques involved in working with wax. I used large models of teeth, along with the actual teeth of the patient, as a reference to basically sculpt a new tooth. I learned the proper tooth anatomy of molars, bicuspids, and incisors in time by trail and error, and a lot of experience!
Once the tooth was fully built up, the bite had to be checked! We used a strip of printer ribbon, and placed it between the teeth and the crown and articulated the bite and pressed firmly. There must be three points of contact in the proper areas of the tooth on a molar for example. The points of contact would appear as dots from the ribbon. Those areas of contact often had to be adjusted by further carving the anatomy of the tooth, and sometimes even building up the tooth more, until the final proper geometry was established. If the bite isn't correct, it will make you miserable and the tooth will have to be remade!
The waxed tooth had a sprue added and then usually two or three teeth could be cast at a time. The casting canister, had a lid with an opening, we built a funnel out of wax at the opening and attached the sprues and teeth to it. Then the lid with the wax teeth was then carefully placed onto the canister (open metal tube) which was lined with a high temp material we added prior to pouring the investment casting material.
Using the open end, opposite the lid, the investment material was mixed and poured in around the teeth on a vibrator to remove any air bubbles, and left to cure. This was then placed in an oven and the wax was turned into powder and left a negative of the teeth. Now...(I know it's quite a process...lol) the canister was placed in a crucible that was spring loaded. The crucible was funnel shaped and the end aligned with the canister that was held in place tightly in the crucible. The metal, titanium or gold, was melted with a torch, and then when at the proper temperature, the crucible was released with a foot pedal. The spring turned it very fast and hard, slinging the metal into the cannister. That's investment casting! Then it was dipped in water to cool and later the casting material was carefully removed from around the teeth. The sprue was cut off and the crown polished! Crown was put on the model work and the bite checked one last time before sending back to the dentist. Whew! Yeah sorry for the long read, and I left out a lot of info!
So what does that have to do with my ship?
Well it was valuable experience! I was working under magnifying glasses, sculpting and carving wax teeth with tools, and using dental bits doing rotary carving as well. Not to mention I got a generous supply of bits given to me!
This has given me somewhat of a head start in carving miniature stuff out of wood! I already learned a lot of valuable hand skills working in the dental lab for over two years making crowns the old school way! I am sure @dockattner Paul can appreciate this story more than most!
So in conclusion... many many years later I am using those bits that I was given... and happy to be doing it!
Loving how the 'solution' follows after the 'problem' so promptly!Three things ahead of the hull planking…
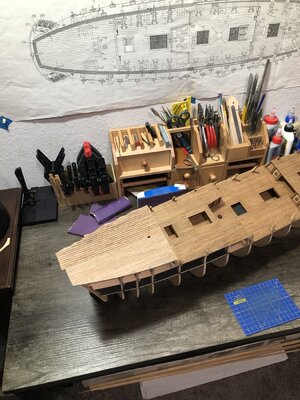
1) plank the upper deck - problem, out of wood. Solution, ordered wood. Problem, only 3mm and 5mm available and I need 4mm. Solution, order 5mm and cut width to 4mm on all boards after cutting to length…sigh! Deck planking to begin soon!
2) Build the wall at the bow, and add doors and trim. The planks curve around the wall and join at the keel. Adding the wall afterwards would be impossible!
3) Build the lower stern section that is planked horizontal prior to planking, as the planks are cut to the edge of this area and should cover the ends of the horizontal boards. There is also the lower section of the galley that the stern section ends at the bottom of. This is curved and has to be added at this point.
After these 3 areas are completed, hull planking can begin. It will be more obvious why as I complete them.
Now for the deck planks…Given the current sales of 20 percent off, I ordered a mini saw, and a combo belt and disk sander. Excited about the new tools, but they are just being shipped.
So…I cut the board widths manually from 5mm to 4mm. I made a jig of sorts, sanded one edge of the board flat (veneer edges are always rough), then put in my jig and cut to width.
View attachment 272498View attachment 272499
All boards completed…
View attachment 272500
Then I marked the stagger joints on the deck sheets…
View attachment 272501
Now I’m ready to charcoal the edges of all the boards, so I can start gluing planks down.
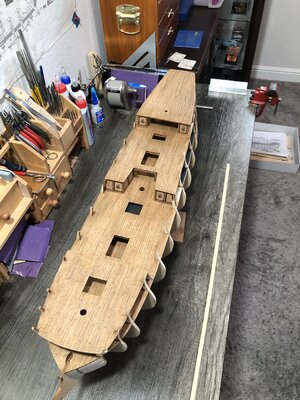
I measured the area of the deck, then determined how many boards of each length were required to cover that area with a little extra. Board lengths were 120mm, 90mm, 60mm and 30mm. Stagger joints are 30mm each, consistent with all decks and the 60mm frame spacing. I basically doubled the frames to get a more natural looking stagger on the decks.
Now the connection becomes clearer ... from crowns for teeth to crowns for lions. Brilliant. Thanks for sharing DeanI am going to share a story with you, the reason will eventually become obvious. Hopefully it won't be too long....lol!
Since I have started carving recently, and employing some rotary carving as well, I can now put to use my dental bits! I probably have over 50 assorted dental bits. These I was given by a friend, who owns a dental lab. In the past he asked if I would be interested working for him on the weekends for extra money and he would pay me by the case, or crown. He thought I would be good at it because I am an artist. Why? Because once upon a time, you had to build and carve crowns out of wax!
Nowadays they have 3d scans and printed teeth!
This was the old school process...
The dentist would prep the tooth that needed a crown and take impressions of the upper and lower teeth. We would then receive the impressions from the dentist. I would take the impressions and pour the model work, upper and lowers. The bite would be established between the upper and lower teeth and hot glued together in a few spots.
Then they were glued to an articulator (metal hinged framework to simulate the biting motion). Then the hot glue was removed). Now you had a working model of the teeth and the patients mouth. You could usually tell by the size of the teeth and wear facets, the age of the patient!
Then we painted on two thin coats of clear on the tooth that was prepped for a crown. This was to ensure the thickness of adhesive to mount the crown was accounted for, and thus the margin of the crown would seat properly on the tooth when adhesive was applied by the dentist when installing it. An important step! Then the model of the prepped tooth was used to make a crown that was sculpted and carved with wax. If it was a porcelain crown, then a thin frame with a shelf above the margin was built to lay porcelain on, which has to be mixed, color matched, brushed on and backed in an oven, layer by layer. An art in and of itself! If it was a gold crown, the full tooth had to be built and carved in wax. My favorite...lol.
You heated a metal tool over a burner and dipped it in the wax to get some hot wax on the tip of the tool and spread that on the model, layer by layer. You had to work fast or the wax would harden on you. You could however reheat it with the tool to smooth out the geometry of the tooth. All carving was done with metal carving tools. You could actually wave the wax tooth over the burner quickly to smooth out geometry as well. There were many techniques involved in working with wax. I used large models of teeth, along with the actual teeth of the patient, as a reference to basically sculpt a new tooth. I learned the proper tooth anatomy of molars, bicuspids, and incisors in time by trail and error, and a lot of experience!
Once the tooth was fully built up, the bite had to be checked! We used a strip of printer ribbon, and placed it between the teeth and the crown and articulated the bite and pressed firmly. There must be three points of contact in the proper areas of the tooth on a molar for example. The points of contact would appear as dots from the ribbon. Those areas of contact often had to be adjusted by further carving the anatomy of the tooth, and sometimes even building up the tooth more, until the final proper geometry was established. If the bite isn't correct, it will make you miserable and the tooth will have to be remade!
The waxed tooth had a sprue added and then usually two or three teeth could be cast at a time. The casting canister, had a lid with an opening, we built a funnel out of wax at the opening and attached the sprues and teeth to it. Then the lid with the wax teeth was then carefully placed onto the canister (open metal tube) which was lined with a high temp material we added prior to pouring the investment casting material.
Using the open end, opposite the lid, the investment material was mixed and poured in around the teeth on a vibrator to remove any air bubbles, and left to cure. This was then placed in an oven and the wax was turned into powder and left a negative of the teeth. Now...(I know it's quite a process...lol) the canister was placed in a crucible that was spring loaded. The crucible was funnel shaped and the end aligned with the canister that was held in place tightly in the crucible. The metal, titanium or gold, was melted with a torch, and then when at the proper temperature, the crucible was released with a foot pedal. The spring turned it very fast and hard, slinging the metal into the cannister. That's investment casting! Then it was dipped in water to cool and later the casting material was carefully removed from around the teeth. The sprue was cut off and the crown polished! Crown was put on the model work and the bite checked one last time before sending back to the dentist. Whew! Yeah sorry for the long read, and I left out a lot of info!
So what does that have to do with my ship?
Well it was valuable experience! I was working under magnifying glasses, sculpting and carving wax teeth with tools, and using dental bits doing rotary carving as well. Not to mention I got a generous supply of bits given to me!
This has given me somewhat of a head start in carving miniature stuff out of wood! I already learned a lot of valuable hand skills working in the dental lab for over two years making crowns the old school way! I am sure @dockattner Paul can appreciate this story more than most!
So in conclusion... many many years later I am using those bits that I was given... and happy to be doing it!

- Mark
The color blind test then, was a number, let’s say a 5 for instance in blue dots, and all the rest of the surrounding dots on the page were yellow. I saw a number 5. When the number made of green dots was in the middle of brown dots…I only saw dots…lol. Not sure how the color blind test is now, but that’s the one I took many years ago to determine I was color blind. If you’re not, you will always see the number that is made up of different colored dots.I too am color blind Dean. They say I'm red/green color blind. I think that is somewhat of a misnomer however, for me I can see red and green it's just if you place a red piece of cloth in the middle of a lush green yard, I would not see it unless I saw the shape first then the red might stand out. To me red belongs in the family of dark colors such as dark green, blue, or brown. It's interesting to not see certain numbers in a color circle but I can tell you what color each colored dot is in the circle.
Lol…yes the Lions crown has very different anatomy…but it’s a crown! And the wearer has a bite!Now the connection becomes clearer ... from crowns for teeth to crowns for lions. Brilliant. Thanks for sharing Dean
- Mark
What a coincidences, Dean. In 1980 I had signed up to be a police helicopter pilot. Many test days later, medical, flight simulators etc etc. The group thinned out from 1100 to 8, a final test in a dark room with very small lights. Then it turned out that under those circumstances: 'color was disturbed'. Then also those books with colored dots. It went quite well, but later in the book no more numbers or letters. (Maybe they weren't there either, as a testSince I am a bit off topic, I might as well go for broke...lol. One more story...
When I graduated high school, I wanted to join the Air Force and become a fighter pilot! I got with a recruiter, then I went and took the SAT test and physical, an all day event! I scored high on the SAT test, and did well on the physical. So next I'm sitting in front of a job counselor. He said what do you want to do in the Air Force? I said I wanted to be a fighter pilot! He looked at my test results and said, "I see here you are color blind!" It was true, I had bombed the color blind test...sigh! I could see a number with the blue and yellow dots, beyond that nothing...it all looked like a bunch of dots! He said you can't fly a fighter jet if you are color blind. There are many colored indicators you have to discern quickly...(why couldn't they use symbols).
But he said I could fly a cargo plane. It was like wanting to be a Formula One driver, and they give me an offer to drive the parts van!
Dreams crushed, I politely declined and joined college to become a Mechanical Engineer. Sometimes I regret not flying anything, as something would have been better than nothing...because I love planes! This was 1980 and maybe things have changed some, but I doubt it?
Anyway, I told you all that to say that I have one handicap as an artist, I am color blind, and that's how I found out! You see, I still see colors, just not the full range like normal people. So some colors look alike to me, dark green and brown, purple and black, etc. But my world is colorful, and I don't know what I am missing, because I only know what my world looks like, color wise. But because of it, I don't always do well mixing colors...lol. So if you see me using colors straight out of the bottle...well...you know...God has a sense of humor!I am a colorblind artist! But it hasn’t really limited me that much. And when it comes to carving, being colorblind will not be a problem at all. So we must learn to work within our limitations.

That 'disability' never bothered me much, because in high school one of my subjects was ‘art and art history’. But I did have a preference for drawing with pencil and/or black ink.
And ..... I also got a lot of attributes from a dentist friend. Should I start sculpting/carving?
Regards, Peter
That's pretty tight again. A delight to the eye.
Regards, Peter
You should, give it a try!What a coincidences, Dean. In 1980 I had signed up to be a police helicopter pilot. Many test days later, medical, flight simulators etc etc. The group thinned out from 1100 to 8, a final test in a dark room with very small lights. Then it turned out that under those circumstances: 'color was disturbed'. Then also those books with colored dots. It went quite well, but later in the book no more numbers or letters. (Maybe they weren't there either, as a test) End of a desired dream job.
That 'disability' never bothered me much, because in high school one of my subjects was ‘art and art history’. But I did have a preference for drawing with pencil and/or black ink.
And ..... I also got a lot of attributes from a dentist friend. Should I start sculpting/carving?
Regards, Peter
Interesting…will have to look into these. Thanks!Here's something for you to considerView attachment 272979
Precisely done and a solid deck for all to come. Rich
Outstanding deck planking Dean.! The consistency in appearance of all phases is remarkable given the many steps you incorporated at each level. Your build is a real treat to watch.
Thank you Daniel! Given the fact the upper deck was wood from a different lot I had to order, it is not as close to the others as I would like, but it probably looks more realistic that way?Outstanding deck planking Dean.! The consistency in appearance of all phases is remarkable given the many steps you incorporated at each level. Your build is a real treat to watch.
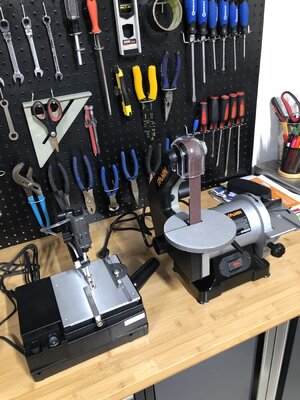
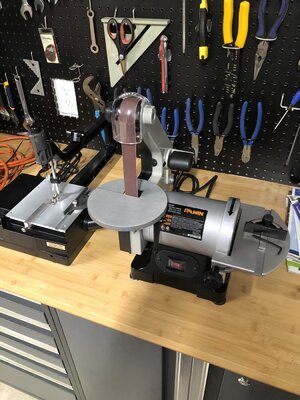
My new toys arrived and I set them up and did a trial run. The saw took the most time to set up. I installed a fine blade, and did a cross cut and ripped a board to width.
What I chose was two pieces of equipment that can perform multiple tasks.
First the saw, which is actually a mini scroll saw… that has a rip fence and miter gauge. So I can do cross cuts, rip boards, cut angles, and do scroll saw work! So very versatile (scroll saw and table saw functions) and I will be putting it use soon!
Second was the sander, which is a combination belt sander and disk sander…both have tilting tables for angles and a miter gauge for compound angles on the disk. In addition the guard for the belt is removable at the top to do drum sanding for internal radii. Once again, very versatile to meet all sanding needs!
I plan to use the disc sander and adjustable table to put the angled edge on my hull planks, each will have a different requirement as far as the angle goes. But I hope to ensure a tight fit of the planks this way.
Pics…


