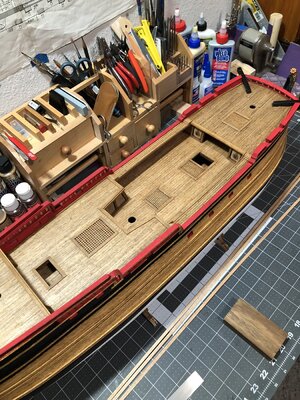
NORSKE LOVE - Billing Boats 1:75 scale

Finished the gratings and openings to the lower decks. Next will be ladders to the lower decks.
I am not doing any railings or other deck furnishings until I get the cannons in place.
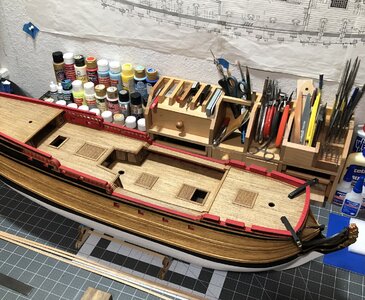
IMG_1797.jpegIMG_1799.jpegIMG_1801.jpeg

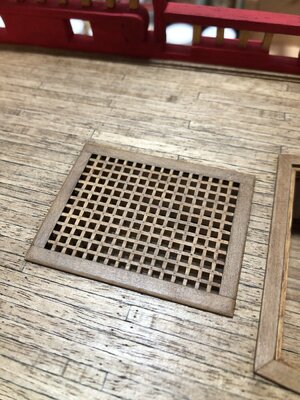
I finally found the recipe to make the gratings look how I wanted them. I started with the nails and then stain and clear coat. But I wasn’t happy until I decided to dry brush a dark sand color on the gratings. The stain acts like a wash and the dry brush highlights and averages the color. But I didn’t want it to be too consistent or it would not look realistic. ;)
I remember what my art teacher told me when I learned the dry brushing technique. She said dry brushing is not perfection! That’s when I realized that it’s about highlighting with variance, to simulate light and color variance that occurs naturally. And that gives objects depth.
Happy modeling!
 
Last edited:
On the fore grating, the width needed made the sides end up with an edge board. Nothing I could do other than make it narrower, but I chose to keep the exact opening size.
Good morning Dean. I had a feeling this was the case. :D
Too late now as everything is glued in place.
By the time all the deck furnishings are in place, I doubt it will be obvious there is a difference from one to another. The details tend to get lost in the clutter.
True story. This is my saving grace a multitude of times.
Here’s where I am, another opening has been framed and a grating in it as well. One more to go on the bow deck.
View attachment 380579
This is looking realistic to me…
View attachment 380580
A pic in natural light…
View attachment 380581
Ok Dean. You don’t need clutter and deck furnishing. These came out really “grate” and fit your NL spot on. Cheers Grant
 
Finished the gratings and openings to the lower decks. Next will be ladders to the lower decks.
I am not doing any railings or other deck furnishings until I get the cannons in place.
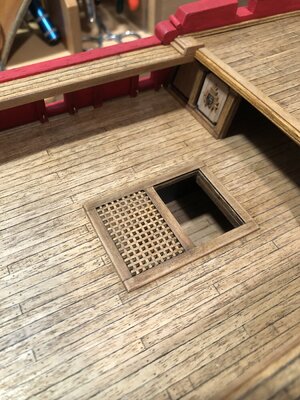
View attachment 380595View attachment 380596View attachment 380598

I finally found the recipe to make the gratings look how I wanted them. I started with the nails and then stain and clear coat. But I wasn’t happy until I decided to dry brush a dark sand color on the gratings. The stain acts like a wash and the dry brush highlights and averages the color. But I didn’t want it to be too consistent or it would not look realistic. ;)
I remember what my art teacher told me when I learned the dry brushing technique. She said dry brushing is not perfection! That’s when I realized that it’s about highlighting with variance, to simulate light and color variance that occurs naturally. And that gives objects depth.
Happy modeling!
You have skills my friend.
 
Good evening Dean. Good to see you back on your NL- I like to be impressed :D. Cheers Grant
Dean I have just finished POCHER Lamborghini. There new model after taking over the old company.
Can you advise the stain you used on your decking thanks
 
A really nice job on those gratings Dean. I notice you don’t have that grain lifted type of fuzzy look, to the wood of the actual gratings, after staining. I have found basswood (and some other woods) at that small scale tend to do that. Your gratings look so sharp am I correct that your gratings are pear wood? Thanks.
 
A really nice job on those gratings Dean. I notice you don’t have that grain lifted type of fuzzy look, to the wood of the actual gratings, after staining. I have found basswood (and some other woods) at that small scale tend to do that. Your gratings look so sharp am I correct that your gratings are pear wood? Thanks.
Thanks Roger! The frame is pear wood, the grating itself is the standard stuff you order online, that has notches to interlock. I typically sand the top prior to stain. Then I clear coat. If you stain and the grain raises, then you can sand with fine sandpaper prior to clear coat. I use water based stains and clear, yet I don’t have issues with the grain raising. Softer woods will be effected more than dense woods. One method is to get the wood damp and let the grain raise, then when dry, sand and stain. ;)
 
Thanks Roger! The frame is pear wood, the grating itself is the standard stuff you order online, that has notches to interlock. I typically sand the top prior to stain. Then I clear coat. If you stain and the grain raises, then you can sand with fine sandpaper prior to clear coat. I use water based stains and clear, yet I don’t have issues with the grain raising. Softer woods will be effected more than dense woods. One method is to get the wood damp and let the grain raise, then when dry, sand and stain. ;)
Useful information and much appreciated, thanks.
 
Not sure if I like the wood tones yet. Maybe after the others are in I can make a better call. The border is pear wood and it seems to always have different tones, which can be frustrating when trying to create a theme. I wanted it to match the pear wood at the perimeter of the decks. I may have to add a little stain…or am I being too picky?
If not happy; reconsider and try something else until satisfied. Otherwise it'll bug you till the end of time.
 
The problem is this is an old kit, with old instructions, that has gone through many changes over the years. They changed materials, blocks, figurehead, wood and manufacturing processes to include lazor cuttting. But they have never updated the instructions, which were never good to begin with, and now are even more confusing! They show the wall locations are printed on deck sheets and they are not there. The part location sheets have numbers missing on one page! I can identify most of the pieces by shape.
I have to say I am not impressed at all! The blocks are plastic! I am going to be giving Dry Dock a lot of business! I most likely will be replacing a lot of the wood for the railings and other areas. I will replace the rope…and doubt I will use the provided sail material. So basically I’m using the foundation of frames, keel and deck sheets. After that I am just using the full scale plans! ;)
So In conclusion, only because I like this ship so much, and no one else makes a kit of it, I will endure this poor kit and turn it into something that is presentable! But I fear all kits need some embellishments, some more than others! So it’s a good thing I got this on sale, because I’m not sure what I paid for if I’m not using more than half of the provided materials? :p
Dean. You cheer me up. As a beginner I thought I was being dumb confronting all of the your list of missing so far at the beginning of the journey. It frustration and I expected more of BB. However. You’re here and I am at this art of wall making and upper rear deck. I must confess my competence will not let me embark on such delicate fantastic details but I can improve where I would have gone without reference to your material. This blog is now my Guidance. I am itching to race ahead and see what you have done but I will complete a section at a time as you do as BB don’t advise the order of things. Thanks again. Ps I made Jo racing car in plastic Tanya kit when I was a kid so your pocket interests me I know up completed how did you find it.
 
Dean. You cheer me up. As a beginner I thought I was being dumb confronting all of the your list of missing so far at the beginning of the journey. It frustration and I expected more of BB. However. You’re here and I am at this art of wall making and upper rear deck. I must confess my competence will not let me embark on such delicate fantastic details but I can improve where I would have gone without reference to your material. This blog is now my Guidance. I am itching to race ahead and see what you have done but I will complete a section at a time as you do as BB don’t advise the order of things. Thanks again. Ps I made Jo racing car in plastic Tanya kit when I was a kid so your pocket interests me I know up completed how did you find it.
Once again, I am glad if this build log can help anyone else who may be building this kit.
About the Pocher Lotus 72 kit, I ordered it online.
 
Back
Top