OCCRE Nuestra Señora del Pilar de Zaragoza - Manila Galleon at 1/46

Joined
Jan 13, 2018
Messages
345
Points
278

Location
Lisboa, Portugal
Once I had a small model boat...
Then I got myself another small model boat and started scratch building yet another small model boat.;)
My first small model boat was a Viking ship (Amati) that I changed substantially in order to get a passable model of a Viking ship (maybe a build log someday... :cool:)
My second and third small boats you already know although Niña is a little put aside at the moment (but not forgotten).
And there happened my 75th birthday...
And then there were FIVE small model boats :D:D:D:D:D.

Well, one of then is not so small...

At this point I must confess that it was ME who offered myself one of those small boats. The other was a lawful offer... :cool:

Nuestra Senõra del Pilar is kitted by OcCre (spanish) and they sell their more expensive kits complete or in packs. N. S. del Pilar is composed of 6 packs and I offered myself the first two. It is enough to build most of the hull.

The interesting part is that buying the packs is more or less the same price than buying the whole kit and gives more flexibility (and takes a lot less space at the stash.

The first pack is not that exciting, it has a lot of ply for the bulkheads and false keel plus some other wood for planking.

DSC09551.JPG

The instructions are in color, and there are some 1/3 plans. They cover all the packs and as almost all the instructions that I know are pretty useless. I mean, you have some pictures ot the build and a very vague step-by-step instructions .

In summary: you are on your own . :p But that happens with most of the kits I know, either ships or planes so nothing new here so nothing new.

DSC09553.JPG DSC09552.JPG

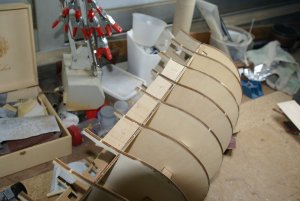
The other thing is that the ship is HUGE. The hull alone is 70cm long and it dwarfs my prince, let alone the Niña.
As a matter of fact I am not sure where I am going to put that monster once finished but I'll think of something. First it needs to be build.

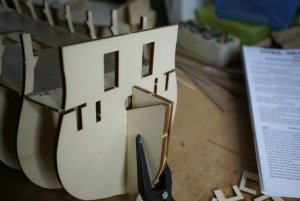
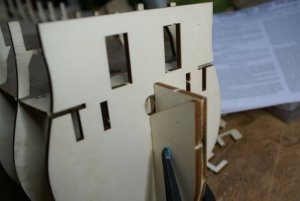
The ply is good quality (5,5mm) but the "bridges" connecting the parts are difficult to break they had to be cut with a heavy carpet knife.

It may seem bold of me being as I am initiating in this hobby, but is not a beginners kit. I may not know a lot about ship kits, but I have my share of kits and instructions and for me a beginners kit is that kit that has very good and detailed instructions, the construction is straightforward, the parts fit together well and there are no traps.

This one has poor instructions, the construction has its problems, the fit is OK but traps it has.

Starting with the ply parts, they are not numbered although there are drawings showing where everything is.

Things like this may happen:

DSC05423.JPG

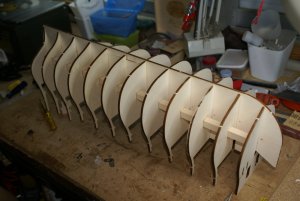
Bulkheads 6 and 8 are the more more alike bulkheads of the ship, they could have been placed near any other more different parts, but here they are and at this point you must guess which is which.

Of course this is no problem, once cut and piled with the other bulkheads it is easy to say wich is wich, but this rings a bell and shows that you have no easy way ahead. Or maybe I am being picky.

Once everythig cut, you have an heavy pile of firewood. :cool::cool:

DSC05425.JPG

Well these are decent hours to be in bed, so more tomorrow.

Regards.

JL
 
Many thanks for starting this building log - we are all looking forward to see her growing
 
Thanks JL, I have always liked the look and period of this ship. I will be looking on with interest.
Here are some reference photos to help with your build: Pilar Photos.


Well thanks a lot or the photos. Very helpful, that yellow color on the hull was a surprise.

I'll try to make justice to the ship, it is a lovely ship really.

Thanks again

JL
 
Well, time to get back to the monster, sorry, the Nuestra Señora. The spanish and the portuguese had this habit of naming the ships after Nuestra Señora (Our Lady, for those of you that don't understand castilian or spanish).

More the spanish than us they always were more catholic.

Putting together the two halves of the keel revealed how huge the model is, as I said it is 70cm of false keel. The wood is good, the laser cut is well done and the parts have a nice fit.

DSC09388.JPG

At first I thought that there was some warp on the ply but it disappeared as the two halves were glued together.

DSC09389.JPG

The halves were glued with the help of a steel ruler to make sure that the bottom of the keel was straight, no signs of the warp, so a very happy modeller.
I used nails while the glue was setting to avoid any deviation. It worked well and this step was completed.

Now for the first deck . (should be the last, if you are going down in the ship, but everybody refers to it as the first deck, so, follow the navy). Four parts, a very small gluing surface, I used PVA at first, it didn't support the weight, so I used CA and it kept untill the deck was planked. The planks, of course gave more strenght to the whole, but even so it broke again. Did not separate due to the planks, but the glue gave way. Some thick cyano solved the problem

DSC09473.JPG.

I must say that I didn't like the wood OcCre supplied for the deck planking. Too much grain and not good quality wood and also the strips were somewhat twisted. I had bought some wood from Hobbies Guinea, a nice dealer from Spain and I had some strips from mukali and manzonia (I don't know the english names, sorry). As the mukali strips were .6x4mm and the manzonia were .6x5mm, due to the large scale of the ship I decide to use using this one.

I used a metal ruler to make sure that the two halves were absolutely straight while gluing,

DSC09481.JPG DSC09483.JPG

You can see here the bulkheads and the false keel, ready to start doing something interesting like an hull :D.


DSC09485.JPG

The fit was excellent, just a touch of sanding paper on the grooves that were a little tight and the bulkeads were absolutely perpendicular to the keeel, no worries here

DSC09486.JPG

Being so, I dry mounted all the bulkheads, make sure everything was square and straight and a bath of thin CA joined everything together.


DSC09488.JPG DSC09489.JPG

four lenghts of square section were supplied the idea is to help get the hull straight. They also give more strenght to the hull because it is heavy.

The fit was a very little loose, I used some spare square wood to glue those sections to some bulkheads (not all, it was not needed) and I ended up with an absolutely straight keel what I only managed to get in my prince with the help of some wood glued to the sides of the keel.

Even without the square lenghts glued to the bulkheads, the keel was almost straight, just a litthe warp

DSC09478.JPG

After gluing the squares, the hull was absolutely straight.

DSC09491.JPG

And it is all for now, time to plank the deck and glue it in place.

See you!

Regards

JL
 

Attachments

  • DSC09490.JPG
    DSC09490.JPG
    170 KB · Views: 30
Proceeding with the build of the "monster", some small innacuracies appeared, after all this is only a kit and as such it has to have some flaws :cool:. It wouldn't be half the fun if it had not

The alignement of the deck and the mast hole, for instance:

DSC09492.JPG


Or a small misalignement with the bulkheads

DSC09493.JPG

Easily corrrected, anyway, some sanding on the front of the decks made the trick, so no real problem here. Not a perfect alignement but also not a disaster, just some care and trial and was corrected.


DSC09494.JPG DSC09495.JPG


The two halves of the lower deck aligned almost perfectly and again some filing helped everything to fit properly


DSC09496.JPG

or almost...


DSC09497.JPG


more sanding, perfect result.


As I was to use thin cyano I needed a perfect fit between the deck and the top of the bulkheads and the false keel, so I carefully sanded the whole to level everything.
No problem here, after sanding they aligned perfectly. Thin cyano does not fill gaps no matter how small they are.


DSC09499.JPG


Time to plank the two halves of the deck. The instructions show the whole deck completely planked, but I found that there is a large surface of it that is completely covered by the upper deck so I spared some wood, time and effort and only planked the part that remains at sight.


DSC09500.JPG DSC09502.JPG


As I already said, I didn't like the supplied wood, so I used some wood (manzonia) I bought and I used it to plank the deck. It is a somewhat dark wood, but I have seen contemporary replicas that have dark decks and not the usual yellowish decks mostly seen.

I used the four butt shift pattern only because it was a large ship and I liked it so... :p


DSC09504.JPG DSC09506.JPG


I represented the treenailing with a small hand drill of .6 mm. It gave a subtle effect that pleased me. Then came the dirty part of it, the black ink and PVA mix part.

The whole planking was spreaded with the mix (this time I used a more greyish mix, less visible than the black that I used on the Prince, so more subtle).


DSC09507.JPG DSC09508.JPG

And this time I also changed the procedure and instead of sanding the planking I scraped it with the blade of a heavy duty knife. It worked much better, was quicker and it saved me a lot od sandpaper and as I sharpened the blade a lot of times one blade did the whole job. Cheaper ;);).


DSC09511.JPG


It gave me the effect of a somewhat worn deck and I liked the look of it. With some more scraping it became even better and being the lower deck you wont see much of it, but anyway I was pleased with the result.

Time to glue the two halves on its place, and as the fitting was very good I could use the thin cyano applied with the plastic pippets that I began to use for that effect. Works wonders.


DSC09545.JPG

In this picture it seems that the the halves does not fit perfectly, but they do. When the picture was taken one half was glued and the other just in place. After gluing they were aligned perfectly .

In spite of all my efforts, a small gap remained between the two halves. In despair I discovered a way to make the uggly gap disappear. In the next photo the left part of the gap was already treated and the gap was invisible, the right part is the gap in all its ugglyness... :)

DSC09546.JPG

I found that filling the gap with PVA and then scrapping the wood in order to get some wood dust on it made it completely disappear.

With the experience comes a lot of very useful small tricks thay make life happyer and easier.


DSC09547.JPG DSC09548.JPG DSC09549.JPG


So here is where I am now. Next steps to follow.


DSC09550.JPG

Regards

JL
 
This getting a very interesting building log....many thanks for sharing with us
 
I am getting to the conclusion that buying the kit in packs was not such a good idea. I only follow the kits instructions loosely and I like to think ahead and I have good reasons to do so, see the example bellow. Being so, I am at the point that although I am dealing with pack one, I need information from parts that only come in pack four, the guns for instance. So it is a better idea to buy the whole kit instead of buying it in parts. The price is the same, or almost the same and at least you know what you have to deal with.

So this is a small update since I am waiting for the rest of the packs that I have now ordered. I hope they arrive soon

I am finding a great difference between building ships and planes (apart from the final aspect, of course :p) . All the instructions for the planes either plastic scale airplanes or flying models like gliders are very precise and if you follow them step by step you will certaily get a good result.

Not so with the ships, at least with the few ones I know. Take the following example:


DSC09572.JPG

Look at piece 33. There are two of them that are cemented at each side of the false keel, right? Now look at the same thing in the real world:


DSC09557.JPG

Yes, there is a thing called bowsprit that must pass between the two parts 33. How????

The practical joker that made the base model for the instructions forgot that small detail and if one is folowing the photos then one is going to be in some trouble latter. They had the same problem with their model, of course, and some pages latter, the following appears:


DSC09573.JPG


So someone discovered that the bowsprit had to be fitted there and digged a hole there and a rough one, by the way. There is no reference to that at any part of the instructions. Either that or you flatten the mast in order to make it pass through the parts 33.

DSC09558.JPGDSC09559.JPGDSC09560.JPG

Well, this trap was avoided by digging a channnel in both parts 33. That way the bowsprit fits perfectly.

I wonder how many of these traps am I going to find. One passed, x to be avoided...

So, don't follow the instructions. EVER. At least it is what I have discovered so far.

Regards

JL
 

Attachments

  • DSC09554.JPG
    DSC09554.JPG
    120.9 KB · Views: 32
  • DSC09556.JPG
    DSC09556.JPG
    105.8 KB · Views: 31
I am getting to the conclusion that buying the kit in packs was not such a good idea
Hi JL, can you explain what do you mean buying packs? Is this kinda a subscription magazine like Deagostini?
 
Next step: gunports.

The least I can say about this is that Occre has a very funny way of treating the gunports. Very funny indeeed. In fact so funny that it took me a lot of thinking how to avoid that method and make something more real and taking me to a better result.

The instructions tell you to glue 5mm gun ports into a more than 7mm bulkheads and then plank the rear side and fill the space with some spare wood. Same must be done to the front side, of course.


DSC09589.JPG DSC09590.JPG DSC09591.JPG DSC09592.JPG


It know it works because I have already seen it made, but it is not to my like. You have to think that the gunports are to be planked front and rear and it would be good to have some support for the plankig. Also the sugested method lives a lot to be desired, you are supposed to glue right angled gun ports in a place where there are nothing similar to a right angle, the whole thing is twisted in every direction.


DSC09561.JPG DSC09562.JPG


So you must fill the result with spare wood with a very strange format and you have no support for the planking except for the gun ports themselves.

I thied to make the process a little more rational shaping each gunport individualy so that they followed the deck line. I measured the ancled and applied it to each gunport, but I was not pleased with the result.


DSC09563.JPG DSC09574.JPG DSC09575.JPG


I alligned the ply with the back of the bulkheads, but these being curved did not guarantee that the aligment would avoid the filling to get a good fit of the rear planking. I didn't like it a bit

As I have arlready told, it is not impossible to do this step the way that occre indicates, but it means a lot of work without the garantee that at the end you have a nice result.

So I decided to invent a little and make t my way. The good thing with kits is that you can change things and get a better result, or at least be convinced that you did so. ;) At least you do what you think is better and get some satisfaction with it.

I still have a lot of wood from my aeromodelling past and among it some lightply of various thicknesses. For those of you that don't know this wood, it is a sort of ply, light in weight, wrongly called balsa play (it has nothing to do with balsa) , that is mainly used in buildings in wall isolation. It is very easy to work with, cuts with an x-acto and sands well and easily. So I decided to fill the space between the bulkheads with this material, align that "wall" as much as I could with the rear face of the bulkheads and fill the front with some thin balsa sanded to follow the format of the hull.

Like that I gain a larger surface to glue the planks to and avoid all the imprecision of the occre method.

I started by preparing the bulkheads sanding them and the deck to get the form of the hull and getting a nice hull surface, ready for the planking.


DSC09578.JPG

That done I prepared my gun ports shaping the lightply to fit the space between the bulkheads

DSC09576.JPG DSC09577.JPG

Much nicer than the supplied ply gun ports.

Adjusting the saw to the width of the gunports in order to make all gunports equal:

DSC09579.JPG


DSC09580.JPG DSC09581.JPG DSC09582.JPG

Easier than working with the original gunports.

As my lightply was 3mm I glued two shapes together to get near the 7mm of the bulkheads. So, only a little space would remain to get even with the surface of the hull

DSC09584.JPG

It is very easy indeed to work with lighply.

DSC09583.JPG

DSC09585.JPG DSC09586.JPG


And it is where I am now. This weekend I intend to have the two sides of the hull made. (one of them has still the original gunports glued)...


The ship is looking like this


DSC09593.JPG

I am pleased with the result and I learned with the planking of the "Prince de Neufchatel" that it is a lot easier to have a good surface to glue the planks to, instead of only glue them to the surface of the bulkheads. I intend to fill the hull with either balsa of blue foam in order to get that surface. Avoids some wavy shapes I have seen.

Regards

JL
 
love your planking technique using the black paint. I would have never thought of that.
 
Port side has now a wall (not Trump's, more like Pink Floyd's :cool:) perfectly ligned up with the bulkheads and ready to receive the planking.

I confess it is much harder work than the method Occre advised, but like this I can glue the planks perfectly and I am sure the gunports are all at equal distance from the deck (not so if I did it Occre's way) and follow a nice curve along the hull.

I used lightply and some balsa too, in the holes the balsa was hardened with thin cyano in order to be easier to file the gunports.

DSC09604.JPG DSC09605.JPG

to see some advance, since I have to do the same to the other side AND the lower gunports (not following Occre once again), I started planking the inside of the bulwarks. Not much is to be seen, since the lower deck is almost entirely covered by the upper deck, so I am not going to plank all the lenght, only the part that can eventually be seen.


DSC09609.JPG


I also strated the starboard side, much easier now since I know exactly what to do.

I hope that this thing begans to look like a ship and not a pile of wood how it looks now. Patience (and hard work)

JL
 

Attachments

  • DSC09608.JPG
    DSC09608.JPG
    175.8 KB · Views: 36
Back
Top