Do you still have the cat?Glad its not much damage. I had a cat get one of my ships during my final rigging. I would usually put it in my shop when I was done for the evening, this evening I didn't and the cat got it the next morning it was on the floor all the rigging ripped off masts broken and parts chewed on and on top of that he sprayed it with a musky odor that would gag a maggot. total loss on that ship
-

Win a Free Custom Engraved Brass Coin!!!
As a way to introduce our brass coins to the community, we will raffle off a free coin during the month of August. Follow link ABOVE for instructions for entering.
-

PRE-ORDER SHIPS IN SCALE TODAY!
The beloved Ships in Scale Magazine is back and charting a new course for 2026!
Discover new skills, new techniques, and new inspirations in every issue.
NOTE THAT OUR FIRST ISSUE WILL BE JAN/FEB 2026
You are using an out of date browser. It may not display this or other websites correctly.
You should upgrade or use an alternative browser.
You should upgrade or use an alternative browser.
Panart: San Felipe 1:75 Scale Build Log [COMPLETED BUILD]
- Thread starter Donnie
- Start date
- Watchers 66
-
- Tags
- completed build
My deadeyes on the 1:100 scale Connie are way to small to rig up this way. I can't even put a straight pin all the way through them without breaking them!Completed one side - not too bad, just about a late evening work for a couple of hours- then the other side next. A pin vise was used while I was holding the deadeye. Tweezers was used to simply push the nail in - no hammering needed.
I guess I was lucky, Donnie. Most of my Connie gun placement on the upper deck was fine. Unfortunately, the lower openings for the cannons gave me problems in that the flap covers did not always fit. I guess I should have temporarily attached the covers before planking.
Very nice build Donnie, I hope to build one of these soon. I will look into the ZHL per your recommendation...thanks!
- Joined
- Feb 26, 2020
- Messages
- 8
- Points
- 8

I can't tell you how much I appreciate the time and effort you've made to this build log as I embark on my own San Felipe journey. Thank youOk, let me see if I can answer this. Yes, my model is the art 747 and this is the start build date of November 14, 2016. So this model is from this particular era of production. Now, I do not know when this box was actually put together with the contents.
1) No plastic parts in this kit. All metal parts such as cannon barrels, the ornamentation on the stern, and figurehead all metal. Upper Deck Canon Port openings on main deck all metal. the other cannon port lids for lower decks all fabricated out of wood. All stern parts are mostly metal. In other words, as I said are NO plastic parts
2) No rigging blocks for the Cannon Carriages. I did not do this as the scale just too small. I would have had to order smaller blocks in the 1mm x 1mm or less in size to make the scale seem more realistic. to me, it is best to go without blocks on carriages rather than load up all the carriages with blocks too large as it really takes away the look.
Note: the MAIN deck had to be lowered (if I remember about 3mm) so that Cannon Carriages would sit on deck correctly. I have seen several models of this era that they modelers had to either remove the Carriage Wheels or make their own carriages because the deck is too high. The cannons will not even enter the Port Frame openings. I found this out before going further. You will see this in my log early on.
If I am following you right, you already have in your possession the art 747 Panart kit but it is from a long time ago. Is this correct? If so, then the Cannon Carriage placement issue with deck too high might not be an issue at that time.
To add more to this situation, if I had known more, I would have purchased my San Felipe from the ZHL model - their version of the San Felipe is so much better. The Panart was terrible. At first, I was very impressed with the amount of laser cut parts and all the fittings. But, it wasn't until actual construction that I ran into problem after problems.
If I can help you in any way - please let me know. I hope that I have answered your questions.
hi donnie,i have a question about your aft railings that bent around the contour of the ship on the bottom platform. how did you bend them without breaking them? i just can't figure this out. hope you can help me and others on this. thanks,terry
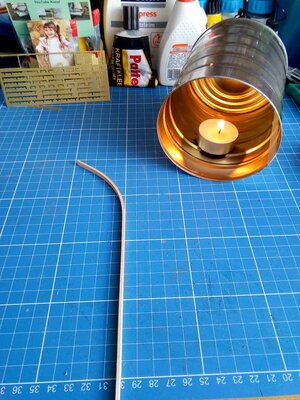
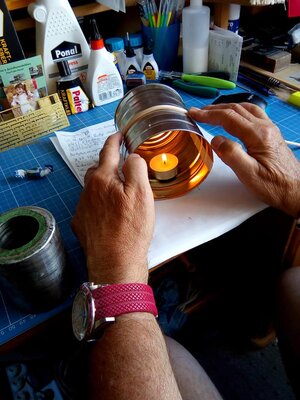
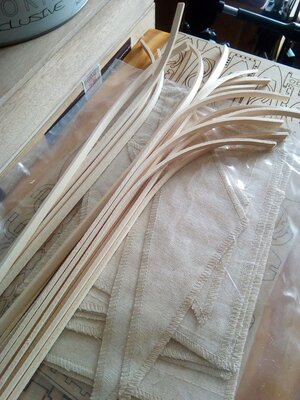
Try the Dry heating method -coming from Germany -cheap and function- Take an empty Conserves CAN.Set it SECURE fast to a piece of Wood. Insert into de Horizontal Can add 3-4 Candeligt (those using Chinese Restaurant) Let it heat up as Stargazer mention. The effect is even bigger, if you ad the plant a few minutes in water, as coming over the gloving CAN, this water will make steam- a combination of very high temperature and steam effect. As you can see, the Plank maintains its form. No need for further treatment. p.s. Altaya/ de Agostine are making a heavy campaign of San Felipe (with all parts in one shut) the surprisingly price of over 900 €hi donnie,i have a question about your aft railings that bent around the contour of the ship on the bottom platform. how did you bend them without breaking them? i just can't figure this out. hope you can help me and others on this. thanks,terry
Attachments
- Joined
- Nov 16, 2018
- Messages
- 145
- Points
- 88

Hi Donnie--I assume you have posted pictures of the San Felipe; I would love to see them..
This is the official first entry to the Build Log of the Panart's San Felipe at 1:75 Scale. The model was ordered from Cornwall Model Boats early this morning (11/9/2016) and I must say that the person (lady) I spoke with over the phone was very nice, and pleasant to do business with. I just wanted to call to make sure all was well with my order. I was very impressed with CMB. By around noon, I was already getting shipping transactions notifications and tracking numbers ! I also ordered the Paint Set (Ref: APS9105W). It is made up of 11 jars. I thought about adding the sails, but I decided not to at this time. Since my sails will be furled, and doesn't require all the sail material (it would be too bulky), I might try my hand at making my own. Furling will not require the sails to be fully made anyway. The Log will most likely start about last week of December 2016. I look forward to everyone following along.
Enjoy !
Donnie
That was a great video Donnie!!! Thank you for sharing.Thank you Gary, Aussie, and undersea. I appreciate it very much. I went ahead and made a video on how I am making the post.
Enjoy.
I hope you all like it.
Donnie l’ve been back and forth trying to decide wether to get the San Felipe from Mantua or the one form ZHL. My main concern is the quality of the wood and how would that affect the process and the end result… any comments on that?Ok, so not the best pictures in the world. These pics are of the wood naturally - doesn't have too much personality to it. But, I am not yet finished. The other pics are darker wood only because I can use water to simulate the effect of urethane satin. I am not going to treenail it, but instead, I am going to resort to an old trick of just drilling holes and sanding to fill the holes with powder from the sanded wood. Then coat with Poly Urethane Clear Satin. Then go over it again. The first image is a drawing I made that shows the planking pattern I used.
WowTry the Dry heating method -coming from Germany -cheap and function- Take an empty Conserves CAN.Set it SECURE fast to a piece of Wood. Insert into de Horizontal Can add 3-4 Candeligt (those using Chinese Restaurant) Let it heat up as Stargazer mention. The effect is even bigger, if you ad the plant a few minutes in water, as coming over the gloving CAN, this water will make steam- a combination of very high temperature and steam effect. As you can see, the Plank maintains its form. No need for further treatment. p.s. Altaya/ de Agostine are making a heavy campaign of San Felipe (with all parts in one shut) the surprisingly price of over 900 €
Haven't seen that way way to bend planks thanks for sharing
Cheers snowy
I know I'm v. late to the discussion but I just wanted to say Donnie I'm extremely impressed with your work. I love the San Felipe model and you've done it justice. I've only seen the first couple of pages of this thread and the final pictures so looking forward to reading the whole thing through!
Thank you for the inspiration!
Thank you for the inspiration!


