
finally I found some pic. of the struktures- do not go to much into chemical problems. only that the 3 huge bio. products make a 3-dimensional structure. I general said to the student that is like building a house. The Glucose is the single brick, which together with the help of concrete-hemicellulose are glued together. The lignins are Stell or very Strong pillars which avoid that with the 1Th storm everything crashed

-

SUBSCRIBE TO SHIPS IN SCALE TODAY!
The beloved Ships in Scale Magazine is back and charting a new course for 2026!
Discover new skills, new techniques, and new inspirations in every issue.
NOTE THAT OUR NEXT ISSUE WILL BE MARCH/APRIL 2026 -

Win a Free Custom Engraved Brass Coin!!!
As a way to introduce our brass coins to the community, we will raffle off a free coin during the month of August. Follow link ABOVE for instructions for entering.
- Home
- Forums
- Welcome to Ships of Scale Forum
- Beginners Corner - How to Get Started
- Basic Tools Needed
You are using an out of date browser. It may not display this or other websites correctly.
You should upgrade or use an alternative browser.
You should upgrade or use an alternative browser.


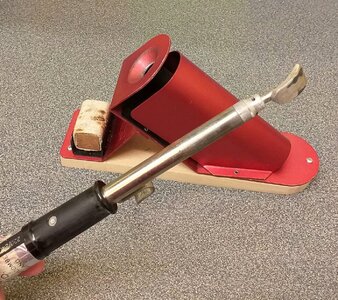
It is cheap and it works. I got the idea from a German Frind Axel Kullich -he has made the Pic. When I was building I nailed into a piece of wood, for holding it, and then a list of each side. but to, not to destroy your table. We need over 200ºC to destroy some of the bonds in this Macro molecule. Mechanical force can do it too, but not good for usThank you for your good ideas El Capi. I like the bean can idea; I think that it needs to be fixed into a (wooden?) cradle to stop it from rolling about. My own recent thoughts have been based around using copper pipe from a diy store as the vessel/chamber in which the plank is heated or steamed. Again this would need to be held in a cradle and the end(s) stopped-off with a cork perhaps?
May the vaccx be with you.
Dudley
happy building and stay safe
el Capp.s the pic below are from 1976 with my wife and 2 years daughter. on top of the bookselves the are a model of the 1Th Norden from Billing boat and the other one is Cutty Sark
Attachments


I've progressed to using this 25w Ademco dry mounting iron for my Artesania Latina dhow build. This tool was quite common back in the days of film photography when mounting a photographic print onto a card mount; used in conjunction with mounting tissue (glue). On my boat build this iron works very easily with 1.5mm basswood once I've dampened the wood with a small modelling paintbrush.
Dudley
Dudley
Attachments

I also have this jig but have not used it yet. Do you think using a hot air gun or blow dryer on hot would speed up the setting process.I soak my planks in water for half an hour, then put them in this plank bending jig to dry.
..View attachment 186475
Will definitely try the tin can and candle method.i HAVE OVER THE LAST yEAR STUDINGED THE PLANK BENDING. i HAVE 25 DIFFERENT CHAPTERS MOST OF THEM WITH SUB CHAPTERS. (sorry)
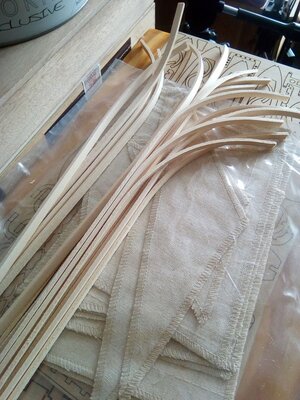
Out of all these methods, only a few is really working. some can be even harmful as caustic soda (NaOH). Soaking in water for a long time is either NO GOOG. The wood will such up water and by then1000 or more Bacterias, which can destroy de wood, so it is easy to bend and set nails, etc in, BUT the wood will dry out again, which gives some physical strengths, which can change the bulkhead position. In the end -after even having seen hear special equipment for bending- the is to me ONLY STEAM -high temperature- Electrically bending as seen here, with high temperature and FINALLY BUT NOT THE LAST "DRY BENDING" Many of you may not know it, BUT it WORKS and it is a very cheap tool. will add some pic. but it consists of an empty TIN (from Beans etc) which is Strongly faster too a piece of Wood horizontal. Now you take 3-4 candlelight (those from Chenice Restaurant, lit it and 30 min. later the tin is BURNING hot. Now simply add your planks -2mm no problem- and the good thing are, that the planks will stay bend, so one can make a batch
Why some are better than others, you will need to know, what is the raw material of Wood. You may be surprised WOOD is build up of 3 huge SUGAR molecules -YES sugar =GLUCOSE the smallest stone. The 3 parts is Cellulose 40-60% -HehiCellulose 40-60% and about 5 10% Lignin. Each sort has a different amount of mainly of Cellulose and Hemi-celluslose. To destroy this HUGE tridimensional Biochemical complex WE NEED a very high temperature
I have been using the old hot soldering iron technique successfully. Just keep dipping the plank in water to heat it and make steam.
I used Steam with very results. This Hot electricity device was not me. The HOT DRY METHODE es to me absolutely the best I have tried -have more than 40 on my back in building. The good thing with the dry method is that they STAY CURVED after treatment. On the pic. you see a batch done without further treatment. Everybody should use what they find the BEST one. I was just trying to tell you something, new-All builders) From the same person, I have got info about HOW TO SQURE GUNPORT by drilling.
Attachments
Your gunport method sounds interesting, looking forward to seeing that, I am about to cut the gunports out on my HMS Ontario build so this would be very timely for me.
Last edited:
I this moment I do not have the web address, but the conoNY ARE OVER Facebook doing a campaign with shall vidioYour gunport method sounds interesting, looking forward to seeing that, I am about to cut the gunports out on my HMS Ontario build so this would be very timely for me.
Attachments

I this moment I do not have the web address, but the conoNY ARE OVER Facebook doing a campaign with shall vidio
Attachments


- Joined
- Jan 12, 2021
- Messages
- 89
- Points
- 78

Tried all the above - they work fairly well with thinner wood . Just ordered this and will see if improved without distortion with thicket wood

Forgive me for this, but it reminds me of my Granddads joke of Grandma getting her Titts caught in the old style washing machine wringer LOL.
what happens if you have breast implants?Forgive me for this, but it reminds me of my Granddads joke of Grandma getting her Titts caught in the old style washing machine wringer LOL.
rattle rattle,,, bang bang bang....what happens if you have breast implants?
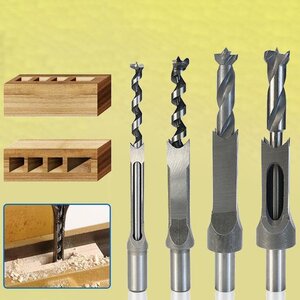
You would have a hard time using those square hole bits on a hull, pretty much useless for gun ports.
i found it tgis morning
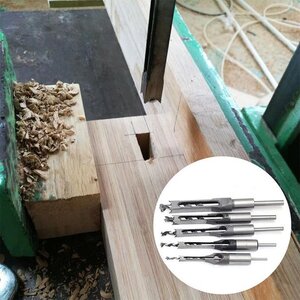
My German Fring Axel -with the dry Bending -made all the gunports on Victory in less than 2 hours, but if you have closed the hull with decks before -problems.you can't the gun port frame inside now.You would have a hard time using those square hole bits on a hull, pretty much useless for gun ports.
- Joined
- Oct 9, 2020
- Messages
- 2,348
- Points
- 488

I have one but what I did is I turned the blade upside down so that the less sharp edge is doing the crimping. This was a trick I found on this site. The reason I do it is because I was finding that my wood was getting cut instead of crimped. It's a little better doing it this way, but in my opinion it is still a hard tool to use.As a shipbuilding novice I bought an Amati plank bender (crimper?) from Cornwall Model Boats: a blunt blade is levered into the block with this tool. It's the size of a pair of pliers. I'm currently using it on 1.5mm bass planking and noting that it (obviously) leaves crimp marks on the inside of the curved piece and can I afford to have these in sight later or can I sand them out? The only downside so far is that the pivot screw undoes itself with use; I can cure this with a little Loctite on the screw thread.

In regards to these square bit drills: these are used in a mortising machine. Very useful in making perfect joints when making furniture. I don’t think one would meet with success trying to cut gun port openings. The video you supplied shows a mortising machine in action. The hull of a ship model won’t fit under the machines holders. If you have success cutting square holes in a model with these bits I applaud you. Good luck.
Mi friend from Germane Axel Kaullich -the one with the dry bending- confirms that it function. I cannot confirm it myselves, as with my nearly 89 years old, Ido not build anymore. so if you believe or not is op to you.sorryIn regards to these square bit drills: these are used in a mortising machine. Very useful in making perfect joints when making furniture. I don’t think one would meet with success trying to cut gun port openings. The video you supplied shows a mortising machine in action. The hull of a ship model won’t fit under the machines holders. If you have success cutting square holes in a model with these bits I applaud you. Good luck.
- Joined
- Oct 9, 2020
- Messages
- 2,348
- Points
- 488
And in addition you would destroy your work that you did with the hull. I find the only thing that works for the portholes is to drill small holes around the perimeter of the square, or parallelogram, and then using the old XactoYou would have a hard time using those square hole bits on a hull, pretty much useless for gun ports.