Soleil Royal by Heller - an Extensive Modification and Partial Scratch-Build by Hubac’s Historian

Progress has been a bit slow, lately. I have continued to be amazed by the amount of prep that is necessary before painting the forward bulwark pieces.

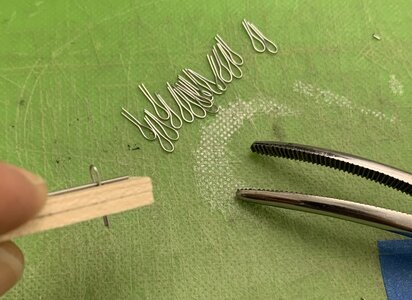
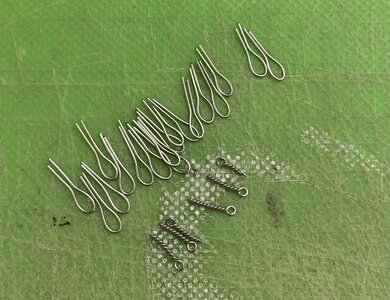
I was having trouble making good eyebolts out of 28 gauge annealed wire. The scale wasn’t quite right, and the eyes were more ovoid than round, before the stems would break from twisting. So, I switched to 32 gauge galvanized steel wire, and consulted Marsalv’s amazing log for Le Gros Ventre.

NOTE: owing to the perpetual disagreement between MSW and SOS, I am not permitted to post links to other builds from one site to the other.

Somewhere, in there, he shares his particular technique for making these eyes, and it involves twisting the shank through a hole drilled into a clothes pin; doing so ensures a straight shank and a neatly centered eye.

I did not happen to have any wooden clothes pins, on hand, so I took a poplar scrap and was able to achieve the same results:
9FEFC7BF-38DF-4D9A-95B2-F264C059B812.jpeg
C19D750C-8252-4752-9FCE-F3E73BB31C3E.jpeg

I found that I had some difficulty while drilling into the bulwarks for these eyes. I repeatedly drilled all the way through the bulwarks. On a wood model, this would be a disaster! On this model, I could simply plug and fair the holes, on the outside, with .030 styrene rod.
775793C1-8201-4104-BBC9-E2317D959957.jpeg

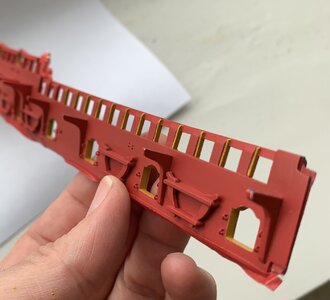
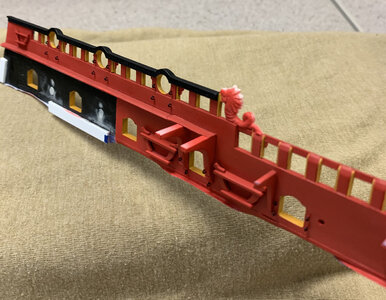
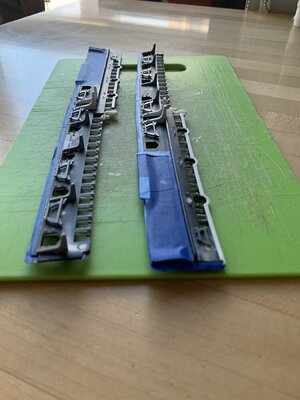
I had been debating whether to glue-in the gangway supporting knees, before paint and assembly. Ultimately, I decided that it would be much easier to locate these accurately before assembly. As with all of the stock kit parts, I spend a significant amount of time and effort cleaning these parts up and breaking all sharp edges.
84B040A7-ED08-4651-92C9-6F33BD2077DC.jpeg

Lastly, I drilled through the cap rails for the baying pins that I will add later:
A7A0BB48-FF19-4236-B311-2774DF0C9C8B.jpeg

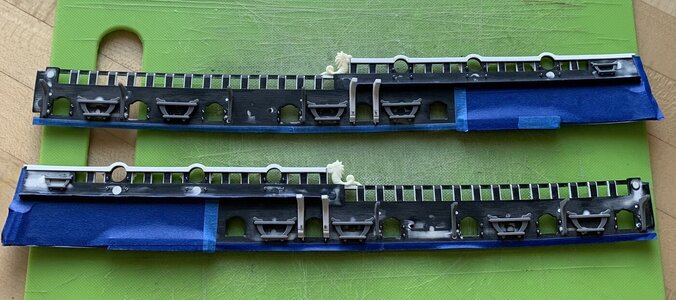
After masking any surface that I didn’t want to scrape away paint from, later, the parts were ready for a coat of spray primer:
952BD600-A1CD-423A-8A49-331261E14106.jpeg

The beauty of the primer coat is that it always reveals whatever might need a little additional attention. I can see that there are a few places where I let the upper port enhancements into the drift rail, above, but was a little overzealous. A small bit of filler will clean that up.

Thank you all for looking in. More to follow!
 
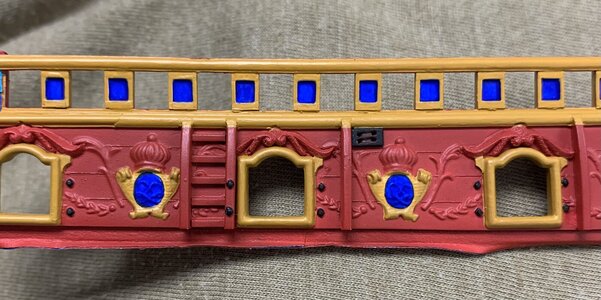
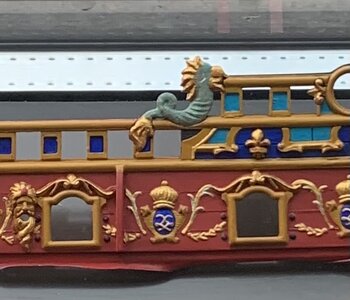
Well, it was a sweltering and otherwise frustrating day, but I managed to finish painting the stern gallery bulwark. My moment of zen:

B68F06E4-76E8-400A-B0EB-982156D04FFE.jpeg

Interestingly, the brighter gold highlights only seem to pop in muted natural light. The monogram escutcheons were interesting to paint because the carved detail is incised; I first fed gold into the V-channel, and then veeery carefully painted the cobalt color up to the edges. I can’t say with absolute authority that this color scheme is completely authentic to the times, but it does make for a very vivid display. It is just time consuming.

I have three complete months until the Joint Clubs conference in New London. Completing the bulwark painting and installing them in time for the show seems like a daunting task. The paint work must be impeccable in order to show the frieze and amortisement to best advantage. At the least, maybe I’ll get one completed broadside.

I will try. We shall see.
 
Well, it was a sweltering and otherwise frustrating day, but I managed to finish painting the stern gallery bulwark. My moment of zen:

View attachment 241507

Interestingly, the brighter gold highlights only seem to pop in muted natural light. The monogram escutcheons were interesting to paint because the carved detail is incised; I first fed gold into the V-channel, and then veeery carefully painted the cobalt color up to the edges. I can’t say with absolute authority that this color scheme is completely authentic to the times, but it does make for a very vivid display. It is just time consuming.

I have three complete months until the Joint Clubs conference in New London. Completing the bulwark painting and installing them in time for the show seems like a daunting task. The paint work must be impeccable in order to show the frieze and amortisement to best advantage. At the least, maybe I’ll get one completed broadside.

I will try. We shall see.
Wonderful work once again Marc,

Personally I would say don't put yourself under too much pressure to get to a certain point in the build, show where you are up to at that point, personally I am quite happy to se an in progress build and there will be another show next year.

Cheers,
Stephen.
 
And, so, the elephant eating contest goes into full swing. Fortunately, because I was such a good little brother, when we were kids, and I let my (now) superstar makeup artist sister use me as a hair and face model, my sister has agreed to let me borrow her airbrush and mini compressor that she sometimes uses to apply makeup. One hand washes the other!

Buried, somewhere in the boxes from our move to Brooklyn, is my own Badger airbrush, but for the life of me - I can’t find it. Anyway, it has been such a wonderful rediscovery of the magic of airbrushing. There is simply no better way to paint broad, highly detailed surfaces.

Early returns on the forward bulwark pieces are looking very good, so far. I was careful to mask off the monogram escutcheons - the crossed “L”s - because an undercoat of red would make the cobalt look dark and purplish - definitely not what I’m after. I am also very pleased that I took the time, during the modification stage, to engrave plank lines between the main deck guns.

B3415C05-5836-4286-BC1C-92FA414CFFFD.jpeg

Without a doubt, it will always be the yellow ocher that is the most time consuming stage, but I have determined that a 2:1 ratio of paint to tap water is the perfect viscosity for even application with good coverage. It still takes 2-3 applications, over a color like red, but that is far better than the 6-7 I was averaging before.

0CC63D7C-DEC8-462B-A905-EECC885A3762.jpeg

The most fiddly painting is the timberhead trim that I applied to box-in the timberheads. It is exactly as tedious as painting a picket fence:

3B586F79-F863-4F8C-BD5B-ADA38C04B44E.jpeg

Eventually, the walnut ink wash will work its magic to lower the volume on these colors, while adding depth and dimension to the surface.

Whereas, in the past I cringed at the thought of traveling with these fragile, bigger parts that I already have invested a huge amount of time in - I have now acquiesced to the reality that that is the only way I will be able to jam-in the number of hours it will take to cross the finish line (of this build stage), by October.

Wish me luck!
 
To say that my self-imposed deadline has lit a fire under me would be an understatement! It has been a week, now, and I’ve been painting in the day AND in the evenings.

At this stage, all of the primary colors are down and I am ready to spray the ink wash before the gilding of the ornaments. It is all extremely vivid, right now, but these pics will give a sense of how the frieze will come to life on the aft bulwark pieces:

6F7268EC-EF59-4E6D-B905-4EC67351B20A.jpeg

Yellow ocher, I think, is a good unifier of these three colors as they all seem to play nicely with the yellow.

Figuring out exactly how I wanted to highlight the timberheads took a minute, and execution of the painting took many more minutes!

67B60576-4882-4F45-B3AF-773AE6E9565F.jpeg

I wanted to draw attention to the fore and sprit sheet block entry, so I painted it black. It seemed unlikely that the sheaves, at this time, would be cast bronze, so I painted them a dark wood brown.

Merely by padding the thickness of the sheer railing by 1/32”, I have created a much more realistic sense of scale for this detail:

DE9DDE78-1EB5-476C-963A-B277C06275A9.jpeg

1865BE7A-829B-49B3-80EF-AD1BCADB928E.jpeg

So, I will finish up the wash and ornamental paint for this piece at home. Incidentally, the dolphin hances will get the same aqua treatment as the figurehead, and this will be a consistent theme that runs through the ship, all the way to the dolphin on the rudderhead.

Tonight, I’ll airbrush the red base-coat for the port side bulwark piece, and the whole process will begin again! Despite my urgency, this is the standard that I will doggedly maintain.

Thank you for the likes, comments and for looking in.
 
It has been about two and a half weeks of very focused and intensive paint work. The starboard, forward bulwark is fully painted, and I have the base colors down for the port side. Here is an illustration of the effect that the walnut ink has in muting the intensity of the base colors:
CBA7CA6D-FD90-4F87-B3CF-76155BCEB035.jpeg
383450CE-F058-47BD-9443-AAEA8CE9A0A6.jpeg

These pictures give a sense of the difference, but the effect is more clearly apparent, in person. The brown of the walnut ink lends just enough of a green cast to the lighter, cerulean blue to better approximate a period French blue. It also has the effect of transforming the darker cobalt to more of an ultra-marine shade.

The following closeup gives a good sense for the interplay between the darker old gold and the brighter gold used to highlight all of the larger ornaments:
ACB97F3C-5C4E-4B4F-A81D-AF4291161FE5.jpeg

It is also more apparent in that picture, the way the ink gets into the moulded depressions of the yellow ocher trim; they dinge-down just enough to have credible depth.

While it may or may not have been a feature of actual practice, in the 1680s, I have made an artistic decision to incorporate silver leaf into areas of the ornamental program where it adds emphasis and clarity to the carved works. Here, I’ve decided to highlight the under reliefs of the acanthus branches:
ED7856CC-D143-4C1E-B8E9-4054B3770B91.jpeg

I am pleased with the dolphins, and even used silver to pick-out the eye relief. One thing to note, this is the one dolphin hancing piece where the hancing moulding is located properly beneath it; on the aft bulwarks, owing to the layout of the sheer steps and the timberhead railings, that is not the case. I included the mouldings there, anyway, because they added more than they detracted from the overall design.

Well, after very much retouching, this is the highest quality brushwork I can produce. I will methodically continue along this path, right up to the show in October. At the least, I am hoping to have one full broadside installed. We’ll see. It is a very busy summer, and the days and weeks are just ripping by!

Today, I am giving myself a little break from painting, and am making the hanging knees that are just visible beneath the break of the quarter deck.
 
Hello Marc,

I am so very pleased when I see you have posted. Your work inspires me to try my very best. To give these reliefs depth is an amazing thing to accomplish - shadows don't work the same way at scale as they do in the real world (if that makes sense) and you have accomplished something that is so very, very hard to do. Thank you for sharing your work with us!
 
Another modeler on MSW asked me how I use the walnut ink wash, so I wrote a detailed description. Having gone to that effort, I thought I might as well post it here for anyone else that is interested:

The walnut ink was something suggested to me at an art supply store. It has numerous advantages over ready-mixed acrylic washes - chief among them is that the product is fully reversible right up until the sealer coat goes on.

In the early days, I applied this stuff straight out of the bottle and wiped away the excess using a Q-tip wrapped in old cotton t-shirt scraps. This worked well, but you couldn’t do much surface area, at a time, because the ink dried so quickly. This wasn’t a big deal because the ink is re-activated with only a little water on a damp brush. Anyway, my early applications to the gunport linings were probably a bit on the heavy side.

I discovered that not all acrylic paints are as sturdy, when it comes to wiping away the excess. The artists’ acrylic yellow ocher that I use - from Vallejo - is pretty soft and fragile for a good while after application. In the interest of time and a desire to not have to retouch the yellow paint all of the time, I developed another, much simpler approach.

Over time, I arrived at a protocol that allowed for a greater working area and much more easily modulated results. Here is what I do.

First: Shake the ink bottle thoroughly; there is a fine sediment that settles to the bottom, and I am certain that this lends some beneficial result to the final effect.

Step 2: Mix a 1:1 ratio of ink to tap water in a shot glass. Shot glasses are great for mixing small paint batches because they don’t allow the mix to spread out too thin and dry out prematurely. What you are aiming for is a mixture that resembles Soy Sauce.

Step 3: Use a wide, flat brush to work the mixture into every crack and crevice. Don’t worry at all about doing this carefully. Just cover everything in a 2-3 square inch area. The result will be too dark, blotchy and it will begin to dry on you before you can even get to the next step. Don’t worry - this is all okay!

Step 4: Dampen a smaller flat brush in clean water, and float a layer of water over the entire area you just covered. This will instantly dilute and begin to homogenize the ink. Blot your small brush onto a smooth-finish table napkin (unlike paper towels, they don’t release loose lint), and then very lightly draw up any loose liquid still floating on the surface, blotting the excess as it becomes apparent that the brush isn’t taking up any more excess.

Don’t over-worry the cracks and crevices, these are the places you want the ink mix to wick-in and dry.

The long mouldings take a little patience to find that right balance of fluid so that just a little color is left in the hollows.

If, ever, you feel you messed up, just re-saturate the area and start over. Interestingly, the next section seems to blend seamlessly into the previous section. There’s a little art to it, but it is really a pretty simple process to master with absolutely zero permanent risk to the model.

One thing to try and avoid is allowing air bubbles to collect on the surface and dissipate on their own, because they will leave ink freckles after they dry. Not a big deal, if they do, but smoothing them away with the damp blotter brush eliminates this problem.

All of this being said, I haven’t even tried model purposed washes, and they also seem very easy to use and modulate - at least on the various YouTuber channels I watch. Walnut ink just happens to be what I started with and it is working so nicely for me.
 
I’ve been enjoying a very restful and beachy vacation in Cape Cod. I brought one of the aft upper bulwark plates with me, and have been busily cleaning up the frieze, securing eyebolts for the gun tackles, filling some holes and drilling others. Not much to really show there.

I did, however, happen upon this other build of the Heller kit, and it is wonderfully vivid in it’s use of color and shading:

https://modellistinavali.forumattivo.com/t3669p75-soleil-royal-1-100-heller

I thought it may interest some of you to take a look.
HELLO Marc!:)
It is nice work in that link You gave, but yours I like much MORE!!! :)))
ALL THE BEST!
Kirill
 
I don’t seem to have any really early pictures on my phone, anymore. So, I will open with the frieze, which was remarkably complicatedView attachment 131322
View attachment 131323
View attachment 131352
View attachment 131354
View attachment 131351
View attachment 131353
View attachment 131348
View attachment 131349
View attachment 131324
View attachment 131347
View attachment 131328
View attachment 131329
View attachment 131325
There is much more that I can and will post, but I have some other things to take care of, right now. More to follow...
Hallo Marc alias @Hubac’s Historian
we all wish you the BEST and a HAPPY BIRTHDAY
Birthday-Cake
 
Back
Top