Thanks for sharing the photos Marc. I have never been to a model ship/boat exhibition and it was interesting for me to see how it all worked. I was delighted to see several excellent Vasas at the show. I'm sure your model was well-received!The show was really very good - a near-record turnout, with about 110 guests, and I believe 105 models. Toms10 (Szabo) earned the Jim Roberts award for his HMS Leopard, and the recognition is well-deserved.
My only regret of the show is that I somehow missed Fried Clams’s Stonington Dragger. I only realized this after the fact when going through pictures of the show that our club member Vadim had taken (see below). That really is a terrible oversight, on my part, because I would have really liked to see the model and to meet Gary, in person. I’m really sorry about that Gary.
https://photos.google.com/share/AF1...?key=M0NvMmVWVEloWVRSbzgzWktwRC1BSV9aZTNtd2pR
SR was, indeed, well-received! I gave about a 20-minute presentation, following Chuck’s excellent ropewalk demonstration - which is a hard act to follow. At first, I only had a couple of new friends from the Jersey club at the table, but Mike Swanson did some rustling for me, and I ended up with a very engaged group of 10-12. This was about perfect for me, as it has been a long while since I did any “public speaking” - my voice didn’t quaver much, but my hands sure did!
Many thanks to our club president Dan Pariser who took the time to mount five specific images of SR and her contemporaries, which very much helped with the story I was trying to tell about the ship and this model. Without these visuals, Dan, the presentation would have been a very different experience.
I owe my wife and two children many thanks for coming out to the show and supporting/enabling Dad with his obsession. They enjoyed themselves, and I think they were surprised to see the range of talent and subject matter on display. Many thanks to them, as I know they hear and see quite enough about ships at home.
After quite a bit of traffic, we made it home, we ate and then I went to bed and slept for nearly 12 hours. Today, I am clear-headed for the first time in ages. I will still leave the model alone for a couple of weeks. I want to be excited about it, when I take up with it again.
-

Win a Free Custom Engraved Brass Coin!!!
As a way to introduce our brass coins to the community, we will raffle off a free coin during the month of August. Follow link ABOVE for instructions for entering.
-

PRE-ORDER SHIPS IN SCALE TODAY!
The beloved Ships in Scale Magazine is back and charting a new course for 2026!
Discover new skills, new techniques, and new inspirations in every issue.
NOTE THAT OUR FIRST ISSUE WILL BE JAN/FEB 2026
You are using an out of date browser. It may not display this or other websites correctly.
You should upgrade or use an alternative browser.
You should upgrade or use an alternative browser.
Soleil Royal by Heller - an Extensive Modification and Partial Scratch-Build by Hubac’s Historian
- Thread starter Hubac’s Historian
- Start date
- Watchers 81
-
- Tags
- 1689 heller hubac refit soleil royal
Hi Marc,
I am really happy the show went well for you.
Lovely photos, looks like there were some wonderful models at the show.
Cheers,
Stephen.
I am really happy the show went well for you.
Lovely photos, looks like there were some wonderful models at the show.
Cheers,
Stephen.
There were many impressive models - not the least of which was a 6’ - at least - model of the cruise ship, the SS United States. The model was fantastically and impeccably detailed.
As I haven’t had much time at all, to devote to the current model, I have spent quite a fair amount of time conducting research for Soleil Royal 1670. As a GenX’er, I am continually amazed by the strides we have made in computing and on-line connectivity; we’ve come a long way from DOS!
It took a little fiddling, but I finally figured out how to navigate the database for the French Archives Nationales. If you recall, I was initially intrigued by a footnote I found in Ronald Portanier’s dissertation on the evolution of ornamental carving, in French naval architecture.
Back in June, I sent a digital file request for this comparison, dating to 1672, between Soleil Royal and the Royal Charles, ex Naseby. I referenced the archive location noted in Portanier’s work MAR/B/5/3 (the archival coding specifically relating to armaments and naval technologies), and included a description of the specific subject matter in the additional information section of the request form. With boundless hope, and breathless anticipation, I pressed SEND, and heard nothing back, thereafter.
Or, so I thought. After the New London show, I decided to re-visit these archives. Searching through abstracts of other files that mention and/or discuss SR, I found the following array of interesting things:
I had great hope that this file, “Les Pieces de sculpture..” might be a Hyatt-like description of Soleil Royal’s stern. I requested this document.
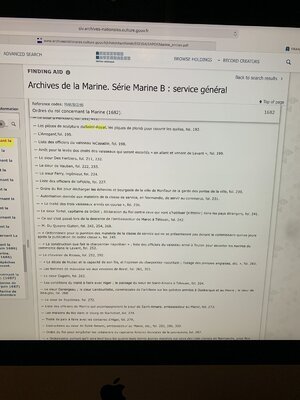
More recently, I discovered this document which apparently discusses the wax model made for the re-fit ornamentation in 1688. I hope to receive this document some time this week.
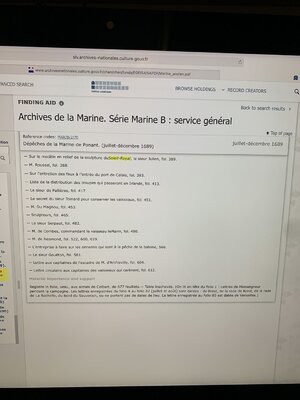
Eventually, I will request this document, which describes the flags carried by SR:
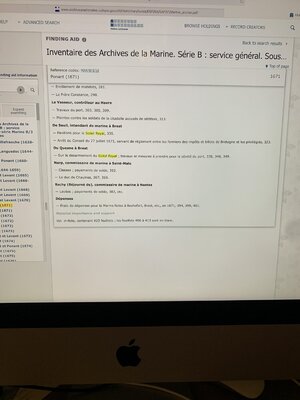
So - back to the first request I made for the SR/RC comparison of 1672. I had thought that Mr. Portanier had mis-identified the location in his footnotes because MAR/B/5/3 seems to reference documents between the years of 1691-1759
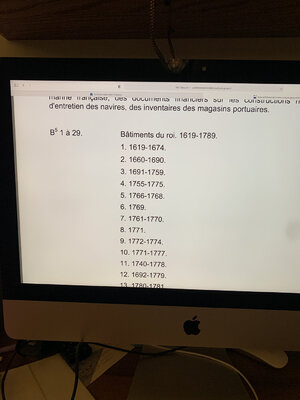
Surely, he must have meant MAR/B5/2. So, I sent a second request referencing this other file location, along with a request for the sculpture document.
Much to my amazement, within five days I noticed an email containing a link to the sculpture document from the file-sharing server WeTransfer. Now, this was enlightening to me. I had been expecting these documents to come from an email address directly connected to the Archives Nationale. When I looked back to my emails from June, I discovered the WeTransfer document linking me to the SR/RC comparison! I had the damn ship in my back pocket for months, and didn’t even realize it! Naturally, the link had expired. ‘Turns out - Mr. Portanier’s referenced location was correct, and I had only succeeded in confusing matters with my second request for the wrong location.
I wrote to my contact at WeTransfer explaining how I had managed to gum-up the works; she was, naturally, having a lot of trouble finding the document in the wrong location.
Anyway, at the end of the day, Ms Wulf ended up sending me the comparison, the sculpture document, what seemed like a fascinating accounting of the “radoub”, or rebuild, and also the ship-log of SR2, from the Valez/Malaga campaign of 1704. To say that I was overjoyed just does not adequately express how I really felt.
And, so, I began the lengthy process of transcribing and translating these variously legible, hand-written documents. I started with the sculpture document. To give you an idea, this letter which is addressed to the Intendant at Brest, Msr. de Seuil, looks like this:
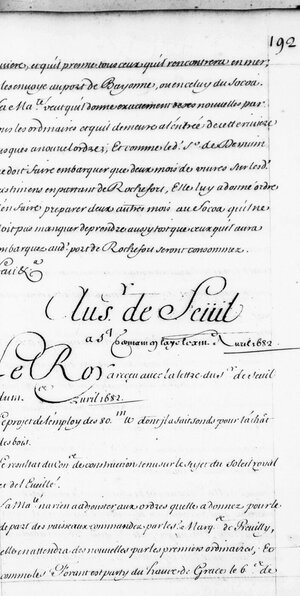
Deciphering something like this is particularly challenging because the spellings are sometimes antiquated, words often run together and seem like one word, and writers of the time employed a strange and archaic form of abbreviation.
In Google Docs, I began to key in a letter by letter transcription, fortunately the software seems to recognize archaic spellings and often suggests the modern spelling and/or phrasing. This combined with my keying possible words into my Google Translate app, helped me to parse a likely meaning from the most opaque sections. I have found that, as I work through a document, I will often encounter more legible examples of words and characters, that help clarify other less clear sections of the text. It is a backward and forward process of revision.
My method is to alternate, paragraph by paragraph the French transcription with the rough English translation. I then highlighted, in blue, any particular passages that had to do with SR, specifically.
Well, this particular document did not turn out to be the treasure-trove I was hoping for. Mostly the correspondance (from a sender I have not yet identified, which does not look like the hand of Colbert) concerns the amassing and distribution of sailors and soldiers, among the major port fleets.
Here is what I found of interest, relating to SR:
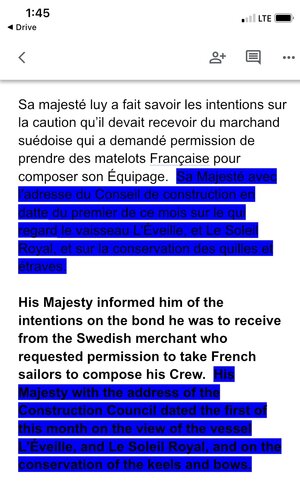
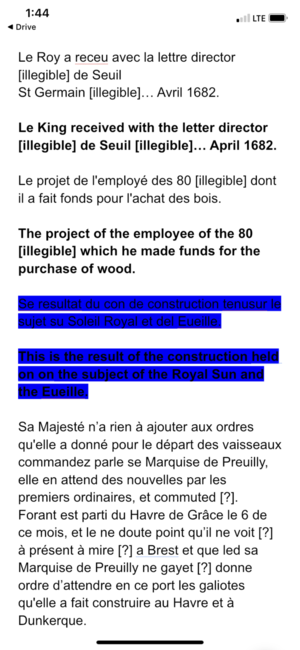
also,
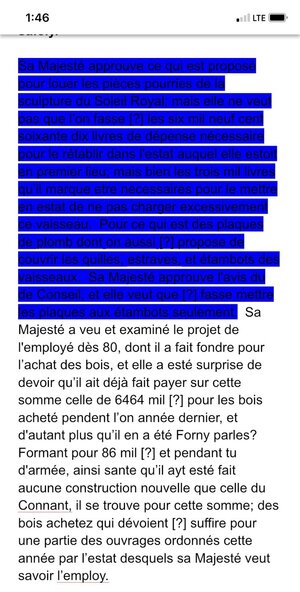
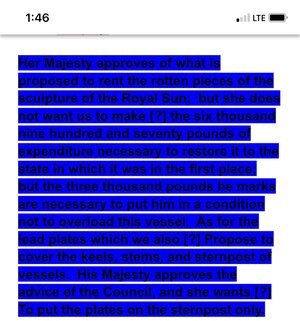
What is interesting to me about these passages is that they were clearly experimenting with methods aimed at preservation of the backbone of the ship, while simultaneously considering a scaling-back of the ornamental works, which were decaying, some 12 years after launching.
 , all well and good. Next, I turned to the radoub document:
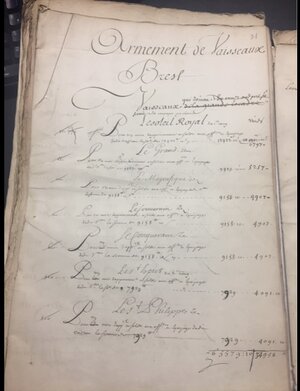
I quickly discovered that a lengthy and thorough translation would not be necessary. This was not, after all, a lengthy accounting of the specific cost estimates for the re-build in 1688/89. Instead, this is an aggregate estimate for the ships returning to port of Brest in August of 1690, one month after Tourville’s victory off Cap de Beveziers. The costs listed are for the radoub (repair of battle damage), careening and general maintenance of the listed ships. It is a fascinating document in its own right, but not especially illuminating toward my quest for understanding the ship as she first was.
Next up, I have turned my attention to the quite lengthy (16 pages!) comparison survey of SR and the RC:
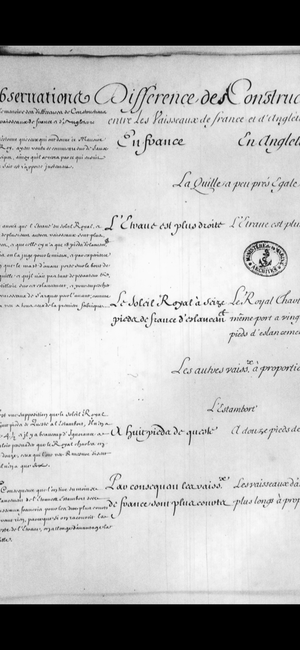
The observations and conclusions noted in the left margins are written in such a small and stylized cursive that they are incredibly difficult to decipher. I have found that my letter for letter transcription has to be conducted via magnification of the PDF files on my phone. Even then, the translations are only approximate, but nonetheless illuminating. Here is what I have so far:
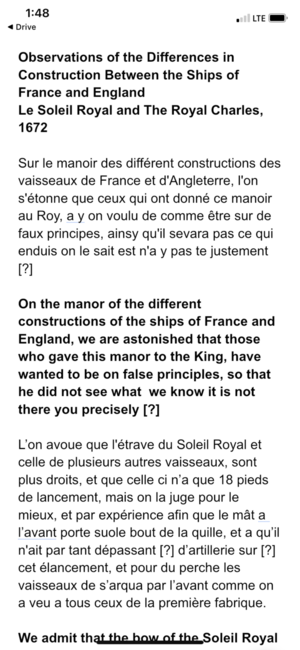
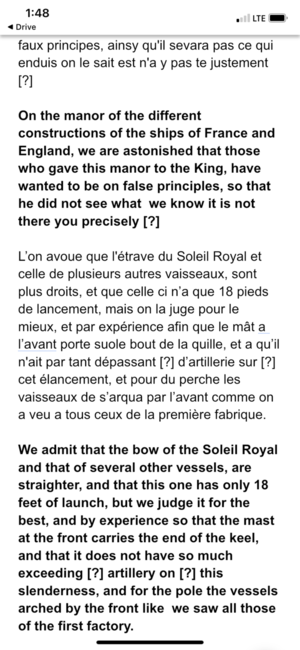
And, so, this is all a process that only slowly yields fragments of a mosaic that might, or might not add up to a portrait of the ship. Perhaps I am merely re-treading ground already covered by Lemineur and others before me. I believe that is a journey I must embark upon for my own edification, though. I will not give up!
What little modeling I have done concerns the buttressing knees of the channels. One advantage of lowering the fore and main channels to below the main deck guns is that there is now more surface mounting area to allow for a more credibly functional support than what the stock kit provides. The process requires some careful coping around the top edge of the upper main wale, and around the garland carvings. It is slow work:
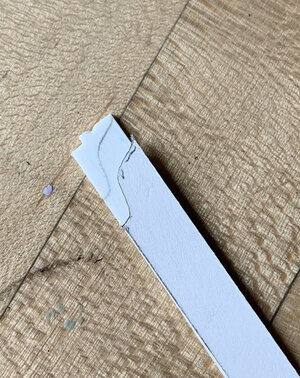
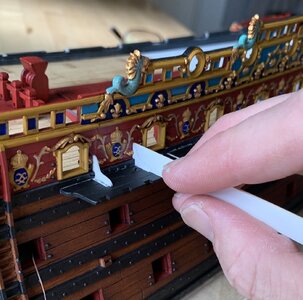
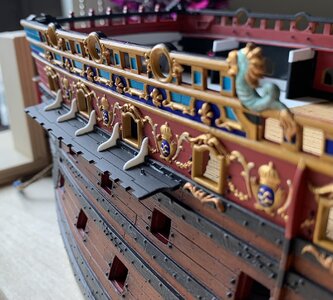
Eventually, I will add the simulated bolt heads, as I have done elsewhere throughout the model. Note how the forward end of the fore channel flares out further than stock, in order to compensate for the lower positioning; this is necessary so that the shrouds will clear the reverse tumblehome of the upper bulwarks.
The iphone sent me a nice reminder from November of 2018, of this project’s early stages:
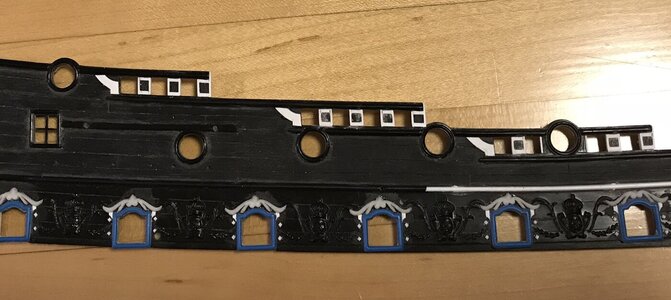
She has come a long way since then!
Well, that was all a mouthful. I hope I have not bored you all to death with my process. Until next time, thank you all for your continued interest, your likes, and your comments.
It took a little fiddling, but I finally figured out how to navigate the database for the French Archives Nationales. If you recall, I was initially intrigued by a footnote I found in Ronald Portanier’s dissertation on the evolution of ornamental carving, in French naval architecture.
Back in June, I sent a digital file request for this comparison, dating to 1672, between Soleil Royal and the Royal Charles, ex Naseby. I referenced the archive location noted in Portanier’s work MAR/B/5/3 (the archival coding specifically relating to armaments and naval technologies), and included a description of the specific subject matter in the additional information section of the request form. With boundless hope, and breathless anticipation, I pressed SEND, and heard nothing back, thereafter.
Or, so I thought. After the New London show, I decided to re-visit these archives. Searching through abstracts of other files that mention and/or discuss SR, I found the following array of interesting things:
I had great hope that this file, “Les Pieces de sculpture..” might be a Hyatt-like description of Soleil Royal’s stern. I requested this document.

More recently, I discovered this document which apparently discusses the wax model made for the re-fit ornamentation in 1688. I hope to receive this document some time this week.

Eventually, I will request this document, which describes the flags carried by SR:

So - back to the first request I made for the SR/RC comparison of 1672. I had thought that Mr. Portanier had mis-identified the location in his footnotes because MAR/B/5/3 seems to reference documents between the years of 1691-1759

Surely, he must have meant MAR/B5/2. So, I sent a second request referencing this other file location, along with a request for the sculpture document.
Much to my amazement, within five days I noticed an email containing a link to the sculpture document from the file-sharing server WeTransfer. Now, this was enlightening to me. I had been expecting these documents to come from an email address directly connected to the Archives Nationale. When I looked back to my emails from June, I discovered the WeTransfer document linking me to the SR/RC comparison! I had the damn ship in my back pocket for months, and didn’t even realize it! Naturally, the link had expired. ‘Turns out - Mr. Portanier’s referenced location was correct, and I had only succeeded in confusing matters with my second request for the wrong location.
I wrote to my contact at WeTransfer explaining how I had managed to gum-up the works; she was, naturally, having a lot of trouble finding the document in the wrong location.
Anyway, at the end of the day, Ms Wulf ended up sending me the comparison, the sculpture document, what seemed like a fascinating accounting of the “radoub”, or rebuild, and also the ship-log of SR2, from the Valez/Malaga campaign of 1704. To say that I was overjoyed just does not adequately express how I really felt.
And, so, I began the lengthy process of transcribing and translating these variously legible, hand-written documents. I started with the sculpture document. To give you an idea, this letter which is addressed to the Intendant at Brest, Msr. de Seuil, looks like this:

Deciphering something like this is particularly challenging because the spellings are sometimes antiquated, words often run together and seem like one word, and writers of the time employed a strange and archaic form of abbreviation.
In Google Docs, I began to key in a letter by letter transcription, fortunately the software seems to recognize archaic spellings and often suggests the modern spelling and/or phrasing. This combined with my keying possible words into my Google Translate app, helped me to parse a likely meaning from the most opaque sections. I have found that, as I work through a document, I will often encounter more legible examples of words and characters, that help clarify other less clear sections of the text. It is a backward and forward process of revision.
My method is to alternate, paragraph by paragraph the French transcription with the rough English translation. I then highlighted, in blue, any particular passages that had to do with SR, specifically.
Well, this particular document did not turn out to be the treasure-trove I was hoping for. Mostly the correspondance (from a sender I have not yet identified, which does not look like the hand of Colbert) concerns the amassing and distribution of sailors and soldiers, among the major port fleets.
Here is what I found of interest, relating to SR:


also,


What is interesting to me about these passages is that they were clearly experimenting with methods aimed at preservation of the backbone of the ship, while simultaneously considering a scaling-back of the ornamental works, which were decaying, some 12 years after launching.
 , all well and good. Next, I turned to the radoub document:
I quickly discovered that a lengthy and thorough translation would not be necessary. This was not, after all, a lengthy accounting of the specific cost estimates for the re-build in 1688/89. Instead, this is an aggregate estimate for the ships returning to port of Brest in August of 1690, one month after Tourville’s victory off Cap de Beveziers. The costs listed are for the radoub (repair of battle damage), careening and general maintenance of the listed ships. It is a fascinating document in its own right, but not especially illuminating toward my quest for understanding the ship as she first was.
Next up, I have turned my attention to the quite lengthy (16 pages!) comparison survey of SR and the RC:

The observations and conclusions noted in the left margins are written in such a small and stylized cursive that they are incredibly difficult to decipher. I have found that my letter for letter transcription has to be conducted via magnification of the PDF files on my phone. Even then, the translations are only approximate, but nonetheless illuminating. Here is what I have so far:


And, so, this is all a process that only slowly yields fragments of a mosaic that might, or might not add up to a portrait of the ship. Perhaps I am merely re-treading ground already covered by Lemineur and others before me. I believe that is a journey I must embark upon for my own edification, though. I will not give up!
What little modeling I have done concerns the buttressing knees of the channels. One advantage of lowering the fore and main channels to below the main deck guns is that there is now more surface mounting area to allow for a more credibly functional support than what the stock kit provides. The process requires some careful coping around the top edge of the upper main wale, and around the garland carvings. It is slow work:


Eventually, I will add the simulated bolt heads, as I have done elsewhere throughout the model. Note how the forward end of the fore channel flares out further than stock, in order to compensate for the lower positioning; this is necessary so that the shrouds will clear the reverse tumblehome of the upper bulwarks.
The iphone sent me a nice reminder from November of 2018, of this project’s early stages:

She has come a long way since then!
Well, that was all a mouthful. I hope I have not bored you all to death with my process. Until next time, thank you all for your continued interest, your likes, and your comments.
Last edited:
Wow Marc,
I hope you find the information you seek, though by the sounds of it that may not happen, all the same enjoy the journey.
I cannot recall how you do your rivet heads, maybe you might be able to refresh my memory when you do them on the knees.
Cheers,
Stephen.
I hope you find the information you seek, though by the sounds of it that may not happen, all the same enjoy the journey.
I cannot recall how you do your rivet heads, maybe you might be able to refresh my memory when you do them on the knees.
Cheers,
Stephen.
Hello, Stephen! What I do for the bolt-heads is to use a single-edged razor to slice thin wafers (about a heavy 1/64”) from .020 Evergreen styrene rod. I spread these wafers out over my cutting surface, so that they’re not clumped together. Then, I flash them with a wand lighter holding the flame about a half-inch above the cutting surface. The heat causes the wafers to dome on one side, and this is the trick to making them look like bolt heads. The heat also expands their diameter slightly.
To apply them to the model, I sharpen a toothpick and apply a small drop of styrene cement wherever I want a bolt head. Then, I use the tip of a razor sharp #11 knife to pick up a wafer, dome side up, and place it over the glue dot. The cement will weld the wafer pretty instantly. It seems super tedious, and it is a little bit so, but it’s the kind of thing where you settle into a groove and before you know it, you’ve covered a large surface area.
This same technique, with a larger diameter styrene rod, worked wonders to simulate the grape cluster on the lower finishing of the quarter galleries.
Thanks for the explanation Marc,Hello, Stephen! What I do for the bolt-heads is to use a single-edged razor to slice thin wafers (about a heavy 1/64”) from .020 Evergreen styrene rod. I spread these wafers out over my cutting surface, so that they’re not clumped together. Then, I flash them with a wand lighter holding the flame about a half-inch above the cutting surface. The heat causes the wafers to dome on one side, and this is the trick to making them look like bolt heads. The heat also expands their diameter slightly.
To apply them to the model, I sharpen a toothpick and apply a small drop of styrene cement wherever I want a bolt head. Then, I use the tip of a razor sharp #11 knife to pick up a wafer, dome side up, and place it over the glue dot. The cement will weld the wafer pretty instantly. It seems super tedious, and it is a little bit so, but it’s the kind of thing where you settle into a groove and before you know it, you’ve covered a large surface area.
This same technique, with a larger diameter styrene rod, worked wonders to simulate the grape cluster on the lower finishing of the quarter galleries.
Nice little trick, I will try to remember that one.
Cheers,
Stephen.
WOW, it's a titanic job!
I am amazed.
I am amazed.
From a life standpoint, my sister and I have made tremendous strides in sorting out our father’s affairs, and our current biggest hurdle is getting approval from his long-term care insurer for assisted living. Steadily, we are getting there, and I appreciate those who have asked, just as I appreciate everyone who comes to visit me here.
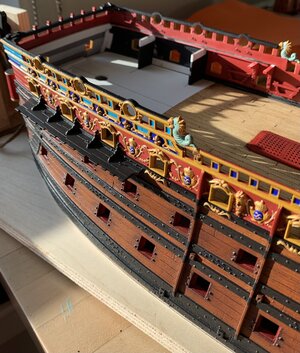
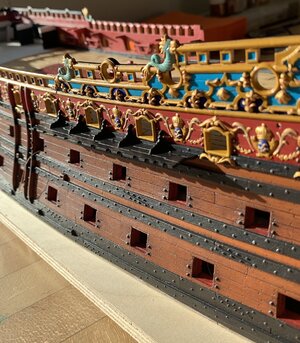
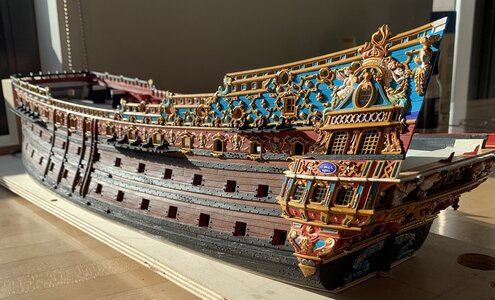
I have managed to sneak-in a few hours, here and there, and I have completed all of the port side buttressing knees of the channels, and I got everything nicely re-painted and pretty. In general, lowering the channels pretty dramatically changes the whole aspect of the model, and the difference is pleasing to me:

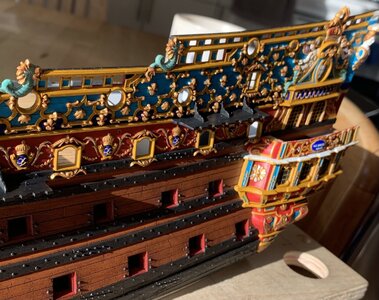
The mizzen channel knees were challenging to cope over mouldings and around the fleurs, but I am happy to have lowered them to here, where there is less interference with the frieze:
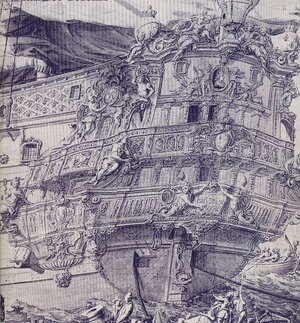
I am using this portrait of the DR, circa 1680, as justification for this placement:
I continue to comb through the archives, but I have yet to find anything vividly descriptive about the ship’s pre-refit external appearance. Despite the beautifully florid cursive, I’ve come to realize the hard truth that the letter writers and record keepers of 17th C. France were basically clerks. Mostly their correspondence has to do with SR’s comings and goings; armaments and dis-armements; payments made/owed to painters and sculptors; cost estimates relating to her refit, etc. It is all fascinating, and it will all get its due mention in my book, but it does not help me paint the picture of the ship.
Where are the artists sharing their wonderfully descriptive observations, when you need them?!
What I’m hoping to find is something along the lines of this:
”The morning fires shone brightly upon the gilded ornaments of Soleil Royal and her heights rose up and became one with the azure sky. The warrior of the Americas clung resolutely to the port side, while that of Africa peered off in the middle-distance - daring his lesser adversaries to emerge from the morning mist. Presiding above, with shimmering rays of gold and silver gilt bursting past his golden chariot is the Sun King, himself…”
And, so forth. It must be out there, somewhere, right?
Anyway, I can now get busy with fitting and prepping the starboard upper bulwark for paint. I can also go ahead and design my stove - that will make a nice little side project. Before long, I can design and make the next tier of stern lights, which will enable me to finish off the wrapping stern walk.
As always, thank you for your likes, comments and for looking-in. More to come!
I have managed to sneak-in a few hours, here and there, and I have completed all of the port side buttressing knees of the channels, and I got everything nicely re-painted and pretty. In general, lowering the channels pretty dramatically changes the whole aspect of the model, and the difference is pleasing to me:


The mizzen channel knees were challenging to cope over mouldings and around the fleurs, but I am happy to have lowered them to here, where there is less interference with the frieze:

I am using this portrait of the DR, circa 1680, as justification for this placement:

I continue to comb through the archives, but I have yet to find anything vividly descriptive about the ship’s pre-refit external appearance. Despite the beautifully florid cursive, I’ve come to realize the hard truth that the letter writers and record keepers of 17th C. France were basically clerks. Mostly their correspondence has to do with SR’s comings and goings; armaments and dis-armements; payments made/owed to painters and sculptors; cost estimates relating to her refit, etc. It is all fascinating, and it will all get its due mention in my book, but it does not help me paint the picture of the ship.
Where are the artists sharing their wonderfully descriptive observations, when you need them?!
What I’m hoping to find is something along the lines of this:

”The morning fires shone brightly upon the gilded ornaments of Soleil Royal and her heights rose up and became one with the azure sky. The warrior of the Americas clung resolutely to the port side, while that of Africa peered off in the middle-distance - daring his lesser adversaries to emerge from the morning mist. Presiding above, with shimmering rays of gold and silver gilt bursting past his golden chariot is the Sun King, himself…”
And, so forth. It must be out there, somewhere, right?
Anyway, I can now get busy with fitting and prepping the starboard upper bulwark for paint. I can also go ahead and design my stove - that will make a nice little side project. Before long, I can design and make the next tier of stern lights, which will enable me to finish off the wrapping stern walk.
As always, thank you for your likes, comments and for looking-in. More to come!
Hi Marc!
Looks GREAT!!!
Looks GREAT!!!
Hi Marc,
I hope things work out well with your dad.
Your SR is a feast for my eyes.
Cheers,
Stephen.
I hope things work out well with your dad.
Your SR is a feast for my eyes.
Cheers,
Stephen.
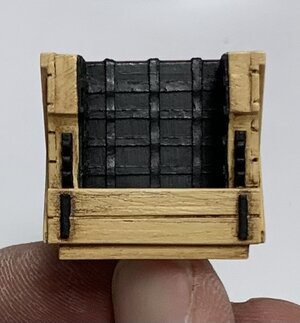
The stove is taking shape nicely. I still have to build out the interior, which is clad in iron plating. I’m toying with representing the brick work, on the top edge, but it will not be visible at all. I have to also attach the three skids that the stove sits upon, on the deck:
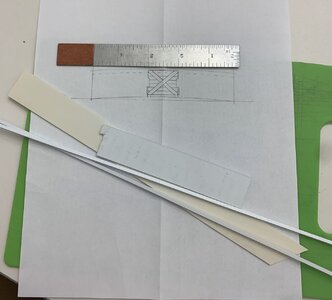
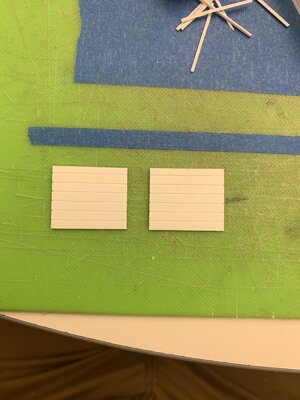
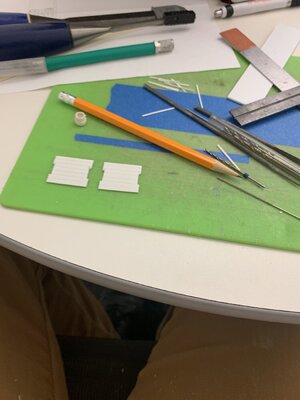
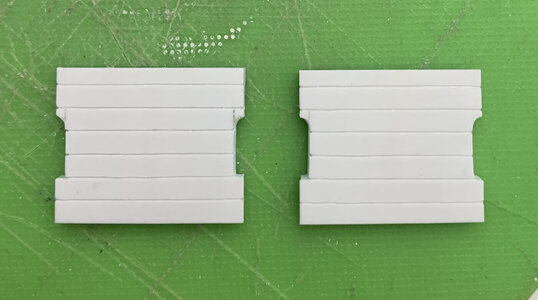
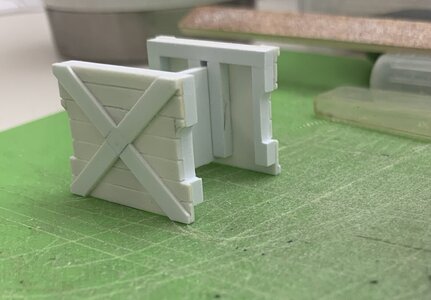
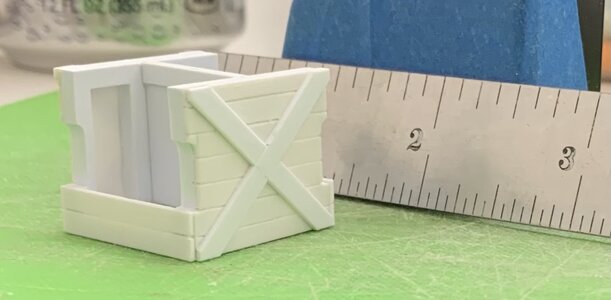
This is a fun little scratch project. There are also rings and other small bits of hardware that will be attached.
Thanks for looking in!


This is a fun little scratch project. There are also rings and other small bits of hardware that will be attached.
Thanks for looking in!
The stove is ready for paint:
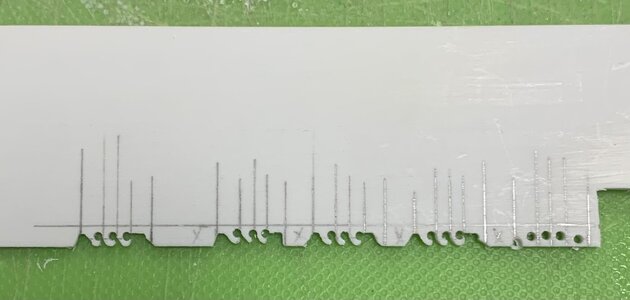
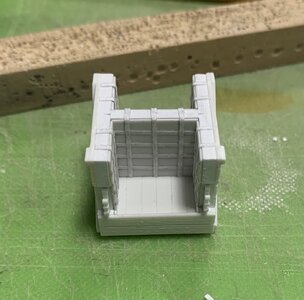
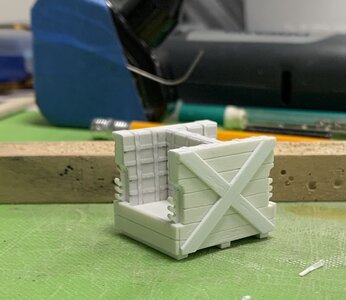
The best scale effect for the lining plate lattices was pedestrian typing paper cut into narrow strips and CA’d in-place. I sanded coarse scratches into the planking, so that the exterior will pick up the Van Dyke Brown distressing well.
I still need to make the “metal” deck sheathing that goes beneath the stove sleepers, but that is a simple thing.
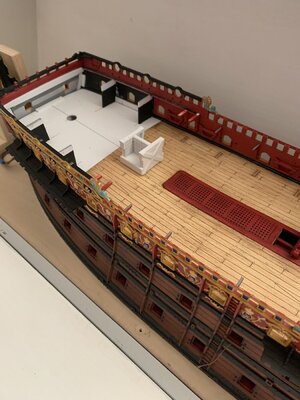
I’m close to being ready for paint on the aft, starboard bulwark. I took even greater care in fitting this last piece because I did not want to deal with any putty at all, on the outside seam. Paint touch-up was a real pain for the three bulwarks prior.
More to come! Thank you for your interest and for stopping by.


The best scale effect for the lining plate lattices was pedestrian typing paper cut into narrow strips and CA’d in-place. I sanded coarse scratches into the planking, so that the exterior will pick up the Van Dyke Brown distressing well.
I still need to make the “metal” deck sheathing that goes beneath the stove sleepers, but that is a simple thing.

I’m close to being ready for paint on the aft, starboard bulwark. I took even greater care in fitting this last piece because I did not want to deal with any putty at all, on the outside seam. Paint touch-up was a real pain for the three bulwarks prior.
More to come! Thank you for your interest and for stopping by.
It's all quite stunning Marc. You are certainly a master of this medium.
Thank you, Paul!
Wow - very good looking - I am looking forward to see this oven also painted
I stumbled on this build yesterday afternoon and basically frittered away the entire night catching up on the entire thing (rather than making any progress on my own build). Could not put it down!
I'm good at following instructions and assembling a kit, so for me, ship modelling is 90% craftsmanship and 10% (or less) artistry. You, Sir, have both in 55 gallon drums! Words simply fail me.
I'm good at following instructions and assembling a kit, so for me, ship modelling is 90% craftsmanship and 10% (or less) artistry. You, Sir, have both in 55 gallon drums! Words simply fail me.
Thank you, Uwek. That is very kind of you to say, Namabiiru! A appreciate very much that you took the time to read through my log.
We’re literally coming down the home-stretch with Dad. We moved his furniture and belongings, this past weekend, and we will move him this coming weekend - HUZZAH!
Naturally, work on the ship is fairly meager, but I did get the deck sheathing and stove painted, and I did manage to make-up and fit the forecastle beam that will be visible at the break of the forecastle deck. A montage that shows my paint processes, particularly for my natural “oak” finish:
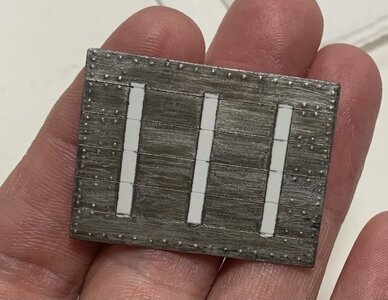
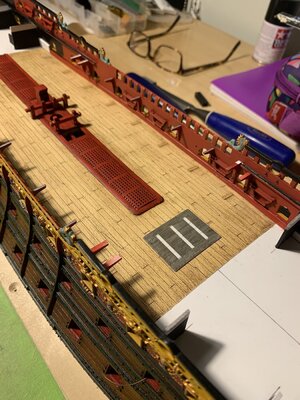
For some reason, I can’t load the other two pics of the sheathing because of an “unknown server error”. Anyway, the process is pretty straightforward; flat black spray primer, followed by Citadel silver (allowing some black to peak through), finished with grey enamel wash. The enamel wash picks up all the nail heads and sheet seams nicely, while giving an oxidized metal finish. The white stripes are masks for where the stove glues down.
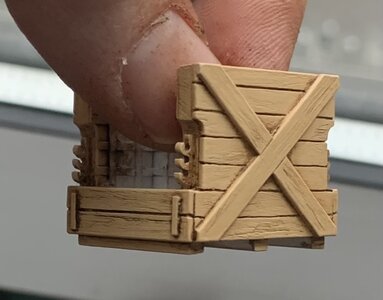
The stove begins with Modelmaster Random Tan as my base coat over white enamel primer:
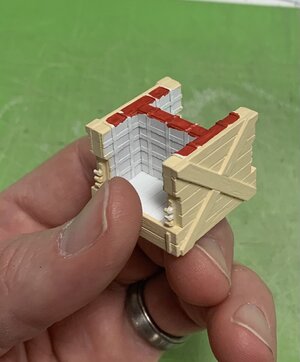
Although it will never be seen, I chose to represent the brick work that is sandwiched between iron and wood.
Next, I slather the whole thing in Windsor and Newton medium grey oil, and allow it to sit for five minutes, or so, before wiping most of it away. This paint gives the wood a pleasing silver-ish cast, like newly oxidizing oak, and it gets into all the plank seams and grain structure:
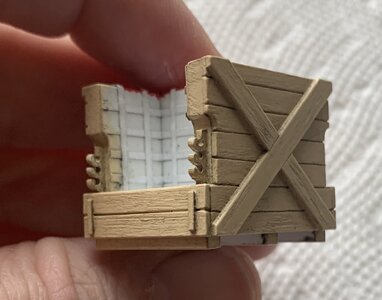
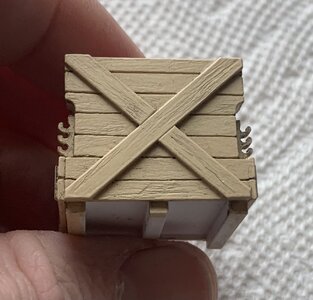
Next, after allowing it to cure for a few days, I do the same thing again with W&N Van Dyke Brown. This is what restores a sense of woody warmth to the surface, while enhancing texture and depth:
The plate mounted to the deck:
The iron blacked-in:
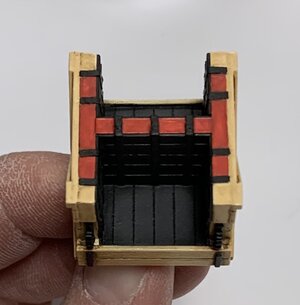
I decided to rub some powdered graphite over the black, so that the lattice would pop a little. Again, this will never be seen, but I wanted to play around with powder effects. It is subtle, but effective:
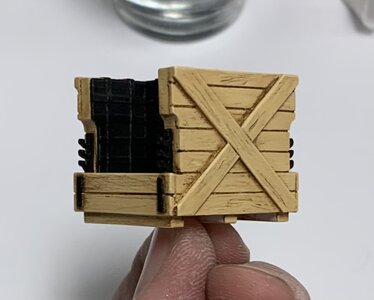
Lastly, the stove on-board:
The stove gives me a central glue connection for that beam, which will lend some rigidity to the whole deck structure.
In other news, I have 2 of 3, aft bulwark gussets fitted and installed. All the prep work on the last bulwark is done, so I will resume painting soon.
I hope all are well, as the holiday approaches. Thank you all for stopping by. More to follow!
Naturally, work on the ship is fairly meager, but I did get the deck sheathing and stove painted, and I did manage to make-up and fit the forecastle beam that will be visible at the break of the forecastle deck. A montage that shows my paint processes, particularly for my natural “oak” finish:

For some reason, I can’t load the other two pics of the sheathing because of an “unknown server error”. Anyway, the process is pretty straightforward; flat black spray primer, followed by Citadel silver (allowing some black to peak through), finished with grey enamel wash. The enamel wash picks up all the nail heads and sheet seams nicely, while giving an oxidized metal finish. The white stripes are masks for where the stove glues down.
The stove begins with Modelmaster Random Tan as my base coat over white enamel primer:

Although it will never be seen, I chose to represent the brick work that is sandwiched between iron and wood.
Next, I slather the whole thing in Windsor and Newton medium grey oil, and allow it to sit for five minutes, or so, before wiping most of it away. This paint gives the wood a pleasing silver-ish cast, like newly oxidizing oak, and it gets into all the plank seams and grain structure:


Next, after allowing it to cure for a few days, I do the same thing again with W&N Van Dyke Brown. This is what restores a sense of woody warmth to the surface, while enhancing texture and depth:

The plate mounted to the deck:

The iron blacked-in:

I decided to rub some powdered graphite over the black, so that the lattice would pop a little. Again, this will never be seen, but I wanted to play around with powder effects. It is subtle, but effective:


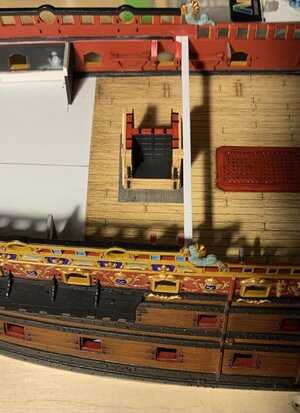
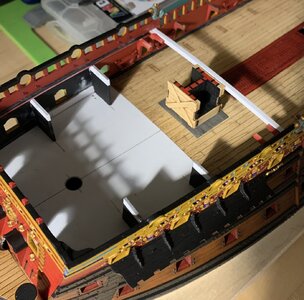
Lastly, the stove on-board:


The stove gives me a central glue connection for that beam, which will lend some rigidity to the whole deck structure.
In other news, I have 2 of 3, aft bulwark gussets fitted and installed. All the prep work on the last bulwark is done, so I will resume painting soon.
I hope all are well, as the holiday approaches. Thank you all for stopping by. More to follow!
The intersection of craftsmanship and artistry is a wonder to behold.


