Sovereign of the Seas - Sergal 1:78 (with hopefully many added details)

FYI For very kind members following this log - Two days I sent a request to Mantua CS in Italy for two of those wood bits that I need to fix the stern mistake.
I indicated that I would willingly pay for the parts including shipping and any handling - no responce yet.:confused:
So for now now LEDs will keep me occupied. :)
 
This will be the last post regarding this worn-out topic. Promise that the next posts will reflect moving forward.Sleep That said;

Hello Kurt @DARVIS ARCHITECTVS
I have, in fact, read and reread your informative and accurate suggestion on how to repair the stern area mistake that I prematurely built into this project.

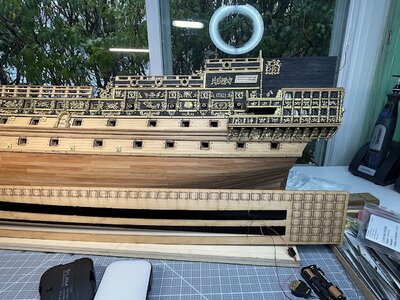
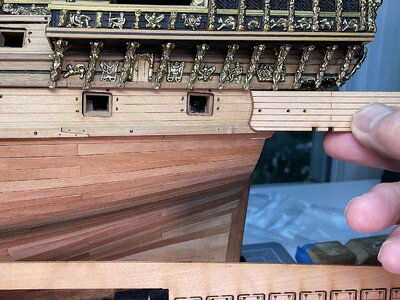
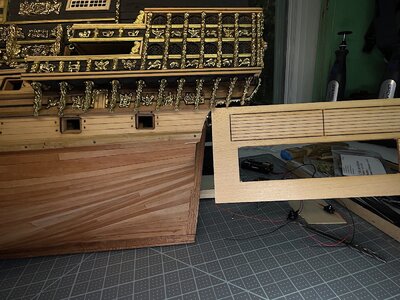
There is actually no, for me, invisible solution. The elephant in the room has to do with the four installed visible kit provided hull length laser etched outer gun deck templates that, in order to properly – invisibly fix - would all need to be entirely removed on both sides. Just adding a custom fix at the rear hull won't blend with the other templates under any circumstances.

I have looked through some of this kit's enclosed leftover - to be unused - laser etched bits – none match the gun plank sizes. Had that been the case the fix would be easy enough needing to add a 1” or so extra length then rebuild, reposition the aft four gun openings, Then I could recanter the angle of the lower incorrect panel.

I’ve sent three emails to Mantua-Sergal along with images of the two bits that I need. Still no response either way to my queries. The irony is that all I need is a couple of inches (or less) of each piece to perfectly match (that's the key for me) the already installed hull length gun deck outer templates.

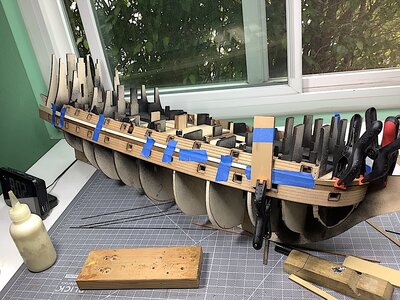
The other paradox is that at the beginning of this projects I was actually going to overlay those etched templates with pearwood to more accurately reflect properly scaled hull plank lengths Got lazythat would have, of course, been a lifesaver. If I can reacquire those two kit parts, or at least small bits of them – then I would go forward and do the needed fix. Otherwise, I’ll just “live with it”.

In closing, Kurt again thanks as always for the time that you spent articulating a fix – as always you are always so thoughtful –

Thanks, my friend…

1.jpeg3.jpeg4.jpeg5.jpg
 
FYI For very kind members following this log - Two days I sent a request to Mantua CS in Italy for two of those wood bits that I need to fix the stern mistake.
I indicated that I would willingly pay for the parts including shipping and any handling - no responce yet.:confused:
So for now now LEDs will keep me occupied. :)

Its a sad fact that most European kit manufacturers have very poor aftermarket service.
 
I have to say that I was impressed with the customer service from Occre. I was missing a few wooden dowels, I got online and filled out the request for the parts. They shipped them to me no questions asked and even included a few extra! Granted it took a while, but luckily I noticed them missing early in the build, so it never slowed me down. ;)
 
I do. This ship was a lot more than a warship, it was a symbol of dominance to all nations of the sovereignty of the English monarch over all others who float a navy. This was the KING'S SHIP, and hence, it was a national symbol, so huge amounts of money were poured into the wooden carvings which were gilt (covered in gold leaf OR painted in gold... gilt meant either back then). The carvings DID add a lot of weight, but for a national symbol, one of a kind, that was part of the plan, and it was also the chief reason why the maritime aristocrats wanted the ship cancelled. It actually sailed failry well considering its weight, but of course it was relatively slow. But, it had a maximum of 102 bronze guns, the heaviest armed ship of its day. No ship dared let it get too close to them! But the King thought it was a great idea to built it, and since the Pett family had such influence with the King, it was built anyway. After the rebuild of 1658-1660, many of the carvings were removed, and also much of the upper structures were lightened, and the interior gun deck heights adjusted to make it more seaworthy. Later on, some of the carvings were reinstalled... remember: NATIONAL SYMBOL. Other nations also built what I call a heavily decorated "royal man-of-war". French: La Couronne 72 guns. Sweden: Wasa 64 guns. Europeans LOVE their pageantry.

After redesign, the ship was considered much better at sailing, even though by then the vessel was badly obsolete compared to other large ships in the British Navy. Still, the Sovereign had an exceptionally long life...59 years, until it sat for the final years at anchor, with money meant for it's upkeep stolen by corrupt persons in charge, and after lack of maintenance had taken its toll, it is rumored some feckless watchman allowed a candle to spill over one January night in 1696, burning the ship to the waterline... a total loss. La Couronne only lasted about 8 years. Wasa, less than 21 minutes. Cautious:rolleyes:

Take a look at the carvings of the Wasa. They were made the same way. Gilt wood, in that case, painted.

Not wanting to hijack this thread but it is historically relevant;

Prior to this ship being built, only residents of English coastal towns had to pay "ship tax" to the Government for upkeep of the Navy so their towns would be protected.

Such was Charles 1st overspend on this vessel, "ship tax" became payable by all. The Navy board disapproved of the expense of this vessel, stipulating that several ships could be built for the same cost. Charles overruled them and the now widespread "ship tax" was partly to blame for the English Civil War!

This vessel caused such a ruckus, the Navy kept this ship anchored out of the way on the river Medway for a good chunk of it's life. You do have to wonder if the fire on board was the result of Arson??

Kind Regards

Nigel
 
Hi all,
Wanted to share this super informative youtube video. I have followed his work for some time now. Not directly related to my build - but in the very same neighborhood. This is his newest from the other day. a quick 25 minutes..... BTW his other videos are also brilliant as well.
Moderators if this needs to be moved to another topic thread please do so.

 
as someone said "If you did not point out these errors I certainly would not have noticed."
I surely sense your frustrations on this one. I would be frustrated too and wondering how to fix it before moving on. However, some mistakes I have made were somewhat minor and I had to move on.
I have found out that even though I never got a response from a European company, it was about 3 weeks and mysteriously the parts showed up in my postal mail. But, then again, it is agony as you don't know what the outcome is.
 
Donnie,
Thanks for your post - glad that you also would have also missed the error :D

These is an update; As I mentioned Mantua/Sergal Italy - so far has not responded. And as Donnie mentioned part may just "show up" one of these days...

In the interim, I also communicated with Mantua/sergal in the UK - they have a retail outlet in South London.

They quickly responded suggesting that they could special order the entire laser panel from Italy and then ship it to me. That panel has many other
parts that are not needed - no big deal - There is, of course, a charge. Not an issue - sent them a Paypal pre-order payment - may take up to 12 weeks to ship.

OK - should be resolved eventually...

Now onto LED's, rudder, and upper deck cannon and carriages while waiting for stern fix.
Oh Kurt - yes, I have a protective way of flipping the ship upside down...

Thanks to all of you for your interest, helpful posts, just dropping by for a look, and of course your likes.
 
Last edited:
Cant wait until you show us more of your craft! I will never have the talent to do a wood ship, but I do like tinkering with the plastic kits and daydreaming watching all the experts here show us their art and skill.
 
Cant wait until you show us more of your craft! I will never have the talent to do a wood ship, but I do like tinkering with the plastic kits and daydreaming watching all the experts here show us their art and skill.
Wade,
There are - you most certainly know brilliant plastic ship builder channels on youTube. These two are excellent IMO -

Studio Blue Ocean
Ebroin's Miniatures
Cheers,
 
Hi,
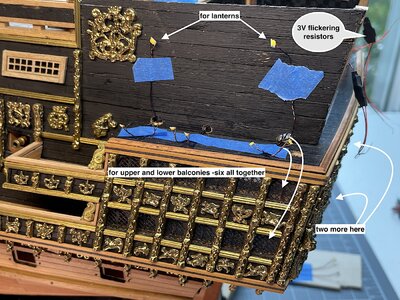
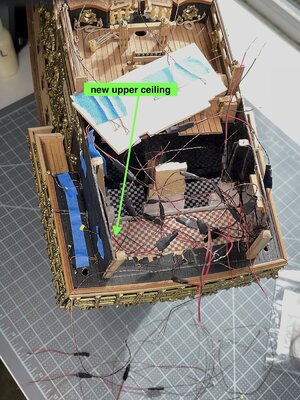
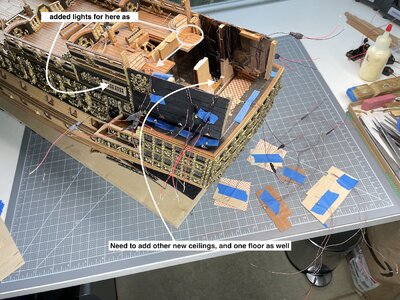
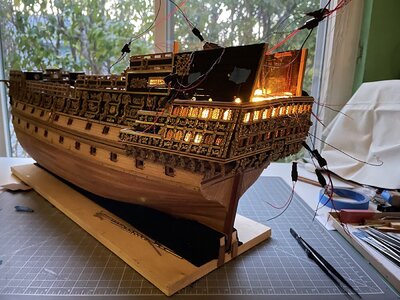
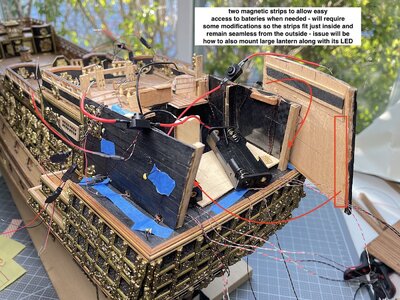
Work in progress update. Got all of the LED’s needed from Evan Designs (excellent source!!!). So started the installs – Yikes this would have obviously been SO much easier had I decided to add lights earlier in this project. But enjoying the current challenge this is creating for me.
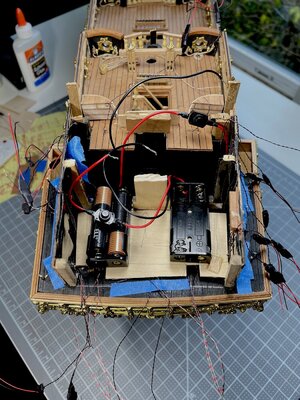
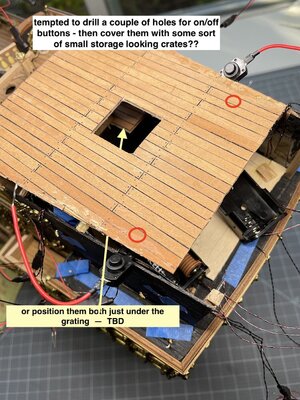
Where to locate the batteries (button and/or AAA two pack) and two needed on/off buttons to be determined. Battery packs will, of course, fit inside – on/off button locations TBD.
PS: all drilled holes and wiring will be hidden by lantern housings - will also, for lanterns, make some kind of candle looking housings.

Thanks for dropping by….

1.jpeg2.jpeg3.jpeg4.jpeg
 
Hi,
Work in progress update. Got all of the LED’s needed from Evan Designs (excellent source!!!). So started the installs – Yikes this would have obviously been SO much easier had I decided to add lights earlier in this project. But enjoying the current challenge this is creating for me.
Where to locate the batteries (button and/or AAA two pack) and two needed on/off buttons to be determined. Battery packs will, of course, fit inside – on/off button locations TBD.
PS: all drilled holes and wiring will be hidden by lantern housings - will also, for lanterns, make some kind of candle looking housings.

Thanks for dropping by….

View attachment 364811View attachment 364812View attachment 364813View attachment 364814
Hi John, the wiring looks to be as complex as most any rigging I've seen. good luck! The look of a lighted ship in the dark is certainly worth the effort.
 
Hi John, the wiring looks to be as complex as most any rigging I've seen. good luck! The look of a lighted ship in the dark is certainly worth the effort.
He'll arrange the wires in a tidy order as he locks down each light source in its final location. Looking like he was bitten by the BASHING BUG. Once you lose that fear of changing parts on a kit, there's no stopping you from super-detailing the model to the extreme.
 
Daniel; thanks for dropping in - well it looks very messy - but all red wires will be spooled into one large twisted "knot" same for blacks - then just attach to battery packs - WILL check each individual light for proper functioning before permanently installing. I'm glad that I took this challenge - will be a very nice extra for this build.

Kurt; haha yes thanks, hopefully it will result as you suggested. And yes having been bitten by the Bashing Bug has its fun as well.....You certainly know!!

Experimenting with locations of the three size lights; Nano, Pico, and Chip blending with some non-flickering as well –
This iPhone image was not up to the task (did not pre-set for correct image quality) – lights are not as intense as some depicted in images, but lights harmoniously blend nicely through windows where I’ve temporarily placed some LEDs. Also, another dozen or so need to be inserted into proper locations.

I did determine that I will have to segregate the wiring. All flickering lights will be connected to a specific 3V AAA power source. Non flickering will have their own AAA battery pack.

Evan Designs indicate that all 3V flickering and non-flickering can be sourced from the same power source. Yes, that’s right, they do all work - but I noted that as such, the flickering effect (of those LEDs) becomes much more muted, as to be almost “missing”. Segregating all flickering onto one power source returned those lights to their proper flickering “look”. IMO

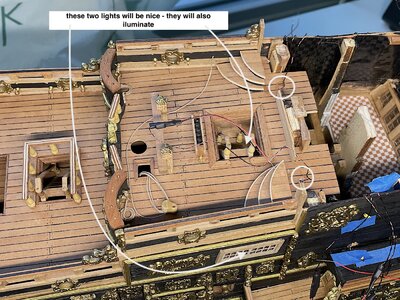
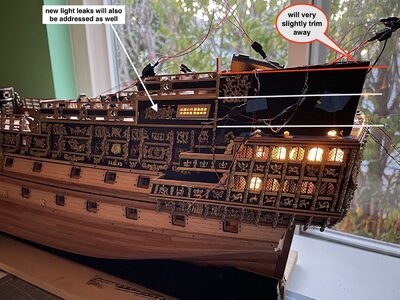
Having also removed the poop deck will allow me to “fix” an issue that I feel is not quite right – the sloping angle of that deck seems a bit too high at the stern. Other images detail my thoughts


Regards,

IMG_8824.jpegIMG_8831 copy.jpegIMG_8837.jpegIMG_8839.jpegIMG_8840.jpeg
 
Daniel; thanks for dropping in - well it looks very messy - but all red wires will be spooled into one large twisted "knot" same for blacks - then just attach to battery packs - WILL check each individual light for proper functioning before permanently installing. I'm glad that I took this challenge - will be a very nice extra for this build.

Kurt; haha yes thanks, hopefully it will result as you suggested. And yes having been bitten by the Bashing Bug has its fun as well.....You certainly know!!

Experimenting with locations of the three size lights; Nano, Pico, and Chip blending with some non-flickering as well –
This iPhone image was not up to the task (did not pre-set for correct image quality) – lights are not as intense as some depicted in images, but lights harmoniously blend nicely through windows where I’ve temporarily placed some LEDs. Also, another dozen or so need to be inserted into proper locations.

I did determine that I will have to segregate the wiring. All flickering lights will be connected to a specific 3V AAA power source. Non flickering will have their own AAA battery pack.

Evan Designs indicate that all 3V flickering and non-flickering can be sourced from the same power source. Yes, that’s right, they do all work - but I noted that as such, the flickering effect (of those LEDs) becomes much more muted, as to be almost “missing”. Segregating all flickering onto one power source returned those lights to their proper flickering “look”. IMO

Having also removed the poop deck will allow me to “fix” an issue that I feel is not quite right – the sloping angle of that deck seems a bit too high at the stern. Other images detail my thoughts


Regards,

View attachment 365184View attachment 365185View attachment 365186View attachment 365187View attachment 365188
I like the idea of having the pushbuttons hiding under an accessible deck item, but this would be good only of the model is not under glass. If under glass, route the switch wires down through the bottom of the ship and place the buttons under the cabinet floor in a location that is easy to reach. I still can't get over how gorgeous this model looks with all that shiny gold! Mine won't look like that for a few more years.
 
Last edited:
Hi John

Your illuminated cabins are going to look fantastic when all boxed in. Just a suggestion (yes I am at it againRedface), you can get cheap remote control fobs and switches off Ebay. This isn't something I have looked at in detail but may be an easier and more "flash" option to switch your lights on and off meaning you only need access to replace batteries. Another option is a magnetic reed switch which is activated by placing an item on the deck to activate, for example a barrel with a magnet inside.These are often used by RC modellers to turn the electrics on and off

Kind Regards

Nigel
 
Back
Top