Hi Roger, it was a good decision to replace the castings with a wooden wheel, it looks much better
-

Win a Free Custom Engraved Brass Coin!!!
As a way to introduce our brass coins to the community, we will raffle off a free coin during the month of August. Follow link ABOVE for instructions for entering.
-

PRE-ORDER SHIPS IN SCALE TODAY!
The beloved Ships in Scale Magazine is back and charting a new course for 2026!
Discover new skills, new techniques, and new inspirations in every issue.
NOTE THAT OUR FIRST ISSUE WILL BE JAN/FEB 2026
You are using an out of date browser. It may not display this or other websites correctly.
You should upgrade or use an alternative browser.
You should upgrade or use an alternative browser.
Syren 1803 1:64 Model Shipways
- Thread starter RogerD
- Start date
- Watchers 61
-
- Tags
- model shipways syren
Thanks Tobias. It’s a cleverly designed little kit that will add some additional interest to the deck fittings. The parts are tiny but the supplied templates keep everything in line.
- Joined
- Jan 9, 2020
- Messages
- 10,566
- Points
- 938

My dear Roger - You Syren is looking splendid! I knew when I read the part about the missing "Y" that you would really be in for some creative comments and luckily, our modeling friends did not disappoint! I had a good laugh - sorely needed! The ship's wheel looks great - I can't wait to see it installed.
My dear Roger - You Syren is looking splendid! I knew when I read the part about the missing "Y" that you would really be in for some creative comments and luckily, our modeling friends did not disappoint! I had a good laugh - sorely needed! The ship's wheel looks great - I can't wait to see it installed.
Thanks Heinrich. It’s really good to see you back with your supportive posts, input and welcome advice.
Many of the small deck and hull fittings, including the wheel, will soon be ready for placement. Then I will move onto the carronade construction. I’m glad you had a laugh at some of the members posts. The active humour on this site certainly makes for some fun interaction.
Small stuff
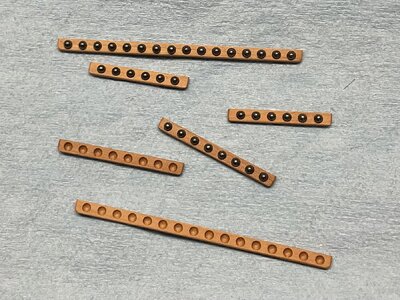
Lots of small items underway and as you know they can be very time consuming. I recently made the little cannon ball racks from pear instead of cutting from the supplied basswood strips. I drilled equidistant holes slightly further back from the leading edge to a half ball depth then coated the pear wood with Tru-oil. The balls are 2mm diameter so that equates to an actual 5” diameter for the 24lb carronades. This is close to the size for this type of armament. Balls are now glued in position and the completed racks will be placed alongside hatches on deck later on.

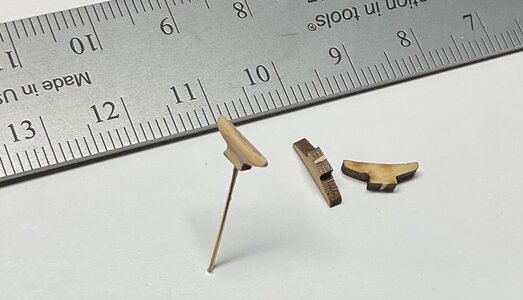
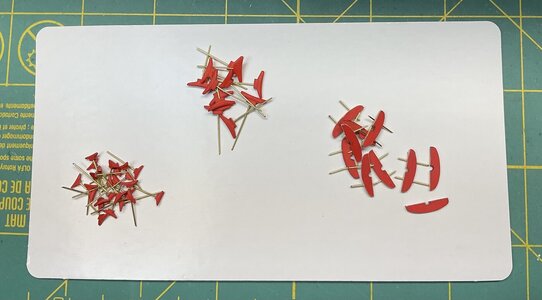
I purchased boxwood 5mm and 9mm cleats from Syren Ship Model Company. The parts are laser cut and supplied in small 1/16” thick sheets. They need to be sanded and shaped to a cleat profile. Removing the char without sanding off too much wood was the main issue as well as correcting the laser angled cut. I wanted to reinforce the holding ability of the cleats so I carefully drilled a hole half way into each cleat for a length of thin brass wire. They are now painted to match the inner planking and the wire will be trimmed as required. In hindsight I could have saved a lot of time purchasing those great looking pre-made cleats from zoly @Dry-Dock Models & Parts. Definitely next time.


In a similar way I drilled two holes through each of the 1/16” swivel brackets for the carronades. I spaced the holes so that the lower carronade sled will hide them. Once glued to the gun-ports the wire will be trimmed and then gently pressed into the lower sills for additional holding, then trimmed again.
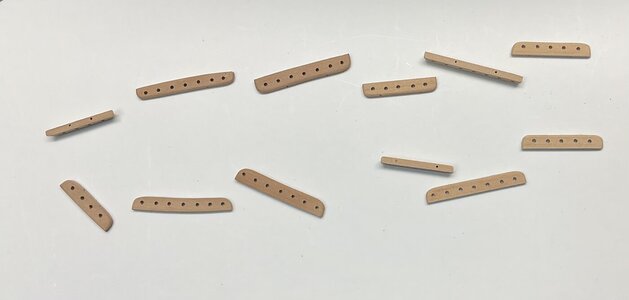
I cut the pin rails from pear sheet I had milled. I drilled holes for the belaying pins, which are deliberately not in a line but will tend, loosely, to follow the curvature of the rail against the inboard bulwarks after further shaping. I also drilled holes transversely through the 1/16” rails to allow for brass wire reinforcement. The rails will be painted red. I have blackened more of the supplied brass belaying pins (not shown) and will probably use them as is.

Oh boy, another wordy post for just little items but if it helps someone else then I hope that’s ok. I’m itching to add all the details to the deck and see it all come together. Thanks for following along. I always appreciate all the feedback, comments and emoji’s.
Lots of small items underway and as you know they can be very time consuming. I recently made the little cannon ball racks from pear instead of cutting from the supplied basswood strips. I drilled equidistant holes slightly further back from the leading edge to a half ball depth then coated the pear wood with Tru-oil. The balls are 2mm diameter so that equates to an actual 5” diameter for the 24lb carronades. This is close to the size for this type of armament. Balls are now glued in position and the completed racks will be placed alongside hatches on deck later on.

I purchased boxwood 5mm and 9mm cleats from Syren Ship Model Company. The parts are laser cut and supplied in small 1/16” thick sheets. They need to be sanded and shaped to a cleat profile. Removing the char without sanding off too much wood was the main issue as well as correcting the laser angled cut. I wanted to reinforce the holding ability of the cleats so I carefully drilled a hole half way into each cleat for a length of thin brass wire. They are now painted to match the inner planking and the wire will be trimmed as required. In hindsight I could have saved a lot of time purchasing those great looking pre-made cleats from zoly @Dry-Dock Models & Parts. Definitely next time.


In a similar way I drilled two holes through each of the 1/16” swivel brackets for the carronades. I spaced the holes so that the lower carronade sled will hide them. Once glued to the gun-ports the wire will be trimmed and then gently pressed into the lower sills for additional holding, then trimmed again.
I cut the pin rails from pear sheet I had milled. I drilled holes for the belaying pins, which are deliberately not in a line but will tend, loosely, to follow the curvature of the rail against the inboard bulwarks after further shaping. I also drilled holes transversely through the 1/16” rails to allow for brass wire reinforcement. The rails will be painted red. I have blackened more of the supplied brass belaying pins (not shown) and will probably use them as is.

Oh boy, another wordy post for just little items but if it helps someone else then I hope that’s ok. I’m itching to add all the details to the deck and see it all come together. Thanks for following along. I always appreciate all the feedback, comments and emoji’s.
Great work Roger. The work you did on the cannon balls in scale makes a beautiful setting. I also used Syrens cleats and I feel for you. One thing I've found is that using brass wire instead of steel is easier to use. (Just my opinion) I keep waiting for more posts.
Hello Will, good to hear from you. I tried to make sure the cannon balls and racks were scaled accordingly. The Model Expo supplied balls are out of scale (realistically) so I purchased 2mm ones.
Yes, the Syren cleats take quite a bit of work to get consistency, which I struggled with. The good thing is securing them apart throughout the model means the sanded size variation will be less noticeable.
I used brass rod for all the reinforcement wires.
More posts to come . Thanks.
Yes, the Syren cleats take quite a bit of work to get consistency, which I struggled with. The good thing is securing them apart throughout the model means the sanded size variation will be less noticeable.
I used brass rod for all the reinforcement wires.
More posts to come
- Joined
- Jan 9, 2020
- Messages
- 10,566
- Points
- 938

My friend, I know exactly how time-consuming those "little" tasks are. Drilling holes for belaying pins takes me forever and umpteen attempts before I am really satisfied. Your cannon ball racks look superbly accurate. And those cleats - drilling holes into those tine little things and shaping them the way you did, is an art form in itself - to me it certainly is.
Thank you Heinrich, you are always generous with your support and words.
- Joined
- Oct 9, 2020
- Messages
- 2,244
- Points
- 488

very impressive on the details. I remember how finicky this build was for me.
It is, thank you Jack. So many small parts that really test the tired old eyes.very impressive on the details. I remember how finicky this build was for me.
I see so many incredible builds on his site just moving along but the Syren seems to have so many extra little parts it takes such a lot of time. My excuse anyway
- Joined
- Oct 9, 2020
- Messages
- 2,244
- Points
- 488

The devil is in the details, as they say...It is, thank you Jack. So many small parts that really test the tired old eyes.
I see so many incredible builds on his site just moving along but the Syren seems to have so many extra little parts it takes such a lot of time. My excuse anyway.
Your work continues to impress, Roger. As I was reading about your work on the cleats I was thinking to myself: you know you can buy those ready to install... But then you went there on your own. Anyway, it's always a pleasure to see your progress. The care you take with each step shows!
Such precise work. Great small pieces like these turn into greater models.Small stuff
Lots of small items underway and as you know they can be very time consuming. I recently made the little cannon ball racks from pear instead of cutting from the supplied basswood strips. I drilled equidistant holes slightly further back from the leading edge to a half ball depth then coated the pear wood with Tru-oil. The balls are 2mm diameter so that equates to an actual 5” diameter for the 24lb carronades. This is close to the size for this type of armament. Balls are now glued in position and the completed racks will be placed alongside hatches on deck later on.
View attachment 432359
I purchased boxwood 5mm and 9mm cleats from Syren Ship Model Company. The parts are laser cut and supplied in small 1/16” thick sheets. They need to be sanded and shaped to a cleat profile. Removing the char without sanding off too much wood was the main issue as well as correcting the laser angled cut. I wanted to reinforce the holding ability of the cleats so I carefully drilled a hole half way into each cleat for a length of thin brass wire. They are now painted to match the inner planking and the wire will be trimmed as required. In hindsight I could have saved a lot of time purchasing those great looking pre-made cleats from zoly @Dry-Dock Models & Parts. Definitely next time.
View attachment 432361
View attachment 432362
In a similar way I drilled two holes through each of the 1/16” swivel brackets for the carronades. I spaced the holes so that the lower carronade sled will hide them. Once glued to the gun-ports the wire will be trimmed and then gently pressed into the lower sills for additional holding, then trimmed again.
I cut the pin rails from pear sheet I had milled. I drilled holes for the belaying pins, which are deliberately not in a line but will tend, loosely, to follow the curvature of the rail against the inboard bulwarks after further shaping. I also drilled holes transversely through the 1/16” rails to allow for brass wire reinforcement. The rails will be painted red. I have blackened more of the supplied brass belaying pins (not shown) and will probably use them as is.
View attachment 432363
Oh boy, another wordy post for just little items but if it helps someone else then I hope that’s ok. I’m itching to add all the details to the deck and see it all come together. Thanks for following along. I always appreciate all the feedback, comments and emoji’s.
Good afternoon Roger. All that fiddling with the small stuff….looking good. Cheers GrantSmall stuff
Lots of small items underway and as you know they can be very time consuming. I recently made the little cannon ball racks from pear instead of cutting from the supplied basswood strips. I drilled equidistant holes slightly further back from the leading edge to a half ball depth then coated the pear wood with Tru-oil. The balls are 2mm diameter so that equates to an actual 5” diameter for the 24lb carronades. This is close to the size for this type of armament. Balls are now glued in position and the completed racks will be placed alongside hatches on deck later on.
View attachment 432359
I purchased boxwood 5mm and 9mm cleats from Syren Ship Model Company. The parts are laser cut and supplied in small 1/16” thick sheets. They need to be sanded and shaped to a cleat profile. Removing the char without sanding off too much wood was the main issue as well as correcting the laser angled cut. I wanted to reinforce the holding ability of the cleats so I carefully drilled a hole half way into each cleat for a length of thin brass wire. They are now painted to match the inner planking and the wire will be trimmed as required. In hindsight I could have saved a lot of time purchasing those great looking pre-made cleats from zoly @Dry-Dock Models & Parts. Definitely next time.
View attachment 432361
View attachment 432362
In a similar way I drilled two holes through each of the 1/16” swivel brackets for the carronades. I spaced the holes so that the lower carronade sled will hide them. Once glued to the gun-ports the wire will be trimmed and then gently pressed into the lower sills for additional holding, then trimmed again.
I cut the pin rails from pear sheet I had milled. I drilled holes for the belaying pins, which are deliberately not in a line but will tend, loosely, to follow the curvature of the rail against the inboard bulwarks after further shaping. I also drilled holes transversely through the 1/16” rails to allow for brass wire reinforcement. The rails will be painted red. I have blackened more of the supplied brass belaying pins (not shown) and will probably use them as is.
View attachment 432363
Oh boy, another wordy post for just little items but if it helps someone else then I hope that’s ok. I’m itching to add all the details to the deck and see it all come together. Thanks for following along. I always appreciate all the feedback, comments and emoji’s.
Sure isThe devil is in the details, as they say...
Thanks Paul. Those pearwood/boxwood cleats from Dry-Dock Models and Parts look really good and appear to be consistent throughout. I was tempted to bin the ones I shaped but once they are fixed in place I think they’ll be ok.Your work continues to impress, Roger. As I was reading about your work on the cleats I was thinking to myself: you know you can buy those ready to install... But then you went there on your own. Anyway, it's always a pleasure to see your progress. The care you take with each step shows!
After following your very impressive Halcon speed build I know what you mean about small stuff. Once the piles of little parts turn into mounted fixtures on the Syren I’ll be a lot happier. Thanks for your comment Kurt.Such precise work. Great small pieces like these turn into greater models.
As we all know there’s lots of fiddling with small stuff, which somehow becomes even smaller as the years roll by. My next build will be a 1:10Good afternoon Roger. All that fiddling with the small stuff….looking good. Cheers Grant
Couple of things came to mind after reading the log.
With the belaying pin rails being under the cap rail can cause frustrations when trying to tie lines to the pins. I learned a method from another web site that is to make a loop of line sliding it under the pin hole and when in place put the pin into the loop while pulling the line taught. You can then finish tying the line.
On MSW in a log of the Syren by Gahm (Thomas Gahm) he had a comment of making belaying pins with a small lathe. I reached out and he game me detail directions of how to make my belaying pins. So just a thought since you seem to use itsy bitsy detail parts. I used high quality toothpicks that were round with correct width.
Hi Will, I had to reduce the width of the cap rails early on to solve a construction issue. Fortuitous in a way because the pins should now be out far enough to allow for the various lines. I’ll know better when I do some test fitting tomorrow.Couple of things came to mind after reading the log.
With the belaying pin rails being under the cap rail can cause frustrations when trying to tie lines to the pins. I learned a method from another web site that is to make a loop of line sliding it under the pin hole and when in place put the pin into the loop while pulling the line taught. You can then finish tying the line.
On MSW in a log of the Syren by Gahm (Thomas Gahm) he had a comment of making belaying pins with a small lathe. I reached out and he game me detail directions of how to make my belaying pins. So just a thought since you seem to use itsy bitsy detail parts. I used high quality toothpicks that were round with correct width.
As for the belaying pins I’m not sure how I’ll approach them. I may just use the kit supplied pins as previously mentioned. Thanks for your suggestions and input, always appreciated.
Edit:
Back in my post #585 I had a brain fart and wrote a couple of things in error:
The carronades I am using are 18lb, not the kit supplied 24lb. I changed out the kit ones some while ago. The 2mm round shot I used is the correct size.
I used NaturOil on the racks not shiny finish True-oil.
Back in my post #585 I had a brain fart and wrote a couple of things in error:
The carronades I am using are 18lb, not the kit supplied 24lb. I changed out the kit ones some while ago. The 2mm round shot I used is the correct size.
I used NaturOil on the racks not shiny finish True-oil.
No worries Roger we all have the farts. OMG I sometimes can't remember breakfast let along what I wrote days ago.


