Good work with the hawse holes - well done
-

Win a Free Custom Engraved Brass Coin!!!
As a way to introduce our brass coins to the community, we will raffle off a free coin during the month of August. Follow link ABOVE for instructions for entering.
-

PRE-ORDER SHIPS IN SCALE TODAY!
The beloved Ships in Scale Magazine is back and charting a new course for 2026!
Discover new skills, new techniques, and new inspirations in every issue.
NOTE THAT OUR FIRST ISSUE WILL BE JAN/FEB 2026
You are using an out of date browser. It may not display this or other websites correctly.
You should upgrade or use an alternative browser.
You should upgrade or use an alternative browser.
Syren 1803 1:64 Model Shipways
- Thread starter RogerD
- Start date
- Watchers 61
-
- Tags
- model shipways syren
Thank you UweGood work with the hawse holes - well done
Gun port hinges
This isn’t really an update, more an observation which may help other Syren builders.
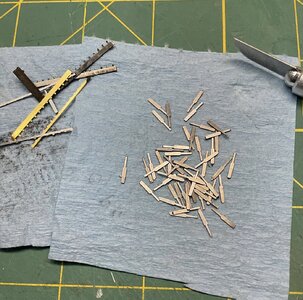
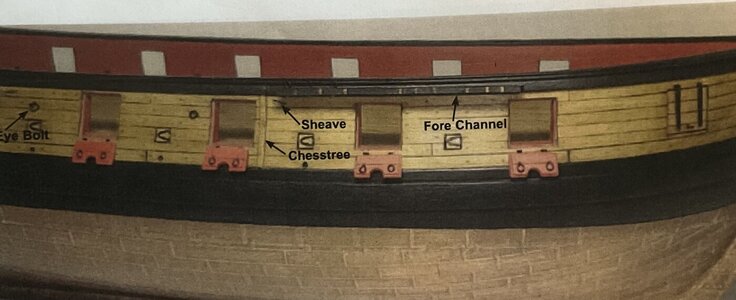
I spent some of my very limited time today, blacking and preparing the gunport hinges. The manual suggests painting them black but I prefer the sort of steel look (see photo). So I cut the brass hinges from the PE sprues, chased them as then bounced around my work top, retrieved them, chemically blackened them, cleaned the tiny pieces up, and had a nice little, as yet, unfinished pile of hinges ready for the next build step. Time consuming yes but this is a prominent visual part of the build so they have to be right. As I referred back to the manual for placement I saw that all that time was for nought. The hinges are not visible on the open gunport lids as shown in the manual (see photo). Crap.
I mentioned to my wife that all that time was spent of something that would not be visible and her response was, “well, you will know they are done correctly and that’s what matters to you even if they won’t be seen”. Good grief, my immediate thoughts were that she’s been talking to Paul @dockattner about his recent “poll” in his thread about completing items that will never be seen.
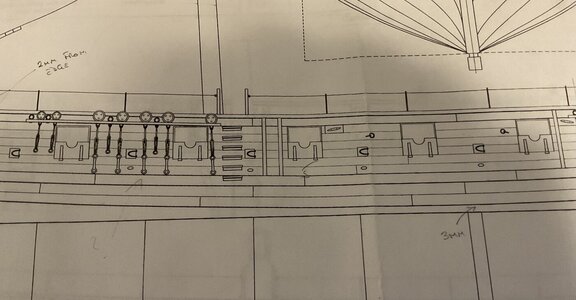
I then turned to the plans, as we all should, and see the lower lids are shown closed (see photo). Some ambiguity it seems between the manual and the plans. I kind of like both options but I’m going to do a KP (Kattner Poll) and ask which looks better - open lower lids or closed? Either way I think I can rig the carronades appropriately. Your thoughts?


- Joined
- Oct 9, 2020
- Messages
- 2,245
- Points
- 488

I had left mine closed. So my vote is to leave them closed.Gun port hinges
This isn’t really an update, more an observation which may help other Syren builders.
I spent some of my very limited time today, blacking and preparing the gunport hinges. The manual suggests painting them black but I prefer the sort of steel look (see photo). So I cut the brass hinges from the PE sprues, chased them as then bounced around my work top, retrieved them, chemically blackened them, cleaned the tiny pieces up, and had a nice little, as yet, unfinished pile of hinges ready for the next build step. Time consuming yes but this is a prominent visual part of the build so they have to be right. As I referred back to the manual for placement I saw that all that time was for nought. The hinges are not visible on the open gunport lids as shown in the manual (see photo). Crap.
I mentioned to my wife that all that time was spent of something that would not be visible and her response was, “well, you will know they are done correctly and that’s what matters to you even if they won’t be seen”. Good grief, my immediate thoughts were that she’s been talking to Paul @dockattner about his recent “poll” in his thread about completing items that will never be seen.
I then turned to the plans, as we all should, and see the lower lids are shown closed (see photo). Some ambiguity it seems between the manual and the plans. I kind of like both options but I’m going to do a KP (Kattner Poll) and ask which looks better - open lower lids or closed? Either way I think I can rig the carronades appropriately. Your thoughts?
View attachment 398623
View attachment 398624
View attachment 398625
Mix and match? Some closed and some open? Or would that look weird? On the Vasa I showed a few carriages pulled back out of the ports just to show off the rigging. Maybe you could do something similar and close the lower lids on those select guns???
Thanks Jack, that would be a good option for showing the hinge arrangement.I had left mine closed. So my vote is to leave them closed.
Hi Paul, great suggestions, not weird at all. I mentally threw around different scenarios too. The carronades on their “sledges” could be rigged for action on one side of the ship, with lowered lids, and secured on the other side with secured lids.Mix and match? Some closed and some open? Or would that look weird? On the Vasa I showed a few carriages pulled back out of the ports just to show off the rigging. Maybe you could do something similar and close the lower lids on those select guns???
I mentioned to my wife that all that time was spent of something that would not be visible and her response was, “well, you will know they are done correctly and that’s what matters to you even if they won’t be seen”. Good grief, my immediate thoughts were that she’s been talking to Paul @dockattner about his recent “poll” in his thread about completing items that will never be seen.


Good morning Roger. Brilliant as always. I prefer the open ports (my 2 cents). If you lie on your back under the ship with a bright light you will see your beautiful hinges
Thanks Heinrich. I realized this morning that I made the lids from pear back in May. Closed they don’t match the stained basswood of the upper hull. However, in the open position only the inner red face will show. Looks like “open” is the answer. (Pity, I thought Grant had a solutionOn WB1 they are all closed, on WB2 they are mix and match, so now I vote for open ports.
 ).
).What you and the Mrs. are into in the privacy of your own home is really none of our business...
Based on your suggestion I put in a request for an early Christmas gift but I don’t think she’ll go for it….
View attachment 398660

Time for an update after many unavoidable delays. However, workshop time permitting, I’ve been working on some of the smaller time consuming components.
The rudder is now attached with tiny brass rod pieces to simulate bolts in the pintles and gudgeons. A somewhat frustrating time getting them all attached and now fingers crossed they stay in place. The close ups certainly show lots of cleanup is necessary.
The sweep ports for the oars are completed with the hinge straps blackened and in place. I cut 0.38mm x1.5mm wire pieces and glued two pieces to each hinge strap to simulate the hinges.
The gun port lids are about 70% completed with the eyebolts drilled and attached. I went with open ports and the lids have two straps glued to the hidden outside faces. The ends of the lid straps were then bent and inserted in hidden holes in the hull. In a similar way to the sweeps I will be attaching tiny brass wire pieces as simulated hinges. Some adjusting to the lids is definitely needed. I have also started securing 2mm blackened metal rings to eyebolts for strategic placement on the hull and later the deck.
The supplied metal stern carving is in place. I air brushed it a sickly tan colour because I wanted it to be less noticeable. It’s not the most appealing kit moulding but I’ve bashed enough parts already so this went on as is.
The “Syren” name is in place but the 2mm Y fell off. It’s in the carpet - somewhere .
.
Thanks for following my slow progress.
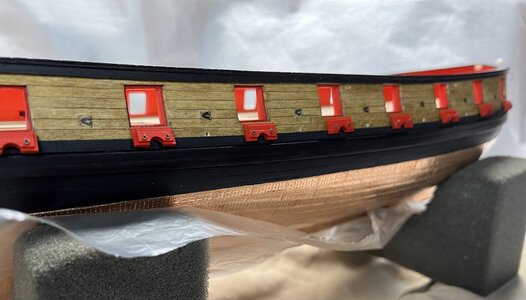
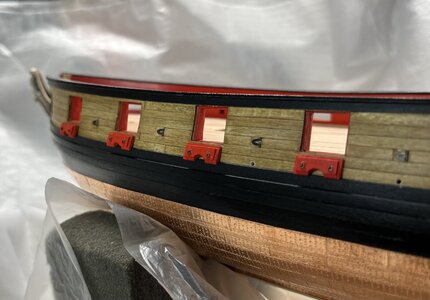
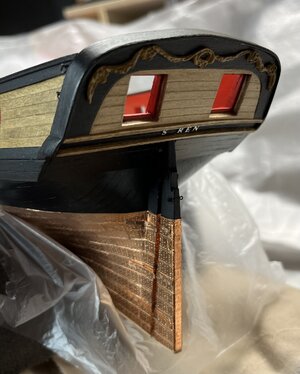
The rudder is now attached with tiny brass rod pieces to simulate bolts in the pintles and gudgeons. A somewhat frustrating time getting them all attached and now fingers crossed they stay in place. The close ups certainly show lots of cleanup is necessary.
The sweep ports for the oars are completed with the hinge straps blackened and in place. I cut 0.38mm x1.5mm wire pieces and glued two pieces to each hinge strap to simulate the hinges.
The gun port lids are about 70% completed with the eyebolts drilled and attached. I went with open ports and the lids have two straps glued to the hidden outside faces. The ends of the lid straps were then bent and inserted in hidden holes in the hull. In a similar way to the sweeps I will be attaching tiny brass wire pieces as simulated hinges. Some adjusting to the lids is definitely needed. I have also started securing 2mm blackened metal rings to eyebolts for strategic placement on the hull and later the deck.
The supplied metal stern carving is in place. I air brushed it a sickly tan colour because I wanted it to be less noticeable. It’s not the most appealing kit moulding but I’ve bashed enough parts already so this went on as is.
The “Syren” name is in place but the 2mm Y fell off. It’s in the carpet - somewhere
 .
.Thanks for following my slow progress.


The missing Y is tragic, but (and I'm embarrassed to confess this) I laughed... Sorry.
The missing Y is tragic, but (and I'm embarrassed to confess this) I laughed... Sorry.
Yep, me too. Especially when I asked my wife to help me find my Y. She just stared at me and started talking about internal motivational forces. I gave up because I have a spare
 .
.Beautiful work on the Sren!  That kit is one of the better ones out there.
Good morning Roger. WOW. She is beautiful rendition of the S'ren....Time for an update after many unavoidable delays. However, workshop time permitting, I’ve been working on some of the smaller time consuming components.
The rudder is now attached with tiny brass rod pieces to simulate bolts in the pintles and gudgeons. A somewhat frustrating time getting them all attached and now fingers crossed they stay in place. The close ups certainly show lots of cleanup is necessary.
The sweep ports for the oars are completed with the hinge straps blackened and in place. I cut 0.38mm x1.5mm wire pieces and glued two pieces to each hinge strap to simulate the hinges.
The gun port lids are about 70% completed with the eyebolts drilled and attached. I went with open ports and the lids have two straps glued to the hidden outside faces. The ends of the lid straps were then bent and inserted in hidden holes in the hull. In a similar way to the sweeps I will be attaching tiny brass wire pieces as simulated hinges. Some adjusting to the lids is definitely needed. I have also started securing 2mm blackened metal rings to eyebolts for strategic placement on the hull and later the deck.
The supplied metal stern carving is in place. I air brushed it a sickly tan colour because I wanted it to be less noticeable. It’s not the most appealing kit moulding but I’ve bashed enough parts already so this went on as is.
The “Syren” name is in place but the 2mm Y fell off. It’s in the carpet - somewhere.
Thanks for following my slow progress.
View attachment 405943
View attachment 405944
View attachment 405945
- Joined
- Oct 9, 2020
- Messages
- 2,245
- Points
- 488

Very impressive looking model!.
It is looking very good
with or without the Y
with or without the Y
She didn’t ask you Y you lost it?Yep, me too. Especially when I asked my wife to help me find my Y. She just stared at me and started talking about internal motivational forces. I gave up because I have a spare.


