Syren 1803 1:64 Model Shipways

just wondering. where did you get the pearwood from? Is there a place in the maritimes that sells this?

Hi Jack, thanks for looking in on my build and for your compliment.

I purchased the milled pear from Joe Volpe, Modeler’s Sawmill, in New Jersey, (link below). He was great to deal with and the pear wood of good colour and quality. The ordering was straightforward and efficient.

The only place I know of in the Maritimes that sometimes stocks it is East Coast Specialty Hardwoods in Dartmouth, Nova Scotia. A bit hit and miss if it’s in stock though (link below).


Little things:

Time for an update although it’s just a few time consuming little things for this post. I have gone over to the dark side more and more as my build progresses by using pear wood instead of the supplied kit basswood :D. It means though that I am spending a lot of time kit bashing by making parts from scratch.

I made most of the parts for the bilge pump, including the base, from pear and some brass rod/strip. I stayed with the kit designers manual and plans although some research turned up interesting facts about these types of pumps. As usual there is still some basic clean up and treatment for the pear components to do.

View attachment 390370

View attachment 390371

The rudder was set aside for a while but the tiller is just recently made. I added bands to reinforce the tiller arm, much the same as seen in other logs and books. Once again, clean up and final tweaking will be done later on.

View attachment 390375

View attachment 390377

I have also started on the very fiddly headrails. I used pear for the cheeks and hair brackets because the fibrous basswood seems to tear as I indent the moulding profile. In a log by dubz (@Dubz Modelling World) I saw his clever little shop made tool that assists marking out the groove along the cheeks. I made my own using a thin piece of wire and a broken handle. By bending the wire to “close the gap” I can get an approximate mark through the decreasing width of the cheeks. Then a blade and awl provides the gentle depressions for the grooves.

View attachment 390392

Thanks again for looking in on my log, the support and helpful words and advice mean a lot to me.
those Little things makes your ship model so beautiful :) Thumbsup
 
i know. I'll buy myself some pear tree seeds and grow my own! lol

ROTF…. and while you wait 9 years for the tree to mature there’s the cut your own option of course.

Back in 2021 I purchased some of the smaller Swiss Pear slabs from Cook Woods (link below). The price at that time was really good and if you calculate out the final billets you need, allowing for cut wastage from each piece, it brings the cost down considerably.

 
Just a small update on small items as time permits:

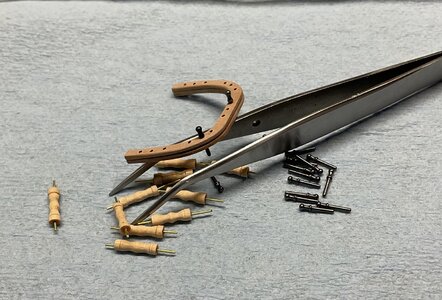
I cut the fife rail from pear using the original basswood as a template, which continues my preference for that wood. There are two layers with the grain of each layer at 90 degrees to the other for strength. The 1/32” holes for the belaying pins were hand drilled - very slowly :D. The belaying pins are now blackened and put away for later.

The stanchions for the fife rail took a while as I attempted to get a consistent shape throughout. I used 1/8” dowel and reduced each stanchion to roughly the size shown on the plans. I then drilled and fitted 1/64” (0.49mm) brass wire to each end, which will provide additional support when the complete rail is fitted later on. The wires are not cut to length yet. Since the stanchions are a different and lighter coloured wood than the pear rail I’ll have to look at trying to match them by staining or even using a brown wash.

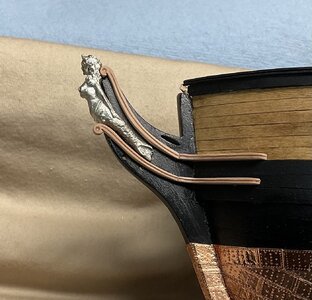
I’ve also started fitting the initial stages of the headrails at the bow. The figurehead is placed purely as a guide to allow for the placement of the cheeks/hair brackets and is yet to be cleaned up, painted etc.

That’s it for now as I head back to the bench :). Thanks for following along and as always I really appreciate your input, comments and helpful criticism.

IMG_4466.jpeg

IMG_4461.jpeg
 
Back
Top