Syren 1803 1:64 Model Shipways

Little things:

Time for an update although it’s just a few time consuming little things for this post. I have gone over to the dark side more and more as my build progresses by using pear wood instead of the supplied kit basswood :D. It means though that I am spending a lot of time kit bashing by making parts from scratch.

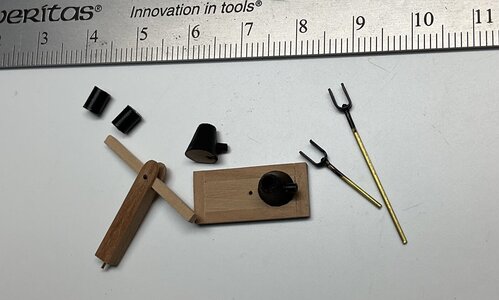
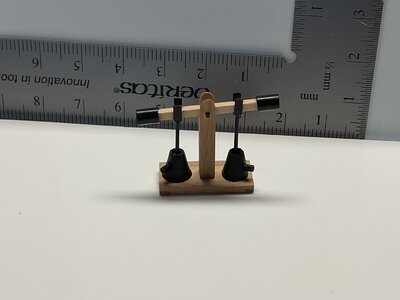
I made most of the parts for the bilge pump, including the base, from pear and some brass rod/strip. I stayed with the kit designers manual and plans although some research turned up interesting facts about these types of pumps. As usual there is still some basic clean up and treatment for the pear components to do.
IMG_4389.jpeg

IMG_4405.jpeg

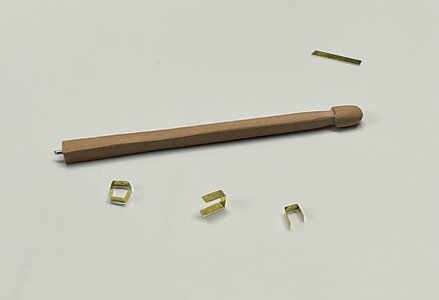
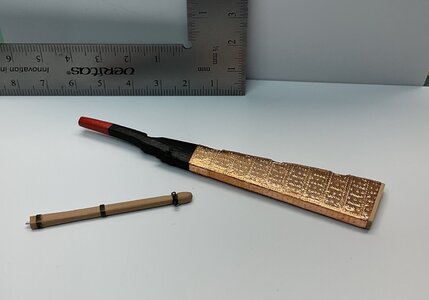
The rudder was set aside for a while but the tiller is just recently made. I added bands to reinforce the tiller arm, much the same as seen in other logs and books. Once again, clean up and final tweaking will be done later on.
IMG_4409.jpeg

IMG_4418.jpeg

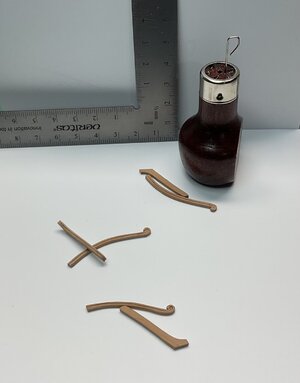
I have also started on the very fiddly headrails. I used pear for the cheeks and hair brackets because the fibrous basswood seems to tear as I indent the moulding profile. In a log by dubz (@Dubz Modelling World) I saw his clever little shop made tool that assists marking out the groove along the cheeks. I made my own using a thin piece of wire and a broken handle. By bending the wire to “close the gap” I can get an approximate mark through the decreasing width of the cheeks. Then a blade and awl provides the gentle depressions for the grooves.
IMG_4415.jpeg

Thanks again for looking in on my log, the support and helpful words and advice mean a lot to me.
 
Last edited:
Great work Roger!
Interesting tool. I typically draw a line using an old drafting compass to ensure it is equidistant from the sides. Then I use a small triangular rifler file to create the groove. I angle the radius tip to be almost all on the end and slowly drag it across the line. Never push! ;)
Then as the groove gets deeper you can switch to a rat tail file if you want a radius groove.
But what you have done looks great, just thought I would share another method.

Thank you Dean. Your modelling experience shines through in the way you come up with clever solutions to what, for many of us, are the more difficult components of a build. I’ll try your suggestion/s on some extra cheek parts I cut. As for the “scribing” tool I have to give full credit to Dirk (dubz) for the original concept. Thanks for your help, I always appreciate your input.
 
Dear Roger. This is simply an incredible build that you are putting together here. The mindset to start manufacturing these ancillary parts from Pear wood, signals not only a growing confidence in model building but also the prowess that goes with it. The bilge pump, tiller arm and rudder are all beautifully made and will add so much to what is already a beautiful build. My only complaint is that I have to wait too long for these updates, but the quality of work never disappoints! Well done, my friend!
 
Looking good. Isn't it fun to bash and see all the added details. I like the bells on the pump rather than the long tubs above deck.

Thanks Will, I quite enjoy the kit bashing as well, although I stayed closely to the design of the bilge pump as shown by the kit designer.

It seems the above deck design of these basic suction pumps varied over time but the working concept remained depending on the era. I was intrigued with the working of this type of manually operated pump. The alternating action of the cross-beam reminds me of modern steam reciprocating duplex pumps, found on many ships.

The above deck outlet pipe on each of the black pump drums were, depending on the build, nationality etc, connected to a portable hose or trough arrangement, which was led to the ship side scuppers. The pumped effluent comprised of a disgusting mess of leaked sea water, rotting matter, crew poop, general waste and other delectable product from the bilges. You can just imagine the stench in the vicinity of the pump during the discharge. Manning for the daily pumping routine was no doubt a low level seaman’s job or the result of some disciplinary action.

There is some very useful information in a book by Thomas J. Oertling “Ships’ Bilge Pumps, a History of Their Development,1500-1900”. I’ll post a copy of the cover to the “Books and References” section of the forum for those interested.
 
Dear Roger. This is simply an incredible build that you are putting together here. The mindset to start manufacturing these ancillary parts from Pear wood, signals not only a growing confidence in model building but also the prowess that goes with it. The bilge pump, tiller arm and rudder are all beautifully made and will add so much to what is already a beautiful build. My only complaint is that I have to wait too long for these updates, but the quality of work never disappoints! Well done, my friend!
Hi Heinrich, thanks for your encouraging post. I find with these small parts I can achieve something when my time is limited. On completion each component is carefully bagged waiting for its turn to be placed on the ship. No doubt a flurry of deck activity when the time comes.

I had a good chuckle this morning reading your “complaint” about waiting too long for updates. I spend a lot of time reading relevant books and papers, which has become a hobby within a hobby. Your comment is, of course, well received and having now made my “back of the classroom” excuses I will head down to the workshop for the day ROTF.
 
My
Hi Heinrich, thanks for your encouraging post. I find with these small parts I can achieve something when my time is limited. On completion each component is carefully bagged waiting for its turn to be placed on the ship. No doubt a flurry of deck activity when the time comes.

I had a good chuckle this morning reading your “complaint” about waiting too long for updates. I spend a lot of time reading relevant books and papers, which has become a hobby within a hobby. Your comment is, of course, well received and having now made my “back of the classroom” excuses I will head down to the workshop for the day ROTF.
My friend don't mind me for a second. This is the classic case of the pot calling the kettle black! Look how long ago I posted a proper update! :)
 
Little things:

Time for an update although it’s just a few time consuming little things for this post. I have gone over to the dark side more and more as my build progresses by using pear wood instead of the supplied kit basswood :D. It means though that I am spending a lot of time kit bashing by making parts from scratch.

I made most of the parts for the bilge pump, including the base, from pear and some brass rod/strip. I stayed with the kit designers manual and plans although some research turned up interesting facts about these types of pumps. As usual there is still some basic clean up and treatment for the pear components to do.

View attachment 390370

View attachment 390371

The rudder was set aside for a while but the tiller is just recently made. I added bands to reinforce the tiller arm, much the same as seen in other logs and books. Once again, clean up and final tweaking will be done later on.

View attachment 390375

View attachment 390377

I have also started on the very fiddly headrails. I used pear for the cheeks and hair brackets because the fibrous basswood seems to tear as I indent the moulding profile. In a log by dubz (@Dubz Modelling World) I saw his clever little shop made tool that assists marking out the groove along the cheeks. I made my own using a thin piece of wire and a broken handle. By bending the wire to “close the gap” I can get an approximate mark through the decreasing width of the cheeks. Then a blade and awl provides the gentle depressions for the grooves.

View attachment 390392

Thanks again for looking in on my log, the support and helpful words and advice mean a lot to me.
Good morning Roger. Your work never fails to impress. Beautiful as always. Ingenious method to make those grooves in the headrails. Your detail is stunning. Cheers Grant
 
Little things:

Time for an update although it’s just a few time consuming little things for this post. I have gone over to the dark side more and more as my build progresses by using pear wood instead of the supplied kit basswood :D. It means though that I am spending a lot of time kit bashing by making parts from scratch.

I made most of the parts for the bilge pump, including the base, from pear and some brass rod/strip. I stayed with the kit designers manual and plans although some research turned up interesting facts about these types of pumps. As usual there is still some basic clean up and treatment for the pear components to do.

View attachment 390370

View attachment 390371

The rudder was set aside for a while but the tiller is just recently made. I added bands to reinforce the tiller arm, much the same as seen in other logs and books. Once again, clean up and final tweaking will be done later on.

View attachment 390375

View attachment 390377

I have also started on the very fiddly headrails. I used pear for the cheeks and hair brackets because the fibrous basswood seems to tear as I indent the moulding profile. In a log by dubz (@Dubz Modelling World) I saw his clever little shop made tool that assists marking out the groove along the cheeks. I made my own using a thin piece of wire and a broken handle. By bending the wire to “close the gap” I can get an approximate mark through the decreasing width of the cheeks. Then a blade and awl provides the gentle depressions for the grooves.

View attachment 390392

Thanks again for looking in on my log, the support and helpful words and advice mean a lot to me.
looks way better than mine did. I assembled straight out of the box. Congratulations!
 
Little things:

Time for an update although it’s just a few time consuming little things for this post. I have gone over to the dark side more and more as my build progresses by using pear wood instead of the supplied kit basswood :D. It means though that I am spending a lot of time kit bashing by making parts from scratch.

I made most of the parts for the bilge pump, including the base, from pear and some brass rod/strip. I stayed with the kit designers manual and plans although some research turned up interesting facts about these types of pumps. As usual there is still some basic clean up and treatment for the pear components to do.

View attachment 390370

View attachment 390371

The rudder was set aside for a while but the tiller is just recently made. I added bands to reinforce the tiller arm, much the same as seen in other logs and books. Once again, clean up and final tweaking will be done later on.

View attachment 390375

View attachment 390377

I have also started on the very fiddly headrails. I used pear for the cheeks and hair brackets because the fibrous basswood seems to tear as I indent the moulding profile. In a log by dubz (@Dubz Modelling World) I saw his clever little shop made tool that assists marking out the groove along the cheeks. I made my own using a thin piece of wire and a broken handle. By bending the wire to “close the gap” I can get an approximate mark through the decreasing width of the cheeks. Then a blade and awl provides the gentle depressions for the grooves.

View attachment 390392

Thanks again for looking in on my log, the support and helpful words and advice mean a lot to me.
just wondering. where did you get the pearwood from? Is there a place in the maritimes that sells this?
 
Back
Top