That is very good to hear RogerThe hawse holes are still in their infancy, I just have to keep enlarging them from inside and out so they meet at a downward angle, leading for’d at the same time. The hull is ok as I very, very slowly work at this. Thanks for your concern Jack.
-

Win a Free Custom Engraved Brass Coin!!!
As a way to introduce our brass coins to the community, we will raffle off a free coin during the month of August. Follow link ABOVE for instructions for entering.
-

PRE-ORDER SHIPS IN SCALE TODAY!
The beloved Ships in Scale Magazine is back and charting a new course for 2026!
Discover new skills, new techniques, and new inspirations in every issue.
NOTE THAT OUR FIRST ISSUE WILL BE JAN/FEB 2026
You are using an out of date browser. It may not display this or other websites correctly.
You should upgrade or use an alternative browser.
You should upgrade or use an alternative browser.
Syren 1803 1:64 Model Shipways
- Thread starter RogerD
- Start date
- Watchers 61
-
- Tags
- model shipways syren
- Joined
- Oct 9, 2020
- Messages
- 2,245
- Points
- 488

It reminds me of my mistake when I did that model.The hawse holes are still in their infancy, I just have to keep enlarging them from inside and out so they meet at a downward angle, leading for’d at the same time. The hull is ok as I very, very slowly work at this. Thanks for your concern Jack.
i just hope it holds up as I continue to attack it with drill bitsThat is very good to hear Roger
I hate to ask but I’m going to ….. ?It reminds me of my mistake when I did that model.
why should you?I hate to ask but I’m going to ….. ?
I said I’m going to but I didn’t say whenwhy should you?
 .
.- Joined
- Oct 9, 2020
- Messages
- 2,245
- Points
- 488

I think it will jinx it if you ask. In my opinion I wouldn't.i just hope it holds up as I continue to attack it with drill bits.
I hate to ask but I’m going to ….. ?
No issues Heinrich, just slow and steady and lots of coffee breaksYou will be fine Roger - don't overthink it!
DittoI think it will jinx it if you ask. In my opinion I wouldn't.
The hawse pipe holes are now drilled through the hull and I have made doublers both inboard and outboard. These are temporarily placed in position ready to be painted later on.
The hawse pipes on the Syren lead downwards at an undefined angle from inboard to outboard and at the same time lead for’d. I say undefined because the angle depends on the height of the deck internally and the space between the cheeks outboard, each Syren build will vary slightly. The manual says to drill outboard first then do inboard. I went with a highly technical approach called “hit or miss” .
.
I started off in a similar way to Heinrich’s recent WB hawse holes with gradually increased drill bit sizes. I started with a very fine drill bit and estimated the necessary angle needed. Obviously the important thing here is not to end up drilling into those deck planks as the drill point exits internally. There is some leeway because that initial tiny exit hole provides an indication of where you need to adjust for the final hole size. I estimate I drilled at about 30 degrees upwards. I then drilled alternately from inboard and outboard.
I measured repeatedly to try and get everything lined up and also used card templates. Each time I increased the drill bit size I left the previous one in the adjoining hole to give me a visual guide to help maintain angles and distances.
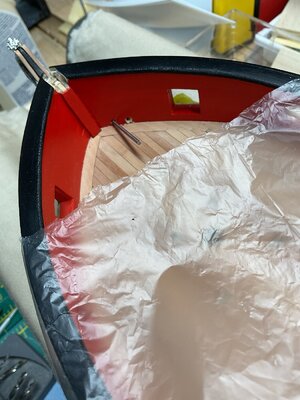
I wanted the holes to be as far for’d as possible, close to the stem. In practice this is so the cable restrains the ship better in the eye of the wind, much as it does in modern practice. For the cable if I go for 1/2” circumference for every foot of beam at 27 feet I get 13.5” circumference. Converted to diameter that’s a little over 4”. So I am probably going to use a max. rope size of 0.062” diameter (1.57mm). I might paint the internal hole a grey lead colour for additional realism or use a lead pencil.
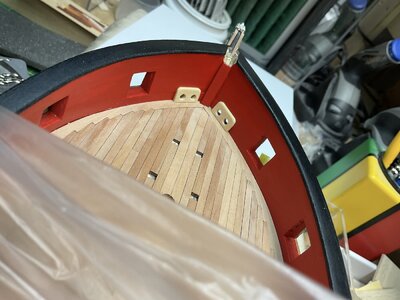
I’m glad that part of the build is mostly done. My photos just show the temporary stage I am at, there’s cleaning up, adjusting and painting to do.
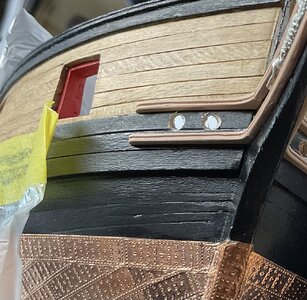
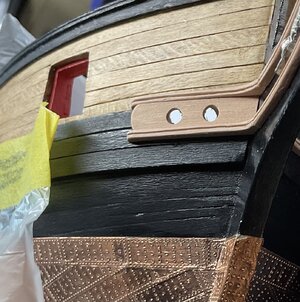
My thanks as always for following along and spending your valuable time reading my posts.
The hawse pipes on the Syren lead downwards at an undefined angle from inboard to outboard and at the same time lead for’d. I say undefined because the angle depends on the height of the deck internally and the space between the cheeks outboard, each Syren build will vary slightly. The manual says to drill outboard first then do inboard. I went with a highly technical approach called “hit or miss”
 .
.I started off in a similar way to Heinrich’s recent WB hawse holes with gradually increased drill bit sizes. I started with a very fine drill bit and estimated the necessary angle needed. Obviously the important thing here is not to end up drilling into those deck planks as the drill point exits internally. There is some leeway because that initial tiny exit hole provides an indication of where you need to adjust for the final hole size. I estimate I drilled at about 30 degrees upwards. I then drilled alternately from inboard and outboard.
I measured repeatedly to try and get everything lined up and also used card templates. Each time I increased the drill bit size I left the previous one in the adjoining hole to give me a visual guide to help maintain angles and distances.

I wanted the holes to be as far for’d as possible, close to the stem. In practice this is so the cable restrains the ship better in the eye of the wind, much as it does in modern practice. For the cable if I go for 1/2” circumference for every foot of beam at 27 feet I get 13.5” circumference. Converted to diameter that’s a little over 4”. So I am probably going to use a max. rope size of 0.062” diameter (1.57mm). I might paint the internal hole a grey lead colour for additional realism or use a lead pencil.

I’m glad that part of the build is mostly done. My photos just show the temporary stage I am at, there’s cleaning up, adjusting and painting to do.


My thanks as always for following along and spending your valuable time reading my posts.
- Joined
- Oct 9, 2020
- Messages
- 2,245
- Points
- 488

slow and steady wins the race. Is that even a saying? I don't know.
Anyways, great job!
Anyways, great job!
Good morning Roger. Firstly I love your work. The close up of the bow shows off your planking, coppering, cannon port, railings etc which are immaculate. Well, with your highly technical hit and missI went with a highly technical approach called “hit or miss”.
 approach certainly rendered plenty of hits. Cheers Grant
Dang. Those are some stellar facings on the hawse holes. A+ for fit and finish Roger!
- Joined
- Oct 17, 2020
- Messages
- 1,691
- Points
- 488

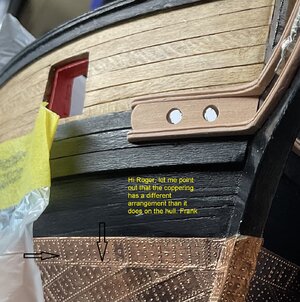
Hi Roger, let me point out that the coppering has a different arrangement than it does on the hull. FrankThe hawse pipe holes are now drilled through the hull and I have made doublers both inboard and outboard. These are temporarily placed in position ready to be painted later on.
The hawse pipes on the Syren lead downwards at an undefined angle from inboard to outboard and at the same time lead for’d. I say undefined because the angle depends on the height of the deck internally and the space between the cheeks outboard, each Syren build will vary slightly. The manual says to drill outboard first then do inboard. I went with a highly technical approach called “hit or miss”.
I started off in a similar way to Heinrich’s recent WB hawse holes with gradually increased drill bit sizes. I started with a very fine drill bit and estimated the necessary angle needed. Obviously the important thing here is not to end up drilling into those deck planks as the drill point exits internally. There is some leeway because that initial tiny exit hole provides an indication of where you need to adjust for the final hole size. I estimate I drilled at about 30 degrees upwards. I then drilled alternately from inboard and outboard.
I measured repeatedly to try and get everything lined up and also used card templates. Each time I increased the drill bit size I left the previous one in the adjoining hole to give me a visual guide to help maintain angles and distances.
View attachment 396100
I wanted the holes to be as far for’d as possible, close to the stem. In practice this is so the cable restrains the ship better in the eye of the wind, much as it does in modern practice. For the cable if I go for 1/2” circumference for every foot of beam at 27 feet I get 13.5” circumference. Converted to diameter that’s a little over 4”. So I am probably going to use a max. rope size of 0.062” diameter (1.57mm). I might paint the internal hole a grey lead colour for additional realism or use a lead pencil.
View attachment 396102
I’m glad that part of the build is mostly done. My photos just show the temporary stage I am at, there’s cleaning up, adjusting and painting to do.
View attachment 396101
View attachment 396103
My thanks as always for following along and spending your valuable time reading my posts.
I think you have identified my tortoise like pace with this build Jack. Mind you it feels like a snail pace sometimesslow and steady wins the race. Is that even a saying? I don't know.
Anyways, great job!
 .
.Hi Grant, thanks for your support. I’m always wary of taking close ups. I sometimes wish Apple iPhones had a selective “ship builders filter”Good morning Roger. Firstly I love your work. The close up of the bow shows off your planking, coppering, cannon port, railings etc which are immaculate. Well, with your highly technical hit and missapproach certainly rendered plenty of hits. Cheers Grant
Thanks Paul, I’m at the point where lots of small time-consuming parts need to be completed. For the Syren the hawse holes are an example of getting it right first time, so it took a while. My excuse anywayDang. Those are some stellar facings on the hawse holes. A+ for fit and finish Roger!
Thank you Frank, I really value your keen eye and experience. I will do more research of coppering techniques for future reference. Unfortunately I’m at a stage where I am reluctant to remove the plates but I will take your respected advice for my next build. Many thanks.Hi Roger, let me point out that the coppering has a different arrangement than it does on the hull. Frank
View attachment 396158
Hello Heinrich, I have said and implied before that following your techniques and methods gives an inexperienced builder more confidence and the kick start necessary to get on with things. Your recent hawse drilling project is an example. Thanks for your always present support.Beautiful work, Roger, which you have executed perfectly.

